
AI Generated Images with Stable Diffusion XL and Vultr Cloud GPU
Introduction
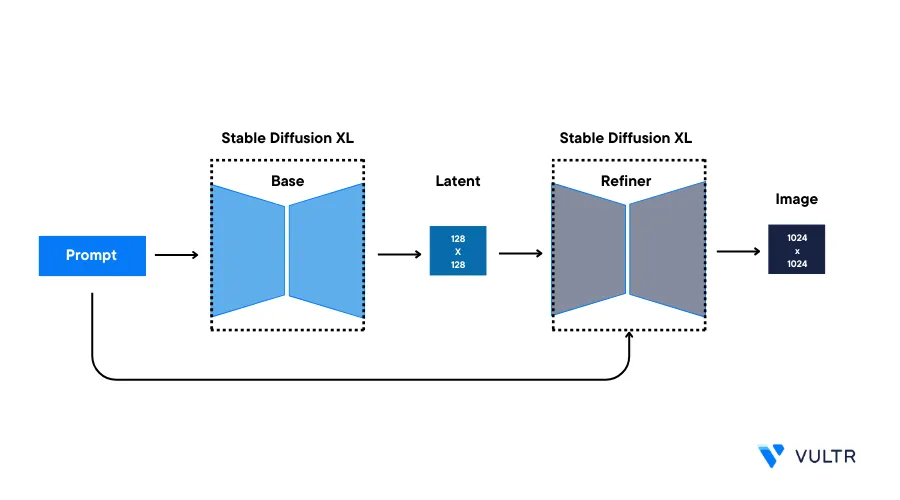
Stable Diffusion XL (SDXL) is a deep learning text-to-image diffusion model developed by Stability AI. It can enhance existing images or generate new ones guided by a text description prompt. SDXL can generate high-resolution images that are more realistic and visually appealing. It can also generate images with more complex details, such as faces and objects.
This guide explains how you can use the Stable Diffusion XL (SDXL) model on a Vultr Cloud GPU instance. You are to install the required packages, generate an image using Stable Diffusion XL Model, increase the image quality using the Refiner model, combine the Refiner model and the base model and mask images by Inpainting.
Prerequisites
Before you begin:
- Deploy a fresh Ubuntu 22.04 A100 Vultr Cloud GPU server.
- Securely access the server using SSH as a non-root user with sudo privileges
- Update the server.
- Install JupyterLab and PyTorch.
Install Required Packages
Install
diffusersand other required packages$ pip install diffusers transformers accelerate safetensors matplotlib ipywidgetsThe above command installs the following packages:
transformers: Consists of multiple pre-trained models used for Natural Language Processing (NLP), Named Entity Recognition (NER), machine translation, and sentiment analysis.diffusers: These are pre-trained diffusion models in the form of prepackaged pipelines. It provides tools for building and training diffusion models. Diffusers also include many different core neural network models, and are used as building blocks to create new pipelines.accelerate: Enables PyTorch to run across any distributed configuration. It uses accelerators like GPUs and TPUs to improve efficiency and scalability, speed up natural language processing (NLP) workflows, and enhance performance.safetensor: It is a package aimed at enhancing debugging and diagnostics for PyTorch tensors. It provides additional features and checks to help identify and prevent common tensor-related issues.matplotlib: It enables you to display the images in Jupyter Notebook.
Create a new directory to save generated images
$ mkdir /home/jupyter/notebooks/generated_imagesThe above command creates a new directory to save the generated images.
Image Generation using Stable Diffusion XL Model
Stable Diffusion XL (SDXL) is a pre-trained text-to-image generation model with 3.5 billion parameters, capable of generating realistic images with resolutions of up to 1024 x 1024 pixels.
To generate images with Stable Diffusion XL, import the required modules such as StableDiffusionXLPipeline from diffusers, torch, and matplotlib.pyplot. Then, initialize the model using the provided model_id and set it up for GPU acceleration by assigning it to the CUDA device.
Open a new Notebook and set it's name to
Stable Diffusion XL Base
To use the model, import the following modules
 import torch
 import matplotlib.pyplot as plt
 from diffusers import StableDiffusionXLPipeline
Below is what each module does:
StableDiffusionXLPipelineclass provides an interface to the model for generating images.torchenables support for tensor computations. In this context, it's used for GPU acceleration.matplotliblibrary allows you to display the generated images.
Declare the model
 model_id = "stabilityai/stable-diffusion-xl-base-1.0"
 pipe = StableDiffusionXLPipeline.from_pretrained(
     model_id,
     torch_dtype=torch.float16,
     variant="fp16",
     use_safetensors=True
 )
 pipe.to("cuda")
By calling the
from_pretrainedmethod, the pipeline takes care of the necessary setup to generate images from text.The parameters passed to the
from_pretrained()method are:- The
model_idof a pipeline. The function call above loads the"stabilityai/stable-diffusion-xl-base-1.0"model. The model ID can also be the path to a local directory containing model weights or a path (local or URL) to a checkpoint file. torch_dtypeis the Torch datatype of the tensors used for pipeline computations.float16is specified explicitly so that the model computations are done in 16-bit floating point numbers, to assist systems with less GPU RAM. It is possible to let the system choose the optimal data type usingtorch_dtype = "auto".
- The
Generate an image by providing a
promptas belowprompt = "Astronaut in a jungle" image = pipe(prompt=prompt).imagesReplace
Astronaut in a junglewith your desired text promptThe above code declares and feeds the prompt to the previously declared pipeline and stores the image attribute. A different image is generated each time you run the module, you can enhance the output image by providing a more detailed prompt.
Render the generated image
plt.imshow(image[0])The
Astronaut in a junglegenerates an image like the one below: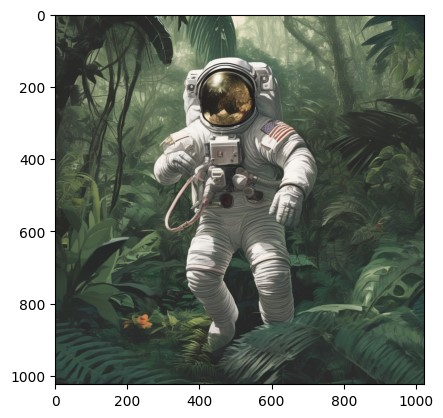
Increase Image Quality using Stable Diffusion XL Refiner Model
Image-to-Image is a pre-trained diffusion pipeline from the Diffusers library that also includes a refiner checkpoint specialized in denoising low-noise stage images to generate images of improved high-frequency quality
The following section explains the steps to refining images using a pre-trained pipeline from the Diffusers library along with a refiner check point
Open a new Notebook and set it's name to
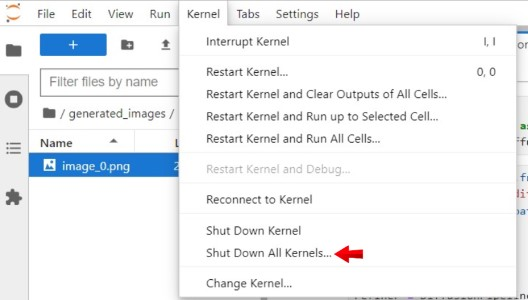
Stable Diffusion XL Image to Image.To clear GPU memory and start running the model, navigate to the Kernel menu option in your Jupyter Notebook, and click Shutdown Down All Kernels.
To use the model, import the following packages
 import torch
 import matplotlib.pyplot as plt
 from diffusers import StableDiffusionXLImg2ImgPipeline
 from diffusers.utils import load_image
Below is what each module does:
StableDiffusionXLImg2ImgPipelineclass provides an interface to the model for refining images.load_imagefunction from theutilsmodule within the diffusers library loads image data from a given source.
Declare the model
 model_id = "stabilityai/stable-diffusion-xl-refiner-1.0"
 pipe = StableDiffusionXLImg2ImgPipeline.from_pretrained(
     model_id,
     torch_dtype=torch.float16,
     variant="fp16",
     use_safetensors=True
 )
 pipe = pipe.to("cuda")
By calling the
from_pretrainedmethod, the pipeline takes care of the necessary setup to refine the generated images.The
model_idof a pipeline. The function call above loads the"stabilityai/stable-diffusion-xl-refiner-1.0"model. The model ID can also be the path to a local directory containing model weights or a path (local or URL) to a checkpoint file.Load the image
init_img_url = "https://i.imgur.com/UikG1MN.png" init_image = load_image(init_img_url).convert("RGB")urlcontains the image's URL, which needs to be refined. And then,load_image(url).convert("RGB")will load the image and convert the image intoRGBcolor space.Generate an image by providing a
promptas belowprompt = "A photo of an astronaut riding a horse on mars" image = pipe(prompt, image=init_image).imagesUse the same
prompthere that you will use to generate your original image or use apromptthat describes your input image. For example, the above image's URL, image was generated by using this sameA photo of an astronaut riding a horse on mars prompt.Render the generated image
plt.imshow(image[0])The
A photo of an astronaut riding a horse on marsgenerates an image like the one below: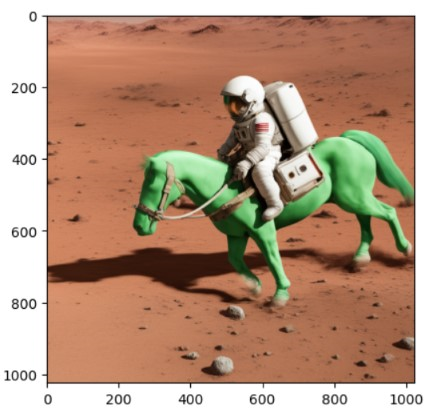
This refiner checkpoint can also be used as a second-step” pipeline after having run the base checkpoint to improve image quality.
You can also access the above code in the following Notebook
Combine Refiner and Stable Diffusion XL Model
Diffusers also allow you to use two pipelines simultaneously from its library. With this, you can generate an image using the StableDiffusion-XL base checkpoint and improve the quality of the generated image using the refiner checkpoint
When you use the base and refiner models together to generate an image, this is known as an ensemble of expert denoisers. The ensemble of expert denoisers approach requires fewer denoising steps in total compared to passing the base model's output to the refiner model, making it significantly faster to run. However, it's important to note that you won't be able to inspect the base model's output because it still contains a significant amount of noise.
Open a new Notebook and set it's name to
Stable Diffusion XL Base + RefinerTo clear GPU memory and start running the model, navigate to the Kernel menu option in your Jupyter Notebook, and click Shutdown Down All Kernels
To use the model, import the following packages
 import torch
 import matplotlib.pyplot as plt
 from diffusers import DiffusionPipeline
Declare the base model
 base = DiffusionPipeline.from_pretrained(
     "stabilityai/stable-diffusion-xl-base-1.0",
     torch_dtype=torch.float16, variant="fp16",
     use_safetensors=True
 )
 base.to("cuda")
Declare the refiner model
 refiner = DiffusionPipeline.from_pretrained(
     "stabilityai/stable-diffusion-xl-refiner-1.0",
     text_encoder_2=base.text_encoder_2,
     vae=base.vae,
     torch_dtype=torch.float16,
     use_safetensors=True,
     variant="fp16",
 )
 refiner.to("cuda")
Because the text encoders and variational autoencoder are the same, you don’t have to load those again for the refiner.
Define the number of inference steps and determine the point at which the model should be passed through the high-noise denoising stage (for example, the base model)
 n_steps = 40
 high_noise_frac = 0.8
The base model is trained on timesteps
0-999, and the refiner is finetuned from the base model on low noise timesteps0-199inclusive, so use the base model for the first800timesteps (high noise) and the refiner for the last200timesteps (low noise). Hence, high_noise_frac is set to0.8so that all steps200-999(the first 80% of denoising timesteps) are performed by the base model and steps 0-199 (the last 20% of denoising timesteps) are performed by the refiner model.Remember, the denoising process starts at high value (high noise) timesteps and ends at low value (low noise) timesteps.
Execute both the pipelines
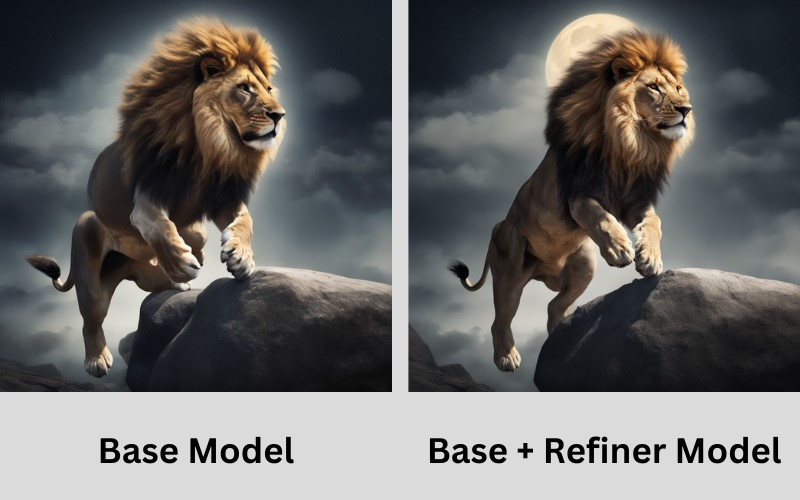
 prompt = "A majestic lion jumping from a big stone at night"

 base_image = base(
     prompt=prompt,
     num_inference_steps=n_steps,
     denoising_end=high_noise_frac,
     output_type="latent",
 ).images

 refined_image = refiner(
     prompt=prompt,
     num_inference_steps=n_steps,
     denoising_start=high_noise_frac,
     image=base_image,
 ).images
Make sure to set
denoising_endanddenoising_startto the same values and keepnum_inference_stepsconstant. Also remember that the output of the base model should be inlatentspace.Render the generated image
plt.imshow(refined_image[0])The image generated by the prompt
A majestic lion jumping from a big stone at nightis an example that illustrates the comparison between using a base model and a combined base and refiner model.However, you won’t be able to inspect the base model’s output because it still contains a large amount of noise.
The above base model image was generated using the Stable Diffusion XL base model with a manual seed. Subsequently, the same manual seed was employed to generate these images for demonstration purposes. If you wish to reproduce images using a manual seed, you can follow the steps below.
Create a new generator
Apply this section with the Stable Diffusion XL Base model, following the same steps used to generate the previous base model image.
 prompt = "A majestic lion jumping from a big stone at night"
 generator = torch.Generator("cuda").manual_seed(3078)
 image = pipe(prompt=prompt, generator=generator).images
Above code block defines a new generator to the pipeline. Using
manual_seed()with a fixed number makes the model produce consistent output. You can pick any integer as the manual seed. By default, the generator generates a new seed for a unique image every time.Execute both the pipelines with same manual seed
Apply this section with Stable Diffusion XL combine Base and refiner model, following the same steps used to generate the previous model image.
 prompt = "A majestic lion jumping from a big stone at night"
 generator = torch.Generator("cuda").manual_seed(3078)

 base_image = base(
     prompt=prompt,
     generator=generator,
     num_inference_steps=n_steps,
     denoising_end=high_noise_frac,
     output_type="latent",
 ).images

 refined_image = refiner(
     prompt=prompt,
     num_inference_steps=n_steps,
     denoising_start=high_noise_frac,
     image=base_image,
 ).images
Above code block above generates an image identical to the base model image using the same manual seed that was used to create the base model image. It then refines the image to improve its quality, allowing you to make a comparison between the two images.
You can also access the above code in the following Notebook
Mask Images by Inpainting
Inpainting is a pre-trained diffusion pipeline from the Diffusers library, designed to fill in missing or damaged regions of an image by predicting these areas based on the surrounding pixels.
Inpainting utilizes the same Stable Diffusion XL base model. The help of a trained diffusion pipeline enables the model to learn how to restore missing or damaged portions of an image while preserving its original style and content.
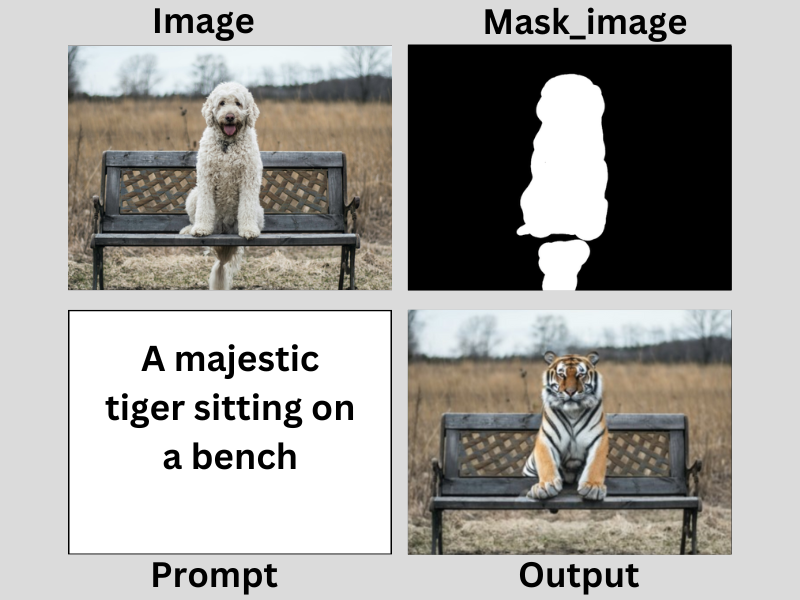
To generate inpainting images, you’ll need the original image and a mask of what you want to replace in the original image. Create a prompt to describe what you want to replace in the masked area.
Open a new Notebook and set it's name to
Stable Diffusion XL InpaintTo clear GPU memory and start running the model, navigate to the Kernel menu option in your Jupyter Notebook, and click Shutdown Down All Kernels
To use the model, import the following packages
 import torch
 import matplotlib.pyplot as plt
 from diffusers import StableDiffusionXLInpaintPipeline
 from diffusers.utils import load_image
Declare the model
 model_id = "stabilityai/stable-diffusion-xl-base-1.0"
 pipe = StableDiffusionXLInpaintPipeline.from_pretrained(
     model_id,
     torch_dtype=torch.float16,
     variant="fp16",
     use_safetensors=True
 )
 pipe.to("cuda")
Upload the images
 init_img_url = "https://i.imgur.com/AsJ1lPf.png"
 mask_img_url = "https://i.imgur.com/liBhpAv.png"
 init_image = load_image(init_img_url).convert("RGB")
 mask_image = load_image(mask_img_url).convert("RGB")
Generate an image by providing a
promptas belowprompt = "A majestic tiger sitting on a bench" image = pipe(prompt=prompt, image=init_image, mask_image=mask_image, num_inference_steps=50, strength=0.80).imagesReplace
A majestic tiger sitting on a benchwith your desired promptRender the generated image
plt.imshow(image[0])Below is an example of the image showing how the model works:
You can also access the above code in the following Notebook
Save Generated Images
Specify the directory you created earlier to save the generated images
save_directory = "/home/jupyter/notebooks/generated_images"The defined directory must exist on the disk. Verify that you created it in your user home directory.
Using a for
loop, save the imagesfor i, image in enumerate(image): image.save(f"{save_directory}/image_{i}.png")The above code saves all generated images to the predefined
save_directorypath. It uses thesave()method to save each image. Saved images are added with filenames in the formatimage_{i}.png, where{i}refers to the index of the image in the list.In your terminal session, verify that the images are successfully saved to the directory.
$ ls /home/jupyter/notebooks/generated_imagesTo download a copy of the generated images, you can use a secure transfer protocol like SFTP, FTP, or RSync to fetch the files to your computer.
Additional Parameters
Below is what each parameter used in the model pipelines does:
prompt: Represents the input text prompt that guides the image generation processnegative_prompt: It guides on what to ignore in image generation. If not defined, you need to passnegative_prompt_embedsinstead. It's ignored when you're not using guidanceguidance_scale < 1generator: An instance of thetorch.Generatorclass that allows you to control the random number generationseed: Specifies the random seed used to initialize the model and the data loader. This helps to ensure that the results are reproducibleguidance_scale: It improves adherence to text prompts and affects sample quality. Values between7and8.5work well, and the default value is7.5add_watermarker: Whether to use theinvisible_watermarklibrary to watermark output images. If not defined, it will default to True if the package is installed, otherwise no watermarker will be usedimages: A list of all generated image objectsheight: Sets the height in pixels of the generated image in the pipelinewidth: Sets the width in pixels of the generated image in the pipelinenuminferencesteps: It defines the number of steps involved in the inference process. It's recommended to set it to50to balance generation speed and result quality. A smaller value leads to faster results and vice versa
Conclusion
In this guide, you generated images using the Stable Diffusion XL (SDXL) model on a Vultr A100 Cloud GPU server. Additionally, you refined the generated images using Refiner, inpainted the mask images using an inpainting pipeline.
More Information
For more information, please visit the following resources:
- Stable Diffusion XL Base Model
- Stable Diffusion XL Refiner Model
- Stable Diffusion XL Inpainting
- Use Hugging Face Diffusion Models on Vultr Cloud GPU