
Build Event Driven Applications on Vultr Kubernetes Engine with Knative Eventing
Introduction
Knative Eventing is a standalone platform that is part of the Knative framework used to simplify the deployment and management of serverless applications on Kubernetes Clusters. It offers a set of tools for routing events that allow developers to create and deploy event-driven serverless applications on Kubernetes.
Knative Eventing offers the following components that work together to enable the development of event-driven systems:
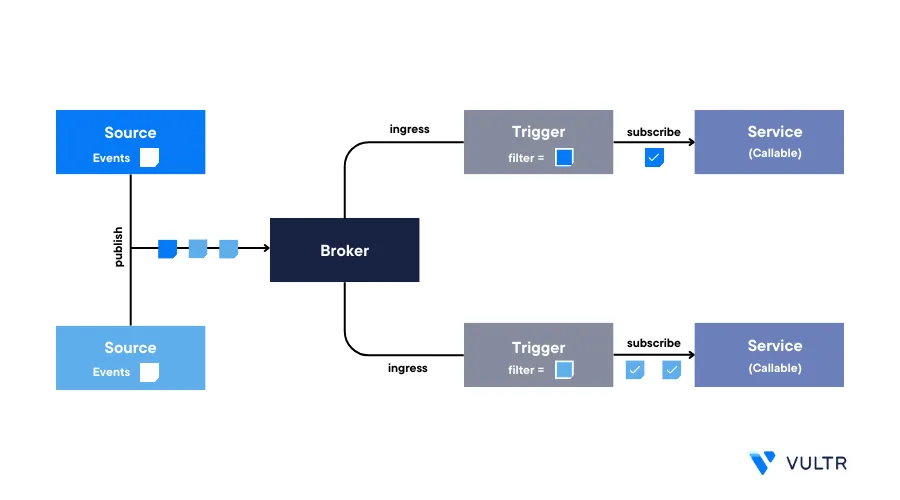
- Event Source: A Kubernetes custom resource that generates events in the system and forwards them to the broker
- Broker: Acts as a central hub that receives and forwards events to the appropriate event-driven workloads
- Channel: Store events in-memory for high-speed, and low-latency scenarios
- Trigger: Filters events based on their content and metadata. A trigger listens to specific events and starts specific actions based on the specified conditions
- Subscriptions: Define how events get delivered to the event-driven application
In this article, install Knative Eventing and implement the following event patterns on a Vultr Kubernetes Engine (VKE) cluster:
- Source to Sink
- Channel and Subscription
- Broker and Trigger
Prerequisites
Before you begin:
- Deploy a Vultr Kubernetes Engine (VKE) cluster with at least five nodes
- Deploy a Ubuntu server to use as the management machine
- Using SSH, access the server as a non-root user with sudo privileges
- Install and Configure Kubectl on the server to access the VKE cluster
Install Knative Serving
Knative Serving is a dependency resource required to run Knative Eventing. Install the necessary Knative Service components on your VKE cluster as described in the steps below.
- Visit the Knative Serving releases page and verify the latest version number. This article uses
v1.11.0, apply the latest version components to your cluster.
Install the Knative Custom Resource Definitions (CRDs)
$ kubectl apply -f https://github.com/knative/serving/releases/download/knative-v1.11.0/serving-crds.yamlInstall the Knative core components
$ kubectl apply -f https://github.com/knative/serving/releases/download/knative-v1.11.0/serving-core.yamlInstall the Knative Kourier controller
$ kubectl apply -f https://github.com/knative/net-kourier/releases/download/knative-v1.11.0/kourier.yamlConfigure Knative Serving to use Kourier as the default controller
$ kubectl patch configmap/config-network --namespace knative-serving --type merge --patch '{"data":{"ingress-class":"kourier.ingress.networking.knative.dev"}}'Verify that the Kourier controller is available in your cluster
$ kubectl --namespace kourier-system get service kourierOutput:
 NAME      TYPE           CLUSTER-IP    EXTERNAL-IP      PORT(S)                      AGE
 kourier   LoadBalancer   10.99.96.89   172.20.2.1   80:30491/TCP,443:30118/TCP   2m9s
Verify that the Kourier load balancer resource has a new external IP address
Verify that all Knative Serving components are ready and running
$ kubectl get pods -n knative-servingOutput:
 NAME                                      READY   STATUS    RESTARTS   AGE
 activator-5c95bd8f69-hk7vz                1/1     Running   0          117s
 autoscaler-7dc9d77576-mk5lj               1/1     Running   0          115s
 controller-77878dc999-7qjk7               1/1     Running   0          113s
 net-kourier-controller-7bbb56bddd-25bzc   1/1     Running   0          79s
 webhook-5586b8f6d7-n59j9                  1/1     Running   0          109s
Install Knative Eventing
- Visit the Knative Eventing Release page and verify the latest version.
v1.11.0is applied in this article, use the latest version to correctly install all components to your cluster.
Install the Knative Eventing CRDs
$ kubectl apply -f https://github.com/knative/eventing/releases/download/knative-v1.11.0/eventing-crds.yamlInstall the latest Knative Eventing core components
$ kubectl apply -f https://github.com/knative/eventing/releases/download/knative-v1.11.0/eventing-core.yamlVerify that the installed Knative Eventing components are available and running in your cluster
$ kubectl get pods -n knative-eventingOutput:
 NAME                                   READY   STATUS    RESTARTS        AGE
 eventing-controller-6cc445d8c5-wgbdd   1/1     Running   2 (3m34s ago)   3m47s
 eventing-webhook-7bcc5cb885-hcjg2      1/1     Running   2 (3m31s ago)   3m44s
Install the in-memory channel to pass events
$ kubectl apply -f https://github.com/knative/eventing/releases/download/knative-v1.11.0/in-memory-channel.yamlInstall the broker to use available channels and run event routing
$ kubectl apply -f https://github.com/knative/eventing/releases/download/knative-v1.11.0/mt-channel-broker.yamlVerify if the channel and broker are correctly installed and running
$ kubectl get pods -n knative-eventingOutput:
 NAME                                   READY   STATUS    RESTARTS        AGE
 eventing-controller-6cc445d8c5-wgbdd   1/1     Running   2 (4m54s ago)   5m7s
 eventing-webhook-7bcc5cb885-hcjg2      1/1     Running   2 (4m51s ago)   5m4s
 imc-controller-58b6df69f7-v4jq2        1/1     Running   1 (47s ago)     54s
 imc-dispatcher-594458c69d-8nwff        1/1     Running   0               50s
 mt-broker-controller-cc69ff94-6kt6n    1/1     Running   0               7s
 mt-broker-filter-7c46c8cf7d-sdxfg      1/1     Running   0               12s
 mt-broker-ingress-68f67cf96b-tvnwh     1/1     Running   0               10s
Install the Knative CLI Tool
Knative CLI is a terminal-based tool that allows you to create resources such as Knative services and event sources without creating manifest files. This allows you to scale Knative services up and down based on your requirements within the Kubernetes cluster. Follow the steps below to install Knative CLI on your management server.
Download the latest Knative CLI realease file for Linux systems
$ wget https://github.com/knative/client/releases/download/knative-v1.11.0/kn-linux-amd64When using a different operating system, visit the Knative CLI release page to download the latest build for your OS flavor.
Move the downloaded binary file to the
/usr/local/bin/directory to enable theknsystem-wide command$ sudo mv kn-linux-amd64 /usr/local/bin/knGrant execute permissions on the
knbinary file$ sudo chmod +x /usr/local/bin/knVerify the installed Knative CLI version
$ kn versionOutput:
 Version:      v1.11.0
 Build Date:   2023-07-27 07:42:56
 Git Revision: b7508e67
 Supported APIs:
 * Serving
  - serving.knative.dev/v1 (knative-serving v1.11.0)
 * Eventing
Implement Source to Sink Patterns Using Knative Eventing
In Knative eventing, source to sink is a basic pattern that represents the flow of events. Sources are the primary event producers that send events to a sink. A sink is a target of events generated by the source. It's responsible for receiving and responding to incoming events from other resources.
Knative eventing offers many types of event sources. In this section, use the PingSource to produce events with a fixed payload on a specified Cron schedule.
Using the Knative CLI, create a Knative Sink service application named
knative-test$ kn service create knative-test --concurrency-target=1 --image=quay.io/redhattraining/kbe-knative-hello:0.0.1Output:
 Creating service 'knative-test' in namespace 'default':

   9.091s Configuration "knative-test" is waiting for a Revision to become ready.
   9.115s Ingress has not yet been reconciled.
   9.158s Waiting for load balancer to be ready
   9.352s Ready to serve.

 Service 'knative-test' created to latest revision 'knative-test-00001' is available at URL:
 http://knative-test.default.svc.cluster.local
Create a PingSource to continuously send a JSON message
Test Message!after every 1 minute to the Knative Service sinkknative-test$ kn source ping create knative-test-ping-source --schedule "* * * * *" --data '{"message": "Test Message!"}' --sink ksvc:knative-testVerify that the PingSource is available
$ kn source ping listOutput:
 NAME                       SCHEDULE    SINK                AGE   CONDITIONS   READY   REASON
 knative-test-ping-source   * * * * *   ksvc:knative-test   17s   3 OK / 3     True
View the cluster pods and verify that
knative-testis available$ kubectl get podsOutput:
 NAME                                            READY   STATUS    RESTARTS   AGE
 knative-test-00001-deployment-848b49ccb-m9plw   2/2     Running   0          34s
 knative-test-00001-deployment-848b49ccb-s2thg   2/2     Running   0          34s
View the logs of any running pod
$ kubectl logs -f knative-test-00001-deployment-848b49ccb-s2thg -c user-containerYour output should look like the one below:
 2023-09-15 04:18:00,112 INFO  [eventing-hello] (executor-thread-1) ce-id=f75a901d-303b-4525-b4fd-7627f20a99f5
 2023-09-15 04:18:00,113 INFO  [eventing-hello] (executor-thread-1) ce-source=/apis/v1/namespaces/default/pingsources/knative-test-ping-source
 2023-09-15 04:18:00,113 INFO  [eventing-hello] (executor-thread-1) ce-specversion=1.0
 2023-09-15 04:18:00,113 INFO  [eventing-hello] (executor-thread-1) ce-time=2023-09-15T04:18:00.101796919Z
 2023-09-15 04:18:00,113 INFO  [eventing-hello] (executor-thread-1) ce-type=dev.knative.sources.ping
 2023-09-15 04:18:00,113 INFO  [eventing-hello] (executor-thread-1) content-type=null
 2023-09-15 04:18:00,113 INFO  [eventing-hello] (executor-thread-1) content-length=28
 2023-09-15 04:18:00,113 INFO  [eventing-hello] (executor-thread-1) POST:{"message": "Test Message!"}
As displayed in the above output, the JSON message sent by PingSource includes the message
Test Messageyou created earlier
Implement Channel and Subscription Using Knative Eventing
Channel and Subscription patterns route events between channels using subscriptions. In Knative, the default In-memory Channel channel provides an interface between the event source and the subscriber. It stores the incoming event data and distributes it to the subscribers.
A Subscription connects a Channel to the event sink (Service) and specifies how events from a channel get delivered to one or more target services. In this section, set up a sample Channel and Subscription pattern using the Knative CLI tool.
Create a new channel named
knative-test-channel$ kn channel create knative-test-channelVerify that the channel is available
$ kn channel listOutput:
 NAME                   TYPE              URL                                                                AGE   READY   REASON
 knative-test-channel   InMemoryChannel   http://knative-test-channel-kn-channel.default.svc.cluster.local   6s    True
Using a text editor such as Nano, create a new PingSource sink service file
$ nano knative-test-ping-source.yamlAdd the following configurations to the file
 apiVersion: sources.knative.dev/v1beta2
 kind: PingSource
 metadata:
   name: knative-test-ping-source
 spec:
   schedule: "* * * * *"
   data: '{"message": "Test Message!"}'
   sink:
    ref:
     apiVersion: messaging.knative.dev/v1
     kind: Channel
     name: knative-test-channel
Save and close the file
The above configuration defines a new PingSource resource that can receive and process the events from the Channel
Apply the resource to your cluster
$ kubectl apply -f knative-test-ping-source.yamlCreate a new subscription file to connect the service channel to an event sink
$ nano knative-test-subs.yamlAdd the following configurations to the file
 apiVersion: messaging.knative.dev/v1
 kind: Subscription
 metadata:
  name: knative-test-subs
 spec:
   channel:
     apiVersion: messaging.knative.dev/v1
     kind: Channel
     name: knative-test-channel
   subscriber:
    ref:
       apiVersion: serving.knative.dev/v1
      kind: Service
      name: knative-test
Save and close the file
Apply the subscription resource to your cluster
$ kubectl apply -f knative-test-subs.yamlUsing the Knative CLI, create another sink service
knative-test-2to view how the channel and the subscriptions work$ kn service create knative-test-2 --concurrency-target=1 --image=quay.io/redhattraining/kbe-knative-hello:0.0.1Verify that the sink service is available in your cluster
$ kn service listOutput:
NAME             URL                                               LATEST                 AGE    CONDITIONS   READY   REASON
knative-test     http://knative-test.default.svc.cluster.local     knative-test-00001     9m3s   3 OK / 3     True
knative-test-2   http://knative-test-2.default.svc.cluster.local   knative-test-2-00001   33s    3 OK / 3     True
As displayed in the above output,
knative-test-2is the new sink service available in your clusterCreate another subscription
knative-test-2-substo subscribe to theknative-test-channel$ kn subscription create knative-test-2-subs --channel knative-test-channel --sink knative-test-2Verify that the subscription is available and ready to use
$ kn subscription listOutput:
NAME                  CHANNEL                        SUBSCRIBER            REPLY   DEAD LETTER SINK   READY   REASON
knative-test-2-subs   Channel:knative-test-channel   ksvc:knative-test-2                              True
knative-test-subs     Channel:knative-test-channel   ksvc:knative-test                                True
Verify that all Knative service pods in your cluster are running
$ kubectl get podsOutput:
NAME                                               READY   STATUS        RESTARTS   AGE
knative-test-00001-deployment-848b49ccb-bkdjb      2/2     Terminating   0          89s
knative-test-00001-deployment-848b49ccb-tn2zb      2/2     Running       0          89s
knative-test-2-00001-deployment-566d9dd859-lndqr   2/2     Running       0          29s
knative-test-2-00001-deployment-566d9dd859-mqqwj   2/2     Running       0          29s
View the logs of any pod to verify if the Channel-Subscription mechanism works
$ kubectl logs -f knative-test-2-00001-deployment-566d9dd859-mqqwj -c user-containerWhen the pod is running correctly, you should receive the
Test Message!JSON output as displayed in the following output:2023-09-15 04:25:05,405 INFO [eventing-hello] (executor-thread-1) ce-id=cc9c5e2c-9ec6-4e00-b03c-ddc134b6fe31 2023-09-15 04:25:05,405 INFO [eventing-hello] (executor-thread-1) ce-source=/apis/v1/namespaces/default/pingsources/knative-test-ping-source 2023-09-15 04:25:05,405 INFO [eventing-hello] (executor-thread-1) ce-specversion=1.0 2023-09-15 04:25:05,405 INFO [eventing-hello] (executor-thread-1) ce-time=2023-09-15T04:25:00.39065862Z 2023-09-15 04:25:05,405 INFO [eventing-hello] (executor-thread-1) ce-type=dev.knative.sources.ping 2023-09-15 04:25:05,405 INFO [eventing-hello] (executor-thread-1) content-type=null 2023-09-15 04:25:05,405 INFO [eventing-hello] (executor-thread-1) content-length=28 2023-09-15 04:25:05,405 INFO [eventing-hello] (executor-thread-1) POST:{"message": "Test Message!"}Before applying a Broker and Trigger to your cluster, remove the ping source, channel, and subscription resources to avoid conflicts
$ kn subscription delete knative-test-subs && kn subscription delete knative-test-2-subs && kn channel delete knative-test-channel && kn source ping delete knative-test-ping-source
Implement Broker and Trigger Using Knative Eventing
Broker and Trigger are event mesh based patterns that collect a pool of events and distribute them to consumers. They offer a custom filtering mechanism to distribute events based on the trigger type.
Create a new broker named
knative-test-brokerto collect events$ kn broker create knative-test-brokerView the new broker resource
$ kn broker listOutput:
 NAME                  URL                                                                                    AGE   CONDITIONS   READY   REASON
 knative-test-broker   http://broker-ingress.knative-eventing.svc.cluster.local/default/knative-test-broker   18s   6 OK / 6     True
Create a Knative Trigger
knative-test-triggerthat references the broker, sink and defines the condition typetesting1for incoming events$ kn trigger create knative-test-trigger --broker=knative-test-broker --sink=ksvc:knative-test --filter=type=testing1Create another Trigger
knative-test-2-triggerwith a different condition namedtesting2$ kn trigger create knative-test-2-trigger --broker=knative-test-broker --sink=ksvc:knative-test-2 --filter=type=testing2Verify the created Triggers
$ kn trigger listOutput:
 NAME                     BROKER                SINK                  AGE   CONDITIONS   READY   REASON
 knative-test-2-trigger   knative-test-broker   ksvc:knative-test-2   11s   6 OK / 6     True
 knative-test-trigger     knative-test-broker   ksvc:knative-test     74s   6 OK / 6     True
The
knative-testservice handles events with the typetesting1, andknative-test-2handles events with the typetesting2View the broker Kubernetes service URL to verify your broker and triggers
$ kubectl get broker knative-test-broker -o jsonpath='{.status.address.url}'Output:
http://broker-ingress.knative-eventing.svc.cluster.local/default/knative-test-brokerRun the following command to send greetings with the type
testing1$ kubectl run greeting-requester --image quay.io/redhattraining/kbe-greeting-requester:latest --env="BROKER_URL=http://broker-ingress.knative-eventing.svc.cluster.local/default/knative-test-broker" --env="GREETING=testing1" --rm=True --attach=true --restart=NeverThe above command scales up the
knative-testservice you have defined with the condition typetesting1View the list of running pods and verify that the
knative-testservice scales up$ kubectl get podsOutput:
 NAME                                               READY   STATUS    RESTARTS   AGE
 knative-test-00001-deployment-848b49ccb-pb2rx      2/2     Running   0          50s
 knative-test-00001-deployment-848b49ccb-s28r9      2/2     Running   0          7m12s
 knative-test-2-00001-deployment-566d9dd859-5kzrb   2/2     Running   0          7m12s
Send another greeting with the type
testing2to scale up theknative-test-2service$ kubectl run greeting-requester --image quay.io/redhattraining/kbe-greeting-requester:latest --env="BROKER_URL=http://broker-ingress.knative-eventing.svc.cluster.local/default/knative-test-broker" --env="GREETING=testing2" --rm=True --attach=true --restart=NeverThe above command should now scale up the
knative-test-2service. You can verify it using the below command.View the list of running pods and verify that the
knative-test-2service scales up$ kubectl get podsOutput:
NAME                                               READY   STATUS    RESTARTS   AGE
knative-test-2-00001-deployment-566d9dd859-2qxdx   2/2     Running   0          14s
knative-test-2-00001-deployment-566d9dd859-gktkh   2/2     Running   0          14s
knative-test-2-00001-deployment-566d9dd859-mr5vk   2/2     Running   0          11s
knative-test-2-00001-deployment-566d9dd859-n6jq5   2/2     Running   0          11s
knative-test-2-00001-deployment-566d9dd859-s97jj   2/2     Running   0          11s
The above output confirms that the filtering mechanism of triggers is successful.
Conclusion
You have implemented different patterns using Knative Eventing on a Vultr Kubernetes Engine (VKE) cluster. Implementing Knative Eventing on the Kubernetes cluster allows you to build scalable, and event-driven microservices. For more information to unlock the full potential of your microservices, visit the official Knative Eventing documentation.