
Introduction
Efficient management and orchestration of containerized applications is important when working with Kubernetes clusters. Golang is a programming language for building scalable and high-performance applications. Its simplicity, efficiency, and strong concurrency support make it ideal for developing microservices and containerized applications. By harnessing the power of Kubernetes clusters, Golang applications run optimally efficiently, with scalability and resilience in a production environment.
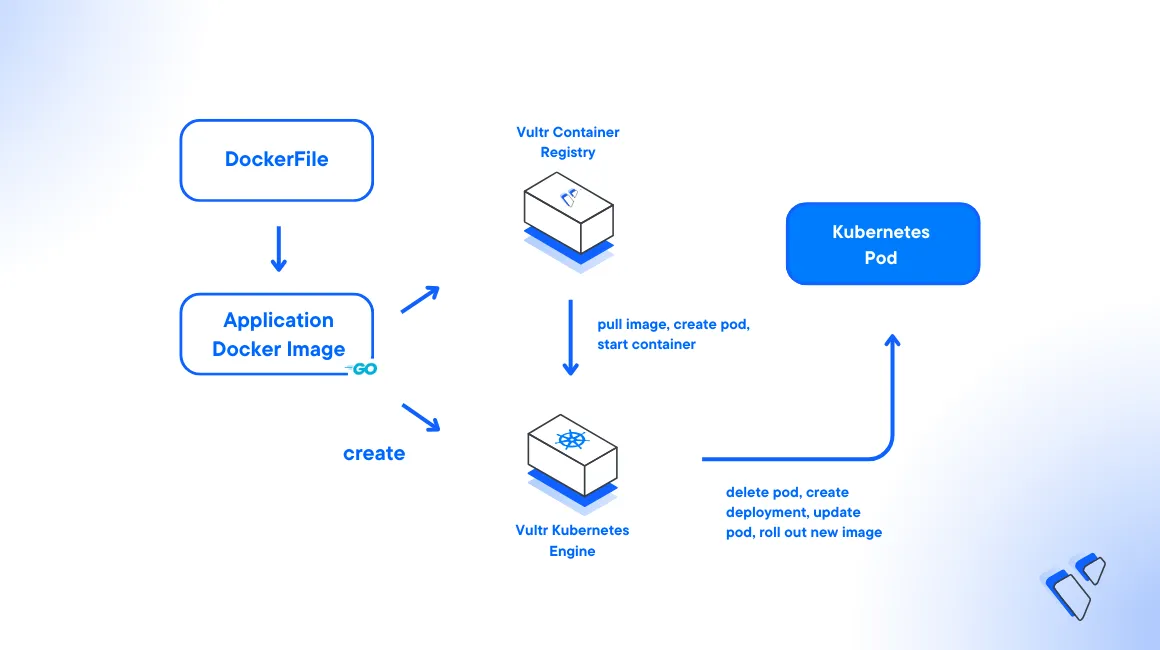
This article explains how to deploy a Golang containerized application on a Vultr Kubernetes Engine (VKE) engine. To efficiently manage the application, you will containerize and push the image using the Vultr Container Registry.
Prerequisites
Before you begin:
- Deploy a Vultr Kubernetes Engine (VKE) cluster with at least three nodes.
- Deploy a Vultr OneClick Docker instance to use as the management system.
- Access the server using SSH as a non-root user with sudo privileges.
- Install and Configure Kubectl to access the cluster.
- Create a Vultr Container Registry to store Docker images.
Create a Golang Application
Install the latest Golang package
console$ sudo apt install golang
Create a new directory to store your application files.
console$ mkdir app
Switch to the new directory.
console$ cd app
Create a Golang main application file using a text editor such as Nano.
console$ nano main.go
Add the following contents to the file.
gopackage main import ( "fmt" "net/http" ) func homePage(w http.ResponseWriter, r *http.Request) { fmt.Fprintf(w, "This is my Go App!") } func setupRoutes() { http.HandleFunc("/", homePage) } func main() { fmt.Println("Go Web App Started on Port 8000") setupRoutes() http.ListenAndServe(":8000", nil) }
Save and close the file.
The above application code performs the following functions:
import: Imports thefmtpackage for formatting and printing, and thenet/httppackage to handle HTTP requests and responses.func homePage: Defines a new HTTP handler. It takes two parameters:w, which is anhttp.ResponseWriterused to write the response, andr, which is anhttp.Requestthat contains information about the incoming request. In this case, it writes the stringThis is my Go App!to the response writer.func setupRoutes: Sets up the application's routes. In the application, it associates the root("/")path with thehomePagehandler function.fmt.Println("Go Web App Started on Port 8000"): Prints a message to the console indicating that the Go web application has started.setupRoutes(): Calls thesetupRoutesfunction to configure the application's routes.http.ListenAndServe(":8000", nil): Starts the HTTP server that actively listens for connections on the defined port8000. The second parameter,nil, specifies that the default server is used. This function blocks interferences and allows the HTTP server to continue running until an error occurs or the program is manually terminated.
Run the Golang application as a background task.
console$ go run main.go &
Output:
Go Web App Started on Port 8000Using the Curl utility, test access to your server port
8000to verify that the application runs correctly.console$ curl 127.0.0.1:8000
Output:
This is my Go App!View the Golang application Job ID.
console$ jobs
Kill the application Job ID to stop the background process. For example, Job ID
1console$ kill %1
Build the Golang Application Image
Create a Dockerfile within the application directory.
console$ nano Dockerfile
Add the following configurations to the file.
dockerfile# Latest golang image on apline linux FROM golang:1.12.0-alpine3.9 # Work directory RUN mkdir /app ADD . /app WORKDIR /app # Installing dependencies RUN go build -o main . # Starting our application CMD ["/app/main"]
The above Docker file configuration includes the following key components:
FROM golang:1.12.0-alpine3.9: Specifies the application image to use the official Golang image version1.12.0based on Alpine Linux version3.9to keep the overall image size small.RUN mkdir /app: Creates a new directory named/appin the Docker image to use as the working directory for subsequent commands.ADD . /app: Copies the contents of the local application directory to the image/appdirectory.WORKDIR /app: Sets the working directory to/app.RUN go build -o main .: Runs thego buildcommand to compile the Go application. The-omain flag specifies that the compiled binary should be namedmain. The.at the end of the command instructs the compiler to run the source code from the current directory.CMD ["/app/main"]: Sets the command that executes when a container based on this image runs./app/mainspecifies the path to the executable binary within the/appdirectory.
Build the Docker image.
console$ docker build -t go-app .
When successful, view the created image and its size.
console$ docker images
Output:
REPOSITORY                          TAG                IMAGE ID       CREATED              SIZE
go-app                              latest             149ea0f60676   About a minute ago   355MB
golang                              1.12.0-alpine3.9   2205a315f9c7   4 years ago          347MB
Start a new container to test the image locally using Docker.
console$ docker run -dit -p 8000:8000 go-app:latest
View the list of running Docker containers to verify that the new container is running correctly on port
8080.console$ docker ps
Output:
CONTAINER ID   IMAGE           COMMAND       CREATED          STATUS          PORTS                                       NAMES
59b3a6a67bf5   go-app:latest   "/app/main"   22 seconds ago   Up 21 seconds   0.0.0.0:8000->8000/tcp, :::8000->8000/tcp   beautiful_panini
Push Docker Image to Vultr Container Registry
To use your Golang container image in a Vultr Kubernetes Engine (VKE) cluster, push it to your Vultr Container Registry as described in the steps below.
Log in to the Vultr Container Registry using your repository username and password.
console$ docker login https://sjc.vultrcr.com/golangregistry -u vcr-user -p vcr-password
Replace
golangregistry,vcr-userandvcr-passwordwith your actual values displayed in the registry overview section.Tag the Docker Image with your Vultr Container Registry repository path.
console$ docker tag go-app:latest sjc.vultrcr.com/golangregistry/go-app:latest
View the list of Docker Images available on your server.
console$ docker images
Output:
REPOSITORY                               TAG                IMAGE ID       CREATED          SIZE
go-app                                   latest             149ea0f60676   7 minutes ago    355MB
sjc.vultrcr.com/golangregistry/go-app   latest             149ea0f60676   7 minutes ago    355MB
In the above output, two container images are listed. This means you can push the tagged
sjc.vultrcr.com/golangregistry/go-appimage to your Vultr Container Registry.Push your
go-appDocker image to the Vultr Container Registry.console$ docker push sjc.vultrcr.com/golangregistry/go-app:latest
Deploy the Golang Application to your VKE Cluster
Create a new deployment resource file
deployment.yaml.console$ nano deployment.yaml
Add the following configurations to the file.
yamlkind: Deployment apiVersion: apps/v1 metadata: name: go-app spec: replicas: 2 selector: matchLabels: app: go-app template: metadata: labels: app: go-app spec: containers: - name: go-app image: sjc.vultrcr.com/golangregistry/go-app:latest ports: - containerPort: 8000
Save and close the file.
Below is what the above Deployment resource directives represent:
name: go-app: Sets the name of the deployment togo-app.spec: Describes the desired state of the deployment.replicas: 2: Sets the number of replica Pods to2.selector: Defines how the deployment identifies the Pods to manage. In the configuration, it uses labels to match Pods with the labelapp: go-app.template: Describes the Pod template used to create new Pods managed by the Deployment.spec: Specifies the specification of the Pods created from this template.containers: Describes the containers within the Pod.name: go-app: Sets the name of the container togo-app.image: sjc.vultrcr.com/golangregistry/go-app:latest: Specifies the image to use with thego-appcontainer,sjc.vultrcr.com/golangregistry/go-appuses the latest image that uses thelatesttag.ports: Specifies the ports exposed by the container.
Apply the deployment to your cluster.
console$ kubectl apply -f deployment.yaml
View the deployment status and verify that it's available.
console$ kubectl get deployment
Output:
NAME     READY   UP-TO-DATE   AVAILABLE   AGE
go-app   2/2     2            2           40s
Verify the pods created by your deployment.
console$ kubectl get pods
Output:
NAME                     READY   STATUS    RESTARTS   AGE
go-app-67b879b97-6zkxd   1/1     Running   0          37s
go-app-67b879b97-vbq2r   1/1     Running   0          37s
As displayed in the above output, the Pods follow the go-app naming scheme specified in the Deployment configuration, for example, the first Pod name is go-app-67b879b97-6zkxd.
View the running Pod logs to verify the container output.
console$ kubectl logs go-app-67b879b97-6zkxd
Output:
Go Web App Started on Port 8000
Expose the Golang Application for External Access
After deploying your Golang application to the VKE cluster, use an Ingress Controller or create a Service resource configuration to expose your application for external access. In this case, VKE uses a linked Vultr Load Balancer resource and associates it with your cluster Service resource. This allows external users to access your application using the Load Balancer public IP Address.
Create a new Service resource file
service.yaml.console$ nano service.yaml
Add the following configurations to the file.
yamlapiVersion: v1 kind: Service metadata: name: load-balancer labels: app: go-app spec: type: LoadBalancer ports: - port: 80 targetPort: 8000 protocol: TCP nodePort: 32000 selector: app: go-app
Save and close the file.
Below is what the above configuration values represent:
name: load-balancer: Sets the service name toload-balancer.type: LoadBalancer: Specifies that the service is a Load Balancer resource. This results in the creation of a Vultr Load Balancer that forwards traffic to the target cluster resources.port: 80: Specifies the external access port used by the service to handle connections. Incoming traffic requests on this cluster port are forwarded to the Service.targetPort: 8000: The running Pods port to forward incoming traffic.protocol: TCP: Specifies the protocol used for the Service, in this case, TCP.nodePort: 32000: Specifies the node port for the Service. NodePort is a way to expose the Service on each node's IP at the specified port.selector: Defines how the Service discovers the Pods to target and forward traffic. In this case, it targets Pods with the labelapp: go-app.
Apply the configuration to your cluster.
console$ kubectl apply -f service.yaml
Wait for at least
3minutes and view the cluster service resources to verify the new Load Balancer external IP address.console$ kubectl get svc
Your output should look like the one below:
NAME         TYPE           CLUSTER-IP       EXTERNAL-IP   PORT(S)        AGE
go-app       LoadBalancer   10.108.248.240   192.168.0.11    80:32000/TCP   3m38s
kubernetes   ClusterIP      10.96.0.1        <none>        443/TCP        6m20s
Using a web browser such as Chrome, visit your Load Balancer IP to access your Golang application. Replace the example IP
192.168.0.11with your actual Load Balancer external IP address.http://192.168.0.11
Conclusion
You have explored the end-to-end process of deploying a Golang application to a Vultr Kubernetes Engine cluster. Each step is important for a successful deployment allowing you to build containerized production applications you can push to the Vultr Container Registry for deployment in your cluster.
No comments yet.