Fine Tune a Hugging Face Diffuser Model on Vultr Cloud GPU

Introduction
The Diffusers library offers access to pre-trained diffusion models in the form of prepackaged pipelines, providing tools for building and training models. While most of the models come pre-trained and are ready for immediate use, it's important to note that pre-trained models are generally versatile and not specialized in any particular task. Datasets on which the models train influence the final outputs.
The output of a model depends on its weights. An untrained model with random weights produces random outputs while the training process updates the weights until the model's output matches the training goals. You can update a model's weights so that it performs better at a specific task. To do this, train the model on a dataset specific to the task it needs to perform.
This guide explains how to fine-tune Hugging Face Diffusion models on an A100 Vultr Cloud GPU instance. It walks you through the steps to fine-tune Stable Diffusion 2.1 to generate images like Pokemons and also Stable Diffusion XL with Dreambooth which lets you generate images that feature the same dog used in the model training.
Prerequisites
Before you begin, make sure you:
- Deploy a Ubuntu 22.04 A100 Cloud GPU server with at least:
- 1/2 GPU
- 40 GB GPU RAM
- 60 GB Memory
- 6 vCPUs
- 700 GB NVME Storage
- Using SSH, access the server and create a non-root sudo user
- Update the server
Fine Tuning Overview
Fine-tuning is the process of adjusting the parameters of a pre-trained model to enhance its performance on a specific task. You can train the pre-trained model by providing relevant datasets for the task and then adjusting the parameters to generate more realistic and task-specific results.
To fine-tune a model, you need:
- A pre-trained model.
- A dataset on which to train and evaluate the pre-trained model.
- A training function to train the model.
In this guide, fine-tune the Stable Diffusion 2.1 and XL models using Low-Rank Adaptation (LoRA). As a training method used in large neural networks, it decomposes weight matrices into smaller update matrices, accelerating training and saving memory. By fine-tuning the updates while preserving original weights, LoRA efficiently adapts models to new tasks on limited memory hardware.
Hardware Considerations
Training models is a GPU-heavy task. Large models have a higher number of parameters (weights) and correspondingly high GPU requirements.
The Stable Diffusion 2.1 model with 983 million parameters requires 12 GB to load in memory and the Stable Diffusion XL (SDXL) model with 3.5 billion parameters requires 16 GB. To fine-tune these models on given datasets, the system needs 24 GB of GPU RAM. The memory requirements can potentially tailor to specific needs through code optimization to diminish RAM consumption.
If the server has insufficient memory to handle the model, the process terminates with an out-of-memory (OOM) error. OOM errors commonly look like the one below:
torch.cuda.OutOfMemoryError: CUDA out of memory. Tried to allocate 256.00 MiB (GPU 0; 80.00 GiB total capacity; 73.26 GiB already allocated; 98.19 MiB free; 73.57 GiB reserved in total by PyTorch)To monitor GPU memory usage, run the nvidia-smi command
$ watch nvidia-smiStable Diffusion 2.1
Stable Diffusion 2.1 is a pre-trained text-to-image generation model, capable of producing realistic generated images with resolutions of up to 768 x 768 px. However, they are not specialized for specific tasks. The output they generate aligns with the dataset on which they train.
For instance, when generating images in a specific style, the model must train on a corresponding dataset. Similarly, to mimic a subject matter expert, the model requires training with relevant resources.
The following section explains the steps involved in fine-tuning the model using a dataset of Pokémon-style images. After the fine-tuning process is complete, you can generate Pokemon-style images using a text prompt.
Fine Tune Stable Diffusion 2.1
Download the training script
$ wget https://raw.githubusercontent.com/huggingface/diffusers/main/examples/text_to_image/train_text_to_image_lora.pyThe above command downloads the required training script.
Download the requirements file
$ wget https://raw.githubusercontent.com/huggingface/diffusers/main/examples/text_to_image/requirements.txtInstall the required packages
$ pip install -r requirements.txtThe above command installs all the required packages used in the training process.
Install the
diffuserspackage from GitHub$ pip install git+https://github.com/huggingface/diffusersInstall the additional required packages
$ pip install xformers bitsandbytes transformers accelerate scipy safetensorsThe above command downloads the following packages:
- xformers: Provides implementations of various transformer-based models and attention mechanisms. It's built on top of PyTorch and offers a convenient way to work with and experiment with transformer architectures
- bitsandbytes: Assists with handling data in different formats
- transformers: Consists of many pre-trained models used for Natural Language Processing (NLP), Named Entity Recognition (NER), machine translation, and sentiment analysis
- accelerate: Enables running PyTorch across any distributed configuration. It leverages accelerators like GPUs and TPUs to improve efficiency and scalability, speed up natural language processing (NLP) workflows, and enhance performance
- scipy: It's a scientific computing library that provides functionality for tasks such as optimization, linear algebra, integration, and interpolation
- safetensors: Enhances debugging and diagnostics for PyTorch tensors. It provides additional features and checks to help identify and prevent common tensor-related issues
Generate the
accelerateconfiguration file$ accelerate config defaultCreate a new directory to store model
$ mkdir outputThe above command creates a new directory where the trained model gets saved to.
Setup the environment variables
 $ export MODEL_NAME="stabilityai/stable-diffusion-2-1"
 $ export DATASET_NAME="lambdalabs/pokemon-blip-captions"
 $ export OUTPUT_DIR="/path/to/output/model"
Below is what each of the variables represents:
export MODEL_NAME: Assigns the value of"stabilityai/stable-diffusion-2-1"that refers to a specific pre-trained language modelexport DATASET_NAME: Set the value of"lambdalabs/pokemon-blip-captions"used to store data accessible by scripts running in the same environment. The used dataset is available in the Hugging Face Pokemon BLIP Captions Dataset.export OUTPUT_DIR: Sets the value of"/path/to/output/model"which represents the path to the directory where the output model gets saved after training. Replace the path with your actual directory where you want to save the trained model.Execute the training script
 $ accelerate launch train_text_to_image_lora.py \
   --pretrained_model_name_or_path=$MODEL_NAME \
   --dataset_name=$DATASET_NAME \
   --output_dir=$OUTPUT_DIR \
   --mixed_precision="fp16" \
   --dataloader_num_workers=8 \
   --resolution=512 --center_crop --random_flip \
   --train_batch_size=1 \
   --gradient_accumulation_steps=4 \
   --max_train_steps=15000 \
   --learning_rate=1e-04 \
   --max_grad_norm=1 \
   --lr_scheduler="cosine" --lr_warmup_steps=0 \
   --checkpointing_steps=500 \
   --validation_prompt="Totoro" \
   --seed=0
The training process may take up to 8 hours. To test the training script beforehand, train the model using
max_train_steps=500to save time. However, the generated output may not be of optimal quality, as the model is not trained on the complete set of training steps.
Infer the Fine Tuned Stable Diffusion 2.1 Model
Access the Python console
$ python3Import the required modules
 >>> from diffusers import StableDiffusionPipeline, DPMSolverMultistepScheduler
 >>> import torch
Define the model identifiers
>>> lora_model_id = "/path/to/output/model" >>> base_model_id = "stabilityai/stable-diffusion-2-1"lora_model_id: Stores the path to the output directory where the trained model exports tobase_model_id: Holds the base model identifier on which model trainsDefine the diffusion pipeline and load the LORA weights
 >>> pipe = StableDiffusionPipeline.from_pretrained(base_model_id, torch_dtype=torch.float16)
 >>> pipe.scheduler = DPMSolverMultistepScheduler.from_config(pipe.scheduler.config)
 >>> pipe.unet.load_attn_procs(lora_model_id)
 >>> pipe.to("cuda")
Generate an image by providing a prompt
>>> image = pipe(prompt="yoda").images[0]The above prompt
yodagenerates an output like the one below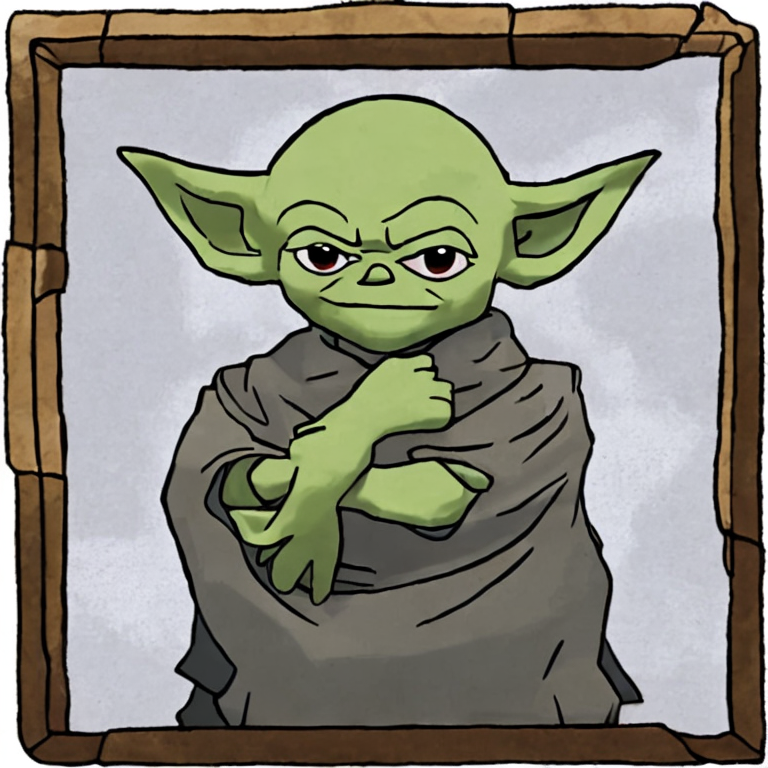
Save the image.
>>> image.save('yoda_pokemon.png')The
image.save()function saves the image to the working directory with the filename of your choice. You can also use an absolute path to save the generated. For example,/path/to/collection/image.png.
Stable Diffusion XL with Dreambooth
Dreambooth is a method for personalizing text-to-image models such as Stable Diffusion XL, utilizing a small set of 3 to 5 subject images. This empowers the model to produce contextually rich images featuring the subject in various poses, scenes, and perspectives, thereby enhancing its capability for diverse image generation.
For example, the original Stable Diffusion XL (SDXL) text-to-image model cannot generate any specific image because it's not trained on that data. But you can fine-tune the model with a few images.
The following section explains the steps for fine-tuning the model using the dog images dataset. Also, give a descriptive text prompt to start image generation, like 'A photo of {unique_id} {unique_class},' such as 'A photo of an sks dog'. Your concise prompts help the model in desired image production. When fine-tuning concludes, generating images of the same dog is possible with just a few words in the prompt.
Fine Tune Stable Diffusion XL using Dreambooth
Download the training script
$ wget https://raw.githubusercontent.com/huggingface/diffusers/main/examples/dreambooth/train_dreambooth_lora_sdxl.pyThe above command downloads the required training script.
Download the requirements file
$ wget https://raw.githubusercontent.com/huggingface/diffusers/main/examples/dreambooth/requirements_sdxl.txtInstall the required packages
$ pip install -r requirements_sdxl.txtThe above command installs all the required packages used in the training process.
Install the
diffuserspackage from GitHub$ pip install git+https://github.com/huggingface/diffusersInstall the additional required packages
$ pip install xformers bitsandbytes transformers accelerate scipy safetensorsGenerate the
accelerateconfiguration file$ accelerate config defaultIf the
acceleratecommand fails to run, end you SSH session, and start it again to activate the libraryCreate a new directory to store instance data
$ mkdir imagesThe above code line creates a new directory. You can upload images into this directory, either directly or by utilizing tools such as FileZilla or WinSCP. The example images are from the Hugging Face Dog Example Dataset.
Create a new directory to store the model
$ mkdir outputThe above code line creates a new directory where the trained model gets saved to.
Set up the environment variables.
 $ export MODEL_NAME="stabilityai/stable-diffusion-xl-base-1.0"
 $ export INSTANCE_DIR="/path/to/training/images"
 $ export OUTPUT_DIR="/path/to/output/model"
 $ export VAE_PATH="madebyollin/sdxl-vae-fp16-fix"
Below is the function of each variable:
export MODEL_NAME: Set to the value"stabilityai/stable-diffusion-xl-base-1.0". This environment variable refers to a specific pre-trained language model.export INSTANCE_DIR: Set to the value"/path/to/training/images". This variable is the path to the directory where training images. Replace this path with the actual path of your training image directory.export OUTPUT_DIR: Set to the value"/path/to/output/model". This variable is the path to the directory where the output model exports after training. Replace the path with the actual path where you want to save the trained model.export VAE_PATH: Set to the value"madebyollin/sdxl-vae-fp16-fix". This variable represents the path of a pre-trained Variable Auto Encoder (VAE) model. A file you add to your Stable Diffusion checkpoint model to get more vibrant colors and crisper images.
Execute the DreamBooth training script
 $ accelerate launch train_dreambooth_lora_sdxl.py \
   --pretrained_model_name_or_path=$MODEL_NAME  \
   --pretrained_vae_model_name_or_path=$VAE_PATH \
   --instance_data_dir=$INSTANCE_DIR \
   --output_dir=$OUTPUT_DIR \
   --instance_prompt="a photo of sks dog" \
   --resolution=1024 \
   --train_batch_size=2 \
   --gradient_accumulation_steps=2 \
   --gradient_checkpointing \
   --learning_rate=1e-4 \
   --lr_scheduler="constant" \
   --lr_warmup_steps=0 \
   --enable_xformers_memory_efficient_attention \
   --mixed_precision="fp16" \
   --use_8bit_adam \
   --max_train_steps=500 \
   --checkpointing_steps=717 \
   --seed="0"
The training process may take up to 2 hours to complete.
Infer the Fine Tuned Dreambooth Model
Access the Python console
$ python3Import the required modules
 >>> from diffusers import DiffusionPipeline
 >>> import torch
Define the model identifiers
>>> lora_model_id = "/path/to/output/model" >>> base_model_id = "stabilityai/stable-diffusion-xl-base-1.0"lora_model_id: Holds the path to the output directory where your trained model exports to.base_model_id: Holds the identifier of the base model on which model it's trained.Define the diffusion pipeline and load the LORA weights.
 >>> pipe = DiffusionPipeline.from_pretrained(base_model_id, torch_dtype=torch.float16)
 >>> pipe = pipe.to("cuda")
 >>> pipe.load_lora_weights(lora_model_id)
Generate an image using a text prompt
>>> image = pipe("A picture of a sks dog in a bucket", num_inference_steps=25).images[0]In the above command, an image generates in relation to the applied prompt
A picture of a sks dog in a bucketin the pipeline. In this prompt, the wordsksfunctions as a{unique_id}, and the worddogfunctions as a{unique_class}, assisting the model in generating the desired output. Use any prompt with{unique_id}and{unique_class}for your desired result, such asA photo of an sks dog inside a car.Output:
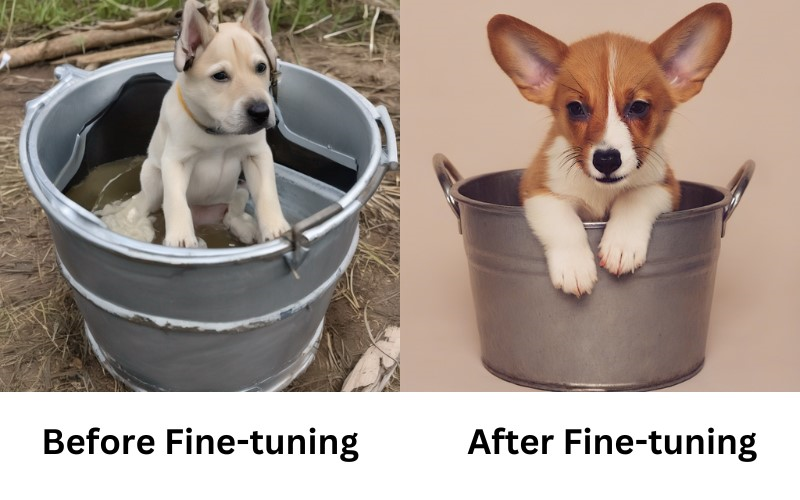
In the above output, the first image generates with the pre-trained model using the same prompt. It cannot generate an image with any specific task. After fine-tuning, the model is capable of generating images from the given dataset.
Save the generated image
>>> image.save("sks_dog.png")The
image.save()function saves the image to the working directory with the filename of your choice. You can also use an absolute path to save the generated image. For example,/path/to/collection/image.png.
Refine the Output (Optional)
Import Stable Diffusion XL Image-to-Image Pipeline
>>> from diffusers import StableDiffusionXLImg2ImgPipelineLoad the refiner
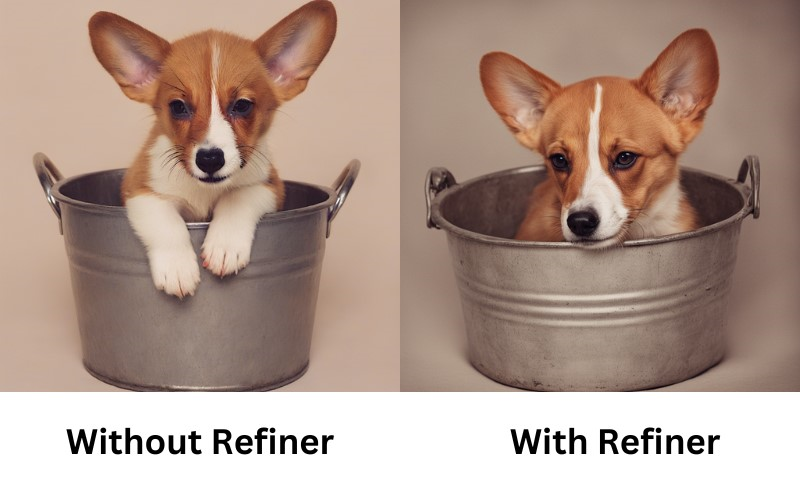
 >>> refiner = StableDiffusionXLImg2ImgPipeline.from_pretrained(
     "stabilityai/stable-diffusion-xl-refiner-1.0", torch_dtype=torch.float16, use_safetensors=True, variant="fp16"
 )

 >>> refiner.to("cuda")

 >>> prompt = "A picture of a sks dog in a bucket"
 >>> generator = torch.Generator("cuda").manual_seed(0)
Generate an image by providing a prompt
 >>> image = pipe(prompt=prompt, output_type="latent", generator=generator).images[0]
 >>> image = refiner(prompt=prompt, image=image[None, :], generator=generator).images[0]
 >>> image.save("refined_sks_dog.png")
The
image.save()function saves the image to your working directory with a custom filename set in the function value.Below is a side-by-side comparison of image generation with and without Refiner pipeline outputs:
Training Parameters
During the fine-tuning process of a model, your training parameters must specify how the model has to train. The provided script is for training a model using the parameters you've specified. Involve working with image data and various settings to fine-tune the training process.
- pretrained_model_name_or_path: Specifies the pre-trained model to use as the base for fine-tuning. The value of
$MODEL_NAMEshould be the name or path of the pre-trained model you want to use - instance_data_dir: Specifies the directory containing the instance data, presumably images, for training. The value of
$INSTANCE_DIRshould be the path to the directory - pretrained_vae_model_name_or_path: Specifies the pre-trained Variable Auto Encoder (VAE) model's name or path. A file that you add to your Stable Diffusion checkpoint model to get more vibrant colors and crisper images
- output_dir: Specifies the output directory to which the trained model and related files export to. The value of
$OUTPUT_DIRshould be the path to the desired output directory. - dataset_name: Specifies the name of the environment variable used to store the dataset used for training.
- mixed_precision: Enables
mixed_precisiontraining, which uses 16-bit floating point representation to speed up training while minimizing memory usage. - instance_prompt: A text prompt that effectively describes the instance images, serving as a unique identifier for the model to generate or manipulate. This serves as the initial point for image generation. For instance, you could use a prompt like: 'A photo of {unique_id} {unique_class},' such as 'A photo of a sks dog.' Your clear and precise prompts assist the model in producing the desired images.
- resolution: Specifies the resolution of the generated images.
- train_batch_size: Determines how many data points apply to train the model at a time. A larger batch size causes the model to learn more efficiently, but it also requires more memory.
- gradient_accumulation_steps: Accumulates gradients over multiple steps before updating the model's weights. This can help simulate larger batch sizes without increasing memory requirements.
- learning_rate: Specifies the initial
learning_ratefor the training process. It's recommended to start with a low learning rate. A higher learning rate accelerates the model's learning, but it can also lead to over-fitting the training data. However, you can apply adjustments to improve results. - lr_scheduler: Specifies the learning rate scheduler that’s used to decay the learning rate throughout the training process.
- lr_warmup_steps: Determines the number of warm-up steps for the learning rate scheduler. A warm-up helps the model adjust to the learning rate gradually at the beginning of training.
- max_train_steps: Sets the maximum number of training steps. The training stops after reaching this number of steps.
- validation_prompt: Provides a validation text prompt that describes the type of image you want the model to generate for validation purposes.
- validation_epochs: Specifies the frequency of validation. The model's performance on the validation prompt evaluates every given epochs.
- dataloader_num_workers: Specifies the number of workers used to load the data. This can help to improve the performance of the training process.
- max_grad_norm: Specifies the maximum norm of the gradients. This helps to prevent the gradients from becoming too large and causing the model to diverge.
- checkpointing_steps: Specifies the number of steps performed between checkpoints. The model gets saved at each checkpoint.
- validation_prompt: Specifies the prompt used to validate the model.
- seed: Specifies the random seed used to initialize the model and the data loader. This helps to ensure that the results are reproducible.
- enable_xformers_memory_efficient_attention: Enables memory-efficient attention mechanisms in the model, which helps reduce memory consumption during training.
- gradient_checkpointing: Utilizes gradient checkpointing, a technique that trades computation for memory. This can help train larger models on limited GPU memory.
- use_8bit_adam: Uses 8-bit Adam optimizer, which can reduce memory usage during training.
Each of these settings and parameters contributes to the joint configuration of the training process for the trained model.
Conclusion
In this guide, you fine-tuned Hugging Face Diffusion models on an A100 Vultr Cloud GPU instance. You also fine-tuned Stable Diffusion 2.1 to generate images like Pokemons and Stable Diffusion XL with Dreambooth to generate final output images.
More Information
For more information about the models applied in this guide, visit the following resources: