How Automating WordPress Backups with Vultr Object Storage using rclone and WP-CLI

Introduction
Performing full WordPress backups protects your site from catastrophic data loss from server crashes, hacks, or accidental data deletions. Without regular backups, you could permanently lose all your WordPress site content, users, settings, and plugins if any potential data loss factors occur.
Manually backing up your WordPress site is time-consuming and involves constant execution steps. If you rely on manual backups, you may skip an important backup, hence, automating the backup process ensures that your backup files are always up to date. This article explains how you can automate the full WordPress backup process using the following Linux tools:
- Bunzip 2 (Bzip2): A compression utility that reduces the total size of archive files to save storage space.
- Rclone: Manages cloud storage volumes, such as Vultr Object Storage.
- WP-CLI: The WordPress command line utility used to manage WordPress core and configuration files.
- Cron: A built-in Linux utility that runs scheduled commands on a server.
By combining the tool functionalities, you will create an automated backup script to regularly perform a full WordPress backup. Then, you will upload the full backup to Vultr Object Storage for restoration at a specific point in time.
Prerequisites
Before you begin:
- Deploy a OneClick WordPress Server using the Vultr marketplace application
- Access the server using SSH as a non-root user with sudo privileges
- Install WP-CLI on the server
- Create a new Vultr Object Storage bucket to store the WordPress backup files
wp-files as the Vultr Object Storage bucket name. webadmin for the non-root user with sudo access and example.com for the WordPress domain. Replace these values with your actual WordPress server details.
Install Rclone
Rclone is a command-line utility used to manage files stored on cloud storage volumes. It performs file synchronization tasks similar to other common utilities such as RSync. Follow the steps below to install Rclone and use it to manage files on your Vultr Object Storage Bucket.
Download and install the latest Rclone installation script.
console$ curl https://rclone.org/install.sh | sudo bash
Output:
rclone v1.64.2 has successfully installed.
Now run "rclone config" for setup. Check https://rclone.org/docs/ for more details.
Test the Rclone configuration to verify that it's installed correctly.
console$ rclone config file
Output:
Configuration file doesn't exist, but rclone will use this path:
/home/webadmin/.config/rclone/rclone.conf
Configure Rclone to use Vultr Object Storage
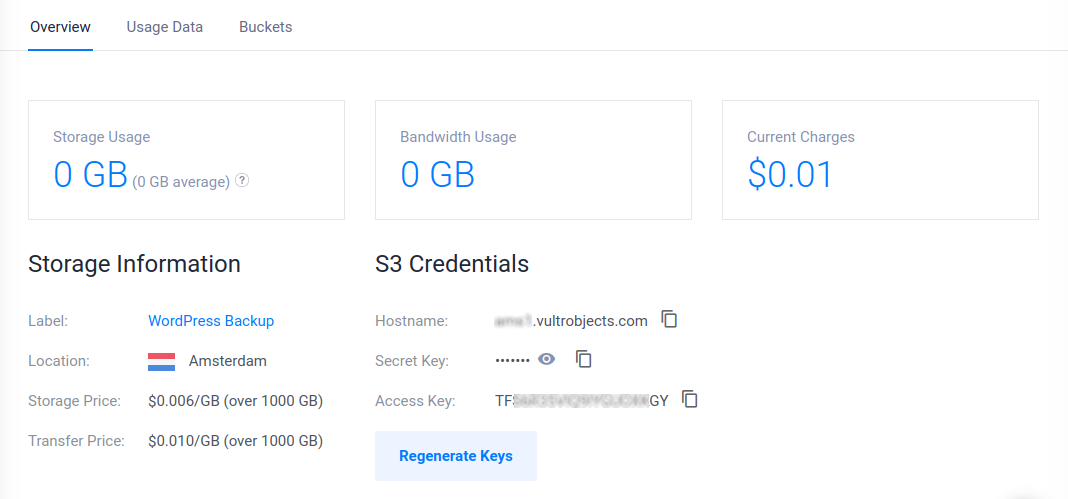
To configure rclone to use your Vultr Object Storage details, access the Vultr Customer Portal. Then, copy your Vultr Object Storage authentication details including the Hostname, Access Key, and Secret Key from the Overview tab
Open the Rclone
configfile using a text editor such as Nano.console$ nano /home/webadmin/.config/rclone/rclone.conf
Add the following configurations to the file to create a new remote location
wp-backupthat points to your Vultr Object Storage bucket.ini[wp-backup] type = s3 provider = Other env_auth = false access_key_id = YOUR_ACCESS_KEY secret_access_key = YOUR_SECRET_KEY region = endpoint = https://endpoint location_constraint = acl = private server_side_encryption = storage_class =
Save and close the file.
The above configuration creates a new Rclone remote storage profile
wp-backupthat points to your Vultr Object Storage. Replace the placeholder values, andhttps://endpointwith your actual hostname such ashttps://ams1.vultrobjects.comto correctly enable your Vultr Object Storage connection. This allows you to use Rclone commands such asrclone copyto copy files to your storage bucket.View the list of Rclone remote profiles and verify the new
wp-backupprofile.console$ rclone listremotes
Output:
wp-backup:Create a sample text file to test your rclone configuration.
console$ echo 'This is a test' > testfile.txt
Copy the sample file to your Vultr Object Storage using Rclone.
console$ rclone copy testfile.txt wp-backup:wp-files/
List all files in your
wp-filesVultr Object Storage to verify that the new file is uploaded, and available in your storage bucket.console$ rclone ls wp-backup:wp-files/
Output:
20 testfile.txtAdditionally, access your Vultr Object Storage file manager and verify that the new sample file is available in your
wp-filesbucket.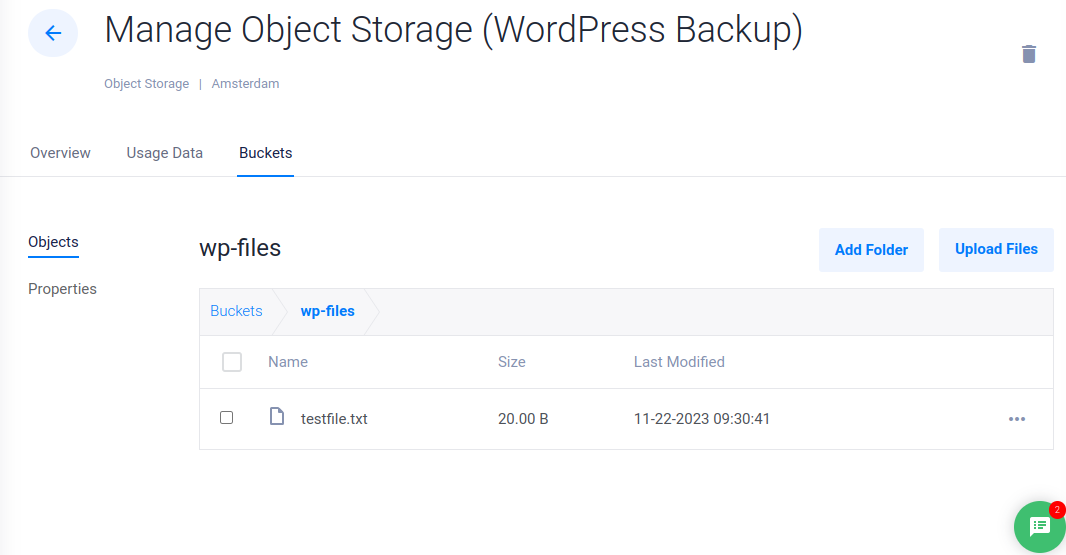
Create a Full WordPress Backup
To back up your WordPress site, copy the WordPress database and site files. The database contains all site content, settings, users, and other data while the WordPress files directory contains uploaded files, plugins, themes, and the WordPress core. If you back up the active database and web root directory, you can restore or migrate your WordPress site at any point in time.
To find your WordPress web files directory, view your server host configuration files to identify your working web root directory. For example, when using Nginx, view the host configurations files in the /etc/nginx/sites-available or /etc/nginx/conf.d directories.
Switch to your web server host configuration files directory.
console$ cd /etc/nginx/sites-available/
Search all available files for your WordPress domain string using the Grep utility to verify your active host configuration file.
console$ grep -r "example.com" .
Output:
/etc/nginx/sites-available/wordpress_https.conf: server_name example.com;Depending on your active configuration file, view the file contents.
console$ cat wordpress_https.conf
Within the configuration, find the
rootdirectory directive:root /var/www/example.com;As returned in your output, your WordPress site uses the
/var/www/example.comweb root directory.Switch to your WordPress web root directory.
console$ cd /var/www/example.com
Long list files in the directory and verify that all WordPress files are available.
console$ ls -l
Your output should look like the one below:
total 200
-rw-r--r--  1 www-data www-data   405 Feb  6  2020 index.php
lrwxrwxrwx  1 www-data www-data    21 Nov 19 06:56 mysqladmin -> /usr/share/phpmyadmin
-rw-r--r--  1 www-data www-data  7211 May 12  2023 wp-activate.php
drwxr-xr-x  9 www-data www-data  4096 Nov  9 00:45 wp-admin
-rw-r--r--  1 www-data www-data   351 Feb  6  2020 wp-blog-header.php
-rw-r--r--  1 www-data www-data  2323 Jun 14 14:11 wp-comments-post.php
-rw-rw-r--  1 www-data www-data  3516 Nov 19 06:57 wp-config.php
drwxr-xr-x  7 www-data www-data  4096 Nov 19 06:58 wp-content
-rw-r--r--  1 www-data www-data  5638 May 30 18:48 wp-cron.php
drwxr-xr-x 27 www-data www-data 12288 Nov  9 00:45 wp-includes
-rw-r--r--  1 www-data www-data  2502 Nov 26  2022 wp-links-opml.php
-rw-r--r--  1 www-data www-data  3927 Jul 16 12:16 wp-load.php
-rw-r--r--  1 www-data www-data 50924 Sep 29 22:01 wp-login.php
-rw-r--r--  1 www-data www-data  8525 Sep 16 06:50 wp-mail.php
-rw-r--r--  1 www-data www-data 26409 Oct 10 14:05 wp-settings.php
-rw-r--r--  1 www-data www-data 34385 Jun 19 18:27 wp-signup.php
-rw-r--r--  1 www-data www-data  4885 Jun 22 14:36 wp-trackback.php
-rw-r--r--  1 www-data www-data  3154 Sep 30 07:39 xmlrpc.php
Create a new environment variable
WP_ROOTto store the WordPress web root directory path, and append the variable to your ~/.bashrc file.console$ echo 'export WP_ROOT="/var/www/example.com"' >> ~/.bashrc
To record the daily backup time, create a new environment variable
BACKUP_TIMEwith a year, minute, day, and minutes value to record the time each backup starts.console$ echo 'export BACKUP_TIME=$(date +%Y-%m-%d_at_%H.%M.%S)' >> ~/.bashrc
Create a new local backup files directory to store your WordPress backups.
console$ mkdir -p /home/webadmin/backups/
Create a new environmental variable to store your backup files directory path.
console$ echo 'export BACKUP_DIR="/home/webadmin/backups"' >> ~/.bashrc
Activate your server profile changes to apply the new variables in your session.
console$ source ~/.bashrc
Verify that the WordPress web root variable is active and available to use.
console$ echo $WP_ROOT
Output:
/var/www/example.comVerify that the backup time variable is available.
console$ echo $BACKUP_TIME
Output:
2023-11-19_at_09.57.57The above output verifies that a backup started on
19 November 2023 09:57:57.
Back Up the WordPress Database
Export the WordPress database using WP-CLI to your web root directory.
console$ sudo -E wp db export --path=$WP_ROOT $WP_ROOT/db_$BACKUP_TIME.sql --add-drop-table --allow-root
The above command uses WP-CLI to export the WordPress database with the --add-drop-table flag that creates an SQL file with commands to delete existing tables with the same name before recreating them. This helps avoid conflicts and ensures a clean import, especially when overwriting an existing database or restoring a database to a previous state.
Output:
Success: Exported to '/var/www/example.com/db_2023-11-19_at_09.57.57.sql'.
Back Up All WordPress Files
Create a compressed WordPress files archive that contains all site files and the
.sqlfile you exported earlier.console$ sudo -E tar -jcvf $BACKUP_DIR/wp_$BACKUP_TIME.tar.bz2 -C $WP_ROOT/.. $(basename $WP_ROOT) --ignore-failed-read
The above command creates a new Tar archive compressed using Bzip2
jthat includes all files in the WordPress web root directory to your backup files directory. The--ingore-failed-readflag allows the backup process to continue in case the Tar utility encounters locked files or cannot read some files during the backup process.List files in your backup files directory and verify that a new
.tar.bz2archive is available.console$ ls -l $BACKUP_DIR
Output:
wp_2023-11-19_at_09.57.57.tar.bz2You have created a full WordPress backup archive that includes all the site files and database. You can transfer the single compressed file to your Vultr Object Storage and decompress the files when recovering your WordPress site.
Transfer WordPress Backup Files to Vultr Object Storage
Copy the WordPress backup archive from your local backup files directory to your target Vultr Object Storage bucket
wp-filesusing the rclone copy command.console$ rclone copy $BACKUP_DIR/wp_$BACKUP_TIME.tar.bz2 wp-backup:wp-files/
When successful, list the files in your Vultr Object Storage bucket and verify that your WordPress backup file is available.
console$ rclone ls wp-backup:wp-files
Output:
15 testfile.txt
28234126 wp_2023-11-19_at_09.57.57.tar.bz2
To clear the server storage space, delete the local copy of the WordPress archive
console$ rm -rf $BACKUP_DIR/wp_$BACKUP_TIME.tar.bz2
Delete old backup files to avoid running out of space for new backups
console$ rclone delete wp-backup:wp-files --min-age 7d
This rclone command deletes all backup files older than
7days from your Vultr Object Storage bucket. The --min-age option allows you to specify the maximum age of files to keep. You can increase or increase this value. Consult the rclone documentation to see valid time values for this option.With each backup operation, your Vultr Object Storage accrues more backup files. The delete command allows you to create space for more recent backups by deleting old ones.
Your WordPress site is now safely backed up in your Vultr Object Storage bucket. The next step is to automate the backup process.
Automate the WordPress Backup Process to Vultr Object Storage
To automate the WordPress backup process, set up a new Cron task that runs a backup operations script that includes all file transfer commands as described in the steps below.
Using a text editor such as Nano, create a bash script in your user home directory.
console$ nano /home/webadmin/wp-backups.sh
Add the following contents to the file.
bash#!/bin/bash # Set variables BACKUP_TIME=$(date +%Y-%m-%d_at_%H.%M.%S) WP_ROOT="/var/www/example.com" BACKUP_DIR="$HOME/backups" RCLONE_CONFIG_FILE="/home/webadmin/.config/rclone/rclone.conf" LOG_FILE="/var/log/wp_backup_$BACKUP_TIME.log" MAX_BACKUP_AGE="7d" # Define maximum age of backup files to retain # Print backup timestamp echo "Backup time: $BACKUP_TIME" { # Create backup directory mkdir -p "$BACKUP_DIR" # Export WordPress database wp db export --add-drop-table --path="$WP_ROOT" "$WP_ROOT/db_$BACKUP_TIME.sql" --allow-root # Create a compressed archive of WordPress web root directory sudo -E tar -jcvf $BACKUP_DIR/wp_$BACKUP_TIME.tar.bz2 -C $WP_ROOT/.. $(basename $WP_ROOT) --ignore-failed-read > /dev/null 2>&1 # Copy backup archive to remote storage using rclone rclone --config="$RCLONE_CONFIG_FILE" copy "$BACKUP_DIR/wp_$BACKUP_TIME.tar.bz2" wp-backup:wp-files # List files in remote storage rclone --config="$RCLONE_CONFIG_FILE" lsl wp-backup:wp-files # Remove local backup archive rm -rf "$BACKUP_DIR/wp_$BACKUP_TIME.tar.bz2" #Remove the database SQL dump file rm -rf "$WP_ROOT/db_$BACKUP_TIME.sql" # Delete old files from remote storage (older than the defined maximum age) # Comment out the next line if you don't want to delete old files rclone --config="$RCLONE_CONFIG_FILE" delete wp-backup:wp-files --min-age "$MAX_BACKUP_AGE" # Log the entire process } | tee -a "$LOG_FILE"0 07:39 xmlrpc.php
Save and close the file.
The script uses the following variables to perform WordPress backup tasks:
BACKUP_TIME: Records the date and time when the backup starts, this creates unique file names for each backup copy.WP_ROOT: Defines your WordPress web root directory.BACKUP_DIR: Specifies local backup files directory.RCLONE_CONFIG_FILE: Points to the Rclone configuration file to use when uploading files to your storage bucket.LOG_FILE: Creates a unique log file for each backup process for reference and troubleshooting.MAX_BACKUP_AGE: Sets the maximum age for files to be deleted from your Vultr Object Storage. In the configuration7ddeletes all files older than 7 days from your storage bucket.
Each time you run the above script:
- It exports the WordPress database with drop table statements.
- Creates a compressed bzip archive that contains all WordPress files and the matching database.
- Transfers the latest backup archive file to your Vultr Object Storage using Rclone.
- Displays the list of files in your Vultr Object Storage bucket.
- Removes the local backup archive file and the exported database SQL after successful transfer to save the local server storage space.
- Deletes files older than your specified time period, as per the configuration, files older than 1 week.
- All script operations a logged to a time-stamped file within the
/var/log/using the tee utility.
To successfully create the WordPress database backup, you must run the above script with sudo privileges since WP-CLI command includes the --allow-root option.
Make the script executable.
console$ chmod a+x ~/wp-backups.sh
Run the script to verify that it works correctly.
console$ sudo /home/webadmin/wp-backups.sh
Output:
Backup time: 2023-11-22_at_10.30.27
Success: Exported to '/var/www/html/db_2023-11-22_at_10.30.27.sql'.
       20 2023-11-22 09:29:57.256559544 testfile.txt
       14 2023-11-22 10:29:08.863311480 wp_2023-11-22_at_10.29.08.tar.bz2
 19445245 2023-11-22 10:29:50.585685794 wp_2023-11-22_at_10.29.47.tar.bz2
 19445190 2023-11-22 10:30:08.322695638 wp_2023-11-22_at_10.30.05.tar.bz2
 19445290 2023-11-22 10:30:19.755346688 wp_2023-11-22_at_10.30.16.tar.bz2
 19445218 2023-11-22 10:30:30.171939971 wp_2023-11-22_at_10.30.27.tar.bz2
When successful, a new WordPress backup archive is uploaded to your Vultr Object Storage, and all files in the bucket are listed when the operation is complete.
Access your Vultr Object Storage dashboard to verify the new WordPress backup files are available in the
wp-filesbucket.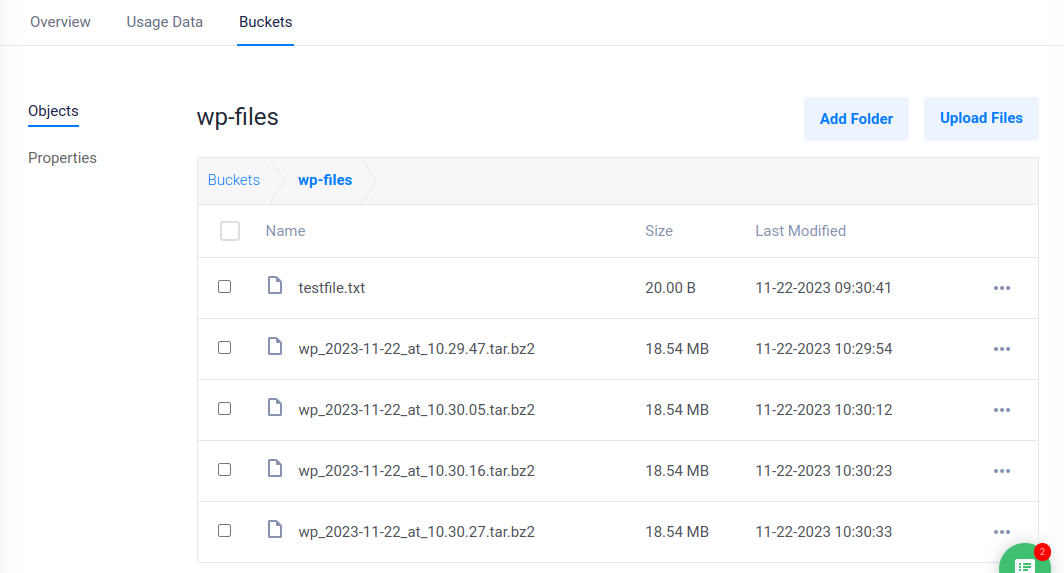
Edit your Crontab configuration to a new task that automates the WordPress backup script to run once every day.
console$ sudo crontab -e
Add the following Cron task to the file.
0 0 * * * /home/webadmin/.wp-backups.shSave and close the file.
The above CronJob executes the
wp-backups.shscript once every day and7times in a week. This ensures that you have access to daily WordPress backups you can use to restore your site at any time. Depending on your WordPress site activity, adjust the schedule to run daily or weekly. For more information, learn the how to use the Cron task scheduler resource.
Restore your WordPress Site Using Rclone and Vultr Object Storage
To restore your WordPress site from different backup versions stored in your Vultr Object Storage, use Rclone to pull your target archive file. Depending on your backup files format scheme, you need to extract files from the archive, and transfer them to your new or existing WordPress web root directory to recover your site using the files.
Create a new
wp-backupsdirectory to store files downloaded from your Vultr Object Storage.console$ mkdir -p /home/webadmin/wp-backups
View the available backup archive files stored in your Vultr Object Storage
wp-filesbucket.console$ rclone lsl wp-backup:wp-files/
Output:
20 2023-11-22 09:29:57.256559544 testfile.txt
45 2023-11-22 10:29:50.585685794 wp_2023-11-22_at_10.29.47.tar.bz2
90 2023-11-22 10:30:08.322695638 wp_2023-11-22_at_10.30.05.tar.bz2
90 2023-11-22 10:30:19.755346688 wp_2023-11-22_at_10.30.16.tar.bz2
18 2023-11-22 10:30:30.171939971 wp_2023-11-22_at_14.39.09.tar.bz2
Note your target backup archive file to restore your WordPress site. For example,
wp_2023-11-22_at_14.39.09.tar.bz2.Copy the backup archive file from Vultr Object Storage to your new
wp-backupsdirectory.console$ rclone copy wp-backup:wp-files/wp_2023-11-22_at_14.39.09.tar.bz2 /home/webadmin/backups/
Switch to your directory.
console$ cd ~/backups
List files in the directory and verify that your WordPress backup file is available.
console$ lsOutput:
wp_2023-11-22_at_14.39.09.tar.bz2Extract files from the WordPress backup.
console$ tar -xvjf wp_2023-11-22_at_14.39.09.tar.bz2
List the directory files and verify the newly extracted WordPress files.
console$ ls -l
Output:
example.com
wp_2023-11-22_at_14.39.09.tar.bz2
In the above output, the new
example.comdirectory is extracted from the backup archive file.Long list files in the extracted directory and verify that all your WordPress files are available.
console$ ls example.com
Output:
total 296
-rw-rw-r--  1 webadmin webadmin 92719 Nov 22 14:39 db_2023-11-22_at_14.39.09.sql
-rw-r--r--  1 webadmin webadmin   405 Feb  6  2020 index.php
lrwxrwxrwx  1 webadmin webadmin    21 Nov 22 09:17 mysqladmin -> /usr/share/phpmyadmin
-rw-r--r--  1 webadmin webadmin  7211 May 12  2023 wp-activate.php
drwxr-xr-x  9 webadmin webadmin  4096 Nov  9 00:45 wp-admin
-rw-r--r--  1 webadmin webadmin   351 Feb  6  2020 wp-blog-header.php
-rw-r--r--  1 webadmin webadmin  2323 Jun 14 14:11 wp-comments-post.php
-rw-rw-r--  1 webadmin webadmin  3516 Nov 22 09:18 wp-config.php
drwxr-xr-x  7 webadmin webadmin  4096 Nov 22 09:18 wp-content
-rw-r--r--  1 webadmin webadmin  5638 May 30 18:48 wp-cron.php
drwxr-xr-x 27 webadmin webadmin 16384 Nov  9 00:45 wp-includes
-rw-r--r--  1 webadmin webadmin  2502 Nov 26  2022 wp-links-opml.php
-rw-r--r--  1 webadmin webadmin  3927 Jul 16 12:16 wp-load.php
-rw-r--r--  1 webadmin webadmin 50924 Sep 29 22:01 wp-login.php
-rw-r--r--  1 webadmin webadmin  8525 Sep 16 06:50 wp-mail.php
-rw-r--r--  1 webadmin webadmin 26409 Oct 10 14:05 wp-settings.php
-rw-r--r--  1 webadmin webadmin 34385 Jun 19 18:27 wp-signup.php
-rw-r--r--  1 webadmin webadmin  4885 Jun 22 14:36 wp-trackback.php
-rw-r--r--  1 webadmin webadmin  3154 Sep 30 07:39 xmlrpc.php
Move the extracted files to your WordPress web root directory to restore your site.
console$ sudo mv example.com /var/www/
Grant the web server ownership permissions to the new web root directory.
console$ sudo chown -R www-data:www-data /var/www/example.com
Restore your WordPress database using the
.sqlfile in your working directory. Replaceexample.sqlwith your actual database backup file.console$ mysql wordpressdb < example.sql
Conclusion
You have implemented an automated backup strategy that creates full WordPress backups using Vultr Object Storage and Rclone. Depending on your preferences, you must ensure that your WordPress backup files are up to date to roll back changes in case any errors arise from updates or security breaches on your WordPress site.
More information
For more information, visit the following resources: