
How to Back Up and Restore PostgreSQL Databases to S3-Compatible Storage in Coolify
Coolify is an open-source, self-hosted Platform as a Service (PaaS) solution for managing cloud infrastructure, applications, and databases. It provides built-in backup capabilities that automate database protection and enable recovery from storage failures or accidental data loss.
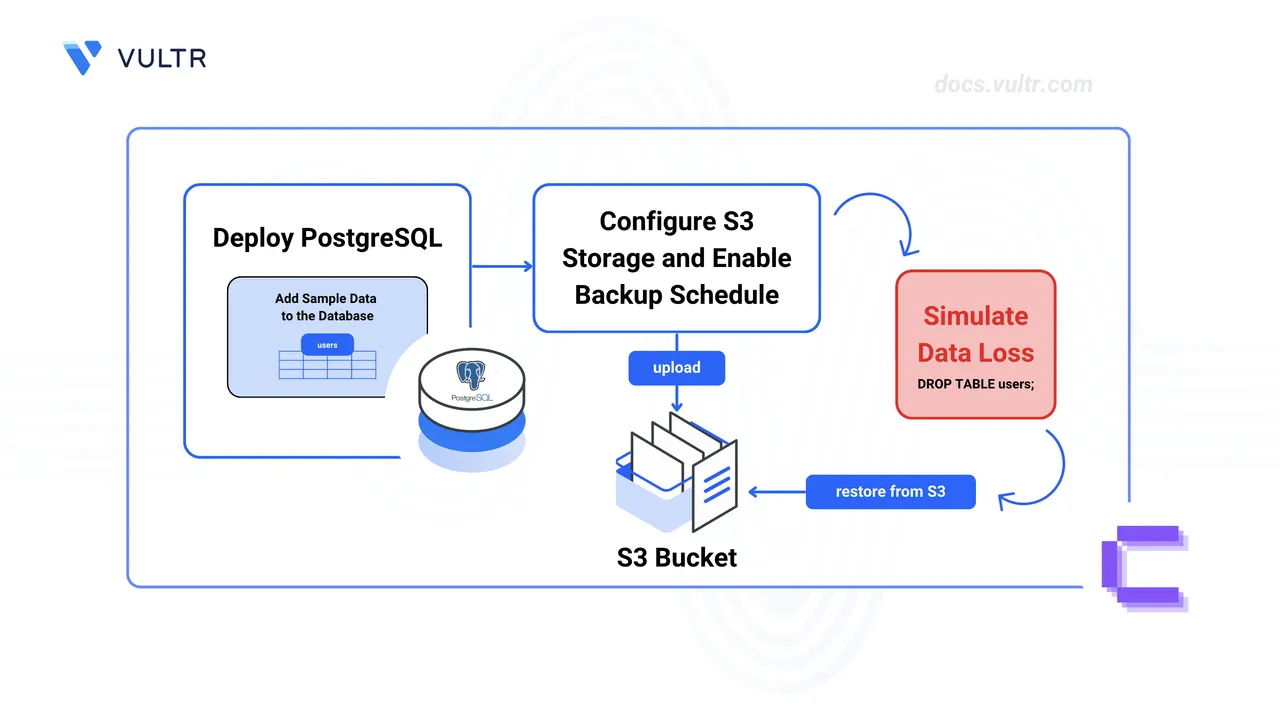
This article explains how to deploy a PostgreSQL database on Coolify, configure scheduled backups to S3-compatible storage, and restore the database from a backup file. It covers sample data creation, data loss simulation, and verification of the restored database.
Prerequisites
Before you begin, you need to:
- Have access to a Linux-based server (with at least 2 CPU cores and 4 GB of RAM) as a non-root user with sudo privileges.
- Install Coolify on the server.
- Have access to an S3-compatible storage service (such as Vultr Object Storage, AWS S3, Wasabi, Backblaze B2, or MinIO).
Deploy PostgreSQL in Coolify
Coolify manages databases as resources within projects. Each project can contain multiple services that share networking and configuration settings.
Open your Coolify dashboard at
http://SERVER-IP:8000. ReplaceSERVER-IPwith your server's IP address. Log in with your admin account.Under Projects, click Add to create a new project.
Name the project (such as Pg Backup) and click Continue to finish creating the project.
Click Add New Resource to create a new resource.
Under Databases, select PostgreSQL.
In the Select a PostgreSQL type screen, select PostgreSQL (the standalone option with the elephant logo, not the PostgreSQL with Supabase or pgVector variants).
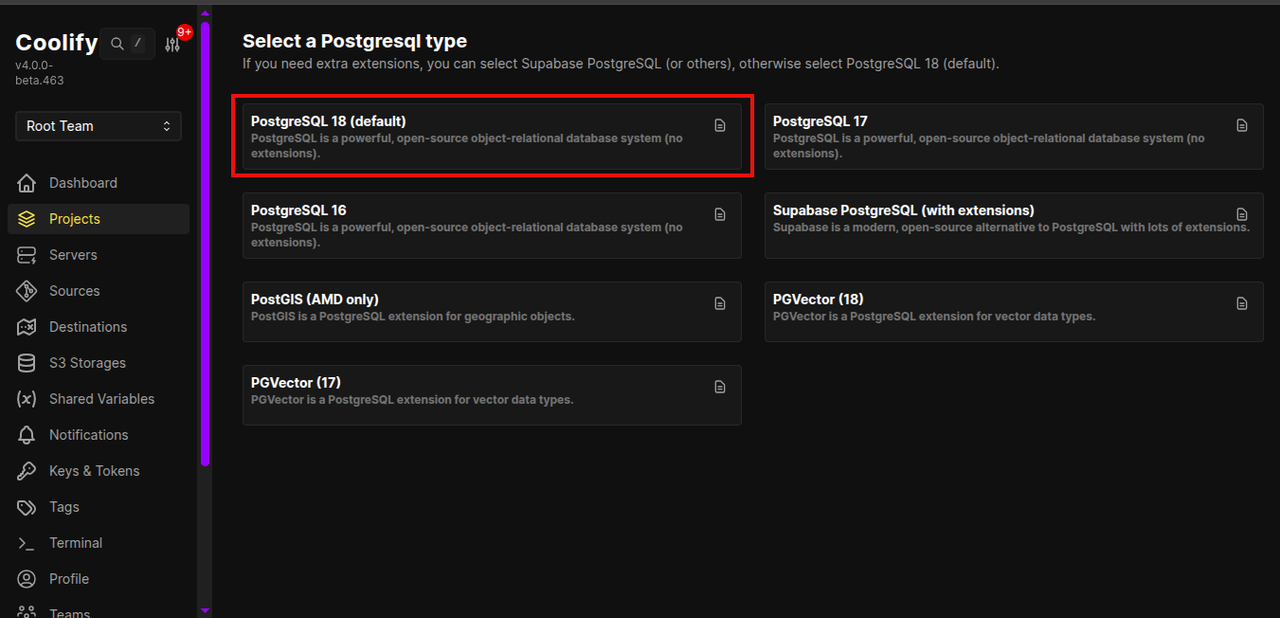
Click Start to deploy the PostgreSQL database.
Add Sample Data to the Database
PostgreSQL stores data in tables that contain rows and columns. Creating sample data provides a baseline to verify that backups capture the database state correctly.
In the PostgreSQL resource dashboard, navigate to the Terminal tab.
Connect to the database using the psql client.
console$ psql -U postgres
Output:
psql (18.2)
Type "help" for help.

postgres=#
Create a sample table.
psqlpostgres=# CREATE TABLE users ( id SERIAL PRIMARY KEY, name VARCHAR(100), email VARCHAR(100) );
Insert sample data.
psqlpostgres=# INSERT INTO users (name, email) VALUES ('John Doe', 'john@example.com'); postgres=# INSERT INTO users (name, email) VALUES ('Jane Smith', 'jane@example.com');
Query the table to verify the data insertion.
psqlpostgres=# SELECT * FROM users;
Output:
 id |    name    |      email
----+------------+------------------
  1 | John Doe   | john@example.com
  2 | Jane Smith | jane@example.com
(2 rows)
Configure Scheduled Backups to S3-Compatible Storage
Coolify uses cron-based schedules to create database dumps and upload them to S3-compatible storage. The backup files are compressed with gzip and stored in a structured directory hierarchy.
Set Up S3-Compatible Storage in Coolify
Coolify requires an S3 storage configuration to upload backup files. The configuration stores the endpoint, credentials, and bucket name used for all backup operations.
In your S3 storage provider's dashboard, create a new bucket for database backups (for example,
pg-backups). Note the bucket name, endpoint URL, access key, and secret key.In Coolify, navigate to S3 Storages in the side menu and click Add.
Configure the S3 storage connection with the following values:
- Name: Enter a descriptive name (for example,
Backup Storage). - Description: Add an optional description.
- Endpoint: Enter your S3 provider's endpoint URL (for example,
ewr1.vultrobjects.comfor Vultr,s3.us-east-1.amazonaws.comfor AWS, ors3.wasabisys.comfor Wasabi). - Bucket: Enter the bucket name.
- Region: Enter the bucket's region (for example,
us-east-1). - Access Key: Enter the access key from your S3 provider.
- Secret Key: Enter the secret key from your S3 provider.
- Name: Enter a descriptive name (for example,
Click Validate Connection & Continue to verify and save the configuration.
Enable Backups for the PostgreSQL Service
Each PostgreSQL service in Coolify has its own backup configuration. The schedule determines when backups run, and the storage destination determines where files are saved.
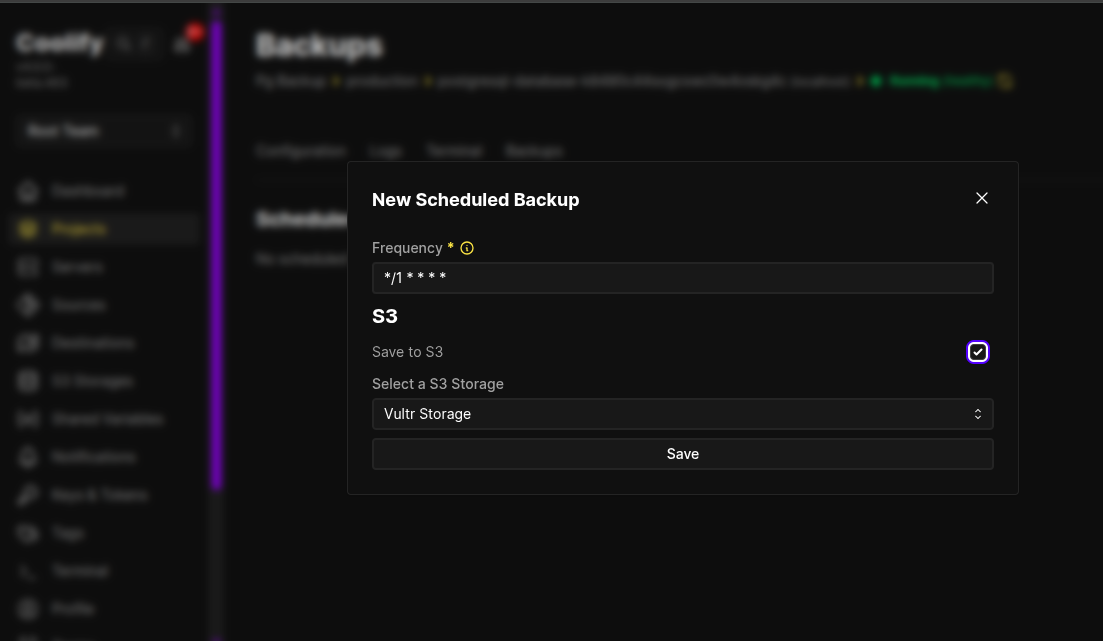
Navigate to the PostgreSQL resource dashboard and select the Backup tab.
Click Add to create the backup schedule.
In the schedule creation form, configure the following:
- Frequency: Set to
*/1 * * * *to run every minute for testing. - Save to S3: Check this checkbox.
- Click Save.
- Frequency: Set to
Click the schedule you created, then under Settings, check the Backup All Databases checkbox and save.
Without this option enabled, the schedule backs up only the defaultNotepostgresdatabase. Additional databases on the server are excluded from the backup.Wait one minute for the first scheduled backup to run. Open the S3 bucket in your provider's dashboard and verify that the backup file appears.
Simulate Data Loss
Dropping a table removes both the table structure and all data it contains. Use this operation to simulate the type of accidental data loss that backups protect against.
Navigate to the Terminal tab in the PostgreSQL resource dashboard. Connect to the database.
console$ psql -U postgres
Drop the
userstable to delete all sample data.psqlpostgres=# DROP TABLE users;
Attempt to query the table to confirm the data loss.
psqlpostgres=# SELECT * FROM users;
Output:
ERROR:  relation "users" does not exist
LINE 1: SELECT * FROM users;
                      ^
Restore the Database from S3-Compatible Storage
Coolify's restore process downloads the backup file from S3 storage, decompresses it, and executes the SQL statements to recreate the database objects and data.
Open the S3 bucket in your provider's dashboard and locate the backup file. Coolify stores backups in a path structure like
data/coolify/backups/databases/.... Click the backup file (for example,pg-dump-all-1771242721.gz) to view its details.
Copy the object key (the path portion without the bucket name). For example, if the full path is:
pg-bucket/data/coolify/backups/databases/root-team-0/postgresql-database-k8480c44sogcswc0w4oskg4c-k8480c44sogcswc0w4oskg4c/pg-dump-all-1771242721.gzThe object key is:
data/coolify/backups/databases/root-team-0/postgresql-database-k8480c44sogcswc0w4oskg4c-k8480c44sogcswc0w4oskg4c/pg-dump-all-1771242721.gzIn the PostgreSQL resource dashboard, navigate to the Configuration tab and scroll to the Import Backup section.
Under Choose Restore Method, click Select from S3.
Under Restore from S3, select the S3 storage you configured earlier (for example, Backup Storage).
Under S3 File Path, enter the object key you noted earlier.
For PostgreSQL servers with multiple databases, enable the Backup includes all databases checkbox to restore all databases from the backup file.
Click Check File. A success message confirms the file is accessible. Click Restore Database from S3 to proceed.
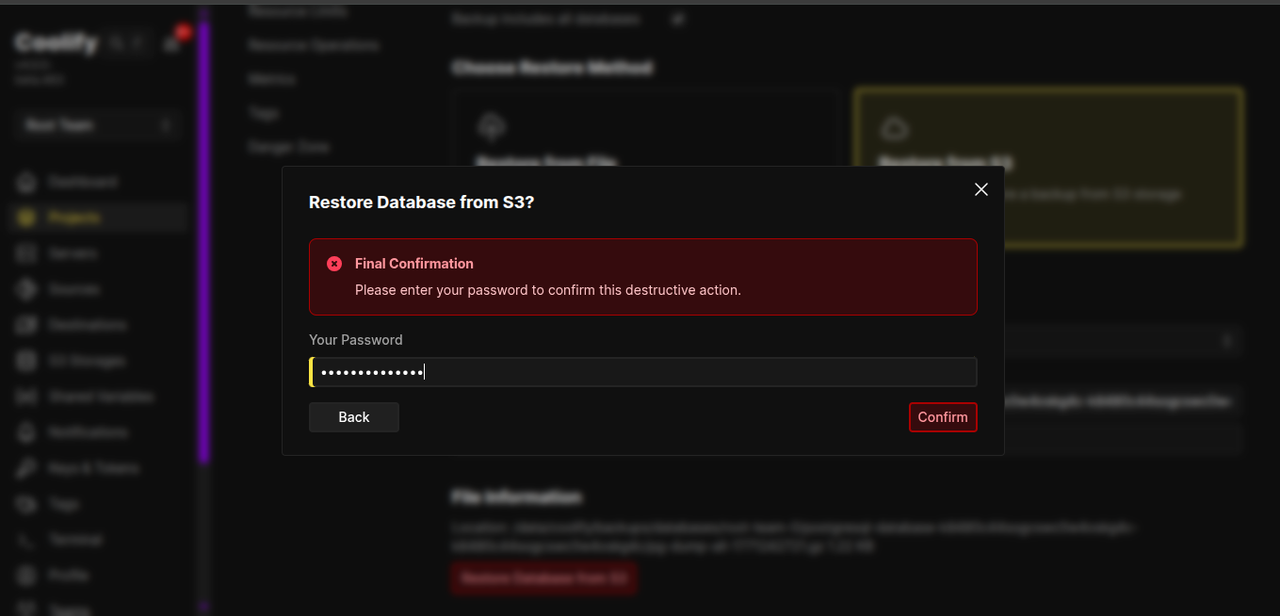
Type the case-sensitive confirmation text exactly as shown and click Continue.
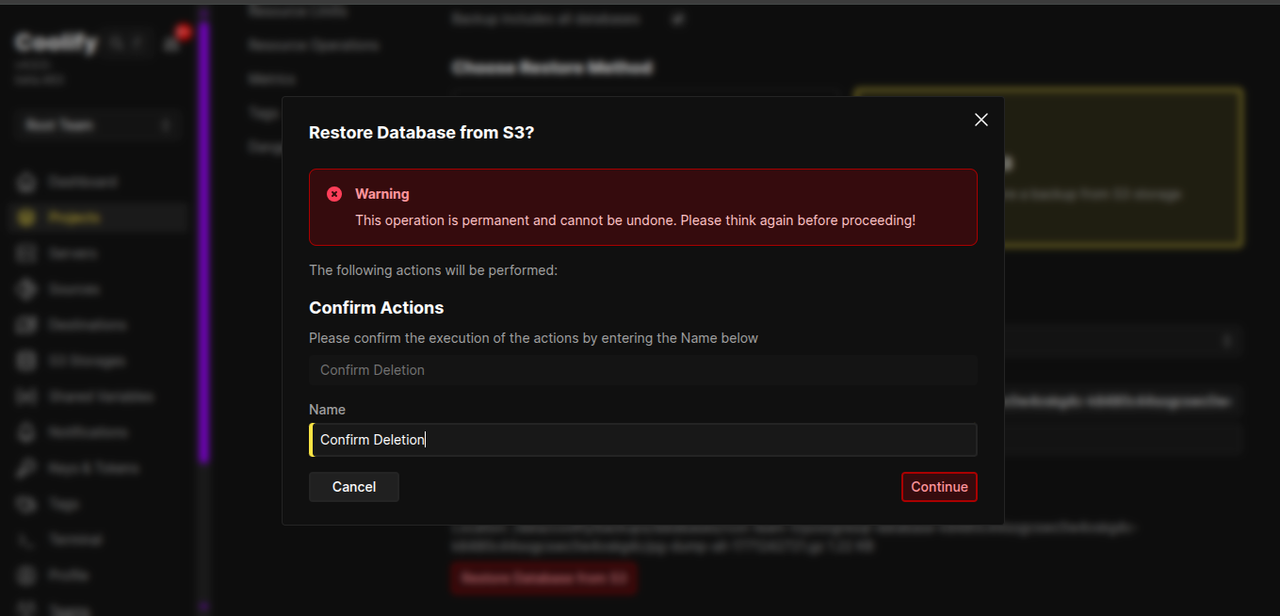
Enter your Coolify password in the prompt, then click Confirm.
Test the Restored Database
Querying the restored data confirms that the backup file captured a complete and consistent snapshot of the database state.
In the Terminal tab, connect to the database using psql.
console$ psql -U postgres
Query the
userstable to verify the restoration.psqlpostgres=# SELECT * FROM users;
Output:
 id |    name    |      email
----+------------+------------------
  1 | John Doe   | john@example.com
  2 | Jane Smith | jane@example.com
(2 rows)
The output matches the original data, confirming the backup captured the complete database state before the table was dropped.
Conclusion
You have configured automated PostgreSQL backups to S3-compatible storage in Coolify, created sample data, simulated data loss, and restored the database from the backup file. This configuration provides data protection against accidental deletions and storage failures. For more information about Coolify's backup features, visit the official Coolify documentation.