How to Boost WordPress Performance with Vultr Managed Databases for Caching

Introduction
Redis® is an open-source NoSQL in-memory database that can work as an object caching solution for Content Management Systems (CMS) such as WordPress. Object caching stores database query results and delivers them faster the next time a user makes similar requests to the site. This caching boosts WordPress performance as the MySQL database response time commonly dictates how fast content gets served to the user.
Follow the steps in this article to boost your WordPress site performance with Vultr Managed Databases for Caching.
Prerequisites
Before you begin:
Install the WordPress Redis® Plugin
Redis® Object Cache is a persistent object cache plugin that stores data directly in an existing Redis® database. To use Redis® on WordPress, install and activate the plugin as described in the following steps.
Using a web browser, log in to your WordPress backend dashboard with your administrative user account.
https://example.com/wp-adminOn the left navigation bar, find and click Plugins.
On the Plugins page, click Add New.
Enter the keyword
Redis® Object Cachein the Search Plugins bar.In the search results, find Redis® Object Cache, and click Install Now.
When the installation is complete, click Activate to make the plugin ready.
Configure the Redis® Object Cache to work with Vultr Managed Databases for Caching
To integrate the WordPress Redis® Object Cache plugin with your Vultr Managed Database for Caching, you need to edit your site's wp-config.php file and add new configurations as described in this section.
Use SSH to access your WordPress server as a non-root user with sudo privileges. Replace
192.0.2.1with your actual server's IP address.$ ssh user@192.0.2.1Install the PHP Redis® extension.
For Ubuntu or Debian:
$ sudo apt install php-redisFor CentOS or Rocky Linux:
$ dnf install php-redisSwitch to your WordPress web root directory. Usually,
/var/www/htmlor/var/www/public_html.$ cd /var/www/htmlList files to verify that all WordPress files are available within the directory.
$ ls -lBack up the
wp-config.phpfile.$ sudo cp wp-config.php wp-config.ORIGUsing a text editor of your choice, open and edit the
wp-config.phpfile.$ sudo nano wp-config.phpAdd the following configurations at the top of the file just below
<? php.define('WP_REDIS_SCHEME', tls ); define( 'WP_REDIS_HOST', 'vultr-prod-a25-ab05-e71-vultr-prod-8c01.vultrdb.com' ); define( 'WP_REDIS_PORT', 16752 ); define( 'WP_REDIS_PASSWORD', 'AVNS_A********' ); define( 'WP_REDIS_DATABASE', 0 ); define( 'WP_REDIS_TIMEOUT', 1 ); define( 'WP_REDIS_READ_TIMEOUT', 1 ); define( 'WP_REDIS_RETRY_INTERVAL', 3 );Edit all values to match your actual Vultr Managed Database for Caching Cluster details. Below is what each of the configuration lines does:
WP_REDIS_SCHEME: Specifies the connection protocol for communications with the Redis® Database. WP_REDIS_HOST: The Vultr Managed Database for Caching Host URL. WP_REDIS_PORT: Specifies the Redis® cluster port. WP_REDIS_PASSWORD: Redis® password to authenticate with the cluster. WP_REDIS_DATABASE: Specifies the Redis® database to associate with your WordPress. Database values range between 0 to 15. WP_REDIS_TIMEOUT: The amount of time in seconds a connection to the Redis® database should wait before timing out (failing). WP_REDIS_READ_TIMEOUT: Amount of time in seconds the plugin should read data from the Redis® database before timing out. WP_REDIS_RETRY_INTERVAL: The time (in milliseconds) the plugin should retry a failed database connection.
Save and close the file.
In a web browser, open your WordPress dashboard.
Navigate to Settings, and click Redis® from the list of options.
Click Diagnostics and verify that your
wp-config.phpchanges display in the log output as below.Status: Drop-in not installed PhpRedis: 5.1.1 Metrics recorded: 0 Filesystem: Working WP_REDIS_SCHEME: "tcp" WP_REDIS_HOST: "vultr-prod-a205-e71-vultr-prod-8c01.vultrdb.com" WP_REDIS_PORT: 16752 WP_REDIS_DATABASE: 0 WP_REDIS_TIMEOUT: 1 WP_REDIS_READ_TIMEOUT: 1 WP_REDIS_PASSWORD: •••••••• Drop-ins: []Navigate to the Overview tab, and click Enable Object Cache to establish a connection to your Vultr Managed Database for Caching.
When successful, the plugin status should change to Connected, and the connection information is displayed in the overview tab.
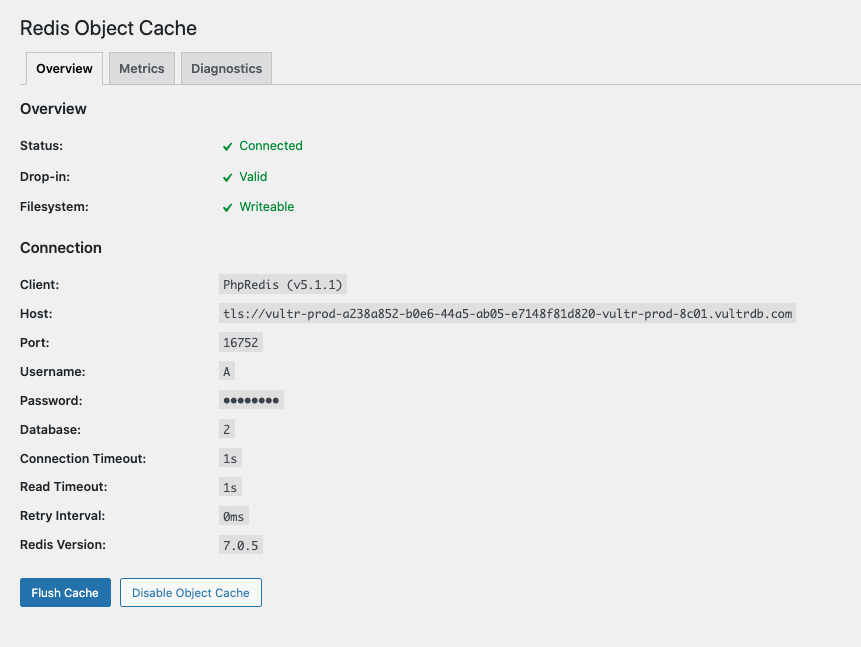
If the plugin status is Not Connected, navigate to Diagnostics for full details on why the connection fails.
To verify that your WordPress requests get cached to the Redis® database. Log in to your Redis® cluster.
$ redis-cli -u rediss://default:[YOUR_PASSWORD]@[-vultrdb.com]:16752Select the WordPress Redis® Database displayed in the plugin connection information. For this article, database
0.> select 0View all keys.
> keys *Your output should look like the one below.
 1)  "wp:posts:last_changed"
 2)  "wp:terms:1"
 3)  "wp:redis-cache:metrics"
 4)  "wp:posts:wp_query-19019c4f7402df31d8711143d3caa1d6-0.77278600 1669223119"
 5)  "wp:comment:get_comments-46612f2dd3b604b784c3eb3dac699d60-0.80307100 1669223119"
 6)  "wp:posts:1"
 7)  "wp:options:can_compress_scripts"
All WordPress request results get cached to the Redis® database and flushed each time you make changes to the website.
Troubleshooting
Depending on your configuration, the Redis® Object Cache plugin may return errors on the Diagnostics page. Below is how you can fix them to connect successfully.
If you encounter this error:
Ping:
Connection Exception: read error on connection to vultr-prod-EXAMPLE.vultrdb.com:16752 (RedisException)
Errors: [
"read error on connection to vultr-prod-EXAMPLE.vultrdb.com:16752"- Verify that you are using the correct connection scheme. By default, Vultr Managed Database for Caching requires TLS/SSL connections.
- Verify that you are using the
tlsconnection scheme in yourwp-config.phpfile.
If you encounter this error:
Ping:
Connection Exception: read error on connection to vultr-prod-a238a852-b0e6-44a5-ab05-e7148f81d820-vultr-prod-8c01.vultrdb.com:16752 (RedisException)
Errors: [
    "Connection refused"
]- Verify that your Redis® cluster details are correct and all
wp-config.phpconfigurations are above any other file configurations just below the<? phpdeclaration.
If you encounter this error:
Ping:
Connection Exception: Redis server went away (RedisException)
Errors: [
Redis server went away"
]- Check that all Redis® configurations are at the top of the
wp-config.phpfile.
Conclusion
You have successfully integrated your WordPress site to a Vultr Managed Database for Caching cluster. Your website performance will improve as users make requests and MySQL database results get cached to your Redis database. For more information on configuring the WordPress Redis® Object Cache, please visit the plugin's official GitHub page.