
How to Build Recommendation System using BERT and NVIDIA NGC
Introduction
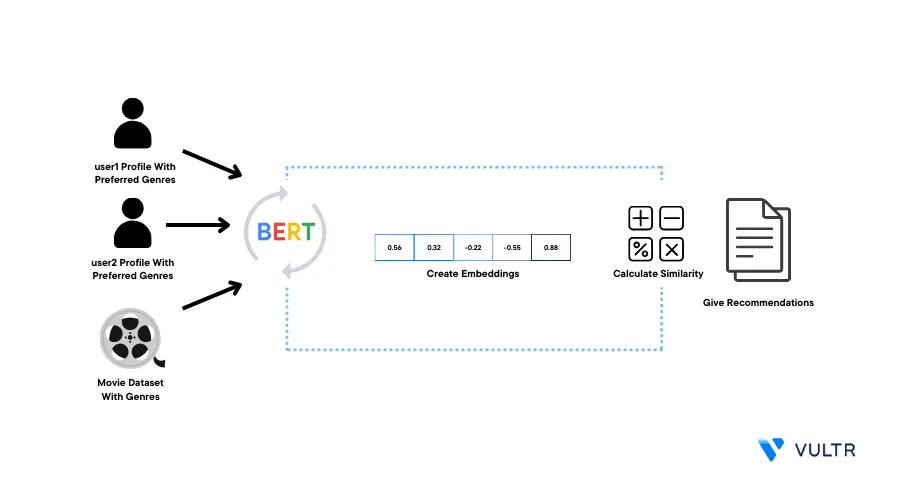
Bidirectional Encoder Representations from Transformers (BERT) is a pre-trained Natural Language Processing Model (NLP) used to understand and generate human language text. Its bidirectional approach allows it to capture the meaning of words more comprehensively. NVIDIA GPU Cloud (NGC) offers a variety of GPU-accelerated containers that take maximum advantage of NVIDIA GPUs and come pre-installed with GPU drivers, libraries, and frameworks that improve development efficiency.
This article explains how to use the NGC PyTorch container with the BERT model to make a movie recommendation system by generating embeddings on a Vultr Cloud GPU Server.
Prerequisites
Before you begin:
- Deploy a Ubuntu A100 Vultr Cloud GPU server.
- Using SSH, access the server
- Create a non-root user with sudo rights and switch to the account
Install the PyTorch GPU Container and Access Jupyter Notebook
Install and run the PyTorch GPU container
$ sudo docker run --gpus all -p 9000:8888 -it -nvcr.io/nvidia/pytorch:23.09-py3The above command installs and runs the GPU-accelerated docker container with the following options:
--gpus all: Allocates all available host GPUs to the container, this makes sure that all GPU resources handle GPU-accelerated tasks-p 9000:8888: Maps the host port9000to the container port8888.--it: Run the container in interactive mode
When successful, verify that you can access the container root shell:
root@workspace #
Run the BERT Model
To run the BERT model on your Cloud GPU server, initialize the BERT model. Then, import the necessary modules, prepare the movie data and user data, create embeddings, and calculate similarity scores to retrieve the top movie suggestions based on user preferences as described in the steps below.
Access your Jupyter Notebook web interface
In the middle top right corner, click the New dropdown to reveal a list of options
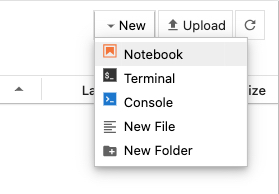
Click Notebook, and select Python 3 (ipykernel) to open a new file
Within the new Notebook file, install
transformersdependency package!pip install transformersThe above command installs
transformerspackage that simplifies the process of working with NLP models.Click Run or press Ctrl + Enter to run the code cell
Import the necessary modules
 import torch
 from transformers import BertTokenizer, BertModel
 import numpy as np
The above command imports the following modules:
BertTokenizerfor tokenizationBertModelfor inferencenumpyfor mathematical calculations
Initialize the model
 model_name = "bert-base-uncased"
 tokenizer = BertTokenizer.from_pretrained(model_name)
 model = BertModel.from_pretrained(model_name)
The above command initializes the
bert-base-uncasedmodel and its tokenizerPrepare the movies data
 movie_data = [
     {"name": "Avengers", "genres": ["Action", "Adventure"]},
     {"name": "Social Network", "genres": ["Suspense", "Drama"]},
     {"name": "Intersteller", "genres": ["Sci-Fi", "Suspense", "Thriller"]},
     {"name": "Iron Man", "genres": ["Action", "Drama", "Adventure"]},
     {"name": "Lights Out", "genres": ["Horror", "Mystery"]},
 ]
The above command prepares a dataset of movies along with the genres the movies belong to. You can add as many movies as you require and genre tags for a particular movie to match your needs.
Prepare the user profiles
 user_preferences = {
 "user1": ["Action", "Adventure", "Sci-Fi"],
 "user2": ["Drama", "Suspense", "Mystery"],
 "user3": ["Adventure", "Horror"],
 }
The above command creates three user profiles along with preferences for each user. This assists the model in matching which movies are best suitable to suggest by calculating the similarity of the embeddings you created earlier.
Encode the movie names
encoded_data = [tokenizer.encode(movie["name"], add_special_tokens=True) for movie in movie_data]The above command processes each movie name through a tokenizer to represent it numerically. Then, it stores the numerical data in a list of encoded movie names
encoded_data.Generate embeddings from the encoded data
 embeddings = []
 for input_ids in encoded_data:
     input_ids = torch.tensor(input_ids).unsqueeze(0)
     with torch.no_grad():
         last_hidden_states = model(input_ids)[0]
     avg_embedding = torch.mean(last_hidden_states, dim=1)
     embeddings.append(avg_embedding.numpy())
The above command processes each encoded movie name through a PyTorch model for computing average embeddings and stores them in the
embeddingslist. The list is then used in the similarity calculations.Calculate the similarity score
 def genre_similarity(user_preferences, movie_genres):
     intersection = set(user_preferences).intersection(set(movie_genres))
     return len(intersection) / (len(user_preferences) + len(movie_genres) - len(intersection))
The above command defines a
genre_similarityfunction that calculates the similarity score between a user's genre preference and a movie's genre. The score represents the overlap between a user's preference and the movie genres.Select the user
 target_user = input("Specify User: ")
 user_genre_preferences = user_preferences[target_user]
 recommendations = []
The above command sets a condition that prompts you to enter the user's name you want to retrieve the movie recommendations.
Generate movie recommendations
 for movie_index, movie_info in enumerate(movie_data):
     movie_genres = movie_info["genres"]
     similarity = genre_similarity(user_genre_preferences, movie_genres)
     recommendations.append((movie_info["name"], similarity))
The above command generates movie recommendations for the specified user based on the
similaritybetween the user's genre preference and the genre for each movie. Then, all the recommendations get stored in therecommendationslist.Print the results
 recommendations.sort(key=lambda x: x[1], reverse=True)
 top_n = int(input("# of Recommendations: "))
 print(f"\nTop {top_n} recommendations for '{target_user}' based on genre similarity:\n")
 for recommendation, similarity in recommendations[:top_n]:
     print(f"Name: {recommendation}, Similarity: {similarity:.4f}")
The above command sorts the movie recommendations in an ascending list based on similarity scores. Then it prompts you to enter the number of recommendations you want and prints the
top_nnumber of movies along with similarity scores.
Conclusion
You have built a BERT-based movie recommendation system on a Vultr Cloud GPU server. You created the system using embeddings and calculating similarity scores between different movie genres and user preferences within the PyTorch NGC GPU accelerated container. For more information, visit the following documentation resources: