How to Connect to a Linux Cloud Server from your Windows Desktop

Introduction
Connecting to a Linux server for the first time may seem confusing, especially if you have a strong Windows background. SSH allows you to establish a secure connection between your computer and the Linux server and manage it remotely.
This article explains how to use PuTTY and OpenSSH client on Windows to connect to a Linux server.
In the end of this tutorial, you know:
- How to install PuTTY and OpenSSH client on Windows
- How to connect to the server using password authentication
- How to create public and private key pairs
- How to connect to the server using public key authentication
- How to enhance the security of your Linux server
Prerequisites
- A Windows workstation
- A Linux server instance
Get Your Linux Server Credentials
- Navigate to your Customer Portal
- Click "Products"
- Click your instance.
- Copy your credentials
- IP Address
- Username
- Password
Install PuTTY
PuTTY is an open-source SSH and Telnet client for Windows which is available for all versions of Windows.
- Download PuTTY from the official website.
- Run the PuTTY installer to install PuTTY.
Connect to The Server with PuTTY Using Password
Open up the Windows Start menu, search for "PuTTY" and launch the application.
Enter the following information into the window named "PuTTY Configuration"
- Host Name (or IP address) - this is the IP address of your Vultr server
- Port - the default port for SSH is 22. See the "Server hardening" section if you want to change the default port.
Click "Open" to start the connection
In the "PuTTY Security Alert" dialog, choose "Accept". You can check the message in the dialog for more information about the security alert.
Enter your username from the previous step. Here is an example result
login as: rootCopy the password from the previous step. Paste the password by clicking the right mouse on the terminal. Here is an example result. The password is not visible.
root@149.28.148.36's password:You are now logged into your server. Here is an example result with a Ubuntu 22.04 server.
 login as: root
 root@149.28.148.36's password:
 Welcome to Ubuntu 22.04 LTS (GNU/Linux 5.15.0-25-generic x86_64)

  * Documentation:  https://help.ubuntu.com
  * Management:     https://landscape.canonical.com
  * Support:        https://ubuntu.com/advantage

   System information as of Sat Apr 23 09:49:11 AM UTC 2022

   System load:  0.0                Processes:               134
   Usage of /:   27.0% of 24.41GB   Users logged in:         0
   Memory usage: 23%                IPv4 address for enp1s0: 149.28.148.36
   Swap usage:   0%

 0 updates can be applied immediately.

 root@vultr:~#
Type
exitthen pressEnterto log out of your server.
Install OpenSSH Client on Windows
OpenSSH Client is another option to connect to your server through SSH included in Windows 10 and Windows Server 2019.
Open up the Windows Start menu, search and open "Manage optional features".
Check the list "Installed features" to see if "OpenSSH client" is already installed.
Click "Add a feature". Find "OpenSSH Client", then click "Install".
Open Command Prompt
Check OpenSSH version:
$ ssh -V
The result should be like:
OpenSSH_for_Windows_8.1p1, LibreSSL 3.0.2Connect to The Server with OpenSSH Using Password
Open Command Prompt or Windows PowerShell
Run the following command to connect to your server. Replace
rootwith your server username. Replaceservernamewith the IP address of your server.$ ssh root@servernameAfter connected, answer
yeswhen you get a message like:The authenticity of host '149.28.148.36 (149.28.148.36)' can't be established. ECDSA key fingerprint is SHA256:ZbS/36vzv0lEzwkSkFGwA8A7gh/GWGFaQFeeC7fPAcY. Are you sure you want to continue connecting (yes/no/[fingerprint])?Copy the password from the previous step. Paste the password by clicking the right mouse on the terminal. Here is an example result. The password is not visible.
root@149.28.148.36's password:You are now logged into your server. Here is an example result with a Ubuntu 22.04 server.
 login as: root
 root@149.28.148.36's password:
 Welcome to Ubuntu 22.04 LTS (GNU/Linux 5.15.0-25-generic x86_64)

  * Documentation:  https://help.ubuntu.com
  * Management:     https://landscape.canonical.com
  * Support:        https://ubuntu.com/advantage

   System information as of Sat Apr 23 09:51:22 AM UTC 2022

   System load:  0.0                Processes:               134
   Usage of /:   27.0% of 24.41GB   Users logged in:         0
   Memory usage: 23%                IPv4 address for enp1s0: 149.28.148.36
   Swap usage:   0%

 0 updates can be applied immediately.

 root@vultr:~#
Type
exitthen pressEnterto log out of your server.
Benefits of Public & Private SSH Keys
Public key authentication provides a reliable and secure alternative to the password authentication. It frees the users from remembering complicated passwords.
Public key authentication also allows secured, automated login in countless automation tools.
In public key authentication, the SSH key pairs includes two keys:
- A public key is on the SSH server. Anyone can encrypt the data using the public key. Using the private key is the only way to decrypt the data.
- A private key remains with the user. The user can use a passphrase to protect the private key files from unauthorized access.
In this article, you generate an ED25519 format keypair. Here are some advantages of ED25519 format compared to other formats:
- Small public and private key length for the same level of security.
- Fast key generation and verification.
Create an ED25519 format keypair with PuTTY
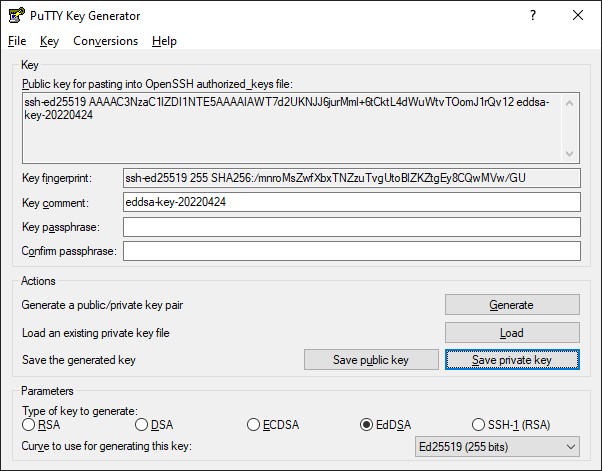
- Open up the Windows Start menu, search for "PuTTYgen" and launch the application.
- Under the "Parameters" section, select "EdDSA". Make sure that the selection box is "Ed25519 (255 bits)"
- Click "Generate".
- Move the mouse over the blank area to generate the keys.
- Click "Save private key" to save the private key. You can set a passphrase to protect the private key from unauthorized access.
- Copy the content of under "Public key for pasting into OpenSSH authorized_keys" file.
The public key is a string as follows:
ssh-ed25519 AAAAC3NzaC1lZDI1NTE5AAAAIAWT7d2UKNJJ6jurMml+6tCktL4dWuWtvTOomJ1rQv12 eddsa-key-20220424The private key is a file with extension .ppk that you need to login to the server.
Here is the content of the generated private key
PuTTY-User-Key-File-3: ssh-ed25519
Encryption: none
Comment: eddsa-key-20220424
Public-Lines: 2
AAAAC3NzaC1lZDI1NTE5AAAAIAWT7d2UKNJJ6jurMml+6tCktL4dWuWtvTOomJ1r
Qv12
Private-Lines: 1
AAAAIGb7S+9kgp96L9HUUY04rgE7laU86BO1scZv8WBSAoo4
Private-MAC: f956dd2563aeb14132be4ea22d22a29ac16733b3285fd07876049226e6774ca5
Create an ED25519 format keypair with OpenSSH on Windows 10 & 11
Open Command Prompt or Windows PowerShell.
Run the following command to generate an ED25519 format key pair. Replace
<comments>with your own comment to organize the keys easier.$ ssh-keygen -t ed25519 -C "<comment>"(Optional) Enter the name of the private key when asked "Enter file in which to save the key".
(Optional) Enter the passphrase to protect the private key from unauthorized access. Leave empty for no passphrase.
Here is an example output
Generating public/private ed25519 key pair.
Enter file in which to save the key (C:\Users\quanh/.ssh/id_ed25519):
Enter passphrase (empty for no passphrase):
Enter same passphrase again:
Your identification has been saved in my-vultr-key.
Your public key has been saved in my-vultr-key.pub.
The key fingerprint is:
SHA256:tmAS/9vfH6prgMC3sZkd2yGxUKW6zN7jgrx2oaX1jmg <comment>
The key's randomart image is:
+--[ED25519 256]--+
|        ....     |
|       . ..      |
|    o   ..o      |
|     = o.+ .     |
|    . *.S = .    |
|     oo&.= .     |
|    . *+= .    . |
|     Eooo= . .. .|
|    oooo=++++....|
+----[SHA256]-----+
Here is the content of the Public key named my-vultr-key.pub:
ssh-ed25519 AAAAC3NzaC1lZDI1NTE5AAAAILuIiHMAsxs5KEfZp6JTp+qP2oqRLqryI0Yc8Ksan9Ft my-vultr-keyHere is the content of the Private key named my-vultr-key:
-----BEGIN OPENSSH PRIVATE KEY-----
b3BlbnNzaC1rZXktdjEAAAAABG5vbmUAAAAEbm9uZQAAAAAAAAABAAAAMwAAAAtzc2gtZW
QyNTUxOQAAACA1qB9J7bfq9x9uxn+y1jmUY6m8h774k6oq1IyRC4nudAAAAJD16Q3I9ekN
yAAAAAtzc2gtZWQyNTUxOQAAACA1qB9J7bfq9x9uxn+y1jmUY6m8h774k6oq1IyRC4nudA
AAAEA/gZuKIFDh6iYkEXYS8N9bl/9w98B6DrpzzHlG8T67EzWoH0ntt+r3H27Gf7LWOZRj
qbyHvviTqirUjJELie50AAAADG15IHZ1bHRyIGtleQE=
-----END OPENSSH PRIVATE KEY-----
Install the Public Key on an Existing Server
Log in to your server using password by following the step at the beginning of this article using PuTTY or OpenSSH Client.
Edit the
~/ssh/authorized_keyswith your favorite text editor. Paste your public key into a new line.nano ~/.ssh/authorized_keysType
exitthen pressEnterto log out of your server.
Install the Public Key on a Server Through the Customer Portal when Deploying
Follow this article to deploy a new server with your SSH key.
Connect to the Server with PuTTY Using SSH Key
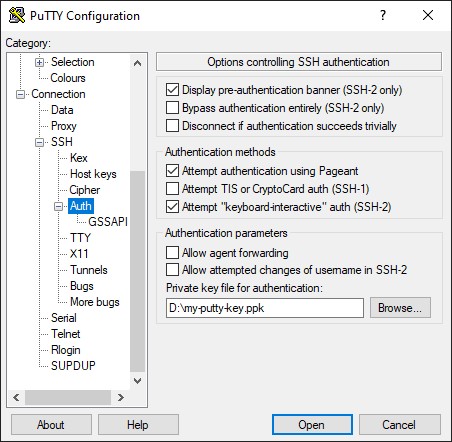
Open up the Windows Start menu, search for "PuTTY" and launch the application.
Enter the following information into the window named "PuTTY Configuration"
- Host Name (or IP address) - this is the IP address of your Vultr server
- Port - the default port for SSH is 22.
On the left sidebar, select "Connection" > "SSH" > "Auth".
Click the "Browser" button and select your private key from PuTTYgen
Click "Open" to start the connection
Enter your username from the previous step. Here is an example result
login as: rootYou are now logged into your server. Here is an example result with a Ubuntu 22.04 server.
 login as: root
 Authenticating with public key "eddsa-key-20220424"
 Welcome to Ubuntu 22.04 LTS (GNU/Linux 5.15.0-25-generic x86_64)

  * Documentation:  https://help.ubuntu.com
  * Management:     https://landscape.canonical.com
  * Support:        https://ubuntu.com/advantage

   System information as of Sun Apr 24 07:33:03 AM UTC 2022

   System load:  0.0                Processes:               134
   Usage of /:   27.2% of 24.41GB   Users logged in:         0
   Memory usage: 23%                IPv4 address for enp1s0: 149.28.148.36
   Swap usage:   0%

  * Super-optimized for small spaces - read how we shrank the memory
    footprint of MicroK8s to make it the smallest full K8s around.

    https://ubuntu.com/blog/microk8s-memory-optimisation

 0 updates can be applied immediately.

 root@vultr:~#
Connect to the Server with OpenSSH Using SSH Key
Open Command Prompt or Windows PowerShell.
If your private key is in the default location (
~/.ssh/id_ed25519) then run the following command to connect to the server. Replacerootwith your server username. Replaceservernamewith the IP address of your server.$ ssh root@servernameIf your private key is in not the default location. Run the following command to connect to the server. Replace
rootwith your server username. Replaceservernamewith the IP address of your server. Replaceprivate_key_pathwith your private key path.$ ssh root@servername -i private_key_path(Optional) Set your private key as default for all servers. Replace
private_key_pathwith your private key path.$ cp private_key_path ~/.ssh/id_ed25519You are now logged into your server. Here is an example result with a Ubuntu 22.04 server.
 Welcome to Ubuntu 22.04 LTS (GNU/Linux 5.15.0-25-generic x86_64)

  * Documentation:  https://help.ubuntu.com
  * Management:     https://landscape.canonical.com
  * Support:        https://ubuntu.com/advantage

   System information as of Sun Apr 24 07:35:01 AM UTC 2022

   System load:  0.0                Processes:               134
   Usage of /:   27.2% of 24.41GB   Users logged in:         0
   Memory usage: 23%                IPv4 address for enp1s0: 149.28.148.36
   Swap usage:   0%

  * Super-optimized for small spaces - read how we shrank the memory
    footprint of MicroK8s to make it the smallest full K8s around.

    https://ubuntu.com/blog/microk8s-memory-optimisation

 0 updates can be applied immediately.

 root@vultr:~#
Server Hardening
Create a sudo User
A best practice for security is to perform server administration as a non-root user.
Follow one of the following article to create a sudo user on your Linux server:
Create a
.sshfolder in the home directory$ mkdir -p ~/.sshEdit the
~/ssh/authorized_keyswith your favorite text editor. Paste your public key into a new line.$ nano ~/.ssh/authorized_keys
Disable Empty Password
Some Linux distributions allow to create users without passwords.
Set the value of PermitEmptyPasswords to no in /etc/ssh/sshd_config file to disable SSH connections with empty passwords.
PermitEmptyPasswords noLimit Users Login Access Using SSH
SSH server allows all users to access remotely. Following below steps to override the default setting and limit users access using SSH
To allow specific users to access using SSH, set the value of
AllowUsersin/etc/ssh/sshd_configfile as follows. Replaceuser1,user2, andubuntuwith your selected usernames.AllowUsers user1 user2 ubuntuTo prevent specific users to access using SSH, set the value of
DenyUsersin/etc/ssh/sshd_configfile as follows. Replaceuser3, anduser4with your selected username.DenyUsers user3 user4
Disable SSH Password Authentication
Follow below steps to disable password authentication to your server.
Make sure you can login using SSH keys
Set the value of
PasswordAuthenticationtonoin/etc/ssh/sshd_configfile to disable password authentication.PasswordAuthentication no
Disable SSH Login for root User
Disabling access for the root user is a good security practice.
Set the value of PermitRootLogin to no in /etc/ssh/sshd_config file to disable log in with root
PermitRootLogin noChange Idle Timeout Interval
Users often keep their SSH connection idle for a long period of time. Setting a timeout after a period of inactivity is a good practice.
Set the value of ClientAliveInterval to your desirable idle timeout in /etc/ssh/sshd_config file. For example, change the timeout value to 360 seconds.
ClientAliveInterval 360Disable Tunneling and Port Forwarding
To disable tunneling and port forwarding, set the following values in /etc/ssh/sshd_config file.
AllowAgentForwarding no
AllowTcpForwarding no
PermitTunnel no
Apply the New SSH Configuration
Check if there is any error in the configuration
$ sudo sshd -tRestart the
sshdservice$ sudo systemctl restart sshd
(Optional) How to Change SSH Default Port 22
Changing the default SSH port is a good practice to avoid unusual traffic to open ports. Before changing the port, you may need to configure the SELinux and the firewall on your system.
Port 2233 is the custom port in this article.
Check if your desirable unused port number is in use
$ sudo lsof -i -P -n | grep LISTENConfigure SELinux to allow the Custom Port for Incoming SSH traffic
Some Linux distributions such as CentOS, RHEL, Alma Linux and Rocky Linux uses SELinux, a built-in security mechanism.
Follow the below steps to configure SELinux to allow your custom port for incoming SSH traffic.
Run the following command to check if your server is using SELinux. Skip this section if you are not using SELinux.
$ sestatusChange to 2233
$ sudo semanage port -a -t ssh_port_t -p tcp 2233Check if SELinux allows the custom port for incoming SSH traffic
$ sudo semanage port -l | grep ssh
The result should looks like:
ssh_port_t tcp 2233, 22How to Open A Port with firewalld
Some Linux distributions use firewalld as the default firewall. You need to open the custom port on firewall.
Check if you are using
firewalld$ sudo systemctl status firewalldOpen the custom port with
firewalld. Replace2233with your custom port.$ sudo firewall-cmd --add-port=2233/tcp --permanentReload the settings
$ sudo firewall-cmd --reload
How to Open A Port with ufw
Some Linux distributions use ufw as the default firewall. You need to open the custom port on firewall.
Check if you are using
ufw$ sudo systemctl status ufwCheck the
ufwstatus$ sudo ufw statusOpen the custom port with
ufw. Replace2233with your custom port.$ sudo ufw allow 2233 comment 'SSH'Enable
ufwif it is not running$ sudo ufw enable
Add a custom Port to the SSH Configuration
Set the value of
Portto your desirable unused port number in/etc/ssh/sshd_configfile. For example, change SSH port to2233Port 2233Restart the
sshdservice$ sudo systemctl restart sshd
Connect to the Server with OpenSSH Using SSH Key on a Custom Port
Add -p port to your ssh command to connect to the server on a custom port. Replace port with your custom port.
$ ssh root@servername -p port