
How to Connect to Vultr Managed Databases for MySQL with Popular Client Apps
Introduction
Vultr Managed Databases for MySQL provide a secure, highly available, and easily scalable solution for hosting your data. However, these databases require client applications that support secure socket layer (SSL) connections. To ensure your data remains secure, this article provides a comprehensive guide to connecting to a Vultr Managed Database using popular client applications, such as MySQL client, MySQL Workbench, PHPMyAdmin, DBeaver, HeidiSQL, Beekeeper Studio, and many others. With these steps, you can use your client application to access and manage your Vultr Managed Database for MySQL securely.
The following values refer to example connection details used in this article:
- Host:
example.vultrdb.com, - Username:
vultradmin - Port:
18140
Please replace the values with your actual connection details from the Vultr Console.
Prerequisites
To complete tasks in this article, you may need to:
- Deploy a Vultr Managed Database for MySQL
- Install your desired client application from the list below on a Vultr Cloud Server or your local workstation.
Then, follow the steps below for your client to connect to the database.
MySQL Client
MySQL Client is the most used command line tool as it's installed with the local MySQL servers. To get started, copy the connection string from the Vultr Console, which looks like this:
$ mysql --host="example.vultrdb.com" --port=18140 --user="vultradmin" --password="your-strong-password"After you connect, verify your SSL connection with the status command. You'll see the connection cipher in the SSL entry if successful.
    mysql> status;
    --------------
    mysql  Ver 8.0.31-0ubuntu2 for Linux on x86_64 ((Ubuntu))

    Connection id:      102
    Current database:
    Current user:       vultradmin@192.0.2.123
    SSL:            Cipher in use is TLS_AES_256_GCM_SHA384

    ...
PHPMyAdmin
PHPMyAdmin is a popular web-based graphical database management tool for MySQL and MariaDB databases. Using the tool, you can connect, create, export, and manage your database with ease. You can install PHPMyAdmin on a cloud server, or locally on your computer through packages such as wamp server and xammp server.
To connect to a Vultr Managed Database for MySQL using PHPMyAdmin. You need to edit the application's main configuration file and add your Vultr database details as described below.
Depending on your PHPMyAdmin installation type, navigate to the
/etc/phpmyadmin/directory.$ cd /etc/phpmyadmin/Verify that the
config.inc.phpfile exists`.$ ls *.phpIf the file does not exist or your server runs a control panel, enter the following command to locate the
phpmyadmindirectory.$ sudo locate phpmyadminSwitch to the directory, and verify that the
config.inc.phpfile is available. For example:$ cd /usr/local/phpmyadmin/On Windows, you can find the PHPMyAdmin folder within your
wamporxamppweb server directory.Edit the
config.inc.phpfile.$ sudo nano config.inc.phpAdd the following Vultr Database configurations at the end of the file.
  $i++;
  $cfg['Servers'][$i]['host'] = 'example.vultrdb.com:18140'; //Vultr host address and port
  $cfg['Servers'][$i]['user'] = 'vultradmin';   //username
  $cfg['Servers'][$i]['password'] = 'ultra-strong-password';  //database password
  $cfg['Servers'][$i]['auth_type'] = 'config';
  $cfg['Servers'][$i]['ssl']=true;
Save and close the file.
In a new web browser window, access the PHPMyAdmin interface.
https://example.com/phpmyadminLog in to PHPMyadmin using your database administrator username and password.
On the left navigation menu, click the Current server: drop-down option, and select your Vultr database from the list.
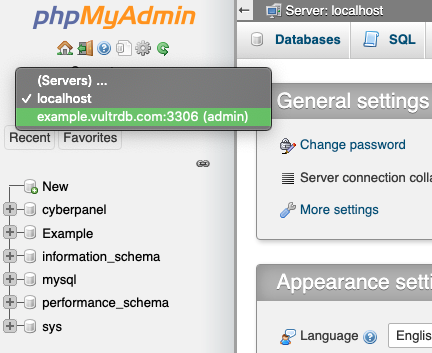
When connected, your Vultr databases display in the Databases section.
Your Vultr Managed Database for MySQL is now connected to PHPMyAdmin, and you can create new user accounts, create new tables, and manage your database within the application interface.
MySQL Workbench
MySQL Workbench is a free graphical database development, administration, and design tool available on Windows, Linux, and macOS. It's used by database developers, architects, and administrators to visually design, generate data, and execute SQL queries on MySQL and MariaDB databases.
To connect your Vultr Managed Database for MySQL using MySQL Workbench, download the latest version from the official website, and install it on your computer.
Open MySQL Workbench from your applications menu.
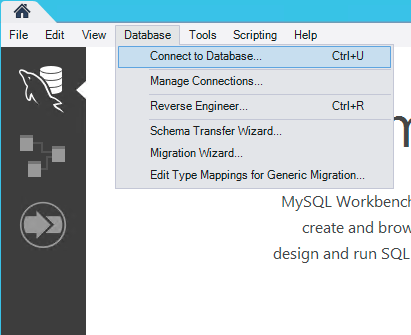
Click Database on the MySQL Workbench top menu bar, and select Connect to Database.
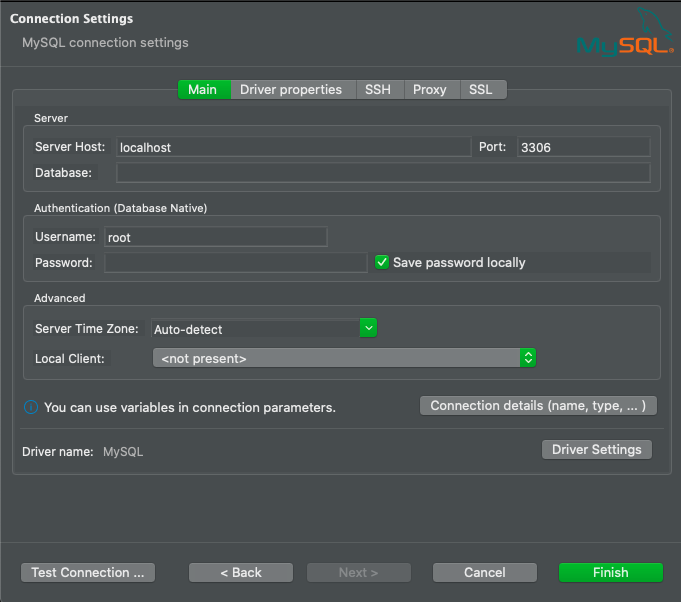
In the open Connect to Database window, keep the Connection Method: set to
Standard (TCP/IP).Enter your Vultr database host address in the Hostname: field and connection port in the Port: field.
Enter the database username, and click Store in Vault to enter the user password.
Keep the Default Schema field empty.
To tighten your database connection, navigate to the SSL tab and select
If availablein the Use SSL drop-down field.Click OK to save changes and connect to your Vultr Managed Database for MySQL.
The MySQL Workbench SQL Editor opens with your database and is ready for use on your computer.
Save the connection to enable it on your computer permanently.
DBeaver
DBeaver is a free, open-source graphical database management tool that supports many SQL database engines such as MySQL, MariaDB, SQLite, and PostgreSQL. It supports cloud data sources, is extensible with extensions, and offers an easy-to-use interface.
To connect your Vultr Managed Database for MySQL using DBeaver, download and install the application from the official website.
Open the DBeaver from your applications list.
Click Database on the top menu bar and select Connect to a database.
Click MySQL from the icon list of database options, and click Next.
In the Server section, enter your Vultr host address in the Server Host: field.
Enter the database connection port in the Port: field.
In the Authentication field, enter your database administrator username and password in the Username: and Password: fields, respectively.
Navigate to the SSL tab, and click Use SSL to enable all secure connection options.
In the Advanced section, deselect the Require SSL: and Verify server certificate options if you have not specified a certificate file for your computer.
Click Test Connection to verify that your details are correct.
When successful, click Finish to save your connection settings.
Your Vultr database displays in the Database Navigator window, double-click it to connect and start managing your database.
CloudBeaver
CloudBeaver is a free, open-source self-hosted database management tool released under the Apache 2.0 license for developers and database users. It supports multiple databases, an SQL editor, a role-based security model, and can migrate to a Kubernetes cluster.
To connect to your Vultr Managed Database for MySQL using CloudBeaver, install the application using docker as listed on the official GitHub instructions page. Then follow the instructions below.
Access the CloudBeaver web interface. Replace the following URL with your actual server address.
http://192.168.0.2:8080In the Connection Management section, click Add.
Click MySQL from the list of database engines.
Within the Driver tab, enter your Vultr database host address, port in the Host and Port fields, respectively.
In the Authentication section, enter your database username and password in the appropriate fields.
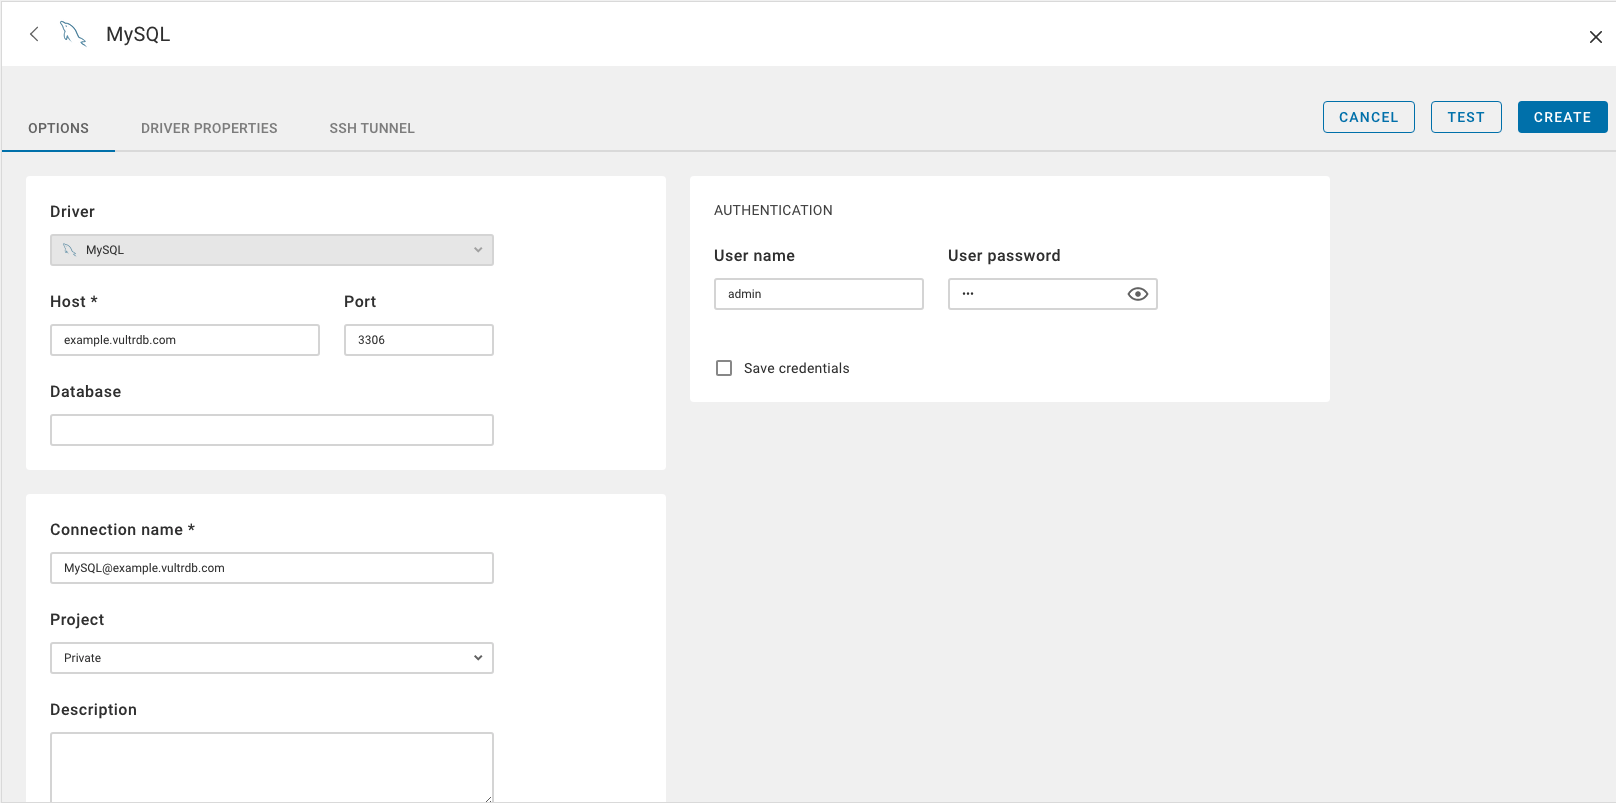
Click Driver Properties and enter
sslin the NAME field.On the useSSL result, click the
truedrop-down, and select Yes.Click Test to verify your database details.
When a connection is established, click Create to permanently add your Vultr database connection.
Navigate to Connection Management, click your Vultr database and establish a connection to start managing the database.
Beekeeper Studio
Beekeeper Studio is a popular SQL database management tool that supports several database engines such as MySQL and MariaDB. It offers features such as SSL connections, an advanced SQL query manager, a multi-tab interface, and data export in multiple formats.
To connect to a Vultr Managed Database for MySQL using Beekeeper Studio, you need to install the latest version from the official website, then follow the steps below.
Open Beekeeper Studio.
In the New Connection tab, click the select connection drop-down field and select
MySQLfrom the list.In the pop-up window, keep MySQL, and keep
Host and Portselected as the connection mode.Enter your Vultr Host address and connection port in the Host and Port fields, respectively.
Toggle the Enable SSL button to ON.
Enter your database username and password in the respective fields. Keep the Default database field empty.
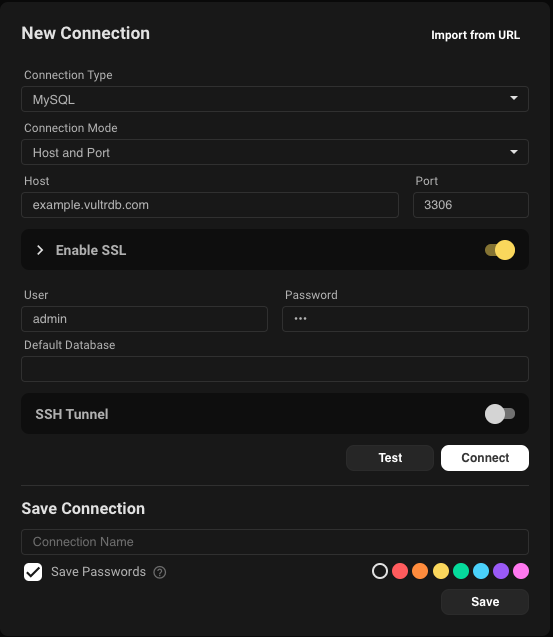
Click Test to verify that your database details are correct.
When successful, enter a custom name in the Save Connection field and click Save to make the database connection permanent.
Click Connect to make a connection to your Vultr Managed Database for MySQL and start managing your database in Beekeeper.
HeidiSQL
HeidiSQL is a free graphical SQL database manager that supports both MySQL and MariaDB Databases. It offers rich features such as SSH tunnel connections, a variables editor, a table editor, full-text search, and a scheduled event manager.
To use HeidiSQL with your Vultr Managed Database for MySQL, you need to download and install the latest version from the official website.
Open HeidiSQL.
In the Session Manager window, click New in the bottom left corner.
Keep MariaDB or MySQL (TCP/IP) selected as the Network type.
Enter your Vultr database host address in the Hostname/IP field.
Enter your database username and password in the respective fields.
Enter your Vultr database port in the Port: field.

Navigate to the SSL tab, and check Use SSL to secure your connection.
Click Save in the bottom left corner to save your connection.
Click Open to establish a connection to your Vultr database and open the SQL query editor.
SQLECTRON
Sqlectron is an open-source lightweight database management tool that offers both a graphical and command line-based interface for database connections. It supports several database engines, offers secure SSL connections, an SQL query manager, and SQL auto-complete feature.
To connect Sqlectron to your Vultr Managed Database for MySQL, you need to download the latest version of the application from the official GitHub repository.
Open Sqlectron from your applications menu.
In the open Servers dialog, click Add to setup a new connection.
Enter your connection name, and select MySQL as the database type.
Toggle the SSL button to ON.
Enter your Vultr host address in the Server Address field, and set the connection port.
Enter a valid database user and password in the respective fields.
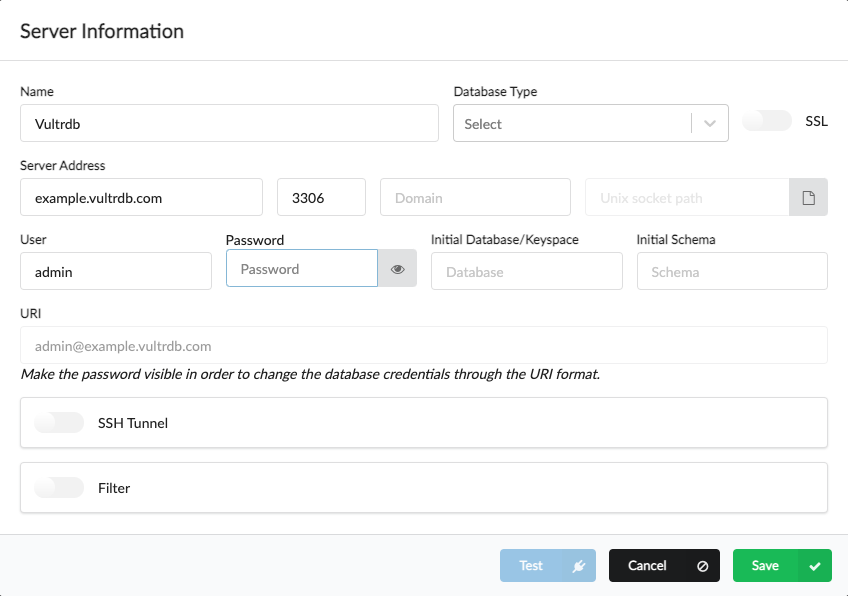
Click Test to verify your database details.
When the connect test is successful, scroll and click Save to make the connection permanent.
Click Connect to establish a connection to your Vultr database and open the SQL query editor.
Navicat for MySQL
Navicat is a paid graphical MySQL database administration and development tool that supports SQL modeling and simultaneous connections to multiple databases. It offers features such as database migration, quick data generation, charts, SSL connections, collaboration, and a visual SQL builder.
To connect to a Vultr Managed Database for MySQL using the Navicat for MySQL application, you need to download the latest version from the official website.
Open Navicat for MySQL from your applications menu.
Click Connection on the main navigation tool bar, and select MySQL from the list of options.
In the New Connection pop-up, give your database connection a name.
Enter your Vultr database host address, and connection port in the respective Host:, and Port: fields.
Enter the Vultr database username and password in the respective fields.
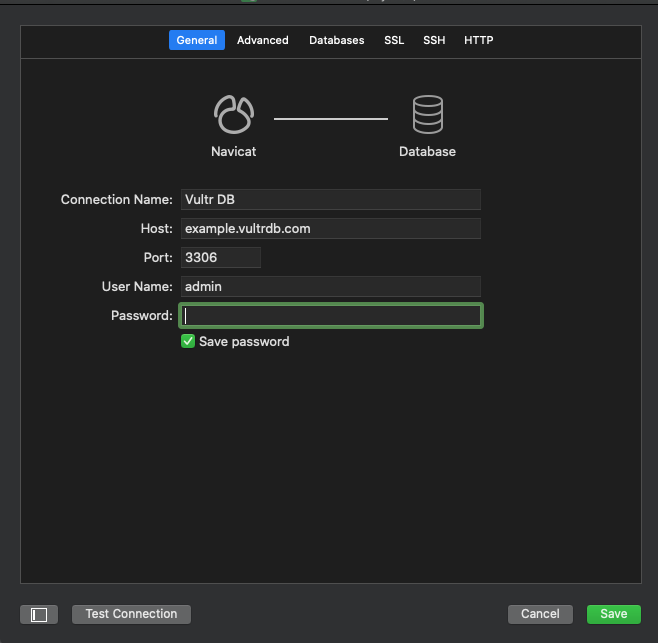
Navigate to the SSL tab, and check use SSL.
Click Test Connection to verify your database details.
When the connection test is successful, click save to add your connection.
Double Click your database connection on the left navigation bar to establish a connection to your Vultr database.
When connected, your Vultr database schema displays in the application.
DbGate
DbGate is a free, open-source graphical SQL database management tool that supports multiple database management and cross-database connections. It supports SSL connections, javascript scripting, rich database design tools, a schema editor, a query editor, and a SQL generator.
To connect DbGate to your Vultr Managed Database for MySQL. Download and install the latest version from the official website and follow the following steps.
Open DbGate from the applications menu.
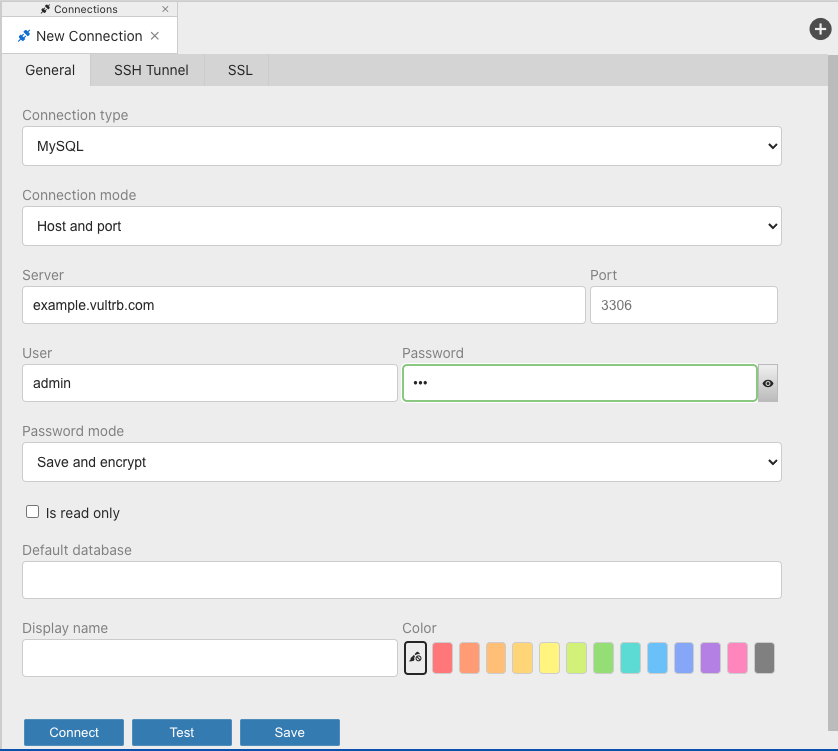
In the New Connection prompt, select MySQL as the connection type.
Keep the connection mode as
Host and Port.Enter your Vultr database host address in the Server field.
Enter the Vultr database port in the Port field.
Enter the Vultr database user and password in the User and Password fields, respectively.
Click the SSL tab, and check Use SSL to ON.
Click Test to verify your database details.
When the connection test is successful, click Save to add your connection permanently.
Click Connect to establish a connection to your Vultr database.
Close the connection dialog and start managing your database from the left navigation Connections tab.