
How to Create a Private Mesh Network with Vultr and Amazon Web Services (AWS) Using Netbird
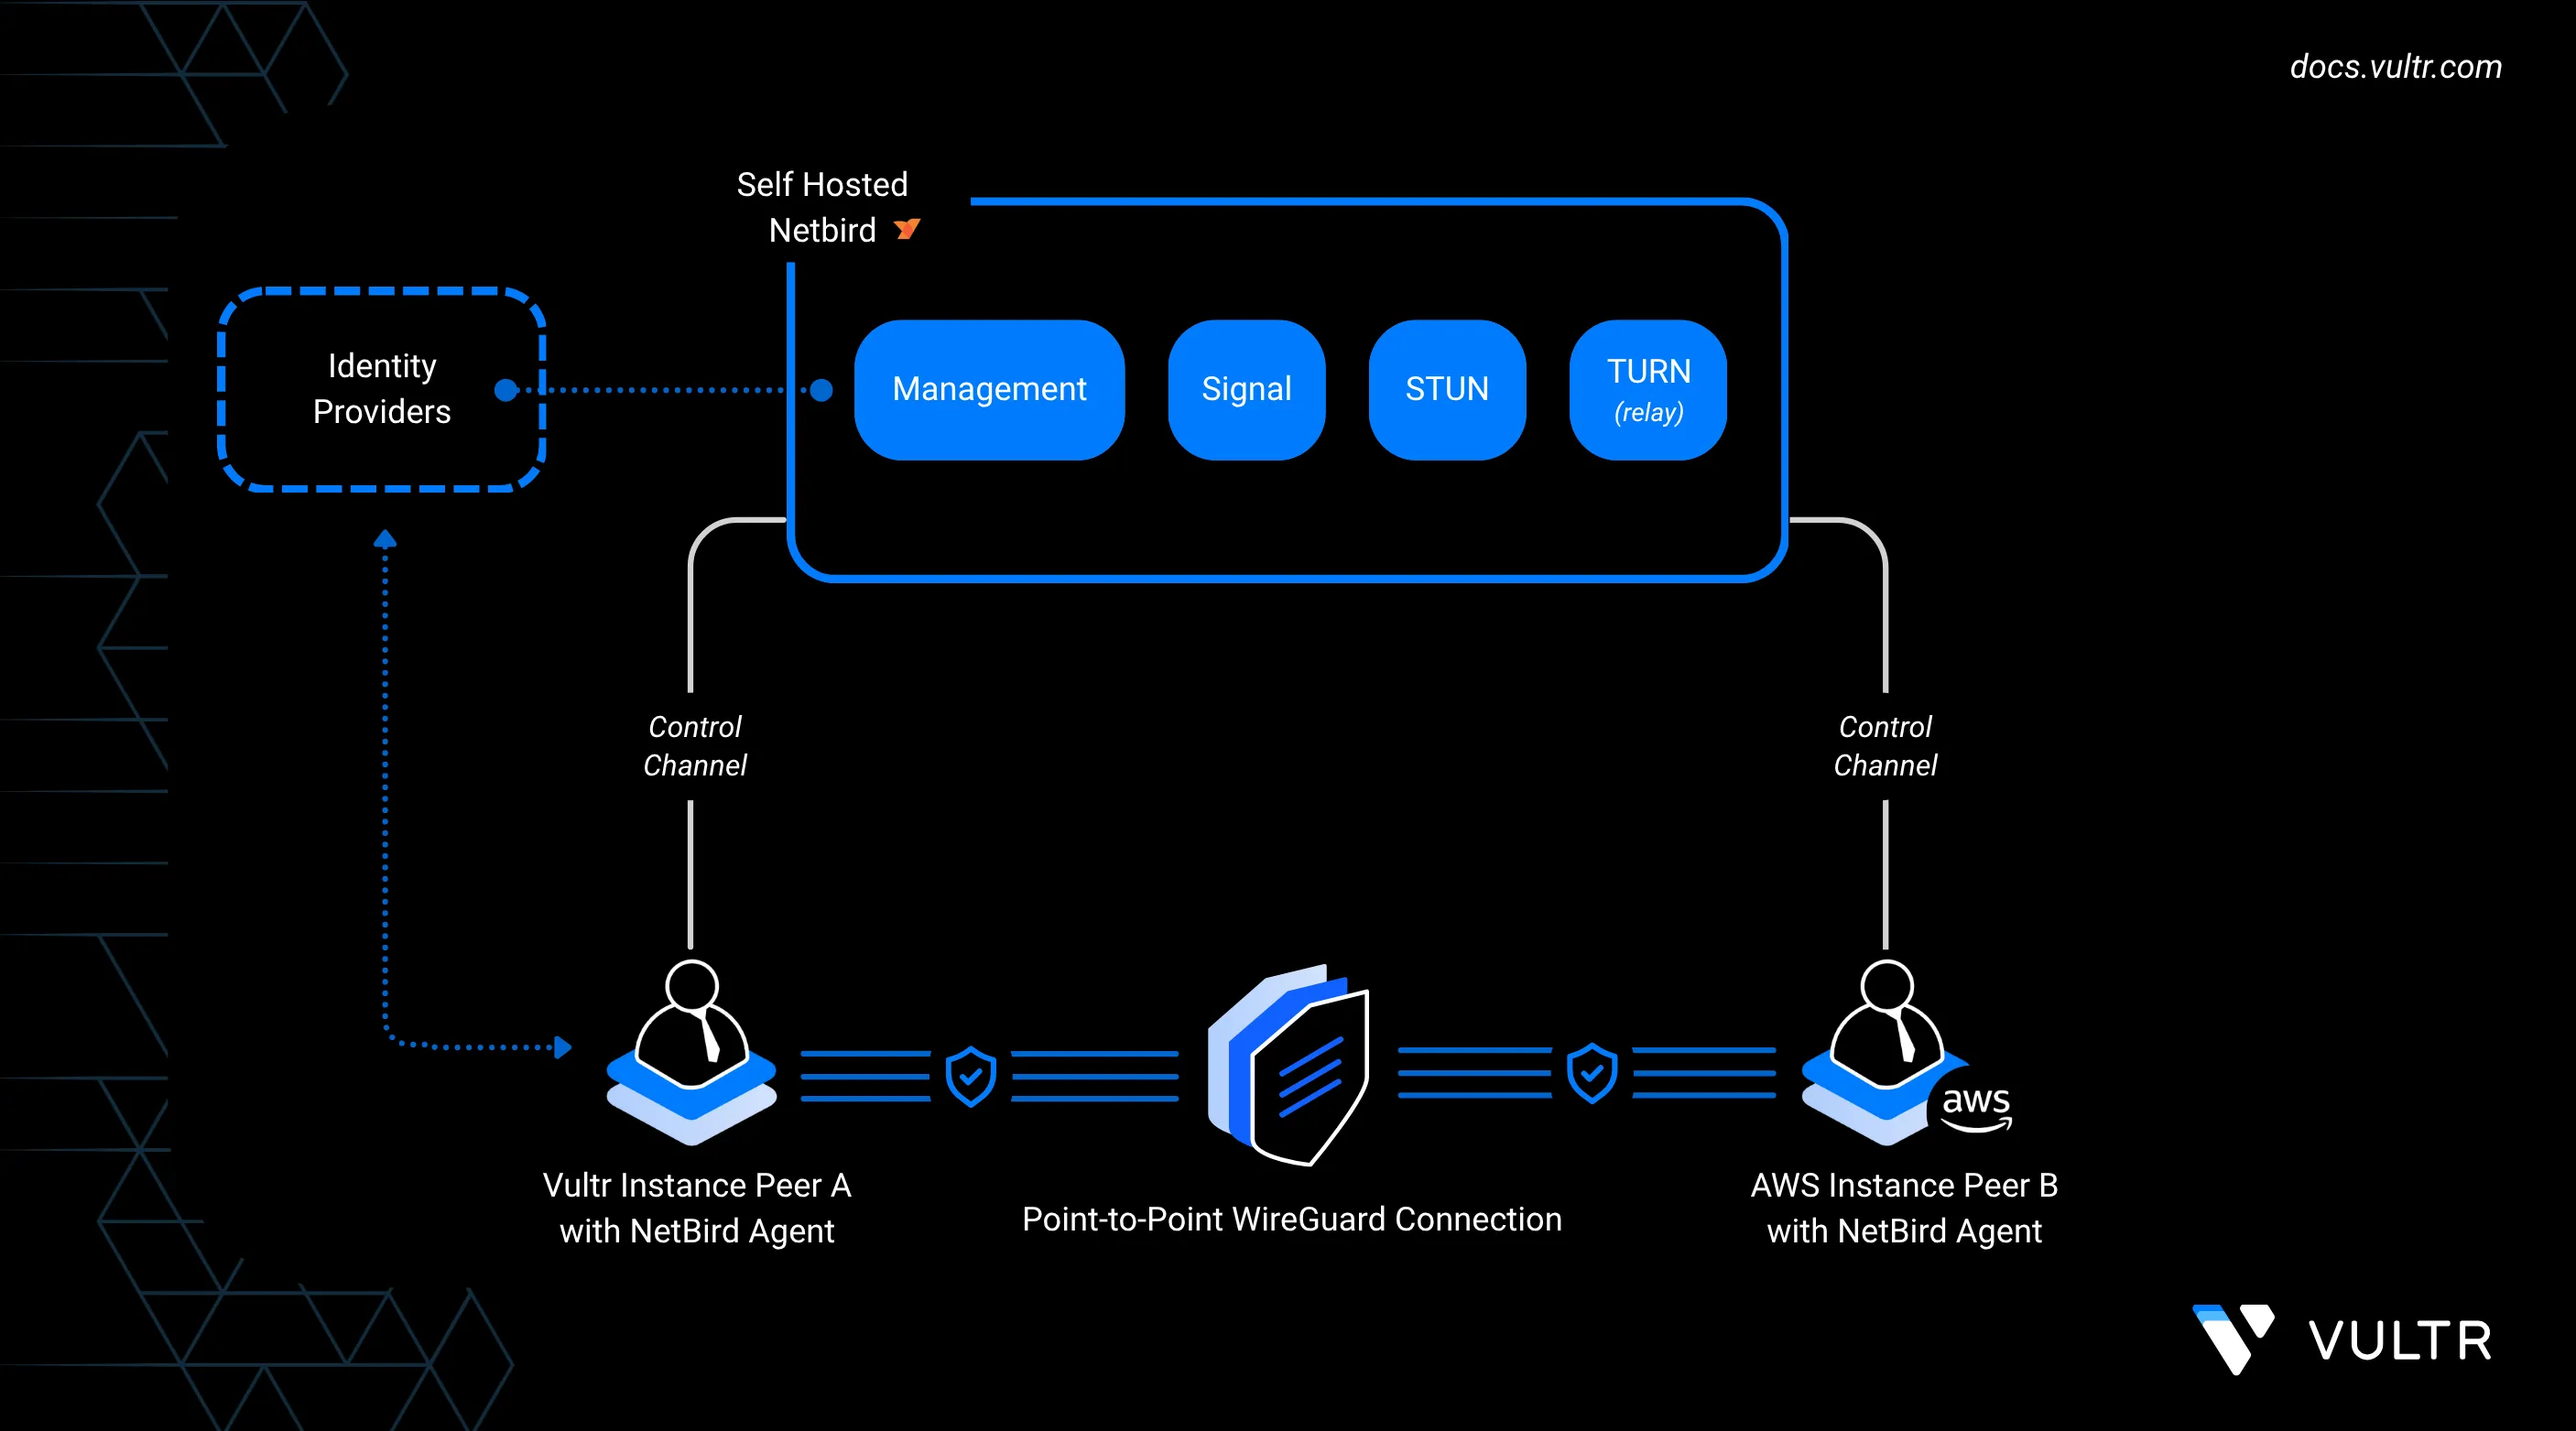
NetBird is an open-source peer-to-peer VPN platform that creates secure, private networks across distributed infrastructure. It builds encrypted mesh networks on top of WireGuard, allowing nodes in different regions or providers to communicate over low-latency private tunnels without manual firewall or port forwarding.
This guide explains how to self-host the NetBird control plane on a Vultr instance and extend the mesh to include an Amazon EC2 server. You provision Vultr and AWS resources, adjust AWS Security Group rules, add peers with setup keys, and verify connectivity. You also configure a Vultr peer as an exit node, routing AWS traffic through Vultr for centralized control and monitoring.
Prerequisites
Before setting up your Vultr–AWS mesh network, make sure you have:
- An Ubuntu-based Vultr instance to host the NetBird control plane.
- Example: deployed in the Delhi (DEL) region.
- This instance needs a domain name with its DNS A record pointing to the public IP, such as
netbird.example.com.
- An additional Ubuntu-based Vultr instance to act as a peer.
- Example: deployed in the Amsterdam (AMS) region.
- An Ubuntu-based Amazon EC2 instance deployed in a region of your choice (for example,
us-east-1), with an Elastic IP (EIP) address attached to it.
Deploy the NetBird Control Plane on Vultr
The control plane is the central service that coordinates peer connections in your NetBird network. In this setup, you host it on a Vultr instance and install the required components with Docker. The deployment brings up the management interface, signaling service, TURN/STUN, and a bundled identity provider (Zitadel).
Open the necessary ports on your Vultr control plane to handle HTTPS, signaling, management, and TURN/STUN traffic.
console$ sudo ufw allow 80/tcp $ sudo ufw allow 443/tcp $ sudo ufw allow 33073/tcp $ sudo ufw allow 10000/tcp $ sudo ufw allow 33080/tcp $ sudo ufw allow 3478/udp $ sudo ufw allow 49152:65535/udp $ sudo ufw reload
Add Docker’s official repository and install Docker Engine, the Compose plugin, and required utilities.
console$ sudo apt update $ sudo apt install ca-certificates curl gnupg lsb-release -y $ sudo install -m 0755 -d /etc/apt/keyrings $ curl -fsSL https://download.docker.com/linux/ubuntu/gpg | sudo gpg --dearmor -o /etc/apt/keyrings/docker.gpg $ echo "deb [arch=$(dpkg --print-architecture) signed-by=/etc/apt/keyrings/docker.gpg] https://download.docker.com/linux/ubuntu $(lsb_release -cs) stable" | sudo tee /etc/apt/sources.list.d/docker.list > /dev/null $ sudo apt update $ sudo apt install docker-ce docker-ce-cli containerd.io docker-buildx-plugin docker-compose-plugin jq -y
Enable and start the Docker service.
console$ sudo systemctl enable --now docker
Add your user to the Docker group so you can run containers without
sudo.console$ sudo usermod -aG docker $USER $ newgrp docker
Verify that the Docker Compose plugin is available.
console$ docker compose version
Run the NetBird installer with your domain set in the
NETBIRD_DOMAINenvironment variable.console$ export NETBIRD_DOMAIN=netbird.example.com $ curl -fsSL https://github.com/netbirdio/netbird/releases/latest/download/getting-started-with-zitadel.sh | bash
ReplaceNotenetbird.example.comwith the domain pointing to your Vultr control plane instance.When the installation finishes, the NetBird dashboard is available at:
https://netbird.example.comCopy the credentials and setup key shown in your terminal before closing it.
Do not close your terminal before copying the setup key and credentials. These values are only shown once during installation.Warning
Configure AWS Security Group for NetBird Peers
Amazon EC2 instances use Security Groups to control inbound and outbound traffic. Before you attach an EC2 peer to your NetBird network, update its Security Group so the instance can reach the Vultr control plane and exchange encrypted traffic.
Log in to the AWS Management Console.
Navigate to EC2.
In the left sidebar, click Instances.
Select the EC2 instance you want to configure.
Click the Security tab in the instance details pane.
Under Security Groups (SG), click the linked Security Group name to view or edit it.
Add rules that allow outbound access to the following ports:
- TCP: 80, 443, 33073, 10000, 33080
- UDP: 3478, 49152–65535
Verify connectivity from the EC2 instance to your Vultr control plane domain.
console$ curl -I https://netbird.example.com
A response such as
200 OKconfirms the peer can reach the control plane.
Add Peers to the NetBird Network
To connect Vultr and AWS servers to your NetBird mesh, use setup keys. Setup keys are pre-authorized tokens that let peers join automatically without requiring an interactive login. See the NetBird Setup Keys documentation for more details.
In the NetBird Admin Panel, go to Setup Keys and click Create Setup Key.
- Assign a descriptive name (for example,
multi-cloud-peers). - Configure usage limits if needed.
- Copy the generated key.
- Assign a descriptive name (for example,
Install the NetBird client on each peer.
console$ curl -fsSL https://pkgs.netbird.io/install.sh | sh
Register the peer with your self-hosted control plane.
console$ sudo netbird up --management-url https://netbird.example.com --admin-url https://netbird.example.com --setup-key <SETUP_KEY>
Replace
<SETUP_KEY>with the copied key.In the Admin Panel, verify that the peer appears online. Rename it to something descriptive, such as
vultr-amsoraws-ec2, and add it to the appropriate group if you plan to configure an exit node later.
Final Verification
After registering both Vultr and AWS peers, confirm that they can communicate securely over the NetBird mesh.
In the Admin Panel, open the Peers tab.
- Both peers should display as Online.
- Each will have a
100.x.x.xNetBird-assigned mesh IP address.
From one peer (for example, your Vultr AMS VM), test connectivity to the AWS EC2 peer using its NetBird mesh IP.
console$ ping 100.x.x.x # Replace with the actual mesh IP of the AWS peer
If the ping succeeds, the private overlay network is working correctly.
Your output should be similar to the one below:
PING 100.100.1.5 (100.100.1.5) 56(84) bytes of data.
64 bytes from 100.100.1.5: icmp_seq=1 ttl=64 time=32.1 ms
64 bytes from 100.100.1.5: icmp_seq=2 ttl=64 time=32.3 ms
Repeat the test in the opposite direction (from AWS EC2 > Vultr peer) to confirm two-way connectivity.
Route Traffic Through an Exit Node
You can configure one peer as an exit node so other peers route their internet traffic through it. In this example, the Vultr AMS instance acts as the exit node, and the AWS EC2 peer forwards its traffic through it.
Designate the Vultr AMS Instance as Exit Node
In the Peers tab of the NetBird Admin Panel, select the peer named
vultr-ams.Scroll down and click Set Up Exit Node.

Enter an identifier such as
ams-exit.
In the Distribution Groups dropdown, select or create a group that will include the AWS peer (for example,
aws-nodes).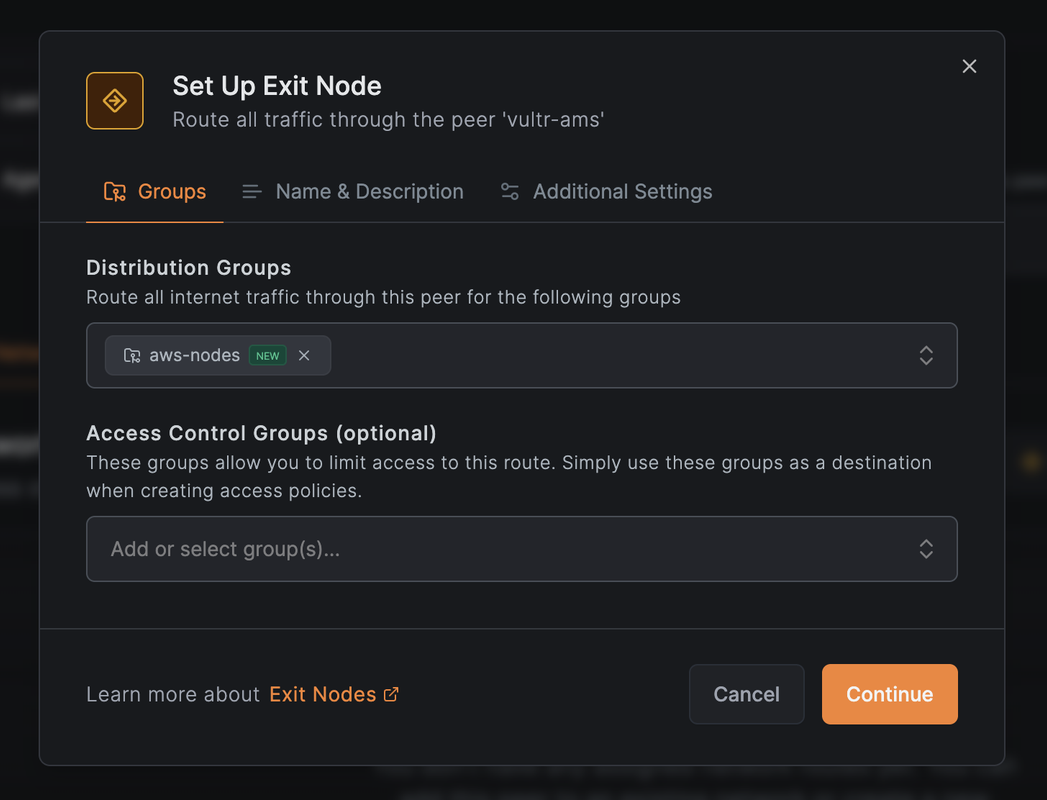
Click Continue and then Save Changes.
The
vultr-amsinstance is now configured as an exit node.
Assign the AWS EC2 Peer to the Distribution Group
- In the Peers view, select the AWS peer (for example,
aws-ec2). - Assign it to the
aws-nodesgroup. - Confirm that it now shows up as part of the peers using
vultr-amsas an exit node.
Verify Routing
To confirm that AWS traffic flows through the Vultr exit node, run the following commands on the AMS-region Vultr peer.
Enable IP forwarding.
console$ sudo sysctl -w net.ipv4.ip_forward=1
Add a MASQUERADE rule to NAT outbound traffic via the correct network interface.
console$ sudo iptables -t nat -A POSTROUTING -o $(ip route get 1.1.1.1 | awk '{print $5}') -j MASQUERADE
Check that forwarding is enabled.
console$ sudo sysctl net.ipv4.ip_forward
Monitor the NAT rule counters.
console$ sudo watch -n1 "iptables -t nat -v -L POSTROUTING"
The output shows a live counter of packets hitting the MASQUERADE rule. The values increase as traffic from the AWS peer passes through the Vultr exit node.
Chain POSTROUTING (policy ACCEPT 200 packets, 15234 bytes) pkts bytes target prot opt in out source destination 78 6210 MASQUERADE all -- any enp1s0 anywhere anywhereIf packet counts do not increase, verify that the AWS peer is assigned to theNoteaws-nodesgroup and ensure its Security Group allows outbound connections.
NetBird Use Cases and Components
Common Multi-Cloud Use Cases
- Hybrid Networking: Link Vultr and AWS environments into a single encrypted overlay without exposing workloads to the public internet.
- Centralized Egress: Route AWS traffic through a Vultr exit node to standardize geo-IP, simplify monitoring, or centralize logging.
- Distributed Application Mesh: Interconnect Kubernetes clusters, VMs, or bare metal across Vultr and AWS into a cohesive private network.
Key Components
- Management Service: Coordinates peer registration and policy enforcement.
- Signal & TURN Server: Provides NAT traversal and relays traffic if direct tunnels are blocked.
- Peer Agent: Lightweight client that creates and maintains WireGuard tunnels.
- Setup Keys: Tokens for non-interactive registration of servers and VMs.
- SSO Integration: Optionally link authentication to providers such as GitHub, Google, or custom OIDC.
Conclusion
In this guide, you deployed a NetBird control plane on Vultr and extended the mesh network to an AWS EC2 instance. You added peers using setup keys, confirmed private connectivity, and configured a Vultr exit node to handle AWS traffic. This configuration enables you to build secure, low-latency multi-cloud networks that connect Vultr and AWS workloads while giving you control over routing, monitoring, and egress.