How to Deploy a Matrix Synapse Chat Server with Element on Ubuntu 22.04
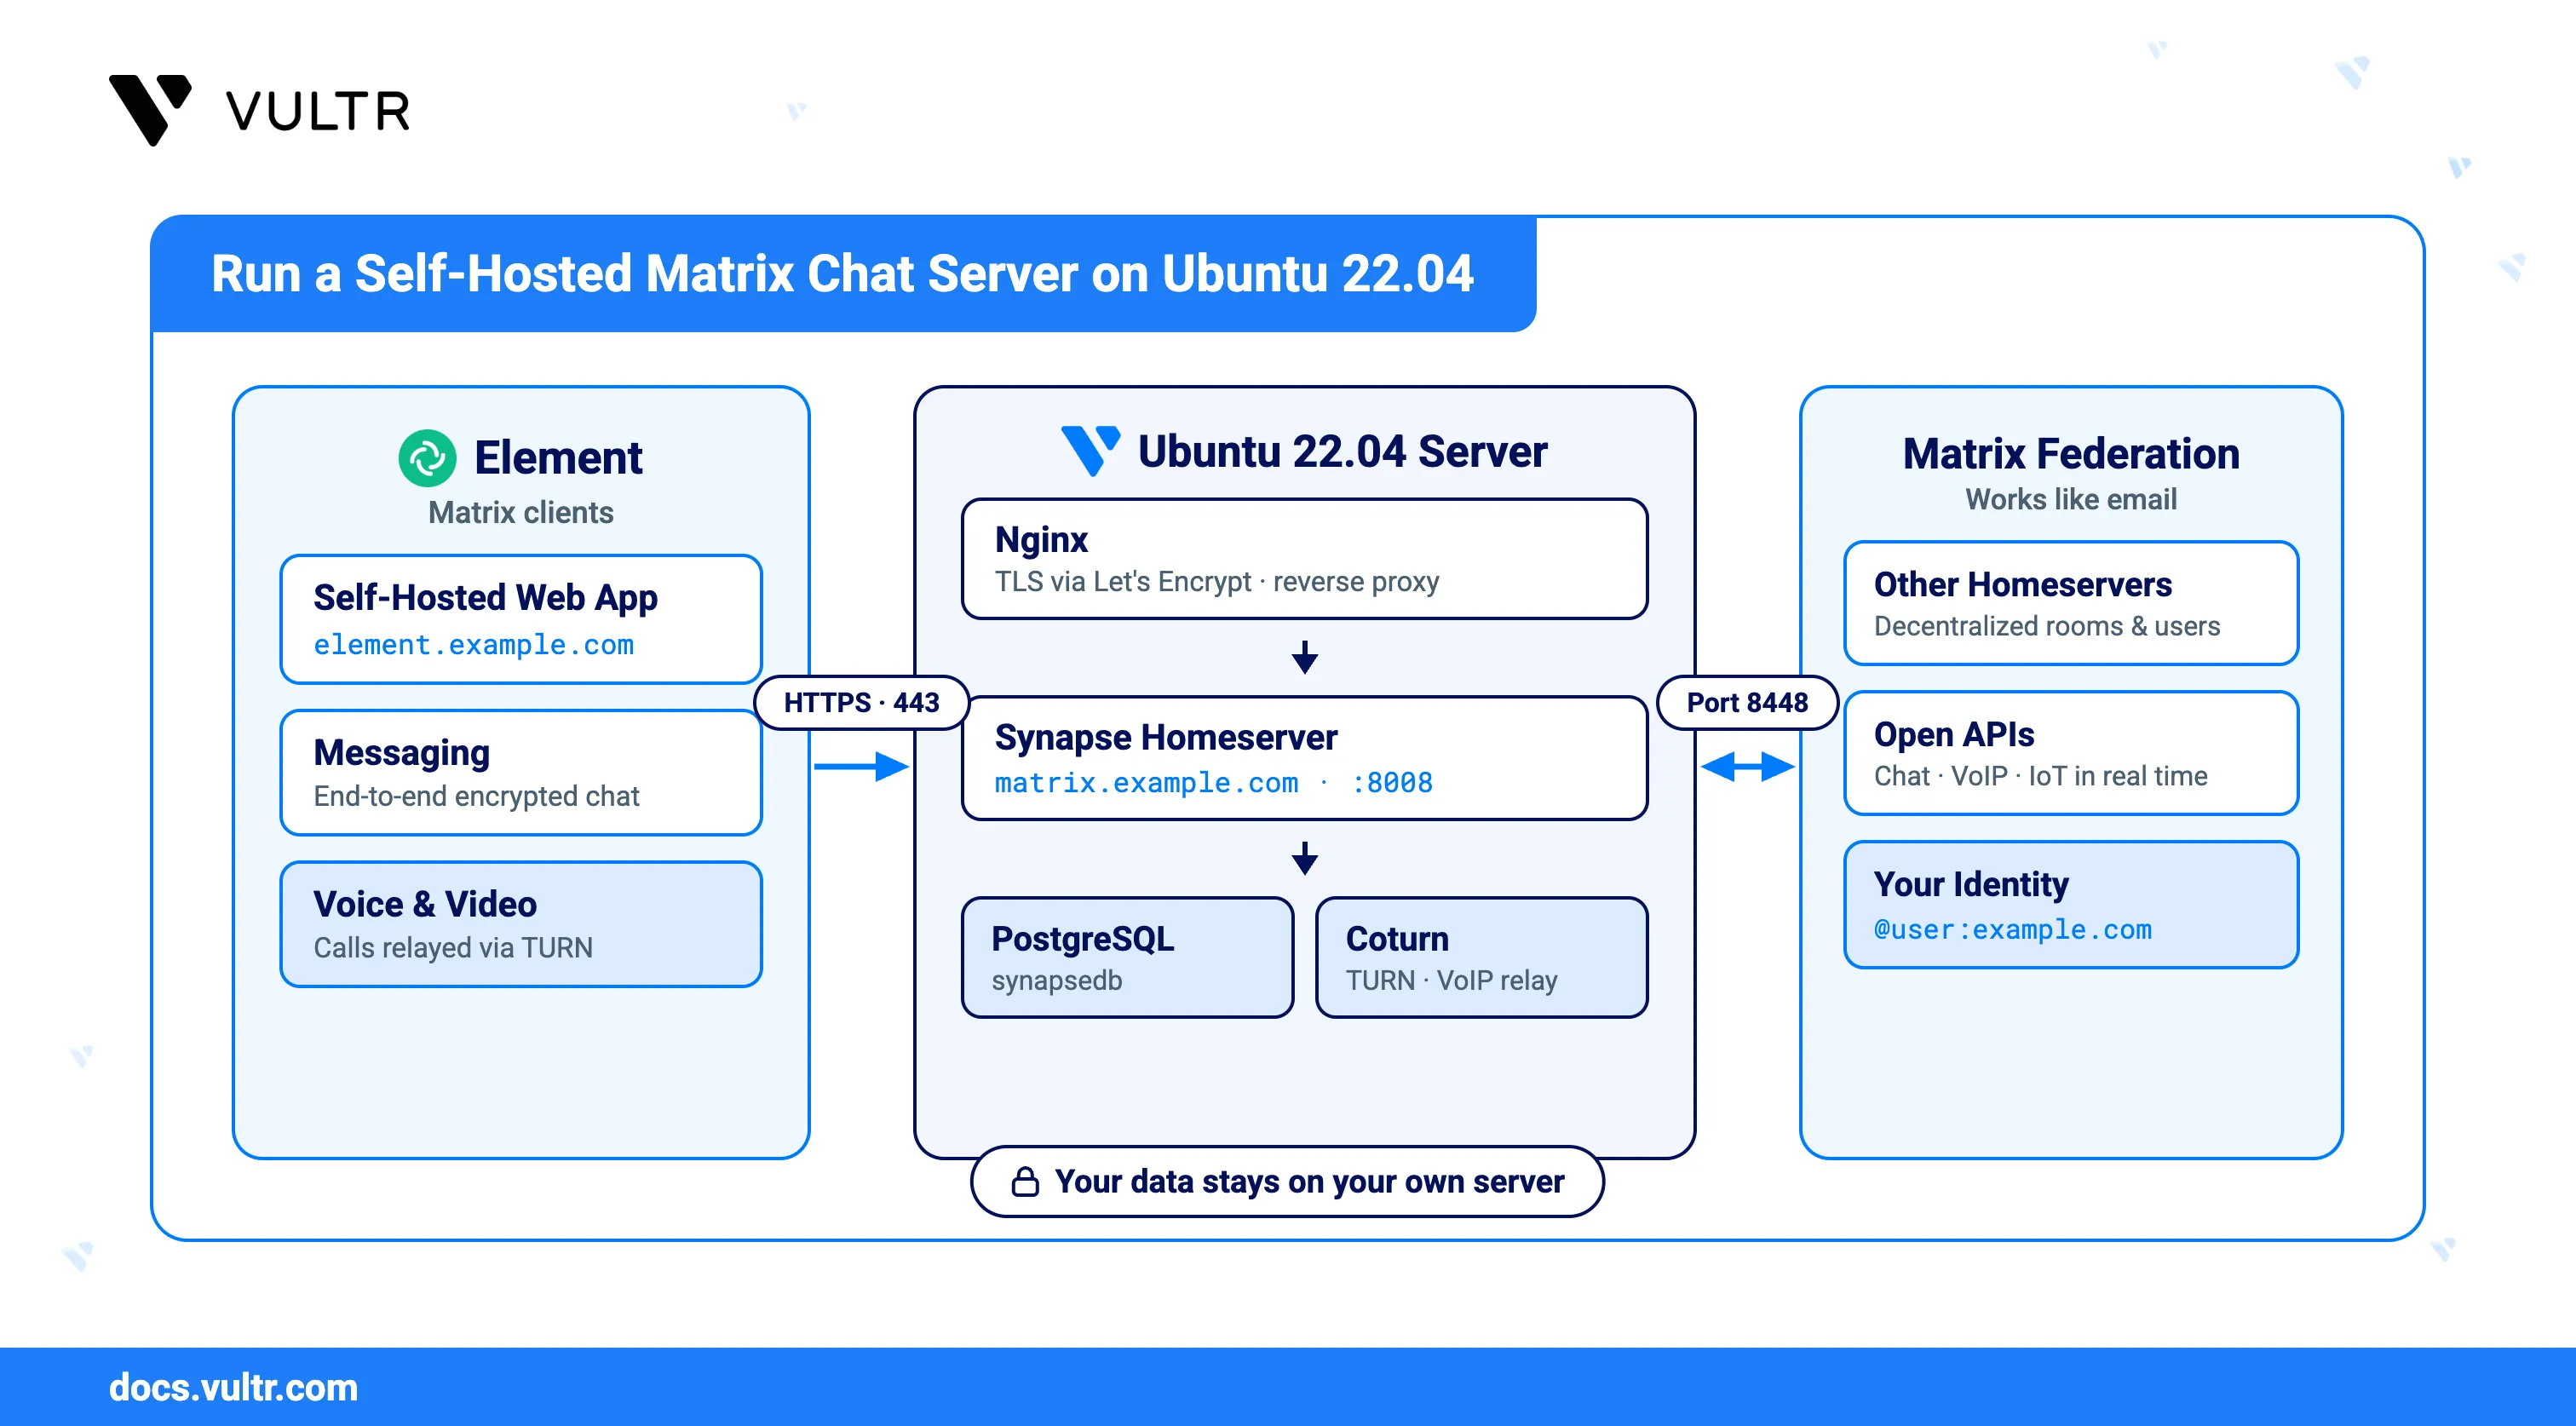
Matrix is a set of open APIs for decentralized and end-to-end encrypted communication. It works across a collection of federation servers to deliver instant messages, Voice over IP (VoIP), and Internet of Things (IoT) communication in real time. Matrix uses homeservers to store account information and chat history, and federation works like email, so you can either use a server hosted by somebody else or host your own. Synapse is the homeserver implementation maintained by the Matrix.org team, and Element is the most widely used Matrix client.
This article explains how to run a self-hosted chat server on an Ubuntu 22.04 server. After completing the steps, you have a Synapse homeserver backed by PostgreSQL, served over HTTPS through Nginx, with a Coturn TURN server for voice and video calls and a self-hosted Element web client.
Prerequisites
Before you begin, you need to:
- Have access to an Ubuntu 22.04 server with at least 2 GB of RAM and one vCPU core as a non-root user with sudo privileges.
- Update the installed packages on the server.
- Create the DNS A records
matrix.example.com,element.example.com, andcoturn.example.compointing to your server's public IP address.
Configure the Firewall
Synapse serves both client traffic and federation traffic, and each arrives on a different port. Open those ports before installing the packages so that certificate issuance and federation succeed once the services start.
Allow HTTP traffic.
CONSOLEAllow HTTPS traffic.
CONSOLEAllow the Matrix federation port.
CONSOLEReview the active rules.
CONSOLEThe output displays
80,443, and8448with anALLOWaction.
Install Matrix Synapse
Ubuntu does not package Synapse, so the packages come from the official Matrix.org APT repository. Signing the repository with a dedicated keyring restricts that key to this repository alone.
Download the repository signing key.
CONSOLEAdd the Matrix repository and bind it to the keyring.
CONSOLEUpdate the package index.
CONSOLEInstall Synapse.
CONSOLEThe installer prompts for a server name. Enter your Matrix domain name, such as
example.com. EnterNto decline reporting of anonymized statistics.Note
The server name becomes part of every user ID on the homeserver and is difficult to change after users exist. To change it later, edit the
/etc/matrix-synapse/conf.d/server_name.yamlfile.
Install and Configure PostgreSQL
Synapse uses SQLite by default, which does not perform well enough for a production homeserver. PostgreSQL is the supported production database, and Synapse expects it to be created with a specific locale and character encoding.
Install PostgreSQL.
CONSOLEOpen the PostgreSQL shell.
CONSOLECreate the Synapse database role. Replace
DB-PASSWORDwith a strong password.PSQLThe role is created and can log in with the password you set.
Create the Synapse database owned by that role.
PSQLThe database is created and owned by the Synapse role. Synapse refuses to start against a database created with any other collation.
Exit the shell.
PSQL
Install Nginx
Nginx terminates TLS and proxies client and federation requests to Synapse. Ubuntu 22.04 ships an older Nginx release, so install the current version from the official Nginx repository.
Download the Nginx signing key.
CONSOLEAdd the Nginx repository.
CONSOLEVerify that the repository file exists.
CONSOLEThe output displays the repository line. An empty result means the file was not written, and
aptinstalls the older Ubuntu package instead.Update the package index.
CONSOLEInstall Nginx.
CONSOLEStart Nginx.
CONSOLE
Issue TLS Certificates
Matrix clients and federating servers both require valid TLS. Certbot issues free certificates from Let's Encrypt, and the Nginx plugin handles the HTTP challenge automatically.
Install Certbot and the Nginx plugin.
CONSOLEVerify the installed version.
CONSOLEThe output displays the Certbot version.
Issue the certificate for the Matrix subdomain. Replace
name@example.comwith your email address andmatrix.example.comwith your Matrix subdomain.CONSOLEGenerate a Diffie-Hellman parameter file.
CONSOLEThe command takes several minutes to complete.
Verify that automatic renewal works.
CONSOLE
Configure Synapse
The package manager overwrites the main Synapse configuration file during updates, so production settings belong in separate files in the drop-in configuration directory. Synapse merges every file in that directory at startup, which keeps your changes safe across upgrades.
Create the database configuration file.
CONSOLEAdd the following configuration. Replace
DB-PASSWORDwith the password you set in Install and Configure PostgreSQL.YAMLSave and close the file.
name: psycopg2: Selects the PostgreSQL driver instead of the default SQLite driver.cp_minandcp_max: Set the minimum and maximum size of the database connection pool.
Generate a registration shared secret.
CONSOLERestart Synapse so that it connects to PostgreSQL and loads the shared secret.
CONSOLEVerify that Synapse is running.
CONSOLEVerify that the output reports
Active: active (running). Synapse creates its schema insynapsedbon this first start, which takes up to a minute.Create an administrator account. Enter a username and password when prompted, then type
yesto grant administrator rights.CONSOLEThe output displays
Success!when the account is created.Create a registration configuration file to allow public sign-ups.
CONSOLEAdd the following configuration to enable registration with email verification. Replace
SMTP-PASSWORDwith the password for the sending mailbox, and the remaining mail server values with your own.YAMLTo skip verification instead, replace the
registrations_require_3pidandemailblocks with the following line.YAMLSave and close the file.
Create a presence configuration file.
CONSOLEAdd the following configuration.
YAMLSave and close the file.
Synapse tracks each user's online status by default, which raises CPU usage on small servers. Disabling presence removes that overhead.
Restart Synapse to apply the changes.
CONSOLE
Configure Nginx
Synapse listens only on the loopback interface and does not terminate TLS itself. Nginx accepts public traffic, handles TLS, and forwards the Matrix client and federation requests to Synapse.
Open the main Nginx configuration file.
CONSOLEAdd the following directive inside the
httpblock, before theinclude /etc/nginx/conf.d/*.conf;line.INISave and close the file.
Create the Synapse site configuration.
CONSOLEAdd the following configuration. Replace
matrix.example.comwith your Matrix subdomain.INISave and close the file.
http2 on;: Enables HTTP/2 for the server block. Nginx 1.25.1 and later deprecate the olderlisten ... http2form and log a warning for every listener that uses it.client_max_body_size: Raises the upload limit from the 1 MB Nginx default so that media uploads succeed.
Test the configuration syntax.
CONSOLEThe output displays
syntax is okandtest is successful.Restart Nginx.
CONSOLE
Install and Configure Coturn
Voice and video calls between clients behind NAT require a Traversal Using Relays around NAT (TURN) server. Coturn relays that media, and Synapse hands out short-lived credentials generated from a shared secret.
Install Coturn.
CONSOLEAllow the TURN control ports.
CONSOLEAllow the TURN TLS port.
CONSOLEAllow the media relay port range.
CONSOLEIssue a certificate for the Coturn subdomain. Replace
coturn.example.comwith your Coturn subdomain.CONSOLEBack up the default configuration file.
CONSOLEGenerate an authentication secret and write it to a new configuration file.
CONSOLEThe command prints the generated secret. Copy the value, because Synapse needs it later in this section.
Open the Coturn configuration file.
CONSOLEAdd the following configuration below the authentication secret. Replace
coturn.example.comwith your Coturn subdomain.INISave and close the file.
use-auth-secret: Enables the shared-secret authentication mode that Synapse expects.denied-peer-ip: Blocks relaying to private and reserved address ranges, which prevents the TURN server from reaching internal services.
Restart Coturn.
CONSOLECreate the Synapse TURN configuration file.
CONSOLEAdd the following configuration. Replace
YOUR-STATIC-AUTH-SECRETwith thestatic-auth-secretvalue from/etc/turnserver.conf, andcoturn.example.comwith your Coturn subdomain.YAMLSave and close the file.
Restart Synapse to apply the configuration.
CONSOLE
Connect a Matrix Client
The homeserver is now reachable over HTTPS, so any Matrix client can sign in to it. Use a hosted client to confirm the deployment before setting up your own Element instance.
Open a Matrix client such as the Element web app, or install the desktop or mobile app. Other options are listed in the Matrix client directory.
Select Sign in, then edit the homeserver address and enter your Matrix subdomain.
Sign in with the administrator account you created in Configure Synapse.
Create a secure backup for your encrypted messages using a security key or passphrase when the client prompts you.
Install Element
Hosting your own Element instance serves the client from your domain rather than a third-party site. Element ships as a prebuilt archive that Nginx serves as static files.
Install the JSON processor used to read the release metadata.
CONSOLECreate the web root for Element.
CONSOLEChange to the directory.
CONSOLEStore the latest release tag in a variable.
CONSOLEVerify that the variable holds a version tag.
CONSOLEThe output displays a tag such as
v1.12.25. An empty value ornullmeans the request failed, and the download in the next step produces a broken filename.Download the release archive.
CONSOLEExtract the archive.
CONSOLELink the extracted directory to a stable path.
CONSOLERepoint the link when you upgrade Element later, after downloading and extracting the new archive. Replace
NEW-VERSIONwith the new release tag.CONSOLE
Configure Element
Element reads its settings from a configuration file in the web root. The shipped sample points at the public matrix.org homeserver, so you must change it to your own before the client is usable.
Change to the
currentdirectory.CONSOLECreate the configuration file from the sample.
CONSOLEOpen the configuration file.
CONSOLEEdit the default homeserver settings to point at your own server.
JSONm.homeserver: Nested under the default server configuration block near the top of the file.base_url: The address Element connects to, which is your Matrix subdomain.server_name: The server name you entered when installing Synapse.
Change the brand name to customize the page title.
JSONSet
disable_gueststo prevent guest access.JSONSave and close the file.
Issue a certificate for the Element subdomain. Replace
element.example.comwith your Element subdomain.CONSOLECreate the Element site configuration.
CONSOLEAdd the following configuration. Replace
element.example.comwith your Element subdomain.INISave and close the file.
Test the configuration syntax.
CONSOLEThe output displays
syntax is okandtest is successful.Restart Nginx.
CONSOLEOpen your Element subdomain in a web browser and sign in with your Matrix account.
Conclusion
You have deployed a self-hosted Matrix chat server on Ubuntu 22.04, with Synapse storing data in PostgreSQL, Nginx serving client and federation traffic over HTTPS, Coturn relaying voice and video calls, and a self-hosted Element web client signing in against your own homeserver. For further configuration such as federation tuning, media retention, and worker processes, see the Synapse documentation and the Element web configuration reference.


0 Comments
Be the first to comment and share your perspective with the community.