
How to Deploy a VPC-Only Vultr Kubernetes Engine with NAT Gateway
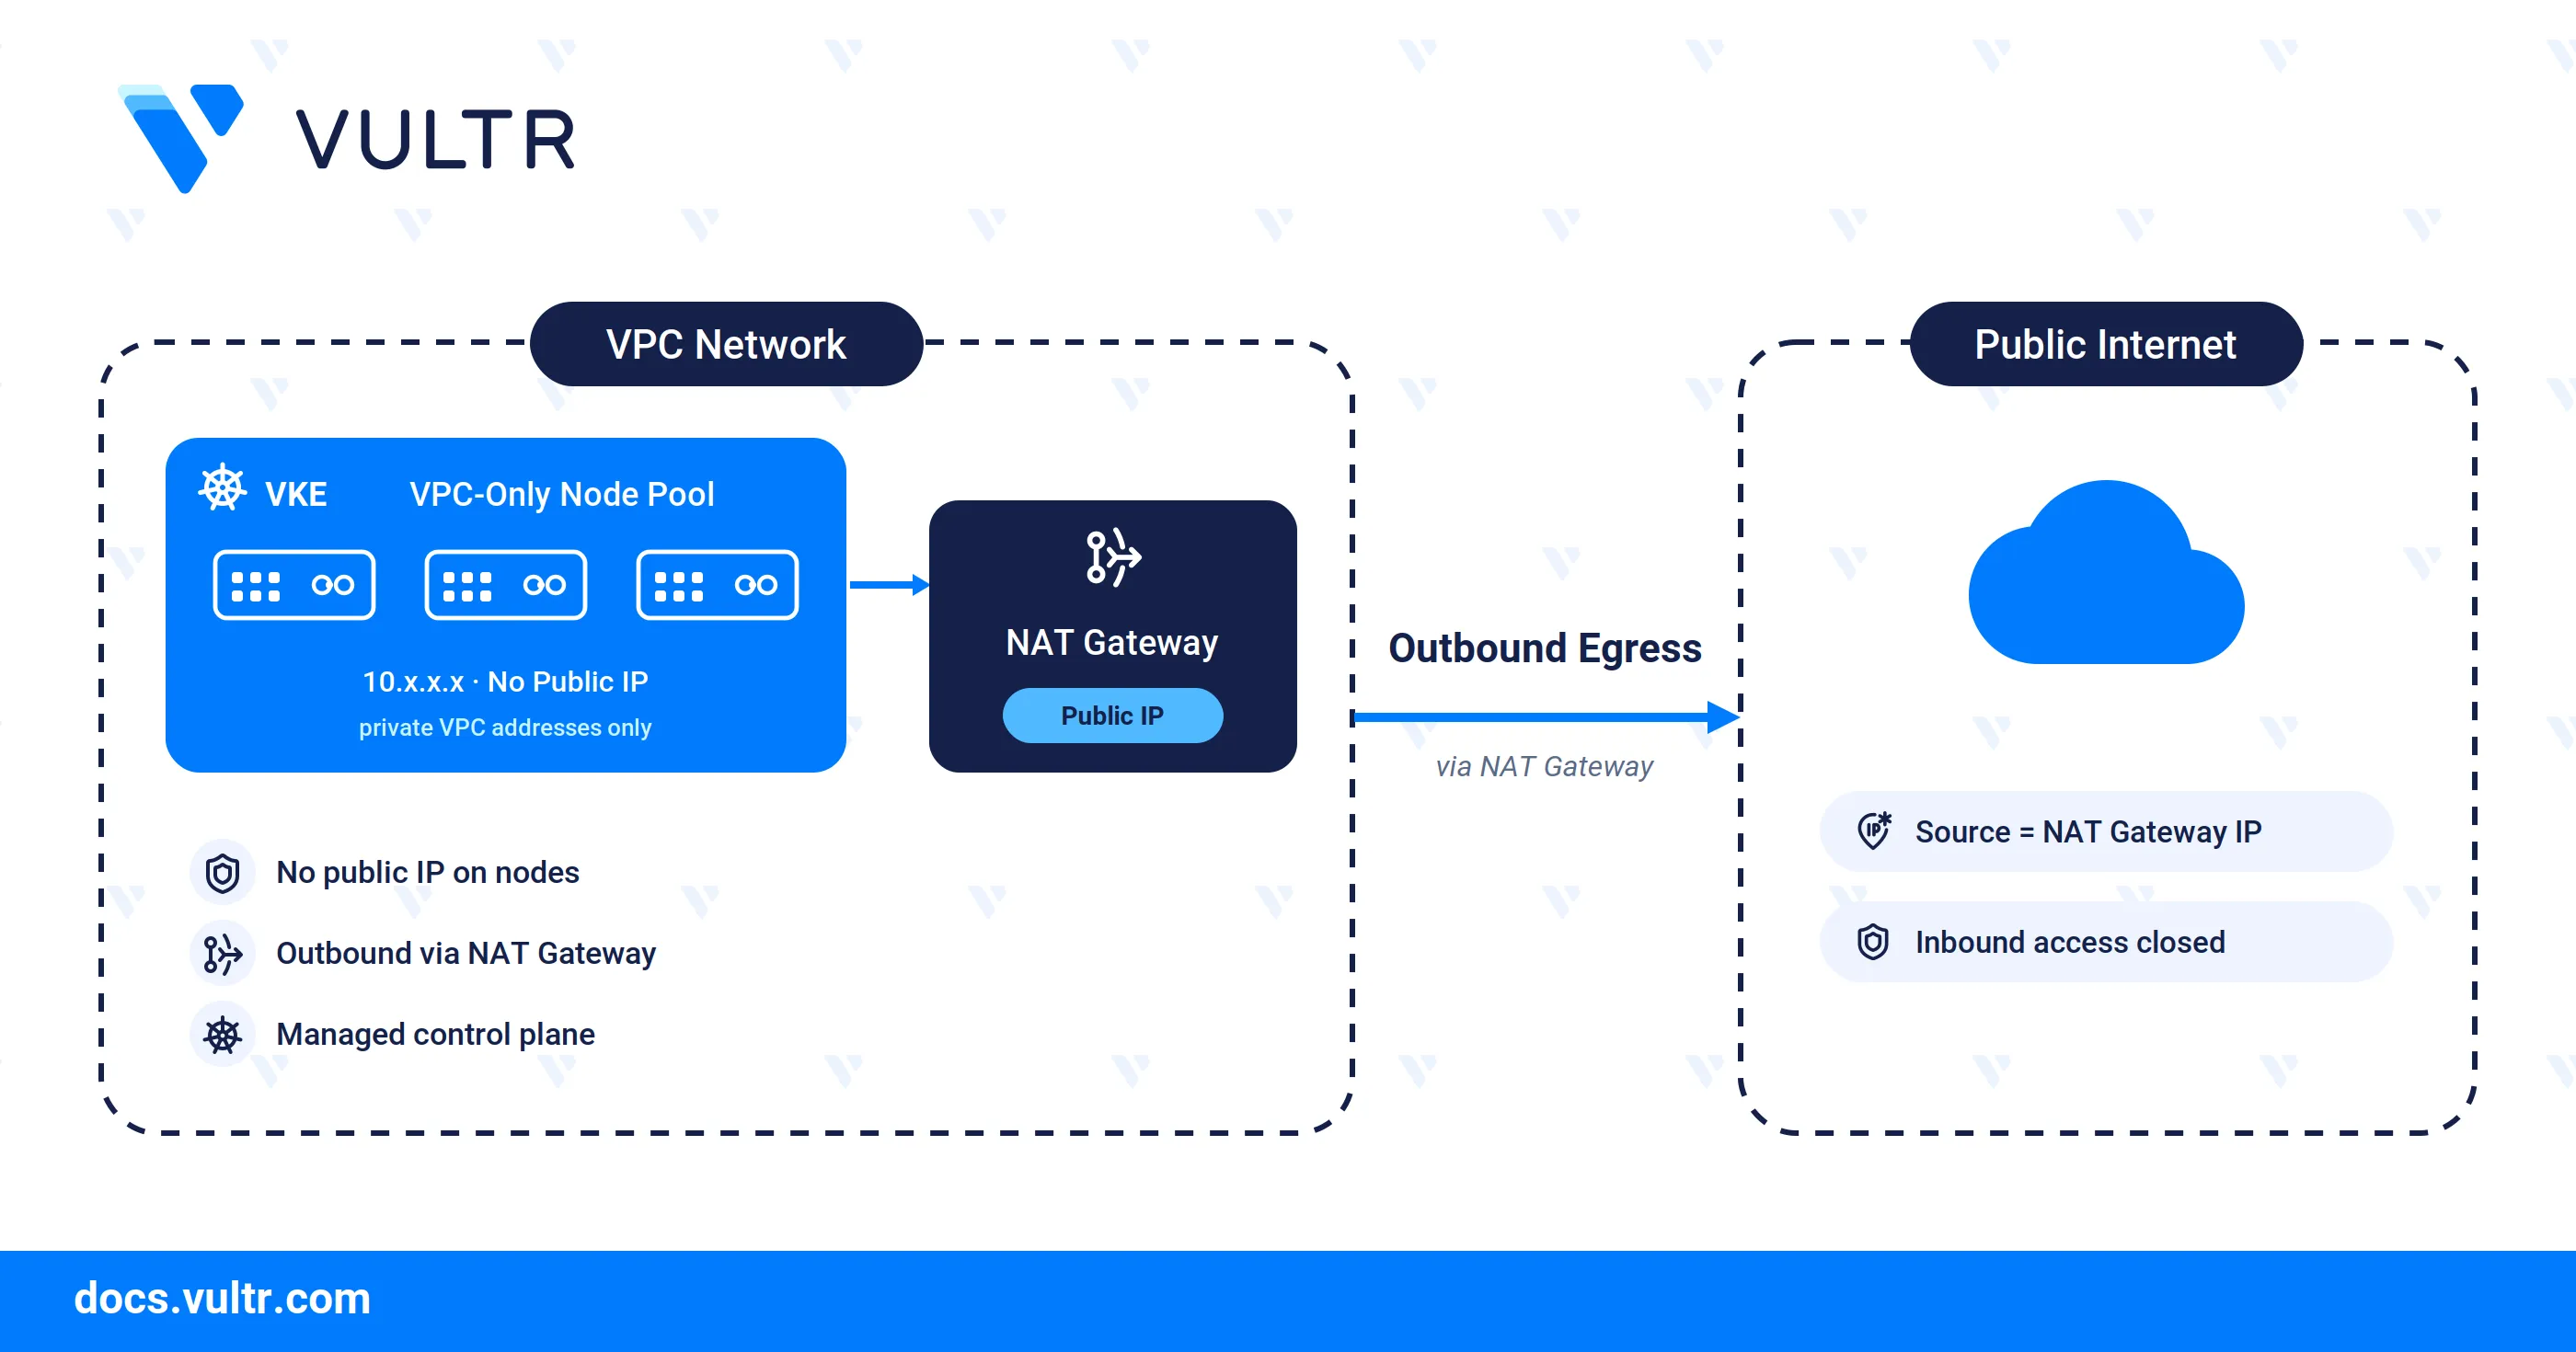
Vultr Kubernetes Engine (VKE) is a fully managed Kubernetes service that operates the control plane and worker nodes on your behalf. A VPC-only node pool attaches its worker nodes to a Virtual Private Cloud (VPC) with no public IP address, and routes their outbound traffic through a NAT Gateway attached to that VPC.
This guide explains how to deploy a VKE cluster with a VPC-only node pool backed by a NAT Gateway, using the Vultr Console to provision the network and the Vultr API to create the cluster.
Prerequisites
Before you begin, ensure you:
- Have access to the Vultr Console.
- Have a Vultr API key to create the cluster, exported as an environment variable.
- Install
kubectlandjqon your local workstation.
Create a VPC with a NAT Gateway
Create the VPC network in the Vultr Console before deploying the cluster. The Vultr Console bundles the NAT Gateway into the VPC: selecting the VPC Network with NAT Gateway option provisions a NAT Gateway with the VPC, which provides the outbound path that the VPC-only nodes use to reach the internet.
- Log in to the Vultr Console.
- Navigate to Network, then click VPC Networks.
- Click Create VPC Network.
- Select the VPC Network with NAT Gateway option.
- Enter a name for the VPC network in the Name field.
- Select the location where you intend to deploy the cluster.
- Click Create VPC Network.
After the VPC provisions, open it from the VPC Networks list to view its details. The detail page reports the Gateway as a NAT Gateway and lists a NAT Gateway IP Address, which is the outbound address for the VPC-only nodes. Note the VPC UUID for use as the VPC ID in the API request.
Deploy the VKE Cluster with a VPC-Only Node Pool
Create the VKE cluster with the Vultr API and attach it to the VPC you created.
Export your API key as an environment variable.
console$ export VULTR_API_KEY="YOUR_API_KEY"
Replace
YOUR_API_KEYwith your Vultr API key.Send a
GETrequest to the List Regions endpoint and note the ID of the region that matches your VPC.console$ curl "https://api.vultr.com/v2/regions" \ -X GET \ -H "Authorization: Bearer ${VULTR_API_KEY}" | jq '.regions[] | {id, city}'
The output lists each region with its
idand city.Send a
GETrequest to the List Available Plans in Region endpoint and note a plan to use for the node pool. ReplaceREGION-IDwith your target region.console$ curl "https://api.vultr.com/v2/regions/REGION-ID/availability" \ -X GET \ -H "Authorization: Bearer ${VULTR_API_KEY}" | jq '.available_plans'
The output lists the plan IDs available in that region.
Send a
GETrequest to the Get Kubernetes Versions endpoint and note your target version.console$ curl "https://api.vultr.com/v2/kubernetes/versions" \ -X GET \ -H "Authorization: Bearer ${VULTR_API_KEY}"
The output lists the supported Kubernetes versions.
Send a
POSTrequest to the Create Kubernetes Cluster endpoint withvpc_onlyset totrueand the VPC ID that has the NAT Gateway.console$ curl "https://api.vultr.com/v2/kubernetes/clusters" \ -X POST \ -H "Authorization: Bearer ${VULTR_API_KEY}" \ -H "Content-Type: application/json" \ --data '{ "label": "CLUSTER-LABEL", "region": "REGION-ID", "version": "KUBERNETES-VERSION", "vpc_id": "VPC-ID", "node_pools": [ { "node_quantity": 3, "label": "NODE-LABEL", "plan": "NODE-PLAN", "vpc_only": true } ] }'
Replace:
- CLUSTER-LABEL: A name for the cluster.
- REGION-ID: The region that matches your VPC and NAT Gateway, such as
ewr. - KUBERNETES-VERSION: A version from the previous step, such as
v1.36.1+1. - VPC-ID: The ID of the VPC that has the NAT Gateway.
- NODE-LABEL: A label for the node pool.
- NODE-PLAN: A plan with a minimum cost of $10, such as
vc2-4c-8gb.
OmittingNotevpc_idwhilevpc_onlyistrueinstructs VKE to provision a new VPC and NAT Gateway automatically. Supplying an existingvpc_idrequires that VPC to already have an active NAT Gateway, otherwise the request fails with a422error.The response returns the new cluster, including its
id. Note this value to use as the cluster ID in later steps.Send a
GETrequest to confirm the cluster reaches an active state.console$ curl "https://api.vultr.com/v2/kubernetes/clusters" \ -X GET \ -H "Authorization: Bearer ${VULTR_API_KEY}"
The output displays the cluster with its node pool, and each node reports
vpc_onlyastrue.
Verify the Deployment
A VPC-only node has no public IP, so every request it makes to the internet exits through the NAT Gateway and carries the NAT Gateway public IP as its source address. Run a request from inside the cluster and match the returned address to the NAT Gateway IP to confirm the routing.
Note the NAT Gateway IP address from the Vultr Console. Navigate to Network, click VPC Networks, then select the VPC you created. The NAT Gateway IP Address field shows the outbound address for the VPC-only nodes.
Download the cluster's kubeconfig from the Get Kubernetes Cluster Kubeconfig endpoint and save it to a file. Replace
VKE-IDwith your cluster ID.console$ curl "https://api.vultr.com/v2/kubernetes/clusters/VKE-ID/config" \ -X GET \ -H "Authorization: Bearer ${VULTR_API_KEY}" | jq -r '.kube_config' | base64 -d > vke-config.yaml
The command saves the decoded kubeconfig to
vke-config.yaml.Point
kubectlat the downloaded configuration.console$ export KUBECONFIG=vke-config.yaml
List the nodes and confirm they report only private VPC addresses.
console$ kubectl get nodes -o wide
The output lists each node with a private address in the
10.x.x.xrange and no public IP address.Run a temporary pod that requests its public source address from an external service.
console$ kubectl run egress-check --image=curlimages/curl --rm -i --restart=Never --command -- curl -s https://api.ipify.org
The pod schedules on a VPC-only node, sends the request, prints the public source address, then
kubectlremoves the pod when it completes.The address it prints matches the NAT Gateway IP address noted in the first step, which confirms that the nodes have no direct public connectivity and that all outbound traffic routes through the NAT Gateway.
Use Cases
A VPC-only node pool removes the public IP from each worker node and routes outbound traffic through a single NAT Gateway. This network model suits workloads that need controlled connectivity rather than direct public exposure:
- Internal backend services: Run databases, message queues, caches, and internal APIs that other services reach over private VPC addresses, without exposing them to the public internet.
- Reduced attack surface: Remove the public network interface from every node so the cluster has no directly reachable public IP, which lowers the exposure available to external scanners and attackers.
- Regulated and compliance-bound workloads: Keep nodes off the public network to support data-isolation requirements common to standards such as PCI DSS and HIPAA.
- Predictable outbound IP: Route all node egress through the NAT Gateway public IP, which gives third-party services and partner firewalls a stable address to allowlist.
- Controlled internet access: Allow nodes to pull container images and reach external services for updates while keeping inbound public access closed by default.
- Public exposure on demand: Keep workloads private by default, and expose only the services you choose through a load balancer or a NAT Gateway port forwarding rule.
Conclusion
You have successfully deployed a VKE cluster with a VPC-only node pool backed by a NAT Gateway. The worker nodes run without public IP addresses, attach only to the VPC, and reach the internet through the NAT Gateway for outbound traffic such as image pulls. To expose workloads on these nodes to the public internet, pair the cluster with a load balancer or a NAT Gateway port forwarding rule. For more information, visit the official Vultr Kubernetes Engine documentation.