How to Deploy an AMD Inference Microservice (AIM) on Vultr Cloud GPU Using AMD AI Workbench
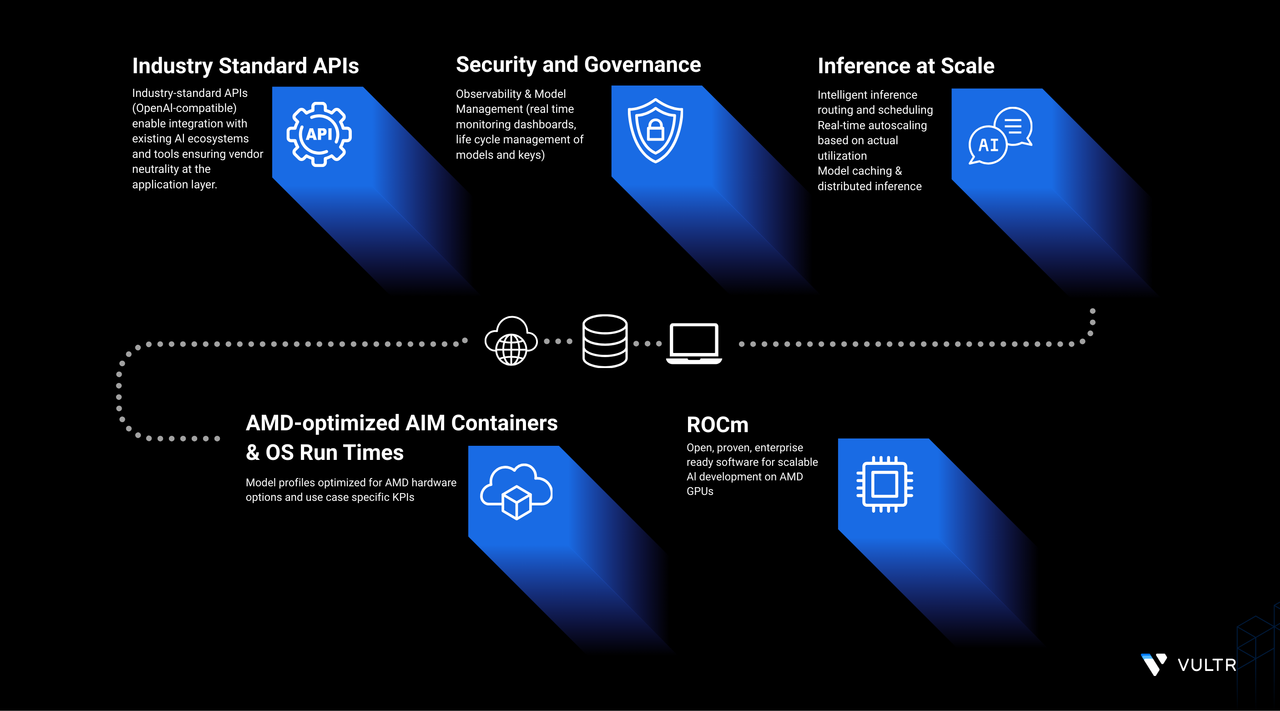
AMD Inference Microservices (AIMs) are standardized, portable services for deploying AI models on AMD Instinct™ GPUs. AIMs run on ROCm and are distributed as container images optimized for AMD hardware. Each AIM automatically selects the best runtime configuration based on the model and GPU, and exposes an OpenAI-compatible API for seamless integration with existing applications.
This guide explains how to deploy an AIM from the AIM Catalog using the AMD AI Workbench UI on Vultr Cloud GPU. It covers signing in to the Workbench, browsing and deploying a model, monitoring the running workload, testing it through the built-in chat interface, retrieving API connection details, and creating an API key for programmatic access.
Prerequisites
Before you begin, ensure you:
- Have access to an AMD Instinct™ MI300X, MI325X, or MI355X GPU.
- Have deployed the AMD Enterprise AI Reference Stack and have access to the AMD AI Workbench UI.
Sign In to AMD AI Workbench
The AMD AI Workbench uses Keycloak for authentication. Open the Workbench URL in your browser and authenticate with your project credentials before accessing the AIM Catalog.
Open
https://aiwbui.amd-ai-workbench.example.comin your browser. Replaceamd-ai-workbench.example.comwith your configured domain.Click Sign in with Keycloak.
The browser redirects you to the Keycloak login page.
Enter your username and password, then click Sign In.
The Workbench dashboard loads and displays an overview of active workloads, GPU device usage, and GPU VRAM usage for the selected project.
Browse and Deploy from the AIM Catalog
The AIM Catalog provides a curated library of pre-built inference microservices for popular open-weight models. Each model card displays supported task types, a brief description, and a Deploy button. Selecting a model opens a deployment panel where you configure the container version, performance metric, and autoscaling behavior before launching the workload.
Click Models in the left navigation panel.
Click the AIM Catalog tab.
The catalog displays available model cards organized by task type, including text generation, conversational, and instruction-tuned models.
Locate the model you want to deploy. Click Deploy on its card.
A Deploy AIM panel opens on the right side of the screen.
Under Deployment Settings, configure the following options:
- Container version: Select the AIM container version to deploy. Choose the latest version unless a specific version is required.
- Performance metric: Select the optimization target for the inference runtime.
- Latency: Minimizes time to first token. Suitable for interactive and real-time applications.
- Throughput: Maximizes tokens processed per second. Suitable for batch workloads.
- Default: Uses the recommended profile for the selected model and GPU.
- Autoscaling: Toggle Enable autoscaling to automatically adjust the number of replicas based on incoming request volume.
Click Deploy to launch the workload.
Note
Deployment time depends on the container image size and model weights. Large models may take several minutes to reach Running status.
Monitor the Deployment
After deployment, the workload appears on the Dashboard with a Pending status while the container image pulls and the model loads. Once the model is ready, the status changes to Running.
Click Dashboard in the left navigation panel.
Locate your workload in the Workloads table. Confirm the Status column shows Running.
Click the three-dot menu on the right side of the workload row and select Open details.
The Workload details page displays:
- Inference metrics: Time to first token, inter-token latency, end-to-end latency, GPU device usage, and GPU VRAM usage with configurable time range.
- Basic information: Container image, container version, resource name, performance metric, canonical model name, workload ID, and creation timestamp.
- Output: External and internal endpoint hostnames.
Test the Model Using Chat
The built-in Chat interface lets you send prompts directly to a deployed model and inspect responses without writing any code. Use this to verify the model is responding correctly before integrating it into an application.
From the Workload details page, click Chat with model. The Chat page opens with the current model pre-selected.
Type a prompt in the input field at the bottom of the page and press Enter or click the send button.
The model streams a response in the chat window.
Integrate with External Applications
AIM endpoints are accessible outside the cluster using an API key and the workload's external URL. The steps below cover creating a scoped API key and retrieving the connection details needed to send inference requests from any external application.
Create an API Key
API keys authenticate programmatic requests to AIM endpoints. Each key can be scoped to one or more model deployments and configured with a validity period. Create a dedicated key for each application or integration to simplify access control and rotation.
Click API Keys in the left navigation panel.
Click Create API Key.
In the Create API Key panel, configure the following:
- Name: Enter a descriptive name to identify the key.
- Validity period: Select how long the key remains valid.
- 1 day, 1 week, 2 weeks, 30 days, 60 days, 90 days: Fixed expiry periods.
- Unlimited: The key does not expire. Use this only for trusted, long-lived integrations.
- Model deployments: Select the AIM deployments this key authorizes access to.
Click Create API key.
Copy the generated key value. The key is not shown again after you close the dialog.
Click Done.
The new key appears in the API Keys table with its name, creation date, and the user who created it. The secret key value is masked after creation.
Connect to the Model API
Each deployed AIM exposes an OpenAI-compatible REST API. The Connect to model dialog provides the endpoint URLs and ready-to-use code snippets in cURL, Python, and JavaScript.
From the Dashboard, click the three-dot menu on your workload row and select Connect to model.
The Connect to model dialog displays:
- External URL: Accessible from outside the cluster. Use this for applications running outside Kubernetes.
- Internal URL: Accessible only within the cluster. Use this for services deployed in the same Kubernetes namespace.
Select the cURL, Python, or Javascript tab under Code Snippet to view the ready-to-use integration code.
The external URL follows this structure:
https://workloads.amd-ai-workbench.example.com/NAMESPACE/WORKLOAD-ID/v1/chat/completionsReplace:
- NAMESPACE: The project namespace where the AIM is deployed.
- WORKLOAD-ID: The unique identifier of the workload, visible in the Workload details page under Basic information.
- MODEL-CANONICAL-NAME: The canonical model name, visible in the Workload details page under Canonical Name (for example,
openai/gpt-oss-20b).
The cURL example below sends a test completion request. Replace
YOUR_API_KEYwith the key created in the previous section.CONSOLECopy the code snippet and use the endpoint URL together with your API key to integrate the model into your application.
Conclusion
You have successfully deployed an AMD Inference Microservice on Vultr Cloud GPU using AMD AI Workbench. You browsed the AIM Catalog, launched a model, tested it through the built-in chat interface, and created a scoped API key for external access. The model now serves inference requests through an OpenAI-compatible API endpoint. For more information on available models and deployment options, visit the official AMD Enterprise AI documentation.


0 Comments
Be the first to comment and share your perspective with the community.