
How to Deploy Inference Using NVIDIA Dynamo and vLLM
NVIDIA Dynamo is an open-source, high-throughput, low-latency inference framework designed to deploy large-scale generative AI and reasoning models across multi-node, multi-GPU environments. It optimizes datacenter-scale AI workloads by boosting LLM inference efficiency and reducing time-to-first-token (TTFT) through intelligent resource management, dynamic GPU allocation, and distributed orchestration. The platform supports disaggregated serving, which separates the prompt processing (prefill) and response generation (decode) phases across different GPUs, enabling independent optimization of each phase. Dynamo integrates with popular frameworks including vLLM, SGLang, and NVIDIA TensorRT-LLM.
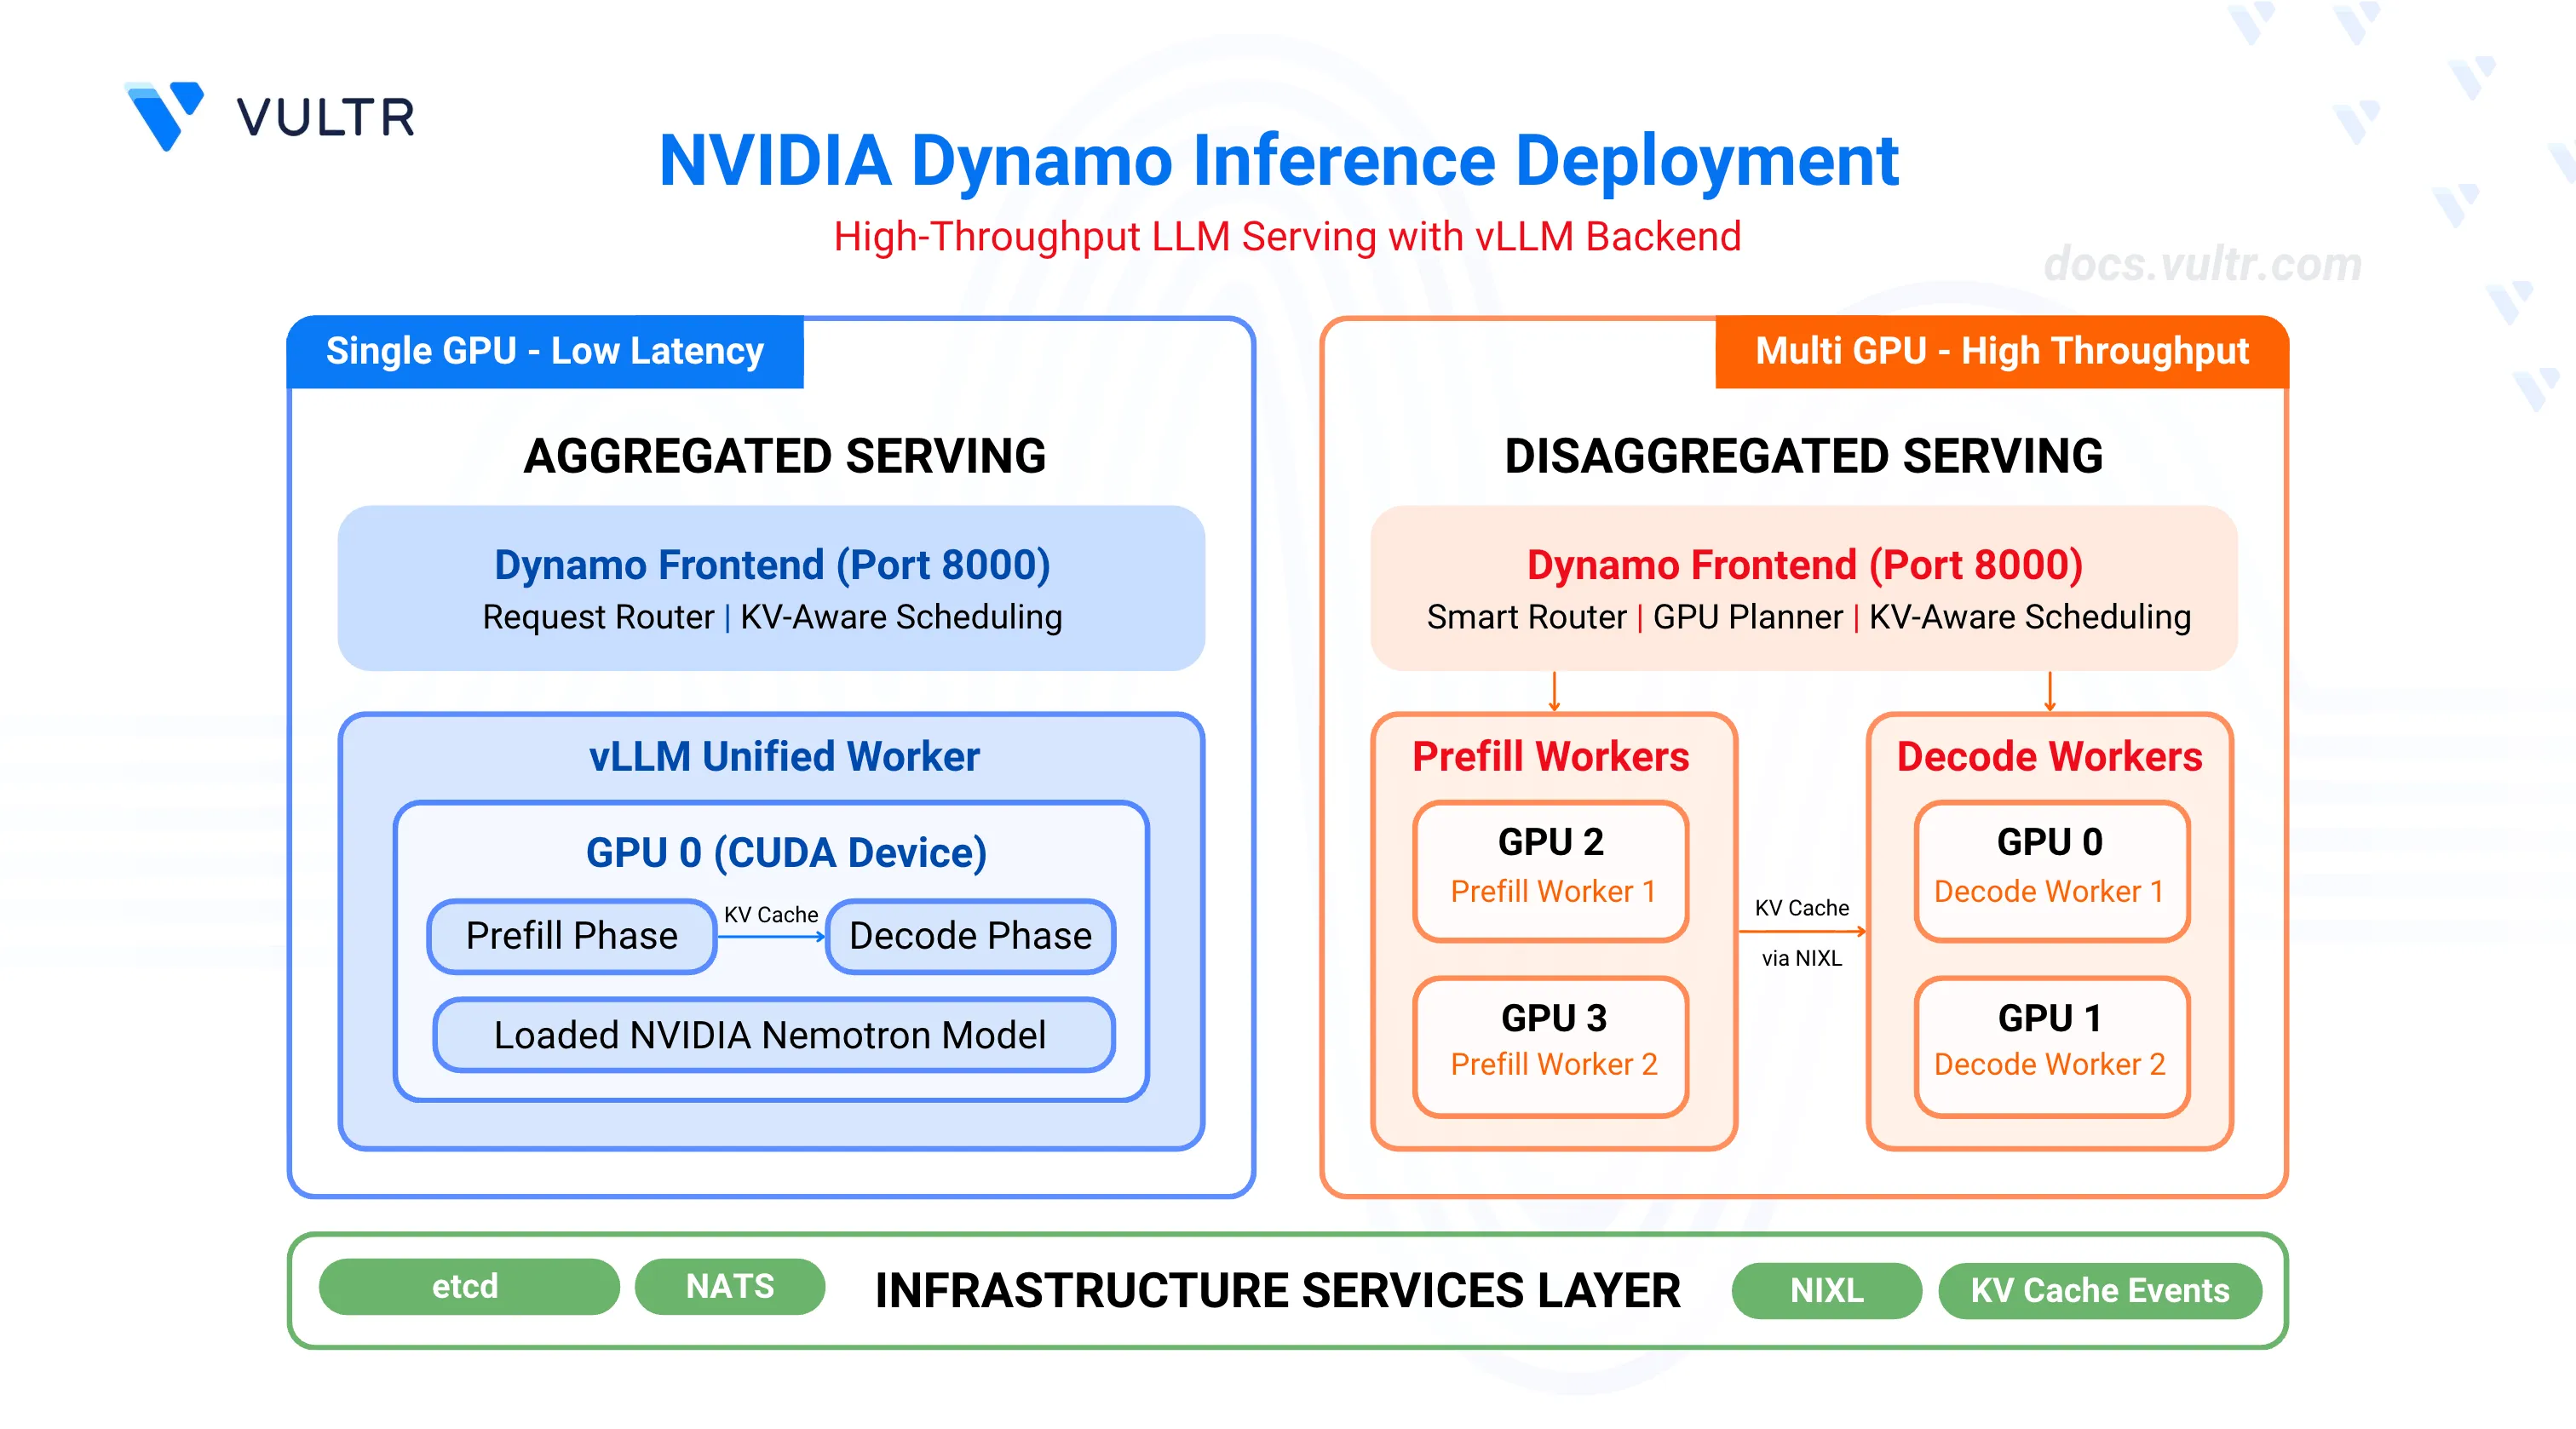
This guide outlines the deployment of NVIDIA Dynamo with the vLLM backend for high-throughput inference workloads. It covers infrastructure setup, container deployment, and two deployment patterns: aggregated serving for single-GPU configurations and disaggregated serving for multi-GPU setups with independent prefill and decode workers.
Prerequisites
Before you begin, ensure you:
- Have access to a Linux server with NVIDIA GPUs installed and the NVIDIA Container Toolkit configured. Use a non-root user with sudo privileges.
- 1 GPU minimum for aggregated serving.
- 4 GPUs for disaggregated serving.
- Install Docker Engine and Docker Compose.
- Create a Hugging Face account and generate an access token for gated models like Llama.
Key Components
This deployment uses several components that work together to provide efficient LLM inference.
NVIDIA Dynamo serves as the orchestration layer, managing GPU resources, routing requests, and coordinating between different workers. The platform includes a frontend service that receives inference requests, a smart router that directs traffic based on KV cache awareness, and a GPU planner that dynamically adjusts resource allocation based on workload demands.
vLLM acts as the inference backend, executing the actual model computations on GPUs. It supports two worker types: prefill workers process incoming prompts and generate initial tokens, while decode workers handle sequential token generation for ongoing responses. The vLLM backend integrates with Dynamo through metrics reporting and KV cache event publishing.
etcd provides distributed service discovery, allowing Dynamo components to locate and communicate with each other across the cluster. It maintains a registry of active workers and their capabilities.
NATS handles message passing between components, particularly for KV cache events. Prefill workers publish KV cache information through NATS, enabling the router to make intelligent decisions about request placement.
NIXL (NVIDIA Inter-GPU Exchange Library) manages efficient data transfer between GPUs during disaggregated serving. It enables prefill workers to transfer KV cache data to decode workers with minimal latency.
Clone the Dynamo Repository
NVIDIA Dynamo provides deployment scripts, container utilities, and orchestration modules required to run inference workloads. Clone the repository to access the deployment assets and container runtime scripts.
Clone the repository.
console$ git clone https://github.com/ai-dynamo/dynamo.git
Navigate to the repository directory.
console$ cd dynamo
Switch to the latest stable release.
console$ git checkout release/0.9.0
The command checks out the stable release. Visit the Dynamo releases page to find the latest stable release version.
Start Infrastructure Services
Dynamo's distributed architecture relies on etcd for worker registry and service discovery, and NATS for KV cache event propagation between prefill and decode workers. The Docker Compose configuration launches both services with exposed ports for client connections (etcd: 2379-2380, NATS: 4222, 6222, 8222). These infrastructure services must run continuously for Dynamo to coordinate worker resources and route inference requests.
Start the infrastructure services.
console$ docker compose -f deploy/docker-compose.yml up -d
Verify the services are running.
console$ docker compose -f deploy/docker-compose.yml ps
The output displays the running etcd and NATS containers.
NAME                   IMAGE                      COMMAND                  SERVICE       CREATED         STATUS         PORTS
deploy-etcd-server-1   bitnamilegacy/etcd:3.6.1   "/opt/bitnami/script…"   etcd-server   6 seconds ago   Up 6 seconds   0.0.0.0:2379-2380->2379-2380/tcp, [::]:2379-2380->2379-2380/tcp
deploy-nats-server-1   nats:2.11.4                "/nats-server -c /et…"   nats-server   6 seconds ago   Up 6 seconds   0.0.0.0:4222->4222/tcp, [::]:4222->4222/tcp, 0.0.0.0:6222->6222/tcp, [::]:6222->6222/tcp, 0.0.0.0:8222->8222/tcp, [::]:8222->8222/tcp
Verify CUDA Version and Pull Container Image
The vLLM container requires a CUDA version match between the host driver and container runtime to prevent GPU kernel incompatibilities. The NVIDIA Container Toolkit maps host GPUs into containers, requiring the container's CUDA version to align with the host driver's supported version.
Check the installed CUDA version.
console$ nvidia-smiThe output displays the CUDA version in the top-right corner of the table.
+-----------------------------------------------------------------------------------------+
| NVIDIA-SMI 580.95.05              Driver Version: 580.95.05      CUDA Version: 13.0     |
+-----------------------------------------+------------------------+----------------------+
....
Pull the vLLM container image from NGC. Match the CUDA version in the image tag to your system's CUDA version.
For CUDA 13.x, use:
console$ docker pull nvcr.io/nvidia/ai-dynamo/vllm-runtime:0.9.0-cuda13
For CUDA 12.x, use:
console$ docker pull nvcr.io/nvidia/ai-dynamo/vllm-runtime:0.9.0
Visit the NVIDIA NGC Catalog to view all available image tags and CUDA versions.Note(Optional) Build the container from source instead of pulling the pre-built image.
console$ ./container/build.sh --framework VLLM
The build process creates an image named
dynamo:latest-vllm. If you prefer using this locally built image, replacenvcr.io/nvidia/ai-dynamo/vllm-runtime:0.9.0-cuda13withdynamo:latest-vllmin all subsequent commands.
Configure Hugging Face Cache Permissions
The container runs as UID 1000 and requires write access to the Hugging Face cache directory for model downloads. Incorrect permissions prevent the container from accessing cached model weights, causing worker initialization failures.
Create the cache directory if it does not exist.
console$ mkdir -p container/.cache/huggingface
Set ownership to the container user (UID 1000).
console$ sudo chown -R 1000:1000 container/.cache/huggingface
Set appropriate permissions.
console$ sudo chmod -R 775 container/.cache/huggingface
Deploy Aggregated Serving
Aggregated serving combines prefill and decode phases on a single worker, eliminating inter-GPU KV cache transfers and reducing request latency. This architecture suits single-GPU environments or workloads prioritizing response time over throughput. The deployment script configures the Dynamo frontend to route requests to a unified vLLM worker that handles both prompt processing and token generation on the same GPU.
Export your Hugging Face token to avoid rate limitations when downloading large models. Replace
YOUR_HF_TOKENwith your actual token.console$ export HF_TOKEN=YOUR_HF_TOKEN
Run the vLLM container with GPU access and workspace mounting. Use the image tag that matches your CUDA version from the previous section.
console$ ./container/run.sh -it --framework VLLM --mount-workspace --image nvcr.io/nvidia/ai-dynamo/vllm-runtime:0.9.0-cuda13 -e HF_TOKEN=$HF_TOKEN
The command starts an interactive container session with GPU support and passes the Hugging Face token to the container.
Inside the container, create a custom launch script for aggregated serving with the NVIDIA Nemotron model.
console$ cat << 'EOF' > ~/nemotron_agg.sh #!/bin/bash set -e trap 'echo Cleaning up...; kill 0' EXIT # Set deterministic hash for KV event IDs export PYTHONHASHSEED=0 # Model configuration - use command line argument or default MODEL="${1:-nvidia/Llama-3.1-Nemotron-Nano-4B-v1.1}" echo "Starting Dynamo Frontend..." python -m dynamo.frontend & echo "Starting vLLM Worker with model: $MODEL" DYN_SYSTEM_PORT=${DYN_SYSTEM_PORT:-8081} \ python -m dynamo.vllm \ --model "$MODEL" \ --trust-remote-code \ --enforce-eager \ --connector none EOF
Make the script executable.
console$ chmod +x ~/nemotron_agg.sh
Run the aggregated serving script.
console$ ~/nemotron_agg.shThe script starts a frontend service on port
8000and a vLLM worker that loads the specified model (defaults to NVIDIA Nemotron Nano 4B).To deploy the larger NVIDIA Nemotron Super 49B model instead, pass the model name as an argument:
console$ ~/nemotron_agg.sh "nvidia/Llama-3_3-Nemotron-Super-49B-v1_5"
The 49B model requires high-memory GPUs such as B200 or GB200 class devices. Ensure sufficient VRAM and consider tensor parallelism for production deployments.NoteOpen a new terminal session on your server (outside the container).
Test with a chat completion request.
console$ curl -X POST http://localhost:8000/v1/chat/completions \ -H "Content-Type: application/json" \ -d '{ "model": "nvidia/Llama-3.1-Nemotron-Nano-4B-v1.1", "messages": [{"role": "user", "content": "Hello! Tell me about AI."}], "max_tokens": 100 }'
The output displays the model's chat response in JSON format.
Deploy Disaggregated Serving
Disaggregated serving assigns prefill and decode phases to separate GPU workers, enabling independent scaling and optimization of each phase based on workload characteristics. Prefill workers process incoming prompts and transfer KV cache data to decode workers via NIXL for efficient inter-GPU communication. This architecture maximizes throughput by allowing multiple decode workers to share prefill resources, improving GPU utilization across the cluster.
Exit the container if you are still inside from the previous section. Press
Ctrl+Cto terminate the running process, then pressCtrl+Dto exit the container.Export your Hugging Face token. Replace
YOUR_HF_TOKENwith your actual token.console$ export HF_TOKEN=YOUR_HF_TOKEN
Run the container with the image tag that matches your CUDA version.
console$ ./container/run.sh -it --framework VLLM --mount-workspace --image nvcr.io/nvidia/ai-dynamo/vllm-runtime:0.9.0-cuda13 -e HF_TOKEN=$HF_TOKEN
Inside the container, create a custom launch script for disaggregated serving with the NVIDIA Nemotron model.
console$ cat << 'EOF' > ~/nemotron_disagg.sh #!/bin/bash # Kill any existing processes pkill -f "dynamo.frontend" pkill -f "dynamo.vllm" sleep 2 # Set deterministic hash for KV event IDs export PYTHONHASHSEED=0 # Model configuration - use command line argument or default MODEL="${1:-nvidia/Llama-3.1-Nemotron-Nano-4B-v1.1}" echo "Starting Dynamo Frontend..." python -m dynamo.frontend & echo "Starting Decode Workers with model: $MODEL" # Decode Worker 1 - Uses GPU 0 CUDA_VISIBLE_DEVICES=0 python3 -m dynamo.vllm \ --model "$MODEL" \ --trust-remote-code \ --is-decode-worker \ --max-model-len 2048 & # Decode Worker 2 - Uses GPU 1 VLLM_NIXL_SIDE_CHANNEL_PORT=20097 \ CUDA_VISIBLE_DEVICES=1 python3 -m dynamo.vllm \ --model "$MODEL" \ --trust-remote-code \ --is-decode-worker \ --max-model-len 2048 & echo "Starting Prefill Workers with model: $MODEL" # Prefill Worker 1 - Uses GPU 2 CUDA_VISIBLE_DEVICES=2 python3 -m dynamo.vllm \ --model "$MODEL" \ --trust-remote-code \ --is-prefill-worker \ --max-model-len 2048 \ --kv-events-config '{"publisher":"zmq","topic":"kv-events","endpoint":"tcp://*:20082","enable_kv_cache_events":true}' & # Prefill Worker 2 - Uses GPU 3 VLLM_NIXL_SIDE_CHANNEL_PORT=20099 \ CUDA_VISIBLE_DEVICES=3 python3 -m dynamo.vllm \ --model "$MODEL" \ --trust-remote-code \ --is-prefill-worker \ --max-model-len 2048 \ --kv-events-config '{"publisher":"zmq","topic":"kv-events","endpoint":"tcp://*:20083","enable_kv_cache_events":true}' & echo "All services starting... waiting for initialization..." sleep 30 echo "Deployment ready!" # Keep script running wait EOF
Make the script executable.
console$ chmod +x ~/nemotron_disagg.sh
Run the disaggregated serving script.
console$ ~/nemotron_disagg.shThe script starts the frontend service on port
8000, two decode workers on GPUs0and1, and two prefill workers on GPUs2and3with the specified model (defaults to NVIDIA Nemotron Nano 4B).To deploy the larger NVIDIA Nemotron Super 49B model instead, pass the model name as an argument:
console$ ~/nemotron_disagg.sh "nvidia/Llama-3_3-Nemotron-Super-49B-v1_5"
The 49B model requires high-memory GPUs such as B200 or GB200 class devices. Ensure sufficient VRAM and consider tensor parallelism for production deployments.NoteOpen a new terminal session on your server (outside the container).
Test with multiple sequential requests to observe worker distribution.
console$ for i in {1..5}; do echo "Request $i:" curl -s http://localhost:8000/v1/chat/completions \ -H "Content-Type: application/json" \ -d "{ \"model\": \"nvidia/Llama-3.1-Nemotron-Nano-4B-v1.1\", \"messages\": [{\"role\": \"user\", \"content\": \"Test request $i\"}], \"max_tokens\": 10 }" | jq '.id' sleep 1 done
Each request returns a unique ID, and the logs inside the container show which workers process each request.
Test with concurrent requests to verify load distribution.
console$ for i in {1..10}; do curl -s http://localhost:8000/v1/chat/completions \ -H "Content-Type: application/json" \ -d "{ \"model\": \"nvidia/Llama-3.1-Nemotron-Nano-4B-v1.1\", \"messages\": [{\"role\": \"user\", \"content\": \"Concurrent test $i\"}], \"max_tokens\": 20 }" & done wait echo "All requests completed"
Dynamo's router distributes the requests across available prefill and decode workers.
Conclusion
You have successfully deployed inference workloads using NVIDIA Dynamo with vLLM. The aggregated serving configuration provides a simple, single-GPU deployment suitable for low-latency applications, while the disaggregated serving configuration optimizes throughput by separating prefill and decode phases across multiple GPUs. Dynamo's intelligent routing and resource management maximize GPU utilization and token generation efficiency. For more advanced configurations, including KV-aware routing, speculative decoding, and Kubernetes deployments, refer to the official NVIDIA Dynamo documentation.