
How to Deploy MLFlow on the Vultr Kubernetes Engine
Introduction
MLflow is a versatile open-source Machine Learning (ML) platform for model lifecycle management. It supports experimentation, duplicability, deployment, and a central model registry. MLflow is used to track machine learning workload experiments, packaging and deployment of code, and collaborative management. Frequently used by data scientists and by MLOps professionals.
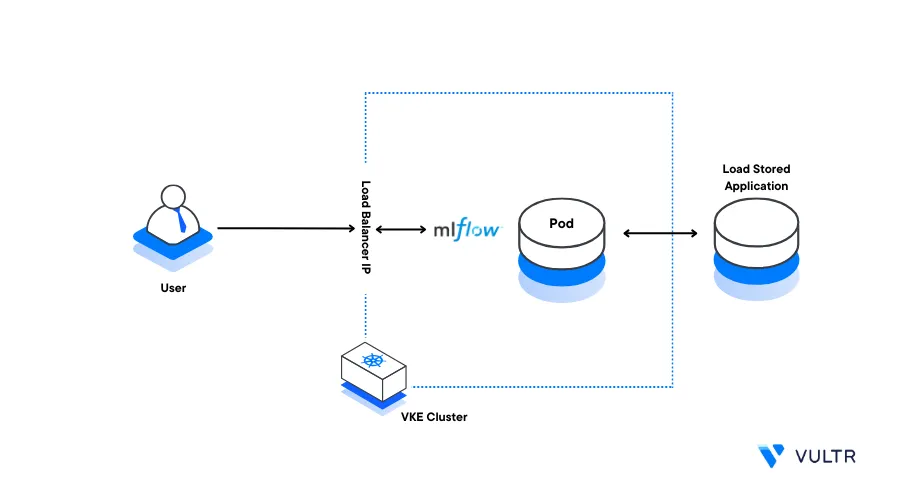
This article explains how to deploy MLflow on a Vultr Kubernetes Engine (VKE) cluster with a working environment and demo application.
Prerequisites
Before you begin:
Deploy a Vultr Kubernetes Engine(VKE) cluster
Deploy a Vultr Ubuntu instance to use as your management server
Using SSH, access the server
Install and configure Kubectl to access the cluster
Install the Helm package manager
$ sudo snap install helm --classic
Deploy Persistent Volume and Persistent Volume Claims (PVCs)
MLflow requires persistent storage to store artifacts and experiment data. In this section, deploy a PV and PVC to the cluster as described in the steps below.
Create a new file
mlflow-pv-pvc.yaml$ touch mlflow-pv-pvc.yamlUsing a text editor such as
nano, edit the file$ nano mlflow-pv-pvc.yamlAdd the following contents to the file
 apiVersion: v1
 kind: PersistentVolume
 metadata:
   name: mlflow-pv
   labels:
     type: local
 spec:
   storageClassName: manual
   capacity:
     storage: 10Gi
   accessModes:
     - ReadWriteOnce
   hostPath:
     path: "/mnt/data"
 ---
 apiVersion: v1
 kind: PersistentVolumeClaim
 metadata:
   name: mlflow-pvc
 spec:
   storageClassName: manual
   accessModes:
     - ReadWriteOnce
   resources:
     requests:
       storage: 10Gi
Save the file
Apply the configuration to your cluster
$ kubectl apply -f mlflow-pv-pvc.yamlVerify the deployed Cluster PVs
$ kubectl get pvOutput:
 NAME        CAPACITY   ACCESS MODES   RECLAIM POLICY   STATUS   CLAIM                STORAGECLASS   REASON   AGE
 mlflow-pv   10Gi       RWO            Retain           Bound    default/mlflow-pvc   manual
Verify the deployed Cluster PVCs
$ kubectl get pvcOutput:
 NAME         STATUS   VOLUME      CAPACITY   ACCESS MODES   STORAGECLASS   AGE
 mlflow-pvc   Bound    mlflow-pv   10Gi       RWO            manual         24s
Install MLflow
Using Helm, add
community-chartsto your repositories$ helm repo add community-charts https://community-charts.github.io/helm-chartsUpdate the Helm repository index
$ helm repo updateInstall MLflow. Replace
vultrwith your desired MLflow label$ helm install vultr community-charts/mlflowView the cluster deployment to verify that MLflow is ready and available
$ kubectl get deploymentsYour output should look like the one below:
 NAME           READY   UP-TO-DATE   AVAILABLE   AGE
 vultr-mlflow    1/1     1            1           19h
Expose the MLflow Forwarding Service For External Access
To access your MLflow deployment over the Internet, set up a forwarding service to expose the application for external access as described in the steps below.
Create a new file
mlflow-service.yaml$ touch mlflow-service.yamlEdit the file
$ nano mlflow-service.yamlAdd the following contents to the file
 apiVersion: v1
 kind: Service
 metadata:
   name: mlflow-service
 spec:
   selector:
     app: mlflow
   ports:
     - protocol: TCP
       port: 80
       targetPort: 5000
   type: LoadBalancer
Apply the service to your cluster
$ kubectl apply -f mlflow-service.yamlWait for at least
3minutes, view the cluster services, and verify the MLflow External IP value$ kubectl get servicesYour output should look like the one below:
 NAME             TYPE           CLUSTER-IP      EXTERNAL-IP   PORT(S)        AGE
 kubernetes       ClusterIP      10.96.0.1       <none>        443/TCP        40m
 mlflow-service   LoadBalancer   10.110.234.98   192.0.2.100   80:31545/TCP   64s
 vultr-mlflow     ClusterIP      10.102.93.29    <none>        5000/TCP       101s
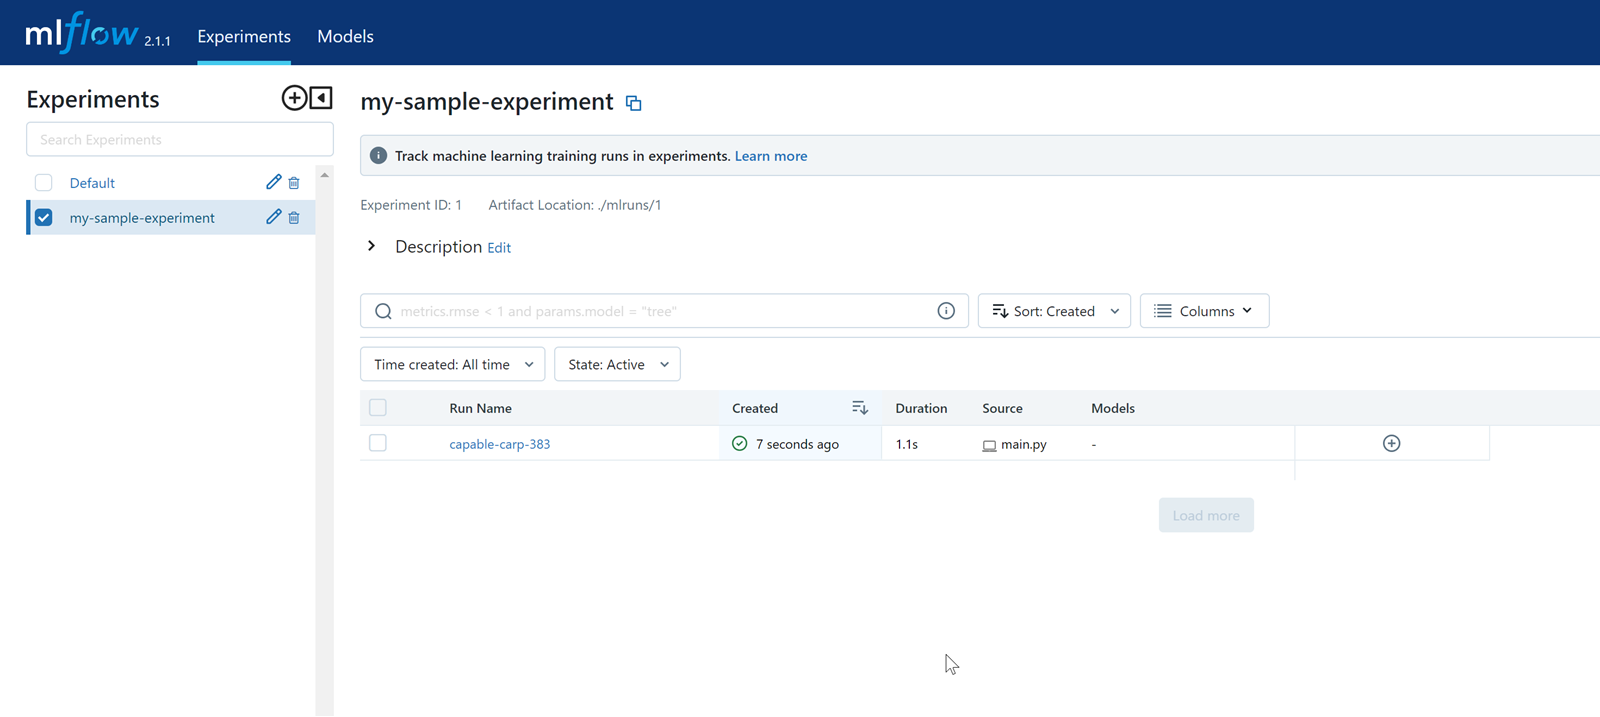
Create a sample MLflow Experiment
To test the MLflow functionalities, create a sample linear regression experiment as described in the steps below.
Create a new directory
Models$ mkdir ModelsSwitch to the directory
$ cd ModelsUsing
pip, install the necessary experiment dependencies$ pip install mlflow scikit-learn shap matplotlibWhen using Conda, install the dependencies in your environment:
$ conda install mlflow scikit-learn shap matplotlibCreate a new environment variable with your desired experiment name
$ export MLFLOW_EXPERIMENT_NAME='my-sample-experiment'Export a new
mlflow_TRACKING_URIwith your MLflow service external IP HTTP URL as the value. For example192.0.2.100$ export MLFLOW_TRACKING_URI='http://192.0.2.100'Create a new file
main.py$ touch main.pyEdit the file
$ nano main.pyAdd the following contents to the file
 # Import Libraries

 import os

 import numpy as np
 import shap
 from sklearn.datasets import load_diabetes
 from sklearn.linear_model import LinearRegression

 import mlflow
 from mlflow.artifacts import download_artifacts
 from mlflow.tracking import MlflowClient

 # Prepare the Training Data

 X, y = load_diabetes(return_X_y=True, as_frame=True)
 X = X.iloc[:50, :4]
 y = y.iloc[:50]

 # Train a model

 model = LinearRegression()
 model.fit(X, y)

 # Log an explanation

 with mlflow.start_run() as run:
     mlflow.shap.log_explanation(model.predict, X)

 # List Artifacts

 client = MlflowClient()
 artifact_path = "model_explanations_shap"
 artifacts = [x.path for x in client.list_artifacts(run.info.run_id, artifact_path)]
 print("# artifacts:")
 print(artifacts)

 # Load the logged explanation

 dst_path = download_artifacts(run_id=run.info.run_id, artifact_path=artifact_path)
 base_values = np.load(os.path.join(dst_path, "base_values.npy"))
 shap_values = np.load(os.path.join(dst_path, "shap_values.npy"))

 # Show a Force Plot

 shap.force_plot(float(base_values), shap_values[0, :], X.iloc[0, :], matplotlib=True)
Save and close the file.
The above Python application imports all necessary libraries and uses the diabetes dataset for training data. The dataset contains a total of 442 samples. Then, the model is trained and an explanation is logged to MLflow using SHAP (Shapley Additive Explanations) that plots the output for a visual representation of the data.
Test the MLflow Experiement
Run the Python application
$ python3 main.pyUsing a web browser such as Chrome, visit your MLflow external IP address
http://192.0.2.100
Verify that the application is included in your MLflow experiments. It uses a linear regression statistical approach to model a relationship between a scalar response and one or more variables.
Conclusion
You have deployed MLflow on a Vultr Kubernetes Engine (VKE) cluster. To test the service operations, implement more examples from the MLflow repository. For more information about MLflow, visit the following documentation resources:
Next Steps
To implement more solutions, visit the following resources:
- Deploy a Machine Learning Model to Production with TensorFlow Serving
- How to Build a Machine Learning Classifier in Python with Scikit Learn
- Introduction to Vultr Cloud GPUs
- Fine Tune a Hugging Face Diffuser Model on Vultr Cloud GPU