
How to Deploy NATS on Vultr Kubernetes Engine
Introduction
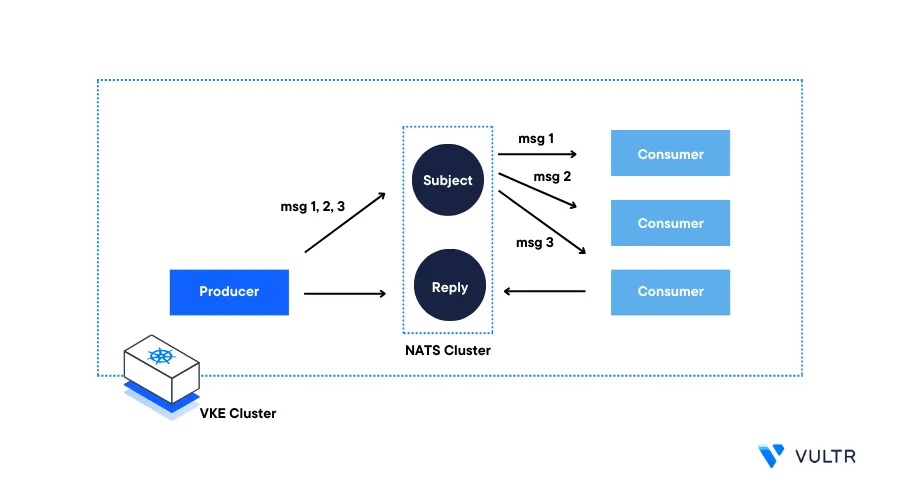
NATS is an open-source, lightweight, and high-performance messaging system designed to build distributed and scalable applications. It provides publish-subscribe, queuing and request-reply messaging patterns that are often used in cloud-native and microservice implementations.
NATS offers publish-subscribe messaging in that a publisher sends a message on a subject and any active subscriber listening on the subject receives the message. This ensures that any message sent by a publisher reaches all registered subscribers.
In addition, NATS also provides queue-based messaging. This allows subscribers to register as part of a queue. Subscribers that are part of a queue form a queue group and only a single random queue group subscriber consumes a message each time it is received by the queue group.
In this guide, you will install a NATS cluster on a Vultr Kubernetes Engine (VKE) cluster using Helm. Then, you will deploy producer and consumer client applications to exchange messages using the NATS Go client within the cluster to verify how queue based messaging works with NATS.
Prerequisites
Before you start:
Deploy a Vultr Kubernetes Engine (VKE) clusterwith at least
3nodesDeploy a OneClick Docker instance using the Vultr Marketplace Application to use the management server
Create a Vultr Container Registry instance to build and store private repositories
Using SSH, access the server as a non-root sudo user
Install and Configure Kubectl to access the cluster
Install the Helm CLI tool
$ sudo snap install helm --classicInstall Go
$ sudo apt install golang
Install NATS
Using Helm, add the NATS repository to your system
$ helm repo add nats https://nats-io.github.io/k8s/helm/charts/Update the Helm repositories
$ help repo updateInstall NATS to your cluster
$ helm install nats nats/natsView your cluster pods filtered by the name
nats$ kubectl get pods -l=app.kubernetes.io/name=natsWait for the Pods to transition to
Runningsimilar to the output below:NAME READY STATUS RESTARTS AGE nats-0 2/2 Running 0 25s nats-box-7ffb855bbb-dhtvk 1/1 Running 0 25s
Set Up the NATS consumer application
Switch to your user home directory
$ cdCreate a new NATS application directory
nats-vke$ mkdir nats-vkeSwitch to the directory
$ cd nats-vkeCreate a new consumer application directory
nats-consumer$ mkdir nats-consumerSwitch to the directory
$ cd nats-consumerCreate a new Go module
nats-consumer$ go mod init nats-consumerUsing a text editor such as
nano, create a new fileconsumer.go$ nano consumer.goAdd the following contents to the file
 package main

 import (
     "fmt"
     "log"
     "os"
     "os/signal"
     "syscall"

     "github.com/nats-io/nats.go"
 )

 func main() {

     natsServer := os.Getenv("NATS_SERVER")
     if natsServer == "" {
         log.Fatal("missing NATS_SERVER env variable")
     }

     subject := os.Getenv("NATS_SUBJECT")
     if subject == "" {
         log.Fatal("missing NATS_SUBJECT env variable")
     }

     queueGroup := os.Getenv("NATS_QUEUE_GROUP")
     if queueGroup == "" {
         log.Fatal("missing NATS_QUEUE_GROUP env variable")
     }

     nc, err := nats.Connect(natsServer)
     if err != nil {
         log.Fatalf("Error connecting to NATS: %v", err)
     }

     fmt.Println("successfully connected to", natsServer)

     defer nc.Close()

     _, err = nc.QueueSubscribe(subject, queueGroup, func(msg *nats.Msg) {
         log.Printf("Received message on subject %s: %s", msg.Subject, string(msg.Data))
     })

     if err != nil {
         log.Fatalf("Error subscribing to subject: %v", err)
     }

     log.Printf("Subscribed to subject %s within queue group %s", subject, queueGroup)

     waitForSignal()
 }

 func waitForSignal() {
     sigCh := make(chan os.Signal, 1)
     signal.Notify(sigCh, syscall.SIGINT, syscall.SIGTERM)

     <-sigCh
     log.Println("Received termination signal. Shutting down...")
 }
Save and close the file.
Below is what the above application code does in order of execution:
- Reads the required environment variables for the NATS server, subject and the queue group
- Connects to the NATS server
- Subscribes to the subject using a queue group
- The message handler logs messages received from the subject to the console
Create the Consumer Container image
Create a new file Dockerfile
$ nano DockerfileAdd the following configurations to the file
 FROM golang:1.18-buster AS build

 WORKDIR /app
 COPY go.mod ./
 COPY go.sum ./

 RUN go mod download

 COPY consumer.go ./
 RUN go build -o /nats-consumer-app

 FROM gcr.io/distroless/base-debian10
 WORKDIR /
 COPY --from=build /nats-consumer-app /nats-consumer-app
 EXPOSE 8080
 USER nonroot:nonroot
 ENTRYPOINT ["/nats-consumer-app"]
Save and close the file.
The above Dockerfile configuration uses a two-stage build process:
- The first stage uses
golang:1.18-busteras the base image to build the NATS consumer program binary - The second stage uses
gcr.io/distroless/base-debian10as the base image and copies the binary produced by the first stage
- The first stage uses
Pull Go modules to create a new
go.sumfile$ go mod tidyList files and verify your directory structure
$ lsOutput:
consumer.go Dockerfile go.mod go.sumLogin to your Vultr Container Registry account. Replace
examplewith your actual registry name$ docker login https://sjc.vultrcr.com/exampleWhen prompted, enter your Registry username and password
Build the
nats-consumer-appcontainer image$ docker build -t sjc.vultrcr.com/example/nats-consumer:latest .Push the image to your registry
$ docker build -t sjc.vultrcr.com/example/nats-consumer:latest .When successful, your output should look like the one below:
 The push refers to repository [sjc.vultrcr.com/example/nats-consumer]
 5adb57ca5a3c: Pushed
 91f7bcfdfda8: Pushed
 05ef21d76315: Pushed
 latest: digest: sha256:1ee56100e7ba4274a8c33b4c49740bbd2f69e4f7f75461208b7d2854c07c63c5 size: 949
Deploy the Nats Consumer Application to VKE
Create a new deployment manifest file
consumer.yaml$ nano consumer.yamlAdd the following contents to the file
 apiVersion: apps/v1
 kind: Deployment
 metadata:
   name: nats-consumer
 spec:
   replicas: 1
   selector:
     matchLabels:
       app: nats-consumer
   template:
     metadata:
       labels:
         app: nats-consumer
     spec:
       containers:
         - name: nats-consumer
           image: sjc.vultrcr.com/example/nats-consumer:latest
           imagePullPolicy: Always
           env:
             - name: NATS_SERVER
               value: nats://nats:4222
             - name: NATS_SUBJECT
               value: vke-nats-demo-subject
             - name: NATS_QUEUE_GROUP
               value: vke-nats-demo-queue
Save and close the file
Deploy the consumer application to your cluster
$ kubectl apply -f consumer.yamlView cluster pods with the name
nats-consumer$ kubectl get pods -l=app=nats-consumerVerify that the
nats-consumerpod is available and running similar to the output below:NAME READY STATUS RESTARTS AGE nats-consumer-746f5ddf75-tzmxs 1/1 Running 0 12s
Set Up the NATS Producer Application
Navigate to the root NATS project directory
nats-vke$ cd /home/nats-vke/Create a new directory
nats-producer$ mkdir nats-producerSwitch to the directory
$ cd nats-producerCreate a new Go module
$ go mod init nats-producerCreate a new file
producer.go$ nano producer.goAdd the following contents to the file
 package main

 import (
     "fmt"
     "log"
     "os"
     "os/signal"
     "syscall"
     "time"

     "github.com/nats-io/nats.go"
 )

 func main() {

     natsServer := os.Getenv("NATS_SERVER")
     if natsServer == "" {
         log.Fatal("missing NATS_SERVER env variable")
     }

     subject := os.Getenv("NATS_SUBJECT")
     if subject == "" {
         log.Fatal("missing NATS_SUBJECT env variable")
     }

     nc, err := nats.Connect(natsServer)
     if err != nil {
         log.Fatalf("Error connecting to NATS: %v", err)
     }

     fmt.Println("successfully connected to", natsServer)

     defer nc.Close()

     c := make(chan os.Signal, 1)
     signal.Notify(c, os.Interrupt, syscall.SIGTERM)

     go func() {
         <-c
         fmt.Println("\nReceived termination signal. Exiting...")
         os.Exit(0)
     }()

     index := 0
     for {
         message := fmt.Sprintf("message-%d", index)
         if err := nc.Publish(subject, []byte(message)); err != nil {
             log.Printf("Error publishing message: %v", err)
         } else {
             log.Printf("Published message: %s", message)
         }
         index++
         time.Sleep(3 * time.Second)
     }
 }
Save and close the file.
Below is what the above application code does:
- Reads the required environment variables for the NATS server and subject
- Connects to the NATS server
- Publishes messages to the NATS server in an infinite loop, and waits for three seconds between each iteration
- Gracefully in response to a
SIGTERMsignal
Create the NATS Producer Container Image
Create a new Dockerfile
$ nano DockerfileAdd the following contents to the file
 FROM golang:1.18-buster AS build

 WORKDIR /app
 COPY go.mod ./
 COPY go.sum ./

 RUN go mod download

 COPY producer.go ./
 RUN go build -o /nats-producer-app

 FROM gcr.io/distroless/base-debian10
 WORKDIR /
 COPY --from=build /nats-producer-app /nats-producer-app
 EXPOSE 8080
 USER nonroot:nonroot
 ENTRYPOINT ["/nats-producer-app"]
Save and close the file.
The above Dockerfile configuration applies the two-stage build process below:
- The first stage uses
golang:1.18-busteras the base image to build the NATS producer program binary - The second stage uses
gcr.io/distroless/base-debian10as the base image and copies the binary produced by the first stage
- The first stage uses
Pull Go modules to create a new
go.sumfile$ go mod tidyBuild the container image with to include all directory files
$ docker build -t sjc.vultrcr.com/example/nats-producer-app:latest .Push the image to your Vultr Container Registry. Replace
examplewith your actual registry name$ docker push sjc.vultrcr.com/example/nats-producer-app
Deploy the NATS Producer Application
Create a new file
producer.yaml$ nano producer.yamlAdd the following contents to the file. Replace
sjc.vultrcr.com/example/nats-consumerwith your actual Vultr Container Registry URLapiVersion: apps/v1 kind: Deployment metadata: name: nats-producer spec: replicas: 1 selector: matchLabels: app: nats-producer template: metadata: labels: app: nats-producer spec: containers: - name: nats-producer image: example-user/nats-producer-app imagePullPolicy: Always env: - name: NATS_SERVER value: nats://nats:4222 - name: NATS_SUBJECT value: vke-nats-demo-subjectSave and close the file.
Deploy the producer application to your cluster
$ kubectl apply -f producer.yamlVerify that the deployment is successful
$ kubectl get deploymentsOutput:
 NAME             READY   UP-TO-DATE   AVAILABLE   AGE
 nats-box         1/1     1            1           6h28m
 nats-consumer    2/2     2            2           6h15m
 nats-consumer2   1/1     1            1           34m
 nats-consumer3   0/1     1            0           33m
 nats-producer    1/1     1            1           6h5m
View cluster pods with the name
nats-producer$ kubectl get pods -l=app=nats-producerOutput:
 NAME                              READY   STATUS    RESTARTS   AGE
 nats-producer-842f5eef42-dfgz     1/1     Running   0          20s
Test the NATS Application Operations
To verify that you have correctly deployed NATS in your VKE cluster, test the application perfomance. Monitor the nats-producer and nats-consumer application logs to view the ongoing cluster operations as described below.
View the NATS producer application logs
$ kubectl logs -f $(kubectl get pod -l=app=nats-producer -o jsonpath='{.items[0].metadata.name}')Monitor the
Published Messageoperations similar to the output below:Published message: message-10 Published message: message-11 Published message: message-12View hhe NATS consumer application logs
$ kubectl logs -f $(kubectl get pod -l=app=nats-consumer -o jsonpath='{.items[0].metadata.name}')Verify the
Received Messagelog operationsReceived message on subject vke-nats-demo-subject: message-10 Received message on subject vke-nats-demo-subject: message-11 Received message on subject vke-nats-demo-subject: message-12To implement load-balancing with multiple pods, scale up the NATS consumer application to
2replicas$ kubectl scale deployment/nats-consumer --replicas=2View the NATS consumer pods to verify the new replica
$ kubectl get pods -l=app=nats-consumerOutput:
 NAME                              READY   STATUS         RESTARTS   AGE
 nats-consumer-6fb9d66968-bclj7    1/1     Running        0          6h19m
 nats-consumer-6fb9d66968-cgr95    1/1     Running        0          6h33m
The NATS consumer application performs load balancing across pods with sequence IDs depending on the deployment time. For example, the first pod is assigned the ID
0and the second pod1View the NATS consumer replica application ID
0$ kubectl logs -f $(kubectl get pod -l=app=nats-consumer -o jsonpath='{.items[1].metadata.name}')Output:
 Received message on subject vke-nats-demo-subject: message-17
 Received message on subject vke-nats-demo-subject: message-20
 Received message on subject vke-nats-demo-subject: message-23
View the replica application ID
1$ kubectl logs -f $(kubectl get pod -l=app=nats-consumer -o jsonpath='{.items[1].metadata.name}')Output:
 Received message on subject vke-nats-demo-subject: message-18
 Received message on subject vke-nats-demo-subject: message-19
 Received message on subject vke-nats-demo-subject: message-21
As displayed in the log output, the NATS application messages are load-balanced between the two consumer instances. NATS sends messages to each instance randomly cecause they are in the same queue group. This way, it's possible to distribute data processing load among multiple consumer instances and scale the application horizontally within the cluster.
Conclusion
You have deployed NATS on a Vultr Kubernetes Engine (VKE) cluster and tested cluster operations using a producer application that sends data to a NATS subject. To balance user traffic and the cluster load, you load-balanced the processing across multiple NATS consumer instances using a queue based messaging pattern. For more information on how to use NATS, visit the official documentation.
More Information
For more information on how to interact with VKE cluster services, visit the following resources: