
How to Deploy NetBird with Zitadel on Vultr
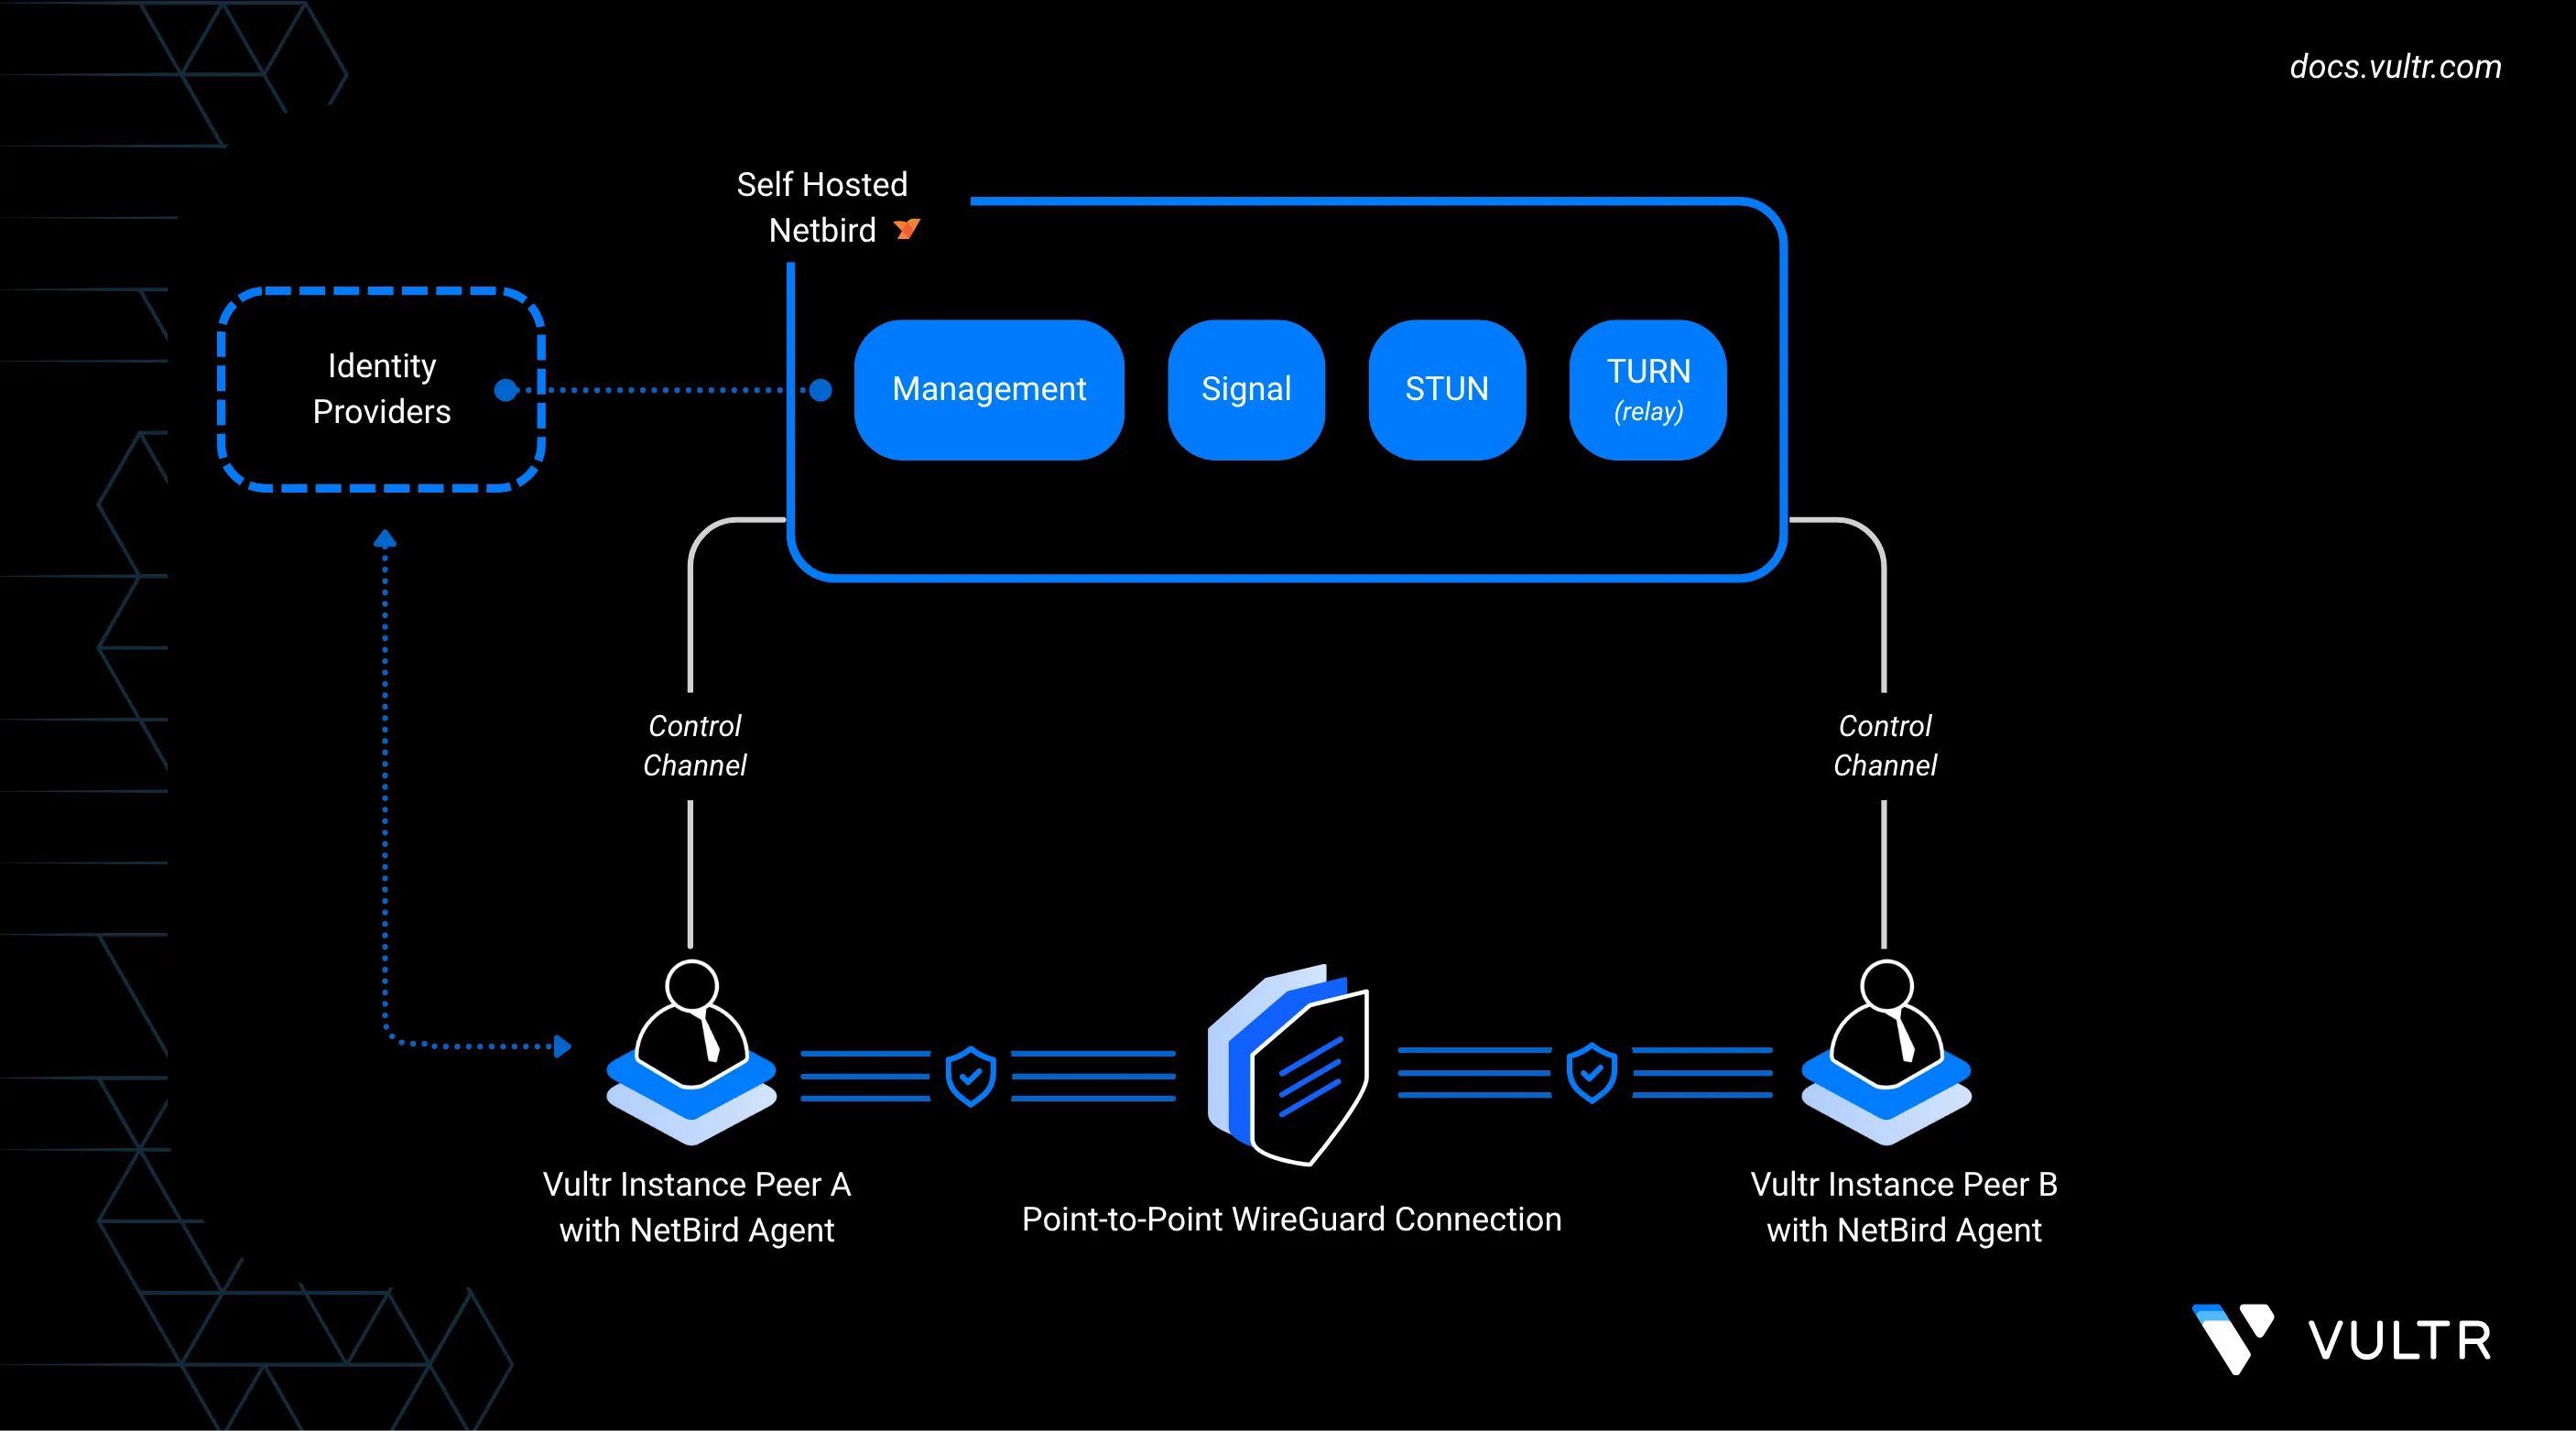
NetBird is an open-source peer-to-peer VPN platform that enables secure private networking across distributed infrastructure. It builds encrypted mesh networks using WireGuard tunnels, allowing seamless, low-latency connections between nodes without manual firewall configuration or port forwarding.
In this guide, you'll learn how to self-host the NetBird control plane on a Vultr instance and connect peers across different regions using setup keys (recommended) or a browser-based login flow. By the end, you'll have a functional mesh network with traffic routed through a designated exit node for secure, centralized egress control.
Prerequisites
Before you begin, ensure you have the following resources provisioned:
- Three Ubuntu-based Vultr instances:
- One in the Delhi (DEL) region
- One in the Amsterdam (AMS) region
- One in the Atlanta (ATL) region
- A public domain name pointing to the public IP of the
Vultr DELinstance
Self Host NetBird
This section walks you through the process of self-hosting a NetBird control plane on a publicly accessible Vultr instance deployed in India. In this setup, you will use a single-line script to deploy the entire stack, including the management service, signal server, TURN/STUN server, and a default identity provider (Zitadel).
At the end of this section, you will have a running NetBird instance accessible via your domain over HTTPS.
Allow the following ports required by NetBird for control plane, TURN, management, and user traffic.
console$ sudo ufw allow 80/tcp $ sudo ufw allow 443/tcp $ sudo ufw allow 33073/tcp $ sudo ufw allow 10000/tcp $ sudo ufw allow 33080/tcp $ sudo ufw allow 3478/udp $ sudo ufw allow 49152:65535/udp $ sudo ufw reload $ sudo ufw status verbose
Set up Docker's apt repository.
console$ sudo apt-get update $ sudo apt-get install ca-certificates curl gnupg lsb-release -y $ sudo install -m 0755 -d /etc/apt/keyrings $ curl -fsSL https://download.docker.com/linux/ubuntu/gpg | sudo gpg --dearmor -o /etc/apt/keyrings/docker.gpg $ echo "deb [arch=$(dpkg --print-architecture) signed-by=/etc/apt/keyrings/docker.gpg] https://download.docker.com/linux/ubuntu $(lsb_release -cs) stable" | sudo tee /etc/apt/sources.list.d/docker.list > /dev/null $ sudo apt-get update
Install Docker Engine, Compose plugin, and utilities.
console$ sudo apt-get install docker-ce docker-ce-cli containerd.io docker-buildx-plugin docker-compose-plugin jq -y
Enable and start the Docker service.
console$ sudo systemctl enable --now docker
Allow your user to run Docker without
sudo.console$ sudo usermod -aG docker $USER $ newgrp docker
If
dockerstill requiressudo, log out and back in to apply the group change.Verify the Compose plugin is available.
console$ docker compose version
Export your domain name and run the NetBird installation script. Replace
example.comwith your actual domain, and ensure the domain'sArecord points to your server’s public IP address.console$ export NETBIRD_DOMAIN=example.com $ curl -fsSL https://github.com/netbirdio/netbird/releases/latest/download/getting-started-with-zitadel.sh | bash
If you prefer to inspect the script before running it, download and review it locally:Noteconsole$ curl -sSLO https://github.com/netbirdio/netbird/releases/latest/download/getting-started-with-zitadel.sh $ cat getting-started-with-zitadel.sh $ export NETBIRD_DOMAIN=example.com $ sudo bash getting-started-with-zitadel.sh
Once the script completes, the NetBird management interface is accessible at:
https://example.comUse the credentials printed in your terminal to log in to the dashboard and begin adding peers to your mesh network.
Do not close your terminal before copying the setup key and credentials. These values are only shown once during installation.Warning
Add Peers to the Internal Network
The recommended way to add servers and headless machines is to use setup keys. Setup keys are pre-authorized tokens that let peers join automatically without interactive login. See the NetBird Setup Keys documentation for more details.
In the Admin Panel, go to Setup Keys and click Create Setup Key. Give it a name (for example, "vultr-servers"), set usage limits as needed, and copy the key value.
On each peer, install the NetBird client.
console$ curl -fsSL https://pkgs.netbird.io/install.sh | sh
Register the peer with your self-hosted URLs and the setup key.
console$ sudo netbird up --management-url https://example.com --admin-url https://example.com --setup-key <PASTE_KEY_HERE>
In the Admin Panel, the peer will appear automatically. Rename each to something identifiable (for example,
vultr-amsandvultr-atl) and assign them to groups as needed.
If you prefer an interactive flow, you can register peers via browser-based login.
Amsterdam Instance
SSH into your Amsterdam-based Vultr instance.
Install the NetBird client.
console$ curl -fsSL https://pkgs.netbird.io/install.sh | sh
Start the registration using your self-hosted URLs.
console$ sudo netbird up --management-url https://example.com --admin-url https://example.com
The CLI will display a login link and a one-time user code, for example:
Please do the SSO login in your browser.
If your browser didn't open automatically, use this URL to log in:

https://example.com/device?user_code=CWMC-RFQZ
Open the URL in your browser and log in using your identity provider (e.g., Google, GitHub, Microsoft).
Approve the new peer when prompted. This binds the Vultr instance to your NetBird account.
Return to the NetBird Admin Panel and go to the Peers view.
Locate the newly registered peer, rename it to something identifiable like
vultr-ams, and assign it to a group if needed.
Atlanta Instance
Repeat the same steps on your Atlanta-based Vultr instance.
SSH into the instance and install the client.
console$ curl -fsSL https://pkgs.netbird.io/install.sh | sh
Register it using the same login process.
console$ sudo netbird up --management-url https://example.com --admin-url https://example.com
Open the URL in your browser and log in using your identity provider.
In the Peers view, rename the new node to
vultr-atlor similar, and assign it to a group.
Final Verification
Navigate to the Peers tab in the Admin Panel.
You should see both
vultr-amsandvultr-atllisted as online.Click each to view their assigned
100.x.x.xmesh IP addresses.Confirm that both peers can ping each other over the private network.
console$ ping 100.x.x.x # Replace with the actual peer IP
This completes the addition of two cloud-hosted peers in different regions.
Route Traffic Through an Exit Node
In this section, we’ll configure the vultr-ams instance as an exit node and route all traffic from the vultr-atl instance through it. This is useful for scenarios where you want to route outbound traffic through a central region for auditing, egress control, or geo-IP masking.
Designate vultr-ams as Exit Node
Navigate to the Peers tab in the NetBird Admin Panel.
Click on the peer named
vultr-amsto open its detail view.Scroll down and click Set Up Exit Node.

Set an identifier such as
ams-exit.
In the Distribution Groups dropdown, select or create a group that will include the
vultr-atlnode (e.g.,atlanta-nodes).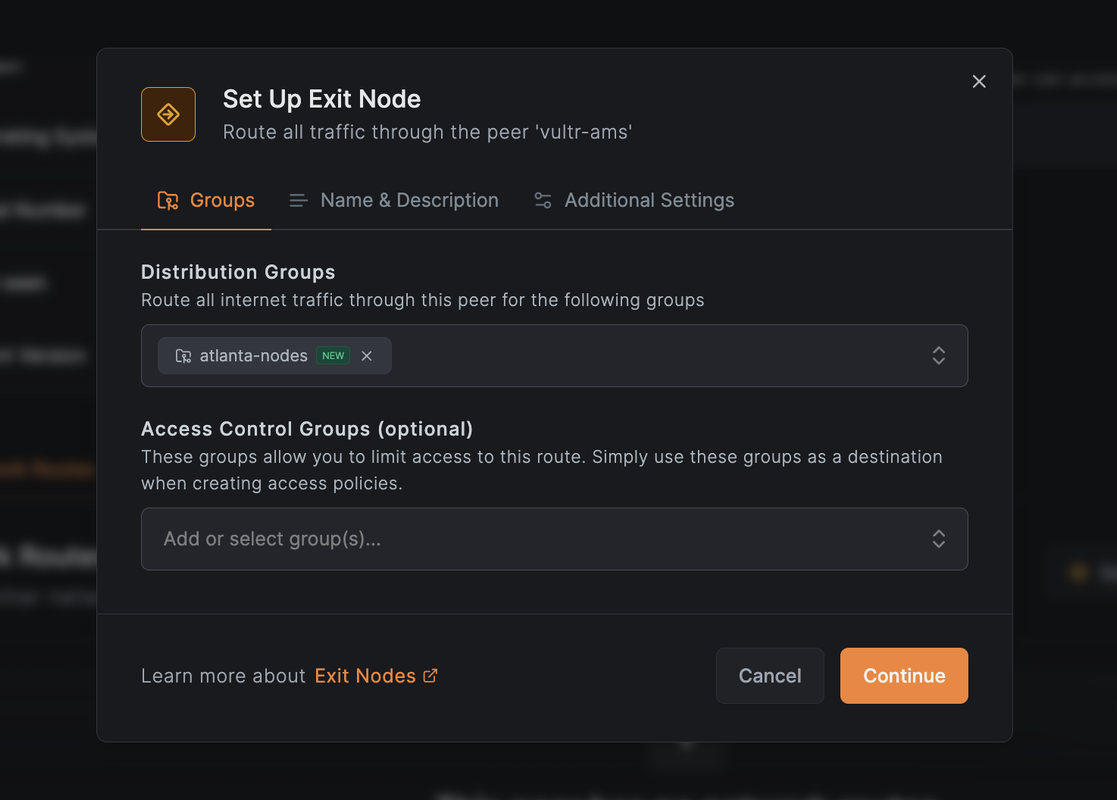
Click Save Changes to apply the configuration.
NetBird will now route all traffic from peers in the
atlanta-nodesgroup through thevultr-amsinstance.
Assign vultr-atl to the Distribution Group
In the Peers view, click on
vultr-atl.Assign it to the
atlanta-nodesgroup.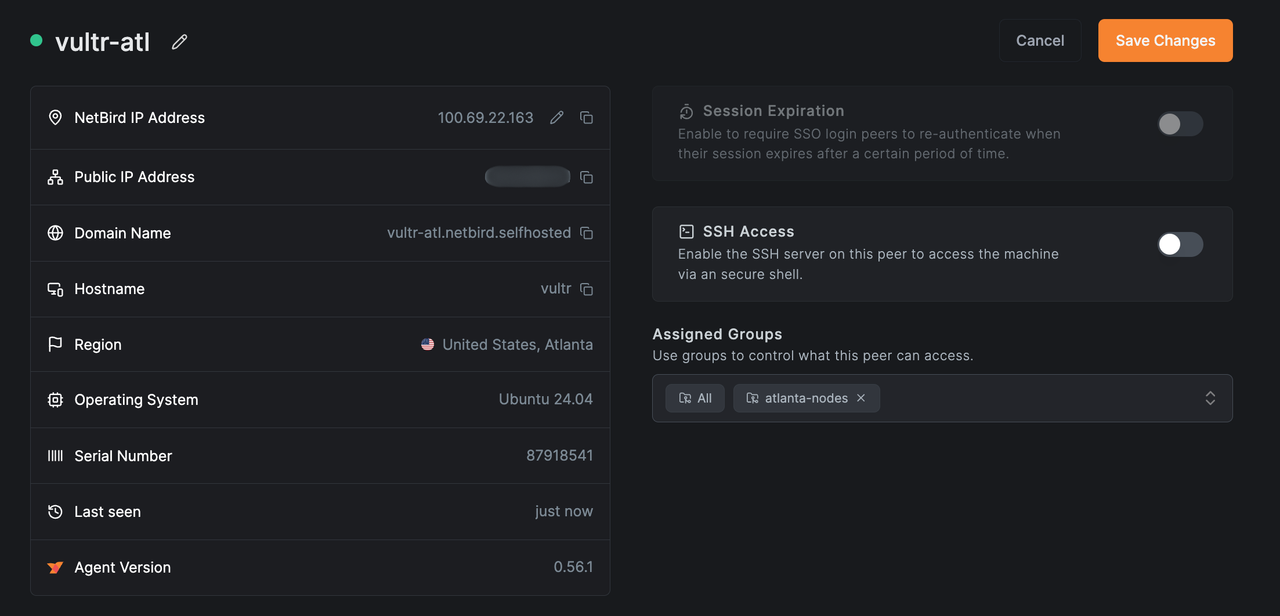
Confirm that it appears in the list of peers using
vultr-amsas an exit node.
Verify Routing
To confirm that traffic from vultr-atl is correctly routed through the vultr-ams exit node, follow the steps below on the AMS-based instance (vultr-ams), which is now acting as the exit node.
Enable IP forwarding.
console$ sudo sysctl -w net.ipv4.ip_forward=1
Add a MASQUERADE rule to NAT outbound traffic via the correct network interface.
console$ sudo iptables -t nat -A POSTROUTING -o $(ip route get 1.1.1.1 | awk '{print $5}') -j MASQUERADE
Confirm IP forwarding is enabled.
console$ sudo sysctl net.ipv4.ip_forward
Monitor traffic routed through this peer.
console$ sudo watch -n1 "iptables -t nat -v -L POSTROUTING"
This command displays a live counter of packets hitting the MASQUERADE rule. You should see the packet count and byte count increase as traffic from the
vultr-atlinstance flows through the exit node.Chain POSTROUTING (policy ACCEPT 100 packets, 8062 bytes) pkts bytes target prot opt in out source destination 42 3098 MASQUERADE all -- any enp1s0 anywhere anywhereIf the packet count does not increase, confirm that theNotevultr-atlpeer is set to usevultr-amsas its exit node, and ensure that firewall rules or network settings on both sides are not blocking outbound connections.
NetBird Use Cases and Components
Common Use Cases on Vultr
- Secure Dev/Test Networks: Privately connect test environments across Vultr regions without exposing services to the internet.
- Remote Access Gateway: Use one Vultr instance as a jump host to access other machines securely.
- Distributed App Mesh: Interconnect Vultr-based Kubernetes, bare metal, and VM workloads into one cohesive private mesh.
Key Components
- Management Service: Handles peer registration and configuration.
- Signal & TURN Server: Facilitates NAT traversal and relays traffic when needed.
- Peer Agent: Lightweight NetBird client that forms encrypted tunnels.
- SSO Integration: Works with providers like GitHub, Google, or custom OIDC.
- Peer Approval: Requires admin approval before peers can join the network.
- Setup Keys: Pre-authorized tokens for joining headless servers or containers.
Conclusion
In this guide, you deployed a self-hosted NetBird control plane on a Vultr instance and created a secure mesh network across multiple regions. You added peers using setup keys, optionally tested the browser-based flow, designated an exit node for outbound traffic routing, and verified connectivity. This configuration enables secure, scalable private networking ideal for multi-region deployments, remote access, and modern application infrastructures.