How to Deploy Spinifex on Vultr - An AWS-Compatible Infrastructure Platform
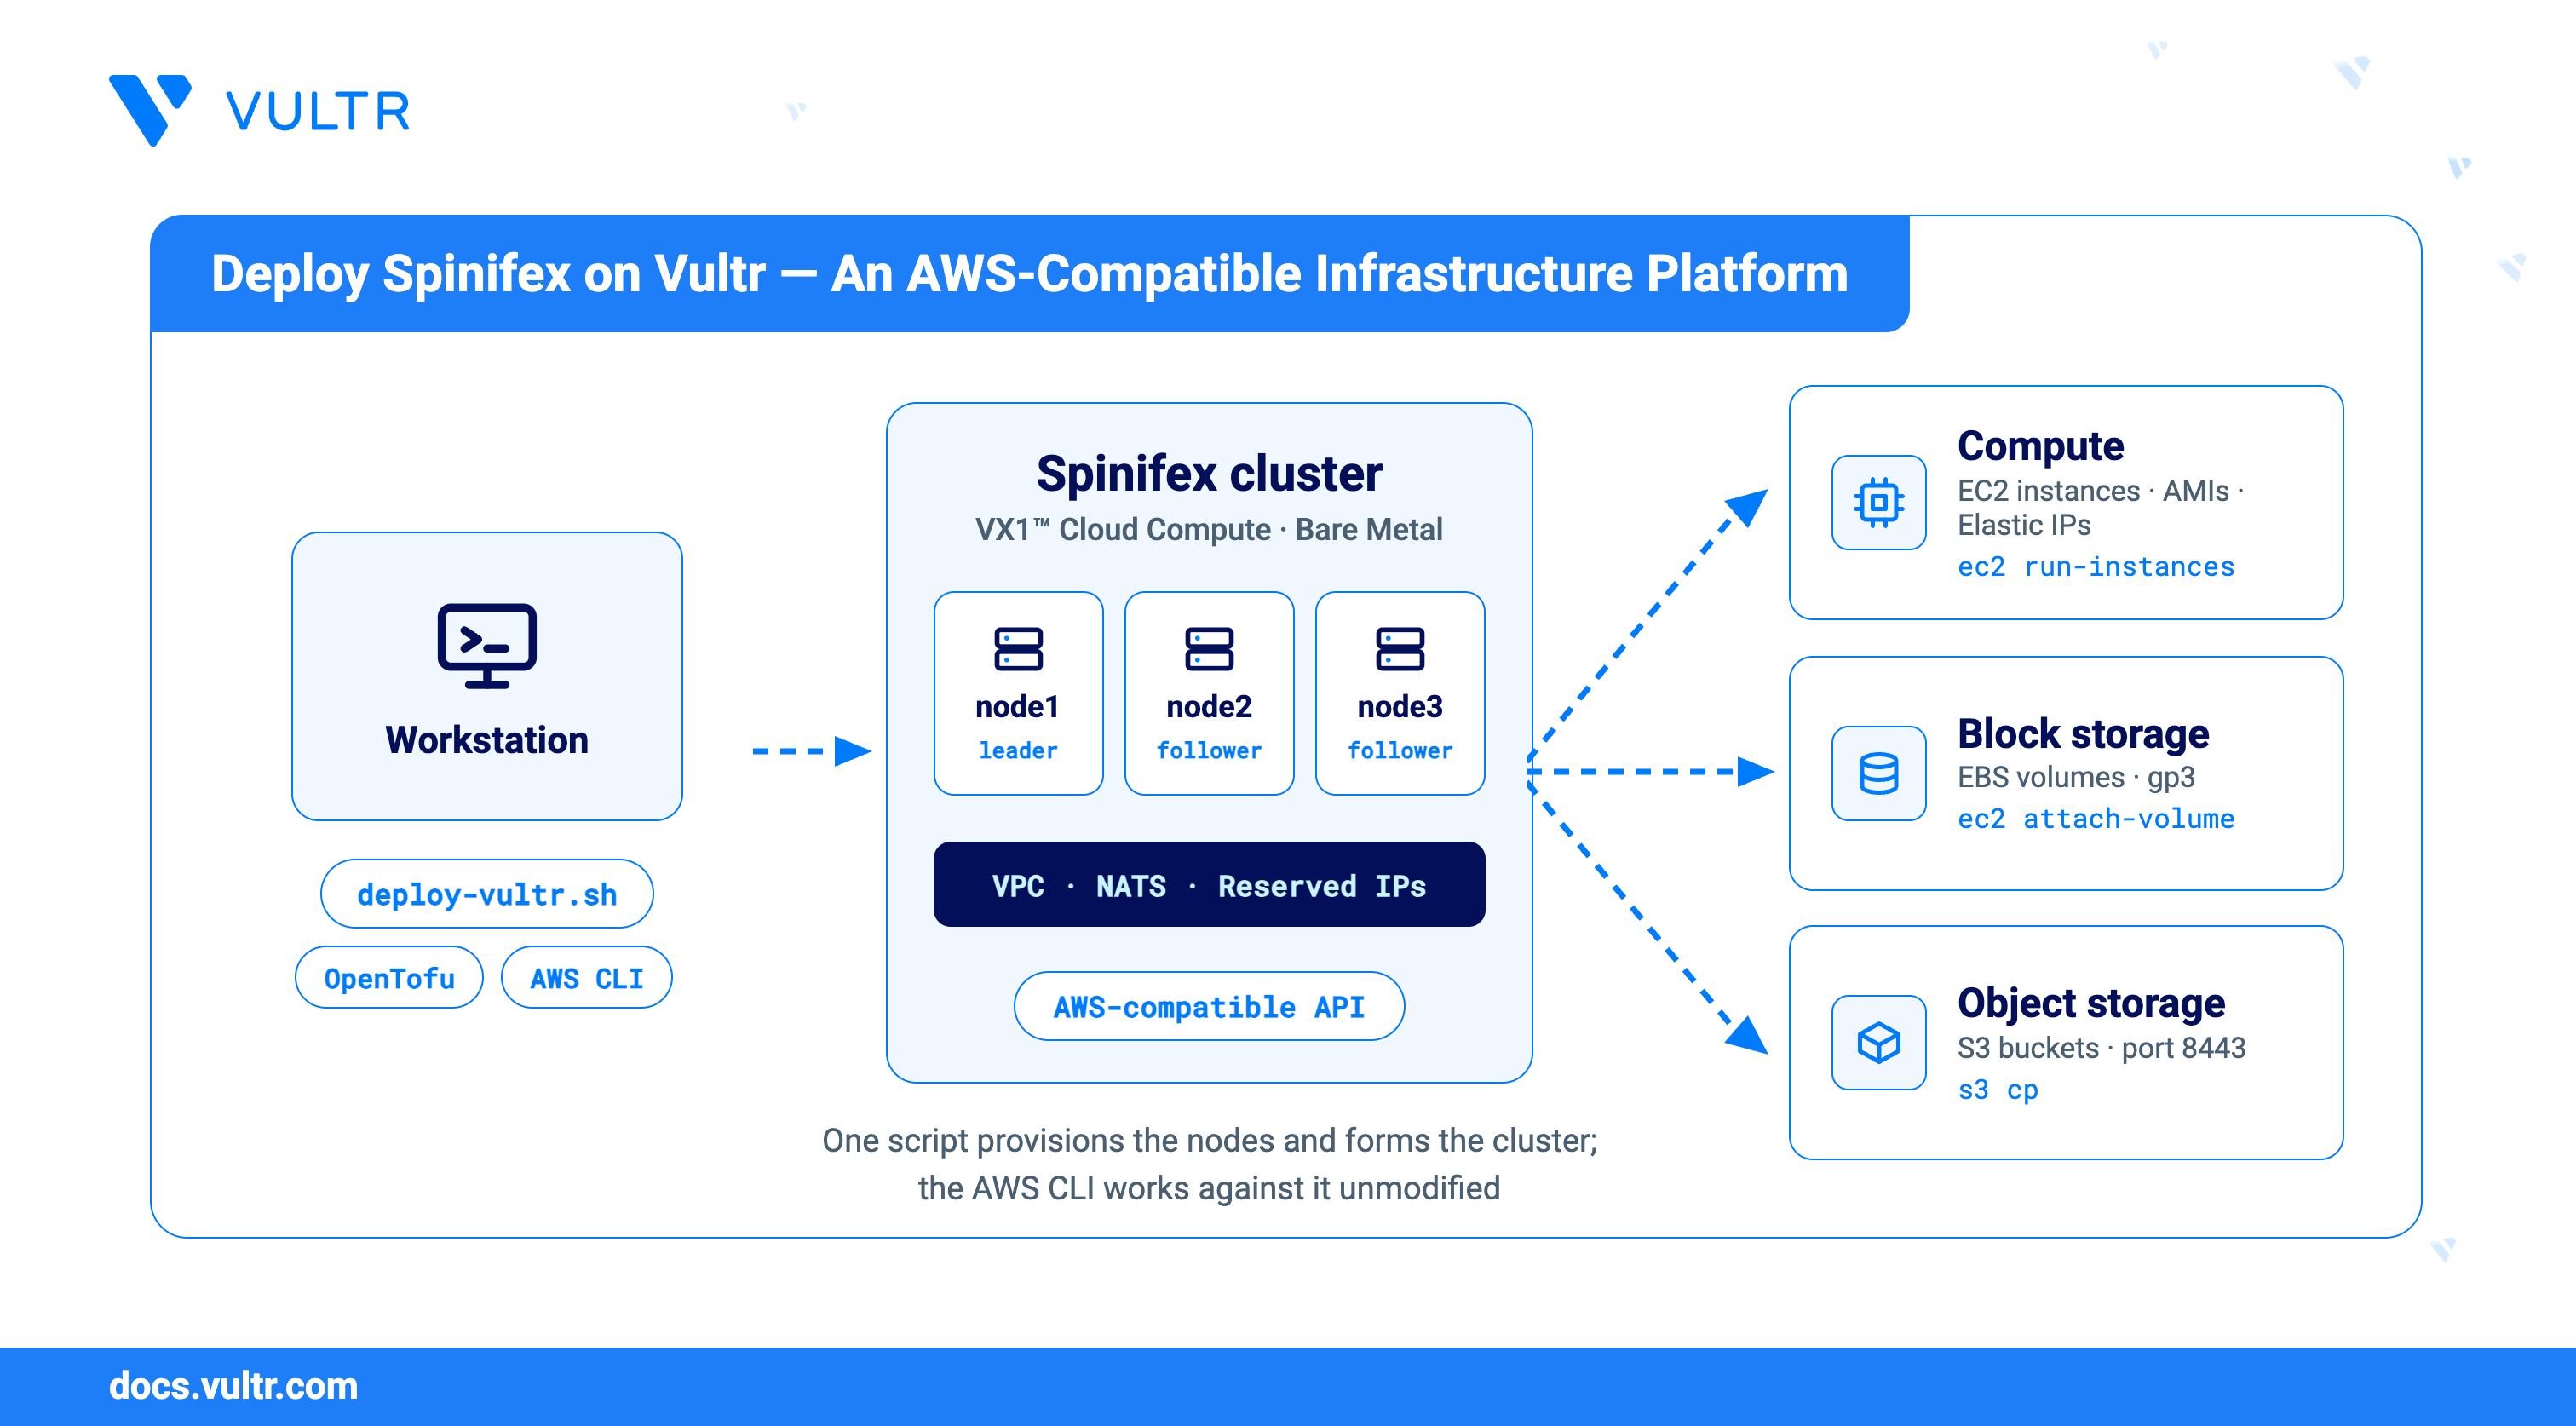
Spinifex is an open-source infrastructure platform that brings core Amazon Web Services (AWS) compatible services, such as compute, block storage, object storage with Simple Storage Service (S3), and Virtual Private Cloud (VPC) networking, to bare-metal, edge, and on-premises environments. Spinifex exposes AWS-compatible APIs, so the AWS Command Line Interface (CLI), AWS software development kits, and the AWS Terraform provider work against it without modification.
This guide explains how to deploy a Spinifex cluster on VX1™ Cloud Compute instances or Bare Metal servers, and how to launch an instance, attach a volume, and store objects on it with the AWS CLI. At the end, you have a working cluster that provides AWS-compatible APIs for compute, storage, and networking, along with many other AWS services.
Prerequisites
Before you begin, ensure you:
- Have a Vultr API Key with an access control list that allows requests from your workstation and from the nodes that the deployment creates.
- Have a Linux or macOS workstation with Git, Bash 4 or later, and
python3installed. macOS includes an older Bash version, so install a newer one with Homebrew. - Install OpenTofu or Terraform 1.5 or later, and AWS CLI version 2.
Choose a Deployment
You can deploy a single node for development and testing, or three nodes for a highly available cluster. Each Spinifex node runs on its own instance or server. A node reserves two virtual CPUs (vCPUs) for the host and Spinifex services, and offers the remaining vCPUs to your workloads without overcommitting.
The following table lists the supported deployment sizes, plans, and approximate costs:
The 16-vCPU VX1™ Cloud Compute plan is the recommended minimum. Bare metal takes longer to provision, and billing starts at creation whether the server is running or stopped.
Prepare an SSH Key Pair
The deployment installs your public key on every node and uses the matching private key to connect and configure them. Verify that a key pair exists on your workstation before you deploy, and create one if it does not.
Check for an existing key pair.
CONSOLEIf the output lists both files, skip to the next section. If the output displays
No such file or directory, continue with the next step.Create a new key pair.
CONSOLEIn the above command:
-t ed25519: Sets the key type to Ed25519.-f ~/.ssh/id_ed25519: Sets the file name and location the deployment expects.
The command prompts you to enter a passphrase. Press Enter to leave it empty, or load a passphrase-protected key into
ssh-agentwithssh-addbefore you deploy, because the script connects without prompting.Display the key fingerprint to verify that the public key is readable.
CONSOLEThe output displays the key size, the fingerprint, and the key type,
ED25519.
Prepare the Deployment Environment
The script in the Spinifex repository wraps OpenTofu and the Vultr Terraform provider. It creates a private VPC network and the cluster nodes, then installs Spinifex on each node over SSH and forms the cluster.
Clone the Spinifex repository.
CONSOLEThe command creates a
spinifexdirectory in the current directory.Change to the deployment directory.
CONSOLEThe directory contains the
deploy-vultr.shscript.Export your API key as an environment variable. Replace
YOUR_API_KEYwith your API key.CONSOLEThe script copies the key to each node over SSH so Spinifex can allocate public addresses. The key does not appear in the Terraform state or the instance metadata.
Deploy the Cluster
Spinifex uses the API key to allocate a reserved IP address whenever a resource needs a public address, such as an instance in a public subnet, an Elastic IP, an internet-facing load balancer, or a network address translation (NAT) gateway. A single command provisions the infrastructure and forms the cluster.
Run the command that matches your deployment, and replace:
- PLAN_ID: The plan from the deployment table, such as
vx1-g-16c-64gfor VX1™ Cloud Compute orvbm-8c-64gb-amdfor Bare Metal. The script accepts only plans with an ID that starts withvx1-orvbm-. - REGION_ID: The ID of the region where you want to deploy, such as
ordfor Chicago. To find a region ID, see the Vultr regions list.
The following commands cover both deployment sizes:
Deploy a single node for development:
CONSOLEDeploy three nodes for production:
CONSOLE
The deployment runs for a while, and the script prints no progress while a node boots, so leave the command running until it returns to the prompt. When the deployment succeeds, the script prints the API endpoint, the AWS profile name, the path to the certificate authority (CA) file, the web console address, and the node addresses.
Verify the Deployment
The status command and the cluster tools confirm that every node came up and joined the cluster.
Display the deployment status.
CONSOLEThe output lists the nodes, the VPC network, the volumes, and the reserved IP addresses that the deployment owns, and the completed deployment steps.
Log in to the first node over SSH.
CONSOLEType
exitand press Enter to return to your workstation. Use./deploy-vultr.sh ssh node2to log in to another node.For a multinode deployment, confirm that all nodes joined the cluster.
CONSOLEYour output should be similar to the one below:
The output displays three nodes in the
Readystate. One node acts as the leader of the NATS messaging system that the cluster services use, the other two act as followers, and all three run the same services.
In the Vultr Console, navigate to Compute. The instances or servers appear with the names spinifex-default-node1, spinifex-default-node2, and spinifex-default-node3. Each one carries the spinifex tag.
Retrieve the AWS Credentials
The deployment generates an AWS-style access key pair and writes it to an AWS profile named spinifex on your workstation, with the endpoint and CA certificate preconfigured.
Display the credentials.
CONSOLEYour output should be similar to the one below:
Do not redirect this output to a file or share it in chat, tickets, source control, or logs. Use the credentials to sign in to the web console at
https://NODE1_ADDRESS:3000/. ReplaceNODE1_ADDRESSwith the public address of node1, which the./deploy-vultr.sh statuscommand lists.Select the
spinifexprofile.CONSOLEList the supported instance types.
CONSOLEA list of instance types confirms that the AWS CLI reaches the cluster and the installation works.
Provision an Instance
With the credentials in place, you use the AWS CLI to run workloads on the cluster the same way you would on AWS. An instance needs an operating system image to boot from, a key pair for SSH access, and a security group that controls its network traffic. After the instance runs, you can add storage and a fixed public address to it. Run the commands in the following sections in the same terminal session, because they rely on the profile and the shell variables you set.
Import an Image
A new cluster has no machine images. Importing a bundled operating system image registers it as an Amazon Machine Image (AMI) that instances launch from.
List the bundled images.
CONSOLEThe output lists each image with its distribution, version, architecture, and boot mode. The bundled images include Alpine, Debian, Oracle Linux, Rocky Linux, and Ubuntu.
Import an image. Replace
IMAGE_NAMEwith a name from the list, such asubuntu-26.04-x86_64, which the later steps in this guide use.CONSOLEThe command downloads the image, verifies its checksum, and writes it to the cluster storage.
Note
If the import fails with an
Input/output errormessage, wait a few minutes for the cluster services to recover, and run the command again. The command reuses the image file it already downloaded.Confirm that the image registered.
CONSOLEYour output should be similar to the one below:
Create an Instance Key Pair
Instances accept SSH logins only from the key pair you select at launch. Create a key pair in the cluster and save the private key on your workstation.
Create the key pair and save the private key.
CONSOLEThe command saves the private key to the
spinifex-key.pemfile and prints nothing.Restrict the private key permissions.
CONSOLEThe command prints no output when it succeeds.
Verify that the cluster lists the key pair.
CONSOLEThe output displays
spinifex-key.
Launch an Instance
The deployment creates a default network with a public subnet that assigns public addresses automatically, so you launch instances without building a network first. A security group controls which traffic reaches the instance.
Store the default VPC ID in a variable.
CONSOLEIn the above command,
VPC_IDholds the ID of the default VPC.Store the default subnet ID in a variable.
CONSOLEIn the above command,
SUBNET_IDholds the ID of the default public subnet.Create a security group.
CONSOLEThe command stores the ID of the new security group in the
SG_IDvariable.Allow SSH traffic from your workstation. Replace
YOUR_PUBLIC_IPwith the public IP address of your workstation, which thecurl -s ifconfig.mecommand displays.CONSOLEThe output displays the new rule for port
22. The default security group blocks all inbound traffic, so the instance rejects SSH connections without this rule.Store the ID of the imported image in a variable.
CONSOLEThe command selects the image by the name that the import registered. If you imported a different image, use the name from the
describe-imagesoutput instead.Launch the instance.
CONSOLERun
aws ec2 describe-instance-typesto list other available instance types.Check the instance state and addresses.
CONSOLEYour output should be similar to the one below:
The instance reaches the
runningstate within a minute. The public address is a reserved IP address that Spinifex creates for the instance. To view it, navigate to Reserved IPs in the console.
Connect to the Instance
The instance runs its first-boot configuration after it reaches the running state, so SSH connections fail for about a minute. Retry the connection until the instance accepts it.
Store the public address in a variable.
CONSOLEThe
PUBLIC_IPvariable holds the public address of the instance.Connect to the instance over SSH.
CONSOLEIf the connection is refused, wait 30 seconds and run the command again. A connection timeout indicates that the security group blocks your IP address. On the first successful connection, SSH prompts you to confirm the host key fingerprint. Type
yesand press Enter. If you imported another image, replaceubuntuwith the default user of that image.On the instance, verify the outbound internet access.
CONSOLEThe output displays the public address of the instance.
Type
exitand press Enter to return to your workstation.
Attach a Volume
A block volume adds storage that exists independently of the instance. Create the volume in the same availability zone as the instance, attach it, and then format it from inside the instance.
Create a 5 GB volume in the availability zone of the instance.
CONSOLEThe cluster reports the
us-east-1aavailability zone by default, regardless of the region where you deployed.Attach the volume to the instance.
CONSOLEThe output displays the
attachedstate. The--devicevalue is only a label. The instance assigns its own device name to the volume, so/dev/sdfdoes not appear inside the instance.Connect to the instance over SSH. Run the remaining steps in this section on the instance.
CONSOLEList the disks of the instance.
CONSOLEThe new volume is the 5 GB disk without partitions or a mount point. In the following steps, replace
DEVICE_NAMEwith the path of that disk, such as/dev/vdb.Create a file system on the volume. The command erases the target disk, so confirm the device name in the previous step first.
CONSOLEThe command creates an ext4 file system and prints a summary that ends with
done.Create a mount point.
CONSOLEThe command prints no output when it succeeds.
Mount the volume.
CONSOLEThe command prints no output when it succeeds.
Verify that the volume is mounted.
CONSOLEThe output displays a file system of about 4.9 GB mounted at
/mnt/data.Type
exitand press Enter to return to your workstation.
Assign an Elastic IP Address
The public address that an instance receives at launch is released when the instance stops, and the instance receives a different address when it starts again. An Elastic IP address stays allocated to your account until you release it, which gives the instance an address that you control. Spinifex backs each Elastic IP address with a reserved IP address that Vultr bills while it exists, and removing the deployment releases it.
Allocate an Elastic IP address.
CONSOLEThe command stores the allocation ID of the new address in the
ALLOCATION_IDvariable.Associate the address with the instance.
CONSOLEThe command associates the address with the instance and displays an association ID.
Verify the address on the instance.
CONSOLEThe output displays the Elastic IP address. SSH connections to this address reach the instance.
Store Objects in S3
The object storage service runs on a separate endpoint from the compute API. Point the AWS CLI at that endpoint, and the same profile supplies the credentials and the certificate.
In the commands in this section, replace:
- BUCKET_NAME: A bucket name you choose.
- NODE1_ADDRESS: The public address of node1, which the
./deploy-vultr.sh statuscommand lists.
Create a bucket.
CONSOLEThe output displays the location of the new bucket.
Create a local file to upload.
CONSOLEThe command creates a local file named
hello.txt.Upload the file to the bucket.
CONSOLEThe output displays an
uploadline for the file.List the objects in the bucket.
CONSOLEThe output displays the
hello.txtobject with its size and upload time.
Manage the Spinifex Deployment
The same script manages the cluster after the first run. The following sections cover the commands that power nodes off and on, create additional deployments, and remove a deployment. Run each command from the directory that contains the script, in the terminal session where you exported your API key.
Stop and Start a Node
The stop command powers a node off through the API, the same way a hardware failure would, so the node gets no chance to hand over its work. Use it on a multinode deployment to confirm that the remaining nodes keep the cluster running.
Warning
The power-off is immediate and interrupts any instances that run on the node.
Stop the second node.
CONSOLEThe script confirms that it requested the power-off for the node and prints the node address.
Start the second node.
CONSOLEThe node rejoins the cluster after it boots.
Confirm that the node returns to the
Readystate.CONSOLEThe output displays the second node in the
Readystate. If the node does not appear asReady, wait a few minutes and run the command again.
Deploy Additional Clusters
Every resource the script creates carries the deployment name, which is default unless you set another one. A different name creates a separate deployment with its own nodes, network, and AWS profile, so you can run more than one cluster in the same account.
Deploy a cluster with a custom name. Replace
DEPLOYMENT_NAMEwith a name of up to 24 lowercase letters, digits, and hyphens.CONSOLEThe AWS profile for the deployment is named
spinifex-vultr-DEPLOYMENT_NAME.Select the AWS profile of the deployment.
CONSOLEThe AWS CLI commands in this terminal session now target the named deployment.
Pass the same name to every other script command that targets this deployment.
CONSOLEThe output lists only the resources of the named deployment.
Remove the Deployment
The destroy command removes the nodes, the VPC network, and every billable leftover the deployment created, including boot volumes and reserved IP addresses.
Warning
The command permanently deletes the nodes and all data stored on them, including instances, volumes, and objects.
Run the destroy command to remove the deployment:
CONSOLE
The script lists the resources it deletes and prompts you to type the deployment name, default, to confirm. To remove a named deployment, add --name DEPLOYMENT_NAME to the command. When the deletion completes, the script prints deployment 'default' destroyed; nothing of it is left in the account. If any resource remains, the script lists it and exits with an error.
Conclusion
You have deployed a Spinifex cluster on VX1™ Cloud Compute instances or Bare Metal servers and used the AWS CLI to launch an instance, attach a volume, assign an Elastic IP address, and store objects on it. To continue, deploy a load-balanced web server with the Nginx Web Server (Load Balanced) Terraform workbook, or manage access with IAM users and policies. For more information, see the official Spinifex documentation.
Tags:AWS

0 Comments
Be the first to comment and share your perspective with the community.