How to Deploy SUSE AI on a Vultr Cloud GPU
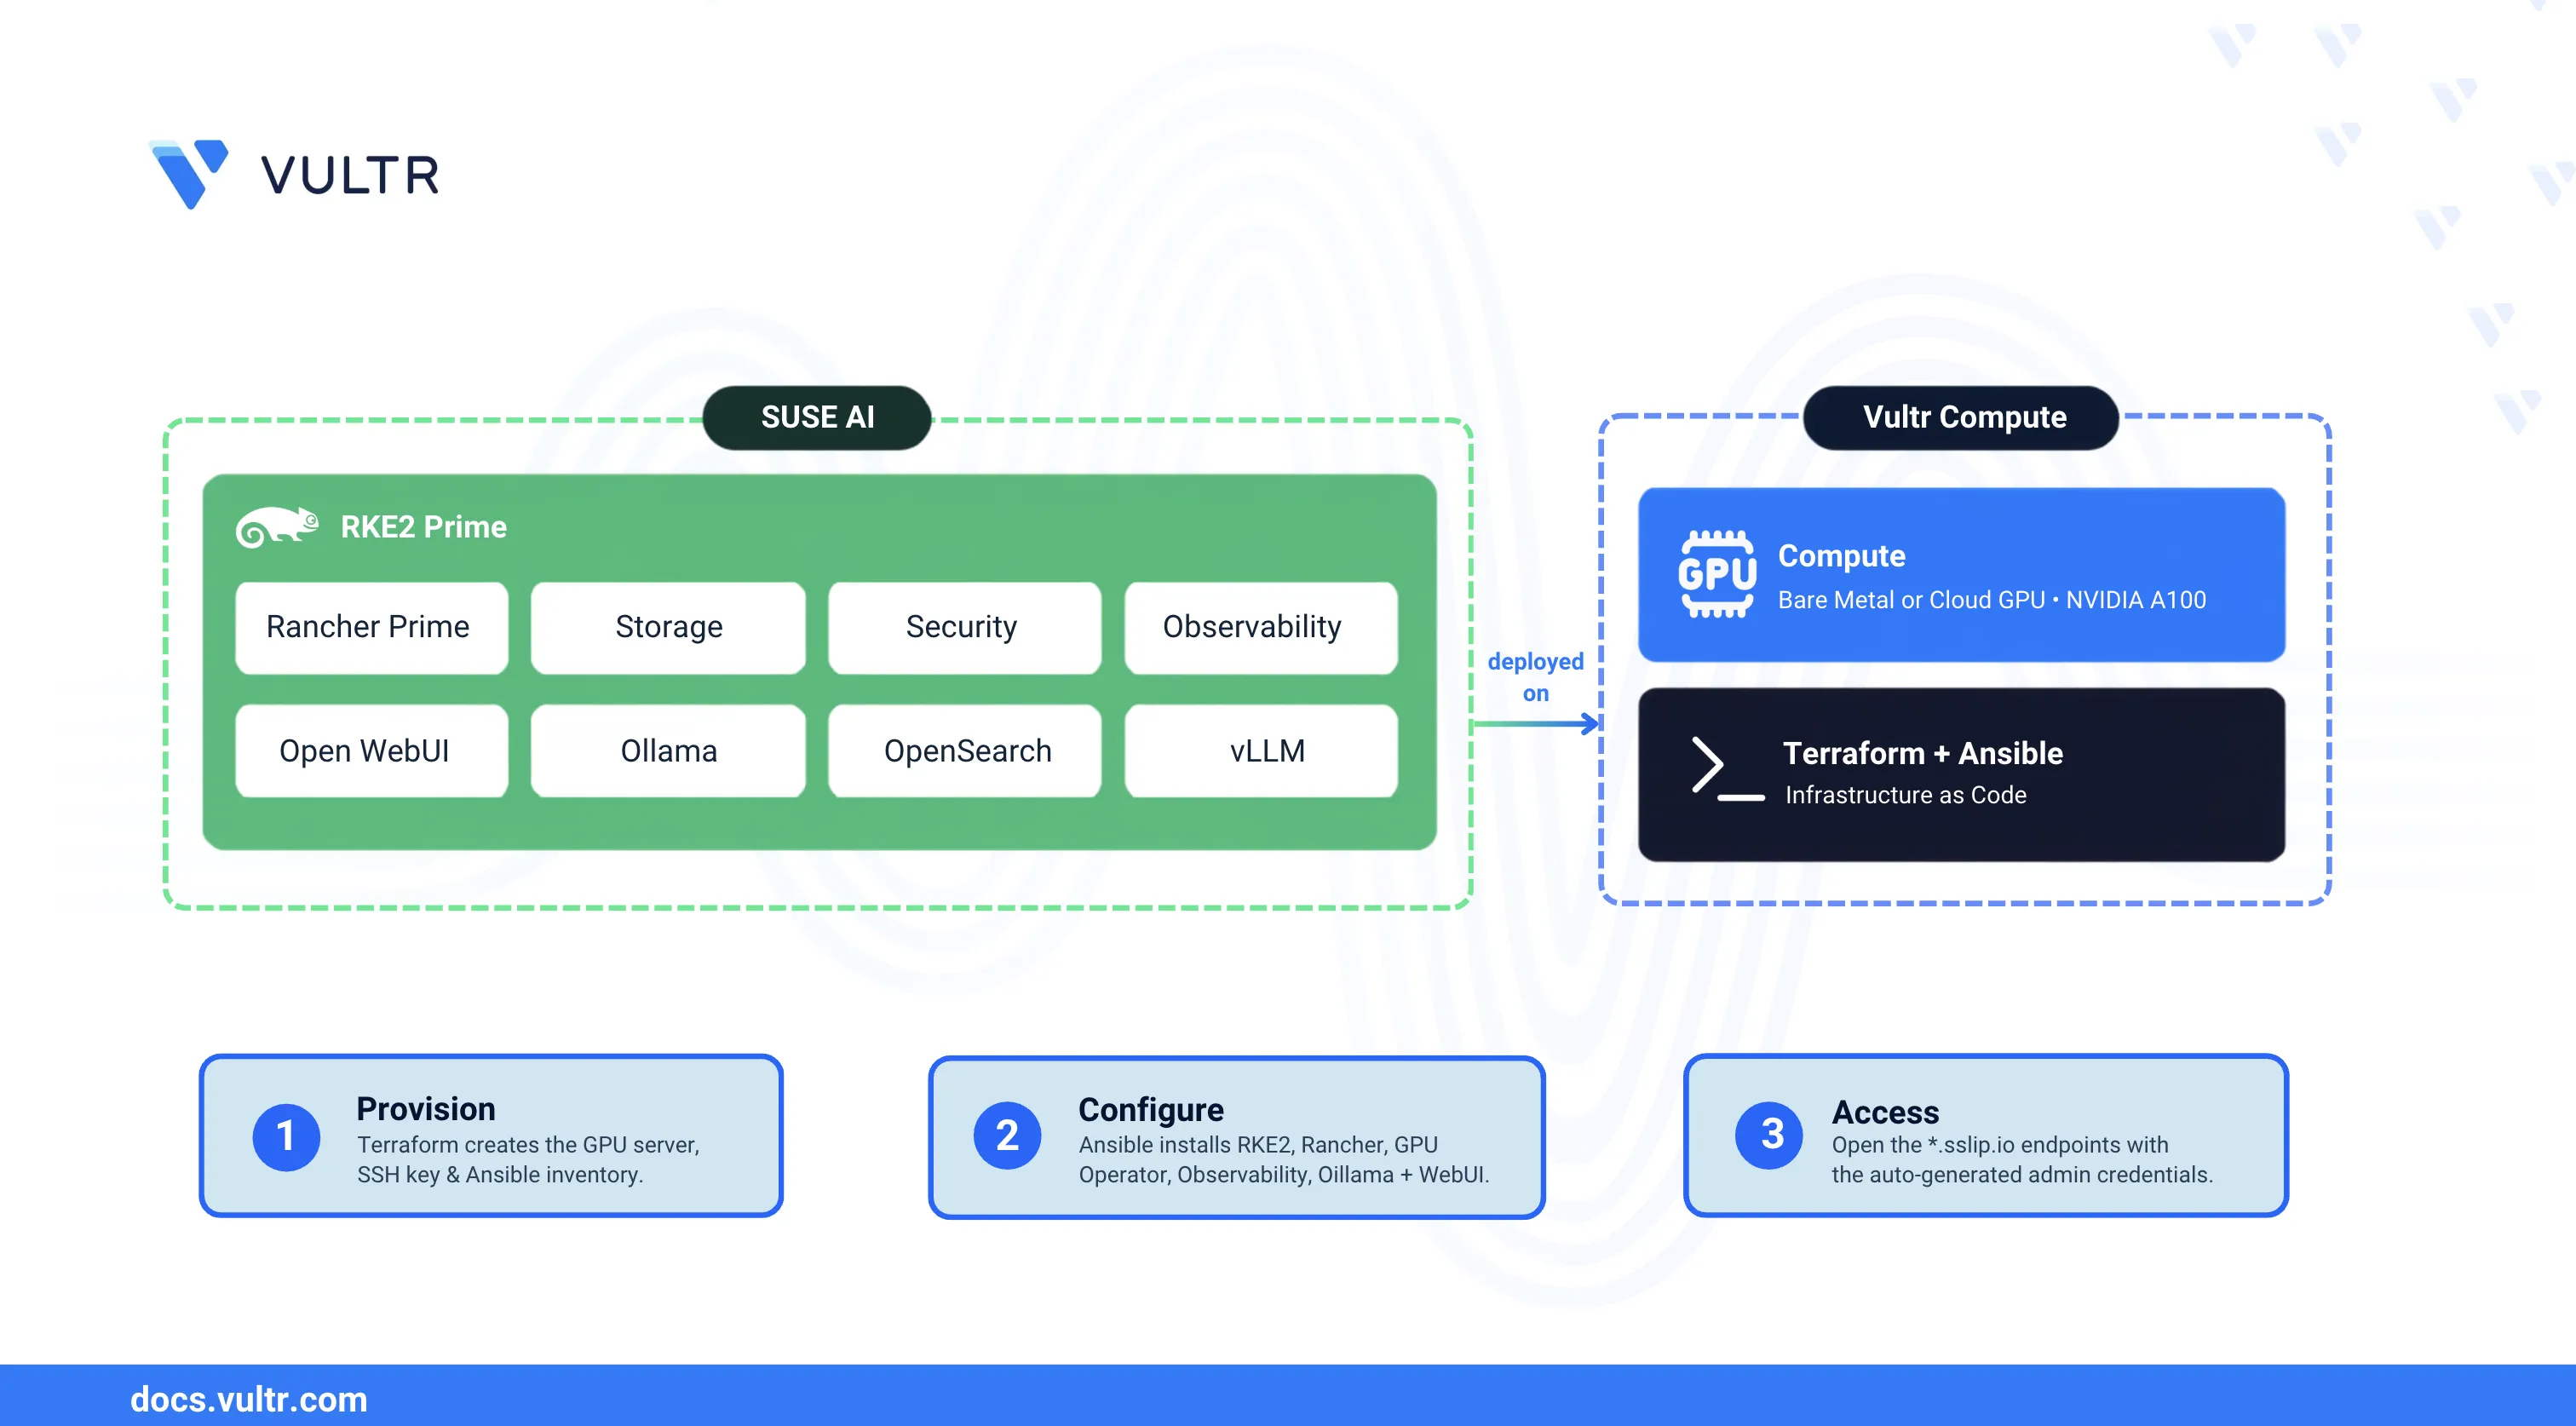
SUSE AI is an enterprise platform that runs large language models (LLMs), inference engines, and retrieval-augmented generation (RAG) pipelines on Kubernetes. It bundles SUSE Rancher Prime as the management plane, SUSE Storage for persistent volumes, SUSE Security for runtime protection, SUSE Observability for cluster telemetry, and a curated AI library that includes Ollama, vLLM, Open WebUI, and vector databases such as OpenSearch and Milvus.
This guide explains how to deploy the SUSE AI stack on a Vultr GPU server running Ubuntu 24.04, using Terraform and Ansible. A single variable selects whether Terraform provisions a Vultr Bare Metal server or a Vultr Cloud GPU instance. Terraform provisions the GPU server, the SSH keypair, and renders the Ansible inventory file. Ansible installs Rancher Kubernetes Engine 2 (RKE2) Prime as the Kubernetes distribution, deploys Rancher Prime with Let's Encrypt TLS, configures SUSE Storage, applies the NVIDIA GPU Operator, deploys SUSE Observability with a generated values file, and runs Ollama and Open WebUI as the inference backend and chat interface.
Prerequisites
Before you begin, you need to:
- Have access to a Vultr API key with permission to provision and manage resources.
- Have quota on your Vultr account for a Bare Metal GPU server or a Cloud GPU instance. Vultr Bare Metal GPU plans are not self-serve on every account. Contact Vultr support to request access before provisioning.
- Hold a SUSE Customer Center (SCC) account with active subscriptions for SUSE Rancher Prime, SUSE Storage, SUSE Security, SUSE Observability, and SUSE AI.
- Generate a SUSE Application Collection access token from apps.rancher.io.
- Retrieve the Prime Artifacts URL from the SCC partner documentation portal.
- Install Terraform, Ansible, and
giton the workstation that runs the deployment. - Open inbound TCP ports
22,80,443,6443, and9345on the target server firewall.
Resource Requirements
Pick the server size based on the components you intend to deploy. The table lists the approximate CPU, memory, and storage each layer requires. The SUSE Observability rows follow the published profile requirements.
The trial and 10-nonha profiles request the same CPU and memory but differ in storage (154 GB versus 335 GB). Every non-HA profile, including 20-nonha, 50-nonha, and 100-nonha, runs on a single node. The HA profiles (150-ha and up) require a minimum of three nodes and fall outside the single-server deployment this guide builds. See the SUSE Observability sizing reference for the full profile table.
Pick a plan that meets the minimum for the deployment scope:
- Core stack with
trialor10-nonhaObservability: 24 vCPUs, 50 GB RAM, 600 GB storage minimum. - Core stack with
100-nonhaObservability: 40 vCPUs, 80 GB RAM, 1 TB storage minimum.
Vultr offers several Bare Metal and Cloud GPU plans at different sizes. Choose any plan that meets the minimum above, using the List Bare Metal Plans and List GPU Plans API references to compare specs.
Clone the Repository
The Terraform and Ansible configuration lives in the suse-ai-on-vultr directory of the code-samples repository. Clone it onto the workstation that runs Terraform and Ansible.
Clone the code-samples repository.
CONSOLENavigate to the
suse-ai-on-vultrdirectory.CONSOLEInspect the directory structure.
CONSOLEThe directory contains:
terraform/: Provisions the GPU server, the SSH keypair, the firewall, and renders the Ansible inventory.ansible/: Holds the roles that install each layer of the SUSE stack.Makefile: Wraps the Terraform and Ansible commands behindmaketargets..env.example: Template that documents every variable the pipeline expects.
Configure the Deployment Variables
The pipeline reads every secret and tunable from a single .env file at the repository root. The Makefile sources this file and re-exports the variables under the TF_VAR_ prefix that Terraform expects.
Copy the example file.
CONSOLEOpen the copied file for editing.
CONSOLEPopulate the deployment variables.
INISave and close the file.
Replace the placeholder values:
- VULTR_API_KEY: The API key generated from the Vultr Console under Account, then API.
- APPCO_USERNAME: The email registered with SCC.
- APPCO_USER_TOKEN: The Application Collection access token from
apps.rancher.io. - SCC_REG_CODE: The SCC registration code for the Rancher Prime subscription.
- SUSE_OBSERVABILITY_REG_CODE: The SCC registration code for the SUSE Observability subscription.
- PRIME_ARTIFACTS_URL: The Prime Artifacts URL retrieved from the SCC partner documentation portal.
- LE_EMAIL: The contact email for the Let's Encrypt account.
- HF_TOKEN: A HuggingFace access token with the license accepted for
meta-llama/Llama-3.1-8B-Instruct, the model the Ansible pipeline deploys by default whenDEPLOY_VLLMistrue. The pipeline forwards this value to the vLLM deployment automatically. - SERVER_TYPE: The Vultr server type to provision. Set to
bare-metalfor a Bare Metal server orcloudfor a Cloud GPU instance. - TF_VAR_instance_label: A label for the Vultr resources that Terraform creates.
- TF_VAR_region: The Vultr region code that hosts the GPU plan (for example,
atl,ewr, orfra). - TF_VAR_plan: The Vultr plan ID for the server. Use a
vbm-*plan whenSERVER_TYPEisbare-metal, or avcg-*plan whenSERVER_TYPEiscloud. - TF_VAR_os_id: The Vultr operating system ID.
2284corresponds to Ubuntu 24.04 LTS. - DEPLOY_OBSERVABILITY: Set to
trueto deploy SUSE Observability and its agent. - DEPLOY_GPU_OPERATOR: Set to
trueto deploy the NVIDIA GPU Operator. - OBSERVABILITY_PROFILE: The SUSE Observability sizing profile (
trial,10-nonha,100-nonha, or150-ha). See Resource Requirements for the minimum vCPUs and RAM each profile needs. - DEPLOY_VLLM: Set to
trueto have the Ansible pipeline deploy vLLM automatically (requires a second GPU and a validHF_TOKEN). Skip the manual vLLM steps in Install Optional AI Library Components when this istrue.
Provision the GPU Server
The Terraform configuration generates an ED25519 keypair, uploads the public key to Vultr, provisions the server set by SERVER_TYPE (a Bare Metal server or a Cloud GPU instance), and writes the Ansible inventory file with the discovered public IP.
Initialize Terraform to download the Vultr, TLS, and Local providers.
CONSOLERun a dry-run plan to preview the resources Terraform will create.
CONSOLEThe plan output lists the server that
SERVER_TYPEselects (Bare Metal or Cloud GPU), the SSH keypair, and the local files that Terraform writes.Apply the plan to provision the server.
CONSOLEProvisioning a Bare Metal server takes approximately ten to fifteen minutes. A Cloud GPU instance takes a few minutes.
Run the Ansible Pipeline
The Ansible playbook contains roles that mirror the SUSE AI deployment phases. The first play waits for SSH connectivity, so the same command works whether the server finished booting or is still coming online. The roles run idempotently, so re-runs reconcile drift without reinstalling running components.
Run the full playbook against the provisioned server.
CONSOLEThe pipeline installs RKE2, Rancher Prime, SUSE Storage, SUSE Observability, the NVIDIA GPU Operator, and the Ollama and Open WebUI AI workloads. The full run takes approximately twenty to thirty minutes, depending on which components are enabled. The final play prints the access URLs and the auto-generated admin credentials.
Confirm that every pod in the cluster reached the
RunningorCompletedstate.CONSOLEThe task fails and lists any pod that is not
RunningorCompleted. No output from that task confirms that every component started successfully.Print the access URLs and credentials again without rerunning the deployment.
CONSOLEThis command re-runs only the final summary play and reprints the same
SUSE AI DEPLOYMENT COMPLETEblock thatmake ansibleprints at the end.
Set Up Rancher Prime
Rancher Prime is the management plane for the cluster. It registers the SCC subscription, installs SUSE Security, and monitors every workload the pipeline deployed. The first visit to the Rancher UI presents a welcome screen that sets the admin password and the server URL.
On the workstation, open the URL below in a browser. Replace
SERVER-IPwith the public IP of the server.On Welcome to Rancher, enter
adminin the Bootstrap Password field.Select Set a specific password to use, then enter and confirm a strong password in the New Password and Confirm New Password fields.
Confirm that the Server URL field reads
https://rancher-prime.SERVER-IP.sslip.io.Select the checkbox to accept the End User License Agreement & Terms & Conditions.
Click Continue.
Register Rancher Prime with SCC
SUSE Customer Center (SCC) tracks the subscriptions backing this deployment and unlocks support entitlements once Rancher Prime registers against it. The Helm install already staged the registration code in the UI during setup. Activate it now to complete the registration.
In the Rancher UI, click the hamburger menu, then navigate to Global Settings, then Registration.
Confirm that the Online Registration tab shows the pre-filled registration code.
Click Register.
The banner changes to
System registration successfully activated, and the Product Registration panel reports the status asActivefor theSUSE Rancherproduct.
Install SUSE Security
SUSE Security (NeuVector) provides runtime protection for the cluster. It scans containers for vulnerabilities, segments network traffic, and detects active threats. Rancher installs it from the Apps catalog or through Cluster Tools. The NeuVector chart does not auto-detect the container runtime, so RKE2 and K3s clusters must set the container runtime to k3scontainerd in the chart values. See the SUSE Rancher Manager NeuVector overview for the runtime values per cluster type. The steps below use the Apps catalog.
- In the Rancher UI, open the Cluster Explorer view for the
localcluster. - Navigate to Apps, then Charts.
- Search for NeuVector, the chart name for SUSE Security, and select it from the results.
- Click Install this version.
- On the metadata step, select Default in Install into Project, then click Next.
- In the chart configuration, open the Container Runtime section and select
k3scontainerd, the runtime RKE2 and K3s require. - Click Install. Rancher pins the namespace to
cattle-neuvector-systemand streams the Helm install logs in the panel at the bottom of the screen.
Access the NeuVector UI
NeuVector serves its UI on its own ingress.
SSH into the server.
CONSOLEOn the server, wait for the NeuVector pods to reach the
Runningstate.CONSOLEOn the server, retrieve the bootstrap admin password.
CONSOLECopy the printed password for use when logging in below.
Exit the SSH session to return to the workstation.
CONSOLEFrom the workstation, in the
code-samples/suse-ai-on-vultrdirectory, expose the NeuVector UI over HTTPS.CONSOLEOn the workstation, open the URL below in a browser. Replace
SERVER-IPwith the public IP of the server.Log in with the following credentials:
- Username:
admin - Password: the bootstrap password you copied earlier
- Username:
Access Open WebUI
Open WebUI provides the chat interface and uses the GPU-accelerated Ollama runtime for inference. The Ansible pipeline pre-deploys the gemma:2b model, which appears in the model selector after the first login.
On the workstation, open the URL below in a browser. Replace
SERVER-IPwith the public IP of the server.Click Get Started.
Enter your full name, email, and password, then click Create Admin Account. The first account you register becomes the Open WebUI admin.
Select the
gemma:2bmodel from the model dropdown and send a message.Open WebUI routes the message to the Ollama service over the private Kubernetes cluster network. Ollama runs the
gemma:2bmodel on the NVIDIA GPU and streams the response back to Open WebUI.
Deploy SUSE Observability
SUSE Observability ships the platform UI and a separate agent. The agent collects topology, metrics, and traces from the cluster and forwards them to the platform. Install the Kubernetes StackPack, generate a service token, then deploy the agent.
On the workstation, open the URL below and log in with the username
adminand the password printed by the Ansible pipeline. ReplaceSERVER-IPwith the public IP of the server.Navigate to StackPacks, then Kubernetes.
Under Installed Instances, enter a name for your Kubernetes cluster in the Kubernetes Cluster Name field, then click Install. The StackPack reports that it is waiting for data from the agent.
On the waiting-for-data screen, click CREATE NEW SERVICE TOKEN and copy the token.
SSH into the server.
CONSOLEExport the service token, cluster name, and server IP.
CONSOLEReplace
svctok-YOUR_GENERATED_TOKENwith the token you copied from the UI,YOUR_CLUSTER_NAMEwith the name you entered during StackPack installation, andYOUR_SERVER_IPwith the public IP of the server.Add the SUSE Observability Helm repository.
CONSOLERefresh the local Helm repository cache.
CONSOLEDeploy the SUSE Observability agent, cluster agent, and checks agent.
CONSOLE
Patch the Node Agent Health Port
The node agent binds STS_HEALTH_PORT to 5555, which the NVIDIA Data Center GPU Manager (DCGM) host engine (nv-hostengine) already holds on GPU nodes. The conflict crashes the agent with bind: address already in use. Move the agent to port 5556.
Set the new health port on the node agent's environment.
CONSOLEPatch the container port definition to match.
CONSOLERestart the DaemonSet to apply the change.
CONSOLEAfter the agent restarts and sends data, the Installed Instances entry transitions to the
Activestate, and the cluster topology renders in the UI.
Install Optional AI Library Components
The SUSE Application Collection ships three additional AI library charts beyond Ollama and Open WebUI. vLLM, mcpo, and PyTorch are each optional, install into the suse-ai namespace, and reuse the application-collection image pull secret from the Rancher install. Apply runtimeClassName: nvidia to any GPU-backed workload. Every command in each subsection below runs on the server.
Note
RKE2 does not promote the NVIDIA runtime to the containerd default even when the NVIDIA GPU Operator sets CONTAINERD_SET_AS_DEFAULT. GPU workloads must therefore set runtimeClassName: nvidia explicitly. The Ollama and vLLM roles already include this value. Without it, the pod schedules on the GPU but the NVIDIA devices never mount, and inference silently falls back to the CPU.
Verify the Deployment
Confirm that every layer of the stack reports a healthy state.
SSH into the server.
CONSOLEList the pods in the AI namespace.
CONSOLEThe output displays the OpenSearch, Ollama, Open WebUI, and Redis pods in the
Runningstate.List the pods in the observability namespace.
CONSOLEThe output displays the platform and agent pods in the
Runningstate.Confirm that Ollama uses the GPU.
CONSOLEThe output reports
library=CUDAwith the A100 GPU description, confirming GPU-backed inference.
Conclusion
You have successfully deployed the SUSE AI stack on a Vultr Bare Metal or Cloud GPU server running Ubuntu 24.04 using Terraform and Ansible. The cluster runs RKE2 Prime as the Kubernetes distribution, Rancher Prime as the management plane, SUSE Storage for persistent volumes, the NVIDIA GPU Operator for accelerator scheduling, SUSE Observability for monitoring, SUSE Security for runtime protection, and the SUSE AI library components Ollama, Open WebUI, and OpenSearch for retrieval-augmented generation. For more information, visit the official SUSE AI documentation.
Tags:Vultr Cloud GPU


0 Comments
Be the first to comment and share your perspective with the community.