How to Establish a Private Connection Between Vultr and Amazon Web Services (AWS)
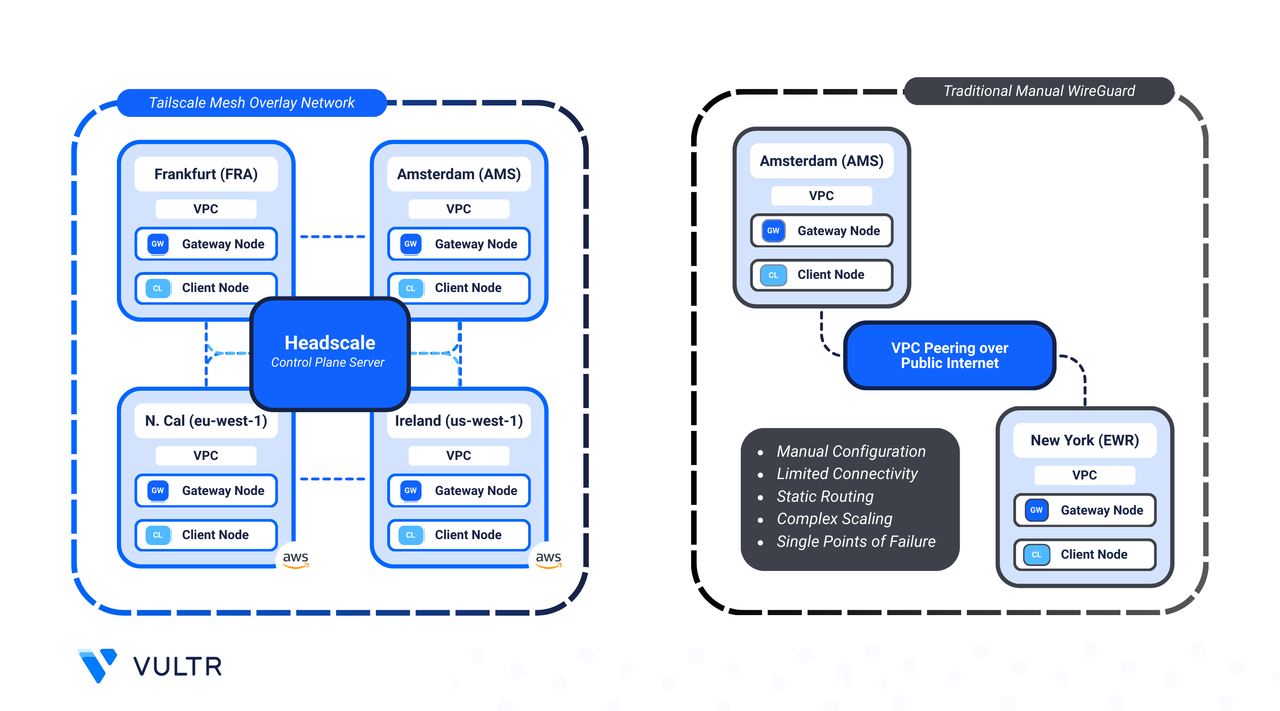
Hybrid cloud deployments often require secure, private connectivity across providers. Traditional VPNs rely on complex configurations and centralized gateways, which can introduce bottlenecks and single points of failure.
Headscale is an open-source, self-hosted control server for Tailscale, a mesh VPN built on the WireGuard protocol. Together, they enable peer-to-peer, encrypted tunnels between nodes without relying on a central gateway, giving you full control over authentication, device management, and network policies while maintaining low-latency, secure connectivity.
By deploying gateway nodes in each cloud and automating configuration with Terraform and Ansible, you can:
- Enable private, encrypted communication between Vultr and AWS workloads.
- Maintain control over your network using self-hosted infrastructure.
- Automate repeatable, scalable deployments.
This guide walks you through setting up Headscale to establish a private connection between Vultr and AWS. The implementation leverages Terraform and Ansible to automate provisioning and configuration, minimizing manual effort and ensuring consistent deployments.
Prerequisites
Before you begin, you need to:
- Have access to a Linux-based instance as a non-root user with sudo privileges.
- Install the command-line tools needed for automation: Terraform, Ansible, and Git.
- Install Vultr CLI and AWS CLI to interact with cloud services and list available regions.
Peer Vultr and AWS Using Headscale
Tailscale with Headscale allows you to self-host a mesh VPN connecting on-prem, site-to-site, or cloud-to-cloud environments. This guide provides instructions to establish a site-to-site mesh, where each site is a Gateway Node in either a Vultr region or an AWS region. The mesh connects to each cloud’s Virtual Private Cloud (VPC) to expose Client Nodes in each datacenter with the others over a private network.
Components
- Headscale Control Server: Self-hosted control server managing Tailscale nodes and coordinating secure connections. In this guide, it runs on a Vultr instance.
- Virtual Private Cloud: Isolated network in each cloud (Vultr and AWS) that enables private connectivity between gateway and client nodes.
- Gateway Node: A
tailnetpeer or Tailscale client in each Vultr and AWS region to join the mesh network across multiple datacenters. - Client Nodes: Represents example services in each region. For example, a database server in Vultr Bangalore that serves as a backend to an API server in AWS eu-west-1.
- FRRouting: Propagates
tailnetroutes from the gateway to Vultr client nodes, enabling cross-datacenter connectivity. - AWS Route Table: Routes for client nodes in AWS are managed by the VPC route table. FRR is not used because AWS's NAT-based architecture overrides OSPF/FRR routes.
Automation With Terraform, Ansible, and Cloud-Init
This implementation is automated using Terraform, Ansible, and Cloud-Init, enabling consistent, repeatable deployments across Vultr and AWS with minimal manual configuration
- Terraform: Defines the entire infrastructure including Vultr VPCs, AWS VPCs, gateway/client nodes in both clouds, and the control server.
- Ansible: Automates post-provisioning tasks, including configuring the control server, gateway/client nodes and setting up routing rules.
- Cloud-Init: Installs Tailscale on first boot, joins the Headscale coordination node, and configures FRR to enable dynamic route propagation across the VPC in each region.
- Startup Script: Reusable script for Vultr client nodes (Ubuntu or RHEL) that automates Tailscale installation and mesh onboarding, simplifying scaling and manual enrollment of new Vultr client nodes.
Provision a Private Network Mesh Between Vultr and AWS
This section provides steps to provision the required infrastructure using Terraform and configure instances post-deployment with the included Ansible playbooks. The following regions are used to demonstrate the peering setup:
You can add or remove regions as needed. The setup is flexible and allows multiple Vultr and AWS regions to be included in the mesh network.
Configure terraform.tfvars
Clone the GitHub repository.
CONSOLEUpdate the
terraform.tfvarsfile with your credentials.CONSOLEPopulate your credentials and adjust regions if needed.
HCLNote
Populate the Vultr API Key and AWS Access Keys in the
terraform.tfvarsfile to enable API access for provisioning resources.
Modifying or Expanding Regions
Understanding how to adjust regions helps maintain network performance and allows scalable deployments.
- Update regions: Update the
vultr_regionsandaws_regionsmaps to change deployment locations for gateway or client nodes. - Headscale server location: Change
headscale_regionto deploy the control server in a new region. Theinstance_planandinstance_os_idvalues are pre-selected to achieve maximum performance and ensure software compatibility. - Add regions: Add entries to
vultr_regionsoraws_regionsmaps. Terraform automatically loops through all defined regions and provisions instances. - AWS AMI per region: Set the
ami_idfor each AWS region to ensure the instances use the correct Ubuntu version. AWS provides different AMI IDs for the same OS in each region. This setup has been tested on Ubuntu 22.04, and using this version is recommended for consistency, security, and performance.
Important
Tips for Region Selection:
List available Vultr regions using the API to choose appropriate datacenter locations for your instances.
CONSOLEList all AWS regions with the AWS CLI to determine which regions to deploy your VPCs and instances.
CONSOLEFetch the latest Ubuntu 22.04 AMI ID for a specific AWS region to ensure your instances use the up-to-date OS.
CONSOLE
Initialize and Apply Terraform
Initialize the Terraform working directory.
CONSOLEThe command above sets up Terraform and downloads any required providers.
Review the execution plan.
CONSOLEApply the Terraform manifests.
CONSOLEYour output should look similar to the one below:
When prompted, type yes to approve and apply the configuration. Provisioning may take up to 5 minutes depending on the number of regions.
Outputs:
These outputs provide important information about your deployed infrastructure:
Client and Gateway Summaries
client_summary: Contains details of all client nodes (Vultr and AWS), including Name, Private IP, Public IP, Provider, and Subnet.gateway_summary: Contains details of all gateway nodes with the same information.
Headscale Control Server IP
headscale_control_server_ip: Shows the public IP of the Headscale control server, which coordinates the mesh network.
Note
Terraform generates a private key file,
id_rsa, inside theterraformdirectory. You can use this key to SSH into the gateway and client nodes for verification or debugging.
Run Ansible Playbooks
Navigate to the Ansible directory:
CONSOLENote
Terraform automatically generates an
inventory.ymlfile in this directory. Ansible uses this file to configure the mesh network, listing all Vultr and AWS gateway and client nodes.Run the Ansible Playbook to configure the private network mesh.
CONSOLEThis playbook uses the generated
inventory.ymlfile to identify instances across Vultr and AWS and configures the Headscale and Tailscale nodes, creating a fully connected private mesh network.Note
To manually add more clients to the mesh network:
Vultr: During instance provisioning, select the
vultr-x-aws-mesh-scriptstartup script and choose the corresponding VPC under VPC Networks. The script automatically configures the instance and adds all OSPF-announced routes. This startup script currently supports only Debian and RHEL instances.AWS: When provisioning, select the respective VPC. No additional installation is required because the VPC Route Table already contains the necessary routes.
Test and Benchmark the Private Network Mesh
After deployment, verify that all regions across Vultr and AWS are connected through the WireGuard-based mesh managed by Headscale. Use Ansible to benchmark both private and public paths, measuring latency, bandwidth, and overall mesh performance.
Run the provided Ansible playbook to execute
iperf3andpingtests between regions using both private and public IPs.CONSOLENote
The network tests may take 5-10 minutes to complete, depending on the number of regions being tested.
After completion, the playbook creates a
network_test_results/directory which contains the following results files:network_results.txt: Consolidated output of all tests, including latency and bandwidth for public and private paths.public_results_table.txt: Tabular summary of region-to-region performance over the public internet.private_results_table.txt: Tabular summary of private mesh performance via Headscale.
Review the test results for the public internet performance between nodes.
CONSOLEYour output should be similar to the one below:
Review the Private IP test results to validate the performance over the Tailscale mesh.
CONSOLEYour output should be similar to the one below:
Note
Public tests usually show higher speeds due to direct internet routing and optimized infrastructure. Private mesh tests use encrypted WireGuard tunnels, which add overhead and may reduce throughput.
Conclusion
You have successfully established a secure, multi-region private network between Vultr and AWS using Headscale and Tailscale. Terraform and Ansible automated provisioning and configuration, ensuring consistent deployments across all regions. Gateway and client nodes communicated over encrypted, low-latency tunnels, while FRRouting and VPC route tables provided seamless routes for cross-datacenter connectivity.


0 Comments
Be the first to comment and share your perspective with the community.