
How to Establish a Private Connection Between Vultr and GCP Using Direct Connect via Console Connect
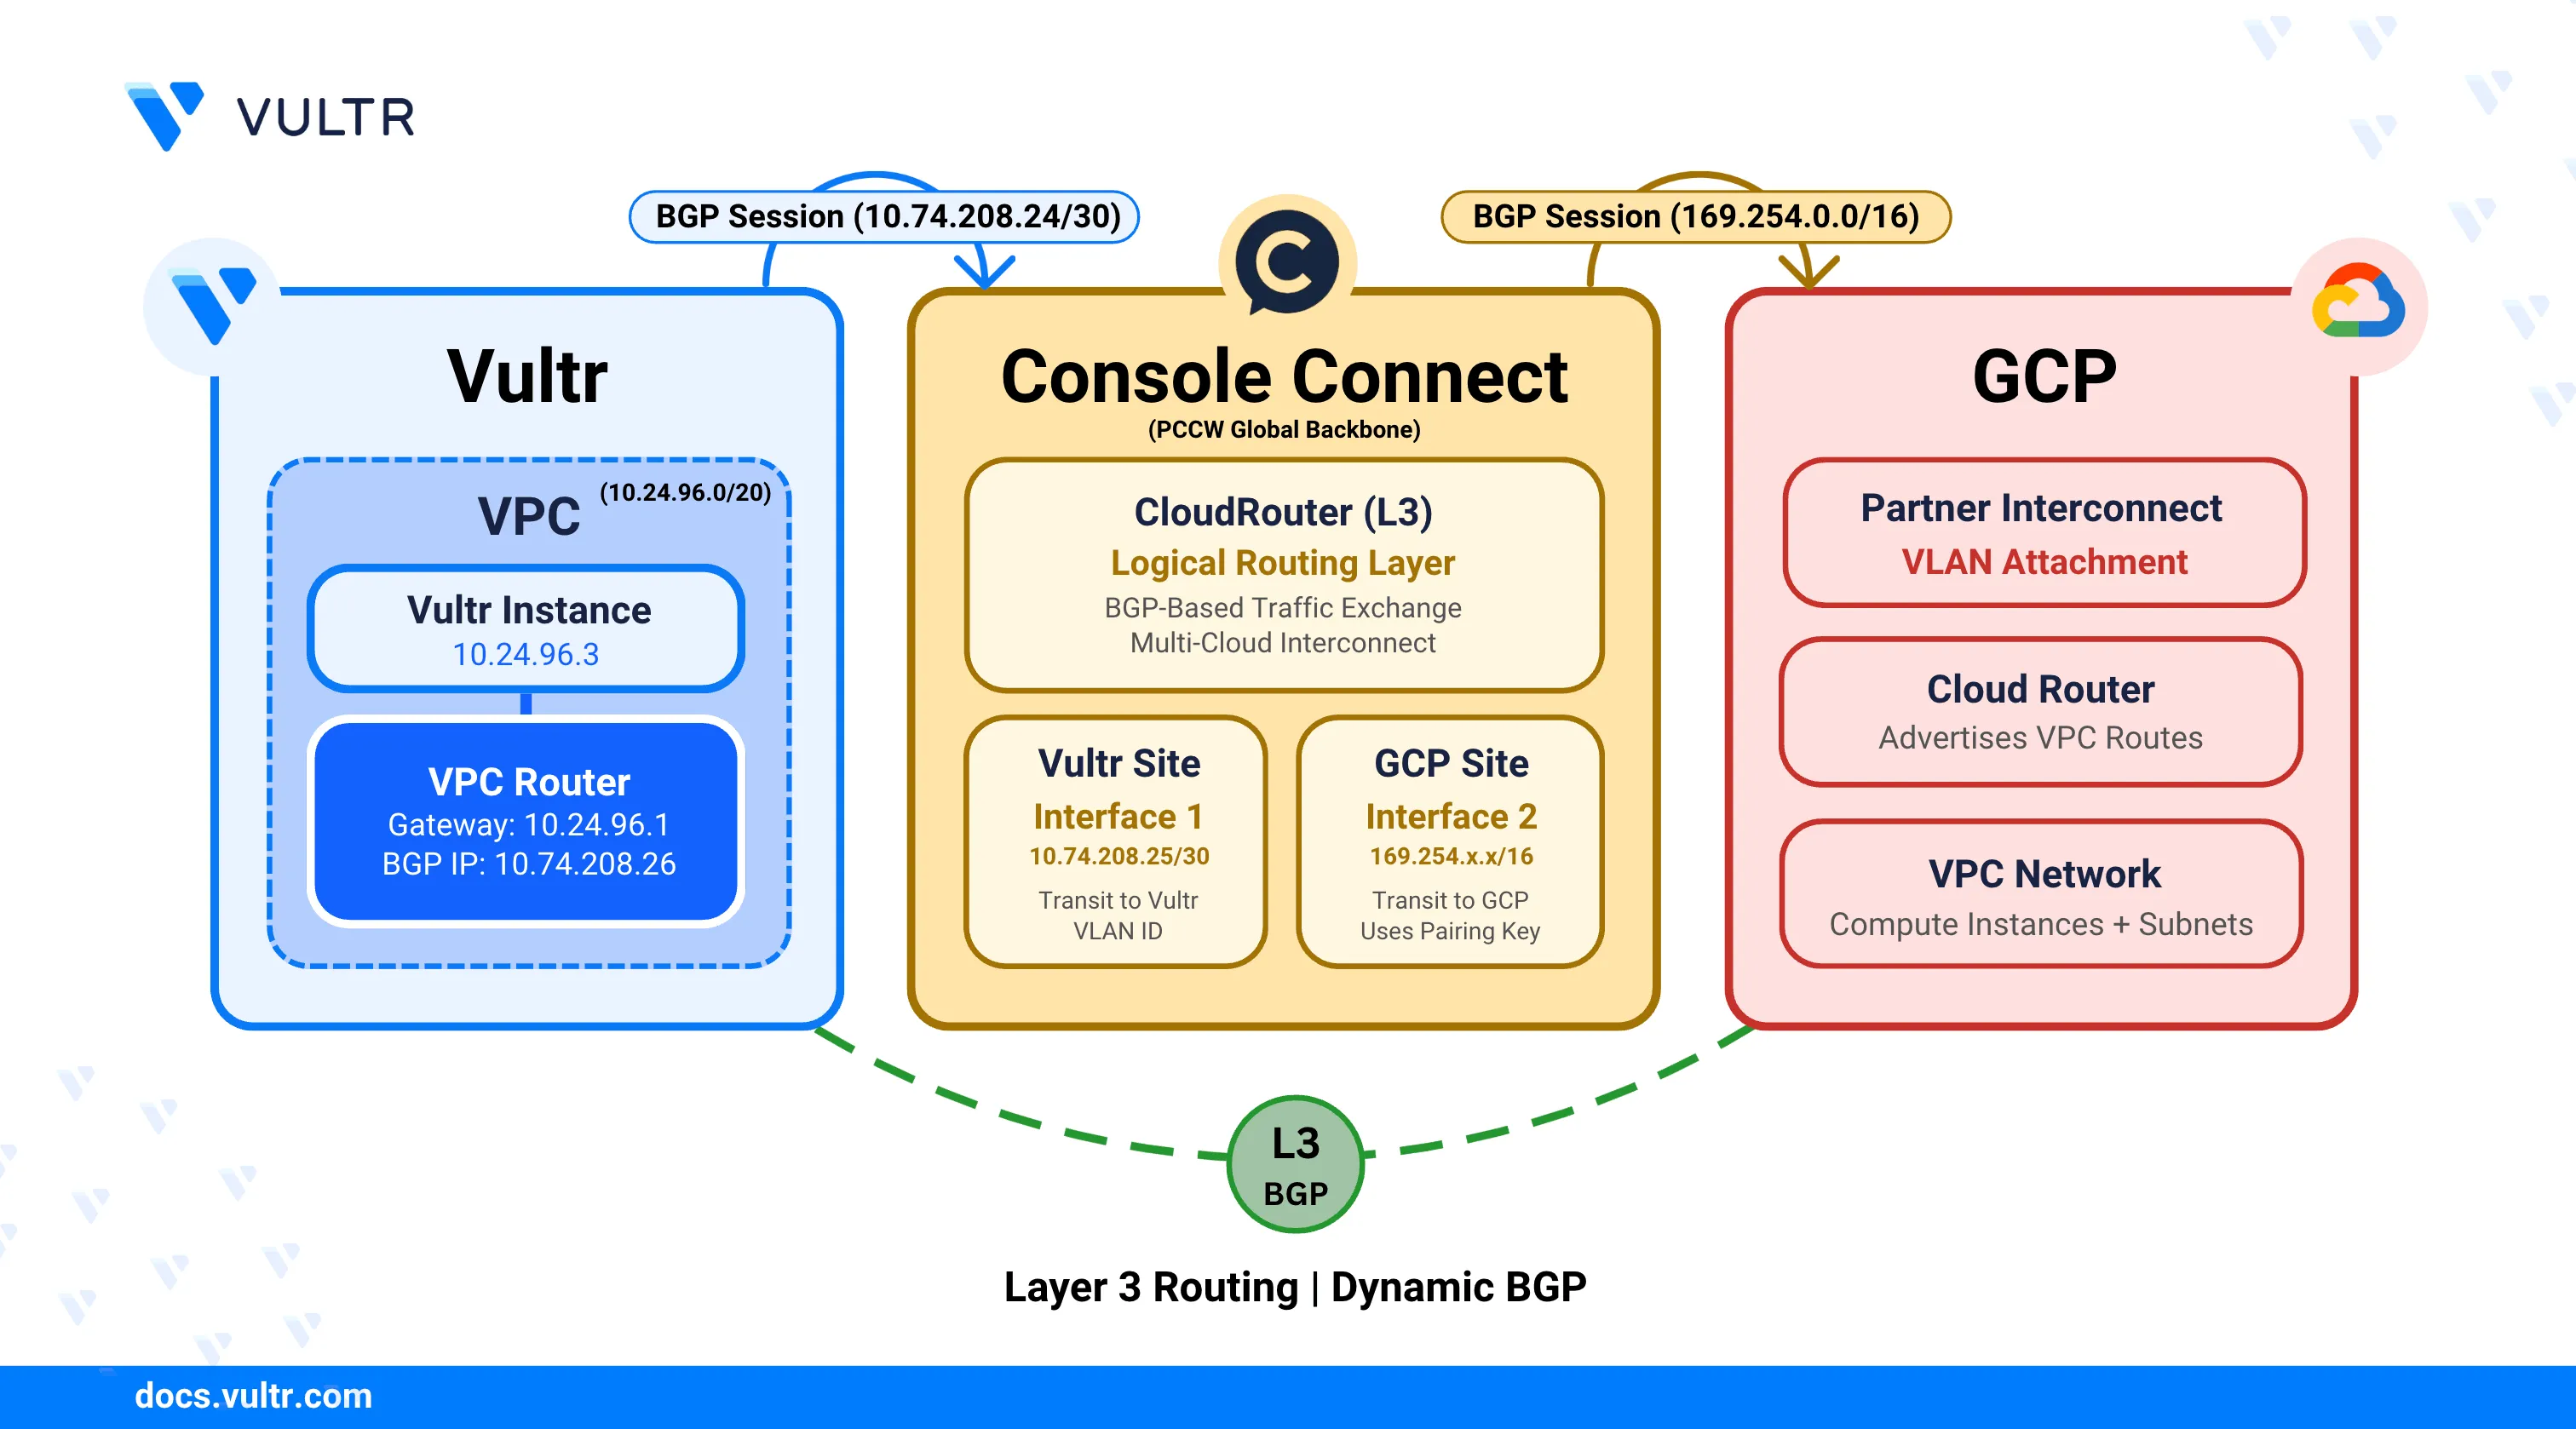
Vultr Direct Connect delivers dedicated network connectivity between Vultr infrastructure and external cloud environments without relying on public internet routing. When integrated with Google Cloud Partner Interconnect through Console Connect, this service creates a secure, low-latency pathway for communication between Vultr resources and Google Cloud Platform (GCP) resources, offering predictable network performance ideal for hybrid cloud and multi-cloud deployments.
This guide explains the end-to-end process for establishing private connectivity between Vultr and GCP using Direct Connect via Console Connect. It describes the CloudRouter provisioning process, Partner Interconnect VLAN attachment creation, site configuration on both platforms, BGP routing setup, and connectivity validation to establish a production-ready private connection.
Prerequisites
Before you begin, ensure you:
- Have access to the Console Connect Portal with sufficient permissions to create a CloudRouter and add new sites.
- Have access to the Google Cloud Console with permissions to create and manage Partner Interconnect VLAN attachments, Cloud Routers, VPC networks, and Compute Engine instances.
- Have an existing VPC network in Google Cloud with at least one subnet configured.
- Have access to the Vultr Console to create and manage Direct Connect and related networking resources.
- Have Border Gateway Protocol (BGP) enabled on your Vultr account.
- Understand VLAN configuration, Autonomous System Numbers (ASNs), and basic BGP routing concepts.
Gather Information About Console Connect Availability
Console Connect is not available in all Vultr locations. Before provisioning a CloudRouter, confirm Console Connect availability for your target location by opening a support ticket with Vultr Support.
Log in to the Vultr Console.
Select Support from the left navigation menu.
Click Open Ticket to create a new support request.
From the available options, toggle the last option to display all fields.
Under Category, select General Support.
Use the following template to open a support ticket requesting Vultr Direct Connect availability through Console Connect.
textSubject: Request to Set Up Vultr Direct Connect via Console Connect Partner ([REGION] Region) Hello Vultr Team, I would like to set up a Hosted via Partner Direct Connect connection using Console Connect. Before provisioning a CloudRouter, please confirm whether the [REGION] location is supported for Console Connect connectivity. If this location is not supported, please share the available alternatives to establish private connectivity with Vultr. Thank you for your assistance. Best regards, [Your Name]
Vultr Support typically responds within 24 business hours.NoteVultr Support provides availability details, supported data center locations, and the requirements needed to provision a CloudRouter.
Provision a CloudRouter in Console Connect
A CloudRouter acts as the core networking component that enables private connectivity between Vultr and external cloud providers through Console Connect. It provides the logical routing layer required to terminate private connectivity circuits on both cloud platforms and securely exchange traffic between their environments.
Log in to the Console Connect portal.
Click the Add New Service drop-down, hover over Layer 3 (CloudRouter), and then click Order.
On the CloudRouter Details page, enter the following information:
- Your CloudRouter name: Enter a descriptive name to identify the CloudRouter.
- Bandwidth: Select the required bandwidth based on your network throughput requirements.
- Duration: Select the contract duration for the connection. Longer durations typically reduce the overall cost.
Click Next: Review to validate and review the configuration.
Click Next: Payment to proceed to the payment page.
Accept the Terms and Conditions, then click Create CloudRouter to provision the CloudRouter.
CloudRouter provisioning typically takes 10–15 minutes to complete.Note
Add a Vultr Site in Console Connect CloudRouter
A Vultr site defines the termination point for private connectivity within your Vultr environment. It associates the CloudRouter with your Vultr account and port location to enable traffic exchange over the private connection.
Navigate to the CloudRouters section and select your CloudRouter.
Verify that the CloudRouter status displays Active.
Click Add New Site, then select Cloud or XaaS as the Site Type.
Select VULTR as the provider.
On the Cloud Details page, enter the following information:
- Vultr Account ID: Enter the email address associated with your Vultr account.
- Vultr ASN: This field is automatically populated.
- Vultr Port Location: Select the Vultr port location where the connection terminates.
Click Next: Site Details to review the cloud configuration.
On the Site Details page, enter the following information:
- Site Name: Enter a descriptive name for the site.
- Rate limit (Mbps): Select the maximum bandwidth for this site.
- Class of Service: Choose a service tier based on traffic priority requirements.
- Bronze: Best-effort traffic.
- Silver: Medium-priority traffic.
- Gold: High-priority traffic.
After selecting the required values, the portal displays the estimated monthly cost.
Click Next: Review to verify the configuration.
Click Next: Terms, review the terms and conditions, and accept all required agreements.
Click Create Site to submit the site for provisioning in Console Connect.
Provide Additional Information to Console Connect
After submitting the CloudRouter provisioning request, Console Connect requires additional information to determine where the connection should terminate within your Vultr account. This information allows Console Connect to associate the CloudRouter with the correct Vultr resources and complete the delivery process.
To proceed, send an email to Console Connect confirming that the CloudRouter has been provisioned and providing the required Vultr account and network details.
Copy the following email template, replace the placeholders with your values, and send it to the addresses below:
support@consoleconnect.comccsupport@consoleconnect.com
textSubject: CloudRouter Delivery Request for Vultr Direct Connect via Console Connect Dear Console Connect Team, I am requesting the delivery of a CloudRouter to establish a Direct Connect connection between Vultr and Google Cloud Platform using Console Connect. The CloudRouter has been provisioned under the Console Connect account [CONSOLECONNECT_EMAIL_ADDRESS], associated with the company profile [COMPANY_NAME]. Please deliver one end of the CloudRouter to the Vultr account associated with the email address below. Vultr Account Email: [VULTR_ACCOUNT_EMAIL_ADDRESS] Vultr Resources: * Virtual Machine Name: [VM_NAME] * Virtual Private Cloud (VPC) ID: [VPC_UUID] Alternative Contact Email: [ALTERNATE_EMAIL_ADDRESS] Thank you for your assistance. Best regards, [YOUR_NAME]
Attach a screenshot of the Console Connect dashboard showing the provisioned CloudRouter.
Console Connect creates a support case and responds with confirmation and any additional requirements.
Create a Partner Interconnect VLAN Attachment in GCP
Partner Interconnect connects your Virtual Private Cloud (VPC) network to external networks through supported service providers. A VLAN attachment creates the connection between your VPC and the Console Connect CloudRouter, enabling private traffic exchange through Border Gateway Protocol (BGP) routing.
Log in to the Google Cloud Console.
In the search bar, enter Interconnect and select Interconnect.
Click Create VLAN attachments.
Under Interconnect type, select Partner Interconnect connection.
Under Encrypt interconnect, choose your preferred encryption option, then click Continue.
Encryption adds processing overhead and may increase latency. Use encryption only if your security requirements mandate protection of data in transit between GCP and Console Connect.NoteOn the partner selection page, select I already have a service provider.
Under Redundancy, choose a redundancy option based on your availability requirements:
- Redundant pair of VLAN attachments: Provides redundancy across two separate VLAN attachments.
- Single VLAN attachment: Creates a single attachment without redundancy.
Select the target VPC network and Region where the VLAN attachment terminates.
Under VLAN, click Create new router to create a Cloud Router for BGP session management.
In the Create a router panel, configure the following settings:
- Name: Enter a descriptive name for the Cloud Router.
- Description: Enter a brief description for the router.
- BGP peer keepalive interval: Specify the keepalive interval in seconds. The default value is
20, and valid values range from20to60. - BGP identifier: Leave this field empty. Console Connect provides the routes automatically.
- Advertised routes: Select Advertise all subnets visible to the Cloud Router to advertise all VPC routes over BGP.
Click Create to provision the Cloud Router.
Enter a VLAN attachment name and an optional description.
Under IP stack type, select one of the following options:
- IPv4 (single-stack): Creates an IPv4-only BGP session.
- IPv4 and IPv6 (dual-stack): Creates both IPv4 and IPv6 BGP sessions.
Set the Maximum transmission unit (MTU) to
1460to prevent packet fragmentation.The VPC network that uses the VLAN attachment must have the same MTU value configured. After creating the VLAN attachment, verify that the VPC network MTU matches the VLAN attachment MTU to ensure proper packet transmission.NoteUnder Allocate BGP IPv4 address, select Automatically to allow Google Cloud to assign BGP peer IP addresses from the
169.254.0.0/16range.Click Create to provision the VLAN attachment.
VLAN attachment provisioning typically takes 2–5 minutes to complete.NoteAfter provisioning completes, copy the Pairing key displayed on the page. Console Connect requires this key to establish connectivity to the Partner Interconnect.
Enable Pre-activate these VLAN attachments, then click OK to complete the process.
Pre-activating the VLAN attachment allows Console Connect to immediately establish the connection when you use the pairing key. When you enable pre-activation, Google Cloud automatically assigns BGP peer IP addresses from theNote169.254.0.0/16range to both the Cloud Router and the Console Connect side. These IP addresses become visible in the VLAN attachment details after Console Connect completes the site provisioning.
Add a GCP Site in Console Connect CloudRouter
A GCP site represents the termination point for private connectivity on the Google Cloud side. It links the CloudRouter to your GCP Partner Interconnect VLAN attachment using the pairing key, enabling end-to-end private communication between Vultr and GCP.
Navigate back to the Console Connect portal.
Select your CloudRouter.
Click Add New Site to create a new GCP site.
Select Cloud or XaaS as the Site Type.
Select GCP as the provider.
On the Cloud Details page, paste the Pairing Key copied from the GCP VLAN attachment.
Click Next: Site Details to configure the site.
On the Site Details page, enter the following information:
- Site Name: Enter a descriptive name for the site.
- Rate limit (Mbps): Select the maximum bandwidth for this site. This value must match or be lower than the VLAN attachment bandwidth.
- Class of Service: Choose a service tier based on traffic priority requirements.
- Bronze: Best-effort traffic.
- Silver: Medium-priority traffic.
- Gold: High-priority traffic.
After selecting the required values, the portal displays the estimated monthly cost.
Click Next: Review to verify the configuration.
Click Next: Terms, review the terms and conditions, and accept all required agreements.
Click Create Site to submit the GCP site for provisioning in Console Connect.
Console Connect site provisioning typically takes 10–15 minutes to complete.Note
Verify BGP Session Status and Configuration
After Console Connect completes the GCP site provisioning, the Partner Interconnect connection activates automatically. Google Cloud establishes the BGP session with Console Connect and begins dynamic route exchange between the networks.
Return to the Google Cloud Console and navigate to Interconnect.
Select VLAN attachments from the left navigation menu.
Locate the VLAN attachment created earlier and verify that the State displays Waiting for partner.
The state transitions to Active after Console Connect completes the connection setup and establishes the BGP session with Google Cloud.NoteAfter the Console Connect GCP site status displays Active, refresh the VLAN attachment page in the Google Cloud Console.
Verify that the State changes to Active.
Click the VLAN attachment name to view the connection details.
On the Details tab, under the Connection section, review the BGP routing configuration. This displays the automatically assigned IP addresses and ASN values for both the Cloud Router and Console Connect sides.
Navigate to Cloud Routers and select the Cloud Router associated with the VLAN attachment.
On the Router details page, scroll down to the BGP sessions section.
Verify that the BGP session displays a green checkmark, indicating the session is active and established. This confirms that the Cloud Router successfully established a BGP peering session with Console Connect.
If the BGP session status shows an error or warning indicator, verify that the Console Connect GCP site status is Active and that the pairing key matches the VLAN attachment configuration.NoteClick the BGP session name to view the session details.
On the BGP session details page, scroll down to the Advertised routes section.
Copy the Destination IP ranges from the advertised routes table. These IP ranges represent the GCP VPC subnets that are advertised to Vultr through Console Connect and are required for configuring routes on the Vultr side.
Provision a Virtual Machine in GCP
Provision a virtual machine in GCP to verify end-to-end connectivity over the private connection. The virtual machine must reside in the same VPC network and region as the Partner Interconnect VLAN attachment.
Navigate to Compute Engine in the Google Cloud Console and select VM instances.
Click Create Instance.
Configure the following settings:
- Name: Enter a descriptive name for the instance.
- Region: Select the same region as your VLAN attachment.
- Zone: Select any availability zone within the region.
- Machine type: Select a machine type based on your testing requirements.
- Boot disk: Select an operating system image (for example, Ubuntu or Debian).
- Networking:
- Network: Select the VPC network associated with the VLAN attachment.
- Subnetwork: Select a subnet within the VPC.
- External IP: Select Ephemeral to assign a temporary public IP address for initial access.
Click Create to deploy the instance.
After the instance enters the Running state, note the Internal IP address. Use this IP address to verify connectivity from the Vultr side.
Provision a Virtual Machine and Configure Routing in Vultr
After the Partner Interconnect connection is established, deploy a virtual machine in your Vultr Virtual Private Cloud (VPC) and configure routing to forward traffic toward Console Connect. This step ensures that workloads inside the VPC can reach GCP over the private connection.
Navigate to the Console Connect portal and select the Vultr site associated with your CloudRouter.
Record the Vultr subnet displayed on the site details page for later use.
Obtain the Vultr router IP provided by Vultr Support. This IP acts as the next-hop router for traffic destined to Console Connect.
The router IP is required to forward traffic from your VPC to the Console Connect subnet. Other routing parameters shown on the Vultr site are preconfigured on the Vultr-managed router to establish the BGP session with Console Connect and do not require manual changes.NoteProvision a virtual machine inside the VPC attached to Console Connect.
After the instance enters the Running state, connect to it using SSH.
console$ ssh USERNAME@SERVER-IP
Replace
USERNAMEwith the username andSERVER-IPwith the public IP address of the server.List the network interfaces and identify the interface connected to the VPC.
console$ ip addr
Output:
...
3: enp8s0: <BROADCAST,MULTICAST,UP,LOWER_UP> mtu 1450 qdisc mq state UP group default qlen 1000
    link/ether 5a:00:05:d3:24:29 brd ff:ff:ff:ff:ff:ff
...
Identify the interface that has an IP address from your VPC subnet.
Add a route to reach the Console Connect Vultr subnet.
console$ sudo ip route add CONSOLE_CONNECT_VULTR_SUBNET via VULTR_ROUTER_IP dev INTERFACE_NAME
Replace:
- CONSOLE_CONNECT_VULTR_SUBNET: The subnet defined on the Vultr site in the Console Connect portal.
- VULTR_ROUTER_IP: The router IP provided by Vultr Support (typically the first IP in the VPC range).
- INTERFACE_NAME: The name of the VPC-attached network interface.
Adding a route at the VM level enables connectivity only for that instance. To enable connectivity for all workloads in the VPC, add the route at the VPC level using the Vultr Console.NoteVerify connectivity to the Console Connect network.
console$ ping CONSOLE_CONNECT_IP
Replace
CONSOLE_CONNECT_IPwith the Console Connect IP listed on the Vultr site.Output:
64 bytes from CONSOLE_CONNECT_IP: icmp_seq=1 ttl=64 time=8.21 ms
64 bytes from CONSOLE_CONNECT_IP: icmp_seq=2 ttl=64 time=6.95 ms
64 bytes from CONSOLE_CONNECT_IP: icmp_seq=3 ttl=64 time=9.35 ms
64 bytes from CONSOLE_CONNECT_IP: icmp_seq=4 ttl=64 time=8.01 ms
Successful ping responses confirm that the Vultr side is connected to the Console Connect network.
Add routes to reach the GCP VPC subnets through Console Connect. Use the destination IP ranges copied from the BGP session's advertised routes.
console$ sudo ip route add GCP_VPC_SUBNET via VULTR_ROUTER_IP dev INTERFACE_NAME
Replace:
- GCP_VPC_SUBNET: The destination IP range from the BGP session's advertised routes (for example,
10.128.0.0/20). - VULTR_ROUTER_IP: The router IP provided by Vultr Support.
- INTERFACE_NAME: The VPC-attached network interface.
Repeat this step for each subnet advertised by the GCP Cloud Router.
- GCP_VPC_SUBNET: The destination IP range from the BGP session's advertised routes (for example,
Verify connectivity to the GCP test instance.
console$ ping GCP_INSTANCE_IP
Replace
GCP_INSTANCE_IPwith the internal IP address of the GCP instance deployed earlier.Output:
64 bytes from GCP_INSTANCE_IP: icmp_seq=1 ttl=61 time=108 ms
64 bytes from GCP_INSTANCE_IP: icmp_seq=2 ttl=61 time=110 ms
64 bytes from GCP_INSTANCE_IP: icmp_seq=3 ttl=61 time=107 ms
64 bytes from GCP_INSTANCE_IP: icmp_seq=4 ttl=61 time=107 ms
Successful ping responses confirm that private connectivity between Vultr and GCP is operational.
Conclusion
You have successfully established a private, dedicated network connection between Vultr and Google Cloud Platform using Direct Connect via Console Connect. By provisioning a CloudRouter, configuring sites on both platforms, creating a Partner Interconnect VLAN attachment, and enabling routing within Vultr, you created a low-latency, secure path for traffic between your Vultr VPC and GCP VPC networks. For more information about Google Cloud Partner Interconnect configuration and advanced routing options, refer to the official Google Cloud Interconnect documentation.