
How to Establish a Private Connection Between Vultr and Microsoft Azure Using Direct Connect via Console Connect
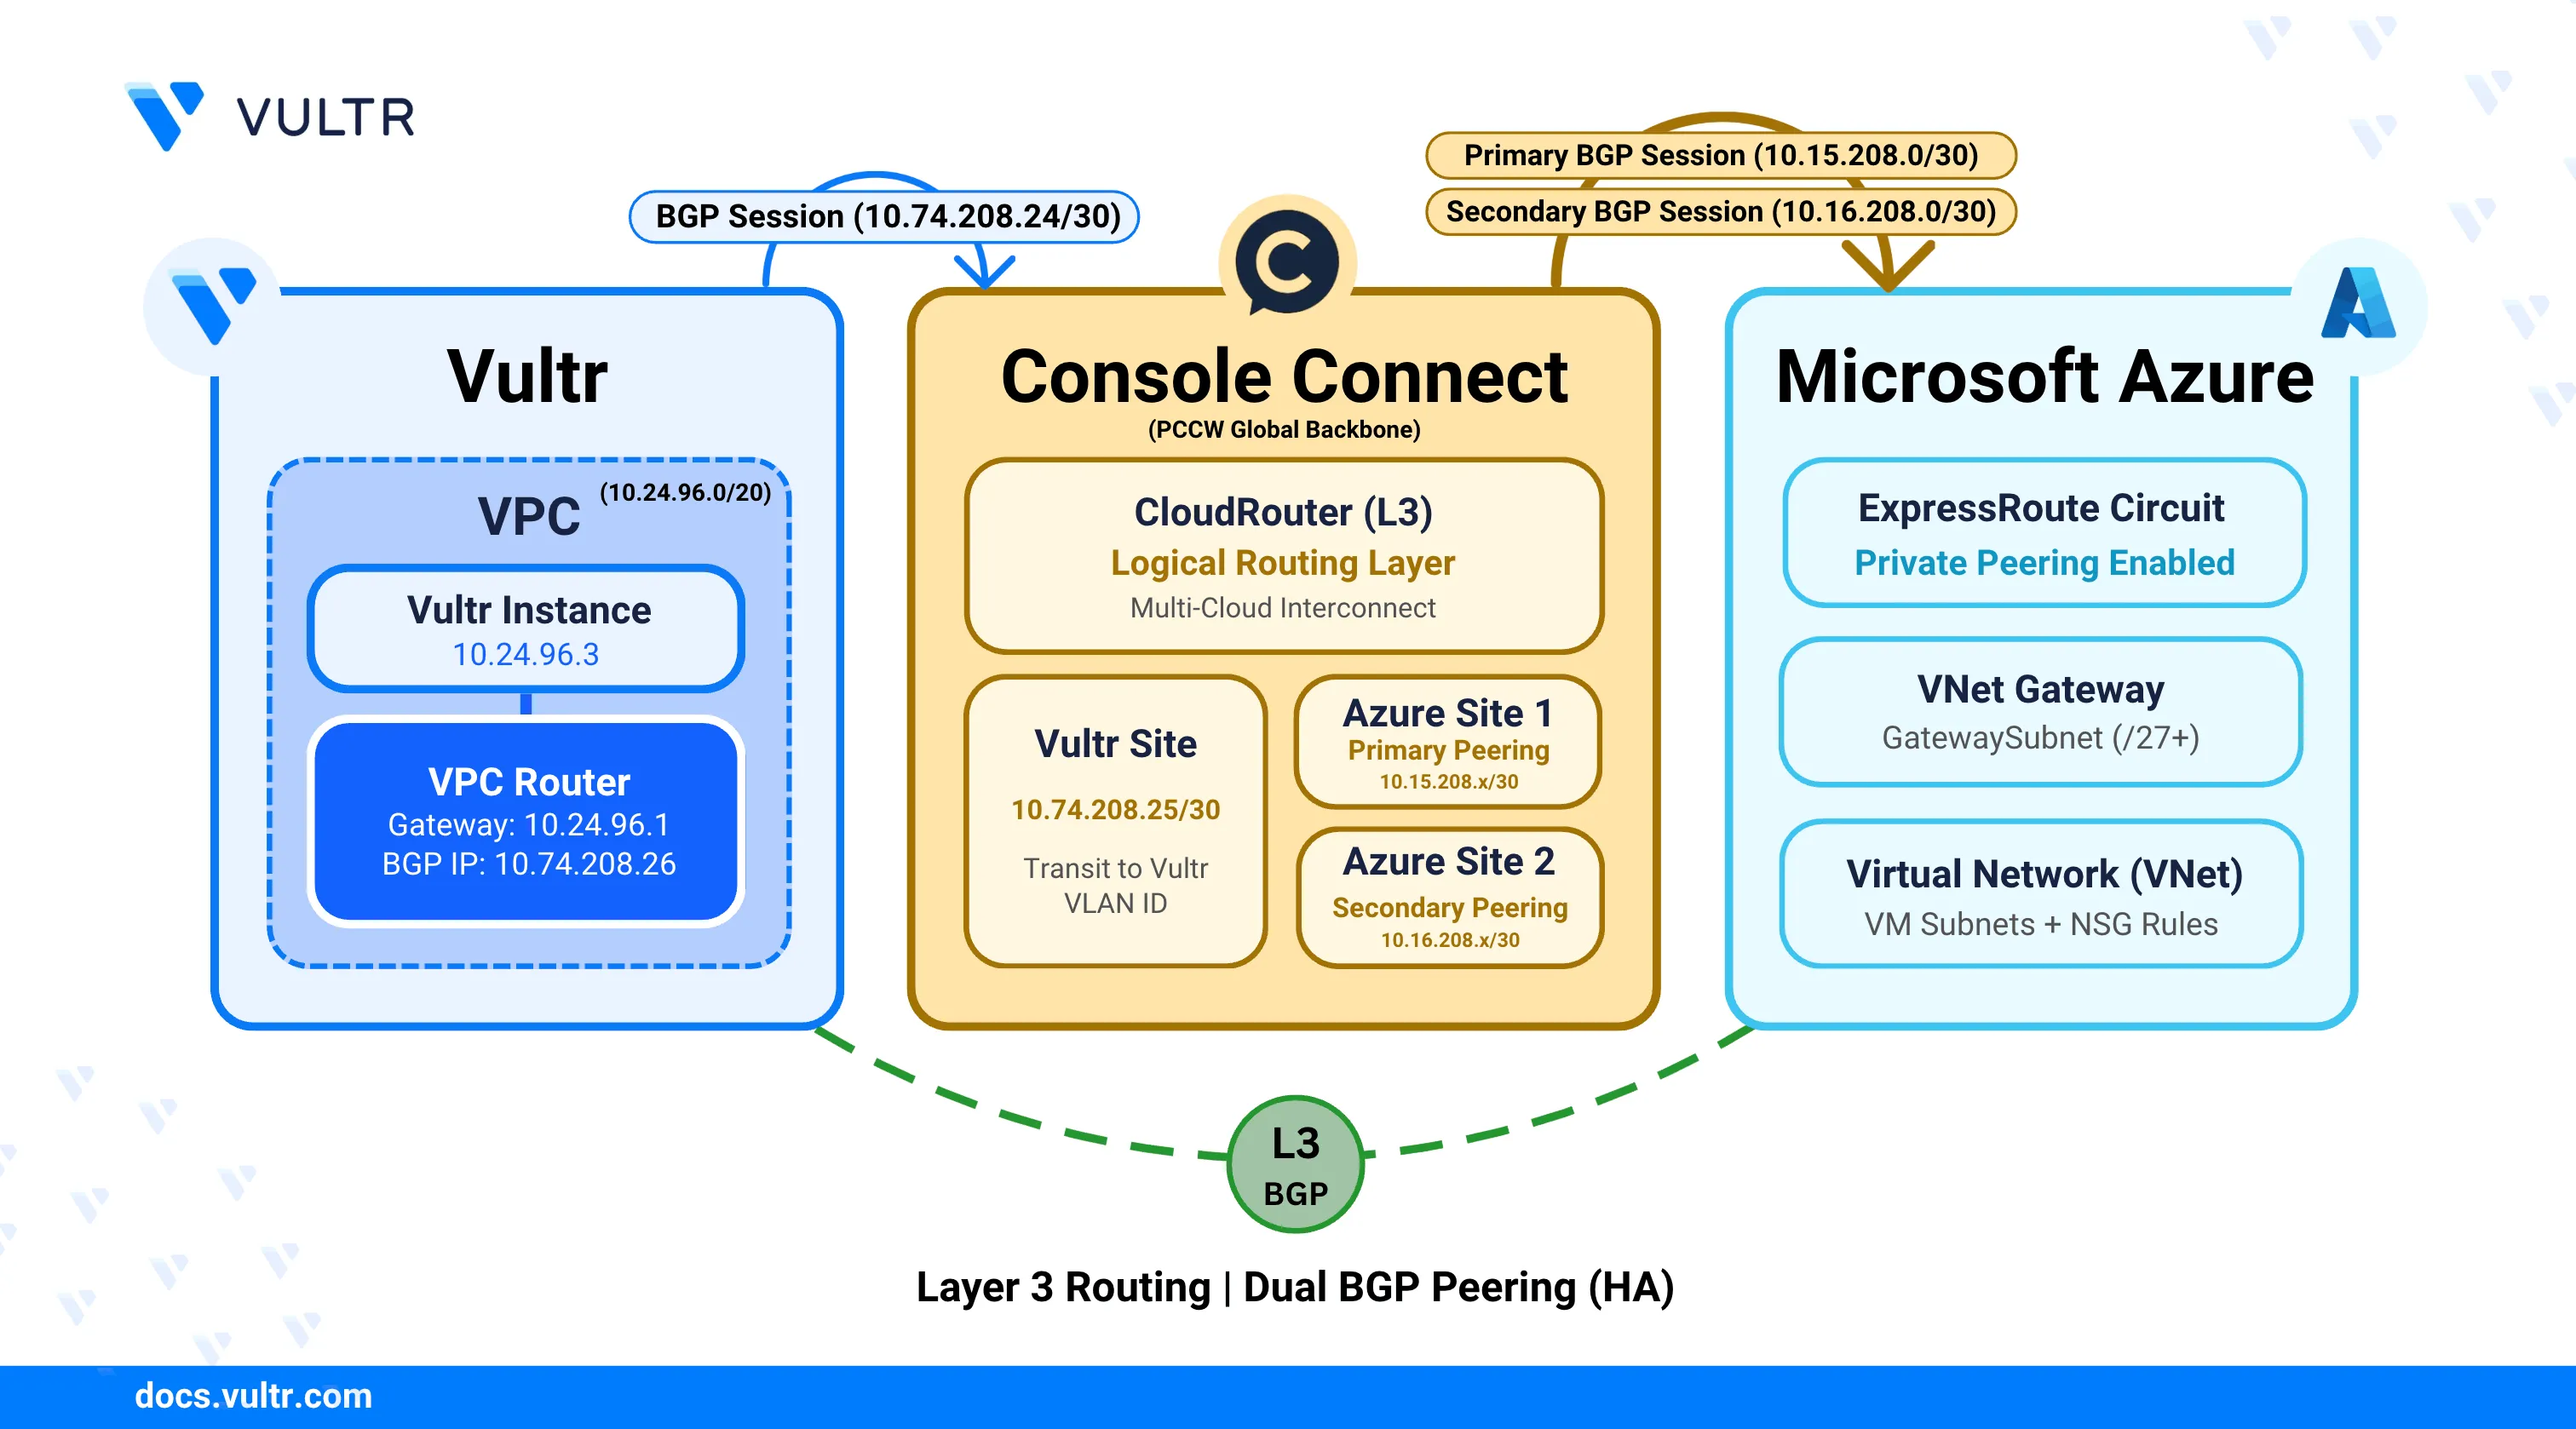
Vultr Direct Connect provides a private, high-bandwidth network connection that links Vultr infrastructure with external cloud providers without traversing the public internet. When combined with Microsoft Azure ExpressRoute through Console Connect, it enables secure, low-latency communication between Vultr instances and Microsoft Azure, making it suitable for hybrid and multi-cloud architectures that require predictable network performance.
This guide explains the end-to-end process for establishing private connectivity between Vultr and Microsoft Azure using Direct Connect via Console Connect. It describes the required network architecture, prerequisite configurations, and the steps needed to provision, validate, and establish a production-ready connection.
Prerequisites
Before you begin, ensure you:
- Have access to the Console Connect Portal with sufficient permissions to create a CloudRouter and add new sites.
- Have access to the Microsoft Azure Portal with permissions to create and manage ExpressRoute circuits, Virtual Network Gateways, and network security resources.
- Have access to the Vultr Console to create and manage Direct Connect and related networking resources.
- Have Border Gateway Protocol (BGP) enabled on your Vultr account.
- Have an active Azure subscription with an existing Virtual Network (VNet) containing a subnet named
GatewaySubnet(recommended/27or larger). - Understand VLAN configuration, Autonomous System Numbers (ASNs), and basic BGP routing concepts.
Gather Information About Console Connect Availability
Console Connect is not available in all Vultr locations. Before provisioning a CloudRouter, confirm Console Connect availability for your target location by opening a support ticket with Vultr Support.
Log in to the Vultr Console.
Select Support from the left navigation menu.
Click Open Ticket to create a new support request.
Toggle the last option to display all available fields.
Under Category, select General Support.
Use the following template to open a support ticket requesting Vultr Direct Connect availability through Console Connect.
textSubject: Request to Set Up Vultr Direct Connect via Console Connect Partner ([REGION] Region) Hello Vultr Team, I would like to set up a Hosted via Partner Direct Connect connection using Console Connect. Before provisioning a CloudRouter, please confirm whether the [REGION] location is supported for Console Connect connectivity. If this location is not supported, please share the available alternatives to establish private connectivity with Vultr. Thank you for your assistance. Best regards, [Your Name]
Vultr Support typically responds within 24 business hours.NoteVultr Support provides availability details, supported data center locations, and the requirements needed to provision a CloudRouter.
Provision a CloudRouter in Console Connect
A CloudRouter acts as the core networking component that enables private connectivity between Vultr and external cloud providers through Console Connect. It provides the logical routing layer required to terminate private connectivity circuits on both cloud platforms and securely exchange traffic between their environments.
Log in to the Console Connect portal.
Click Add New Service, hover over Layer 3 (CloudRouter), and then click Order.
On the CloudRouter Details page, enter the following information:
- CloudRouter Name: Enter a descriptive name to identify the CloudRouter.
- Bandwidth: Select the required bandwidth based on your network throughput requirements.
- Duration: Select the contract duration for the connection. Longer durations typically reduce overall cost.
Click Next: Review to validate the configuration.
Click Next: Payment to proceed to the payment page.
Accept the Terms and Conditions, then click Create CloudRouter to provision the CloudRouter.
CloudRouter provisioning typically takes 10–15 minutes to complete.Note
Add a Vultr Site in Console Connect
A Vultr site defines the termination point for private connectivity within your Vultr environment. It associates the CloudRouter with your Vultr account and port location to enable traffic exchange over the private connection.
Navigate to CloudRouters and select your CloudRouter.
Verify that the CloudRouter status displays Active.
Click Add New Site, then select Cloud or XaaS as the Site Type.
Select VULTR as the provider.
On the Cloud Details page, enter the following information:
- Vultr Account ID: Enter the email address associated with your Vultr account.
- Vultr ASN: This field is automatically populated.
- Vultr Port Location: Select the Vultr port location where the connection terminates.
Click Next: Site Details to review the cloud configuration.
On the Site Details page, enter the following information:
- Site Name: Enter a descriptive name for the site.
- Rate limit (Mbps): Select the maximum bandwidth for this site.
- Class of Service: Choose a service tier based on traffic priority requirements.
- Bronze: Best-effort traffic.
- Silver: Medium-priority traffic.
- Gold: High-priority traffic.
The portal displays the estimated monthly cost based on your selections.
Click Next: Review, to verify the configuration.
Click Next: Terms, review the terms and conditions, and accept all required agreements.
Click Create Site to submit the site for provisioning.
Provide Additional Information to Console Connect
After submitting the CloudRouter provisioning request, Console Connect requires additional information to determine where the connection should terminate within your Vultr account. This information allows Console Connect to associate the CloudRouter with the correct Vultr resources and complete the delivery process.
Send an email to Console Connect confirming that the CloudRouter has been provisioned and provide the required Vultr account and network details.
Copy the following email template, replace the placeholders with your values, and send it to both addresses listed below:
- support@consoleconnect.com
- ccsupport@consoleconnect.com
textSubject: CloudRouter Delivery Request for Vultr Direct Connect via Console Connect Dear Console Connect Team, I am requesting the delivery of a CloudRouter to establish a Direct Connect connection between Vultr and Microsoft Azure using Console Connect. The CloudRouter has been provisioned under the Console Connect account [CONSOLECONNECT_EMAIL_ADDRESS], associated with the company profile [COMPANY_NAME]. Please deliver one end of the CloudRouter to the Vultr account associated with the email address below. Vultr Account Email: [VULTR_ACCOUNT_EMAIL_ADDRESS] Vultr Resources: * Virtual Machine Name: [VM_NAME] * Virtual Private Cloud (VPC) ID: [VPC_UUID] Alternative Contact Email: [ALTERNATE_EMAIL_ADDRESS] Thank you for your assistance. Best regards, [YOUR_NAME]
Attach a screenshot of the Console Connect dashboard showing the provisioned CloudRouter.
Console Connect creates a support case and responds with confirmation and any additional requirements.
Create an ExpressRoute Circuit in Azure
An ExpressRoute circuit establishes the foundation for private connectivity between Microsoft Azure and Console Connect. Azure generates a Service Key during circuit creation, which Console Connect uses to establish the Layer 3 connection.
Log in to the Azure Portal.
In the search bar, type ExpressRoute, then select ExpressRoute circuits.
Click + Create to begin circuit provisioning.
On the Configuration tab, provide the following details:
Project details:
- Subscription: Select the Azure subscription that hosts the circuit.
- Resource group: Select an existing resource group or create a new one.
Resiliency:
Azure offers three resiliency tiers that determine redundancy and availability:
- Maximum resiliency (Recommended): Provides redundancy across multiple edge locations, each with dual physical links.
- High resiliency: Provides metro-level redundancy across separate edge locations with a single physical link.
- Standard resiliency: Uses physical link redundancy within a single edge location.
Select a resiliency tier that aligns with your availability requirements and budget. Maximum resiliency is suitable for production workloads, while Standard resiliency is appropriate for testing or non-critical environments.NoteExpressRoute circuit:
- Region: Select the Azure region for circuit deployment.
- Circuit name: Enter a descriptive name for the ExpressRoute circuit.
- Port type: Select Provider to use Console Connect as the connectivity provider.
- Peering location: Select the Azure peering location that aligns with your Console Connect and Vultr data center locations.
- Provider: Select PCCW Global Limited.
- Bandwidth: Select a bandwidth tier that supports your expected traffic volume.
Azure does not support bandwidth downgrades after circuit creation. Choose a tier that supports your traffic requirements, as insufficient bandwidth leads to packet loss and degraded performance.NoteSKU:
- Local: Limits connectivity to the local Azure region.
- Standard: Enables regional and cross-regional connectivity within the same geopolitical area.
- Premium: Enables global connectivity and increases BGP route limits.
Billing model:
- Metered: Applies charges based on actual outbound data transfer usage.
- Unlimited: Provides unlimited outbound data transfer for a fixed monthly cost.
Azure does not support billing model changes from Unlimited to Metered after circuit creation.Note
Click Next to configure alert rules that notify you when circuit performance degrades or connectivity issues occur.
Click Next to add resource tags for organizational purposes, then click Review + create.
Review the circuit configuration and click Create after validation succeeds.
ExpressRoute circuit provisioning typically completes within 10 minutes.NoteAfter provisioning completes, open the circuit overview page.
Copy the Service key from the overview page. Console Connect requires this key to establish connectivity to the ExpressRoute circuit.
Add a Microsoft Azure Site in Console Connect
A Microsoft Azure site represents the termination point for private connectivity on the Azure side. It links the CloudRouter to your Azure ExpressRoute circuit using the Service Key, enabling end-to-end private communication between Vultr and Azure.
Navigate back to the Console Connect portal.
Select your CloudRouter.
Click Add New Site to create a new Microsoft Azure site.
Select Cloud or XaaS as the Site Type.
Select Microsoft Azure as the provider.
On the Azure Details page, enter the Service Key copied from the Azure ExpressRoute circuit.
Click Next: Site Details to configure the site.
On the Site Details page, enter the following information:
- Site Name: Enter a descriptive name for the site.
- Rate limit (Mbps): Select the maximum bandwidth for this site. This value must match or be lower than the ExpressRoute circuit bandwidth.
- Class of Service: Select a traffic priority tier.
- Bronze: Best-effort traffic.
- Silver: Medium-priority traffic.
- Gold: High-priority traffic.
The portal displays the estimated monthly cost based on your selections.
Click Next: Review to validate the configuration.
Click Next: Terms, review the terms and conditions, and accept all required agreements.
Click Create Site to submit the Azure site for provisioning in Console Connect.
Console Connect creates two sites for the Azure connection: a primary site and a secondary site. This redundancy ensures high availability and failover protection. Each site has its own IP addressing and routing configuration for Azure ExpressRoute redundancy requirements.Note
Configure Azure Private Peering for the ExpressRoute Circuit
Azure private peering enables private IP communication between your Azure virtual networks and the Console Connect network. It establishes the Border Gateway Protocol (BGP) sessions required to exchange routing information between Azure and Vultr through Console Connect.
Configure Primary Peering
The primary peering provides the main connectivity path for the ExpressRoute circuit. It uses a dedicated subnet and VLAN ID to establish a BGP session between Azure and Console Connect.
Navigate to the primary Azure site in the Console Connect portal.
Verify that the site status displays Active.
Record the following routing details for use during Azure configuration:
- Console Connect IP: The IP address Azure uses to peer with Console Connect.
- Microsoft Azure IP: The IP address assigned to the Azure-side router.
- Subnet: The
/30subnet used for the primary peering connection. - Console Connect ASN: The ASN used by Console Connect for the BGP session (typically
3491). - VLAN ID: The VLAN identifier for the primary private connection (customer tag).
Return to the Azure Portal and navigate to your ExpressRoute circuit.
From the left navigation menu, select Peerings.
Select Azure private to configure private peering.
On the Azure private peering configuration page, enter the following information:
- Peer ASN: Enter the Console Connect ASN (
3491). - Primary subnet: Enter the primary subnet recorded from the Console Connect portal.
- Secondary subnet: Leave this field empty for now. Configure it after recording the secondary site details.
- VLAN ID: Enter the VLAN ID from the primary site in Console Connect.
- Shared Key (optional): Leave this field empty unless Console Connect provides a BGP authentication key.
- Peer ASN: Enter the Console Connect ASN (
Do not save the configuration yet. Proceed to configure the secondary peering details.
Configure Secondary Peering
The secondary peering provides redundancy and automatic failover capability for the ExpressRoute circuit. It uses a separate subnet and VLAN ID to establish an independent BGP session, ensuring connectivity remains available if the primary path fails.
Navigate to the secondary Azure site in the Console Connect portal.
Verify that the site status displays Active.
Record the following routing details:
- Console Connect IP: The IP address for the secondary peering.
- Microsoft Azure IP: The IP address for the Azure-side secondary router.
- Subnet: The
/30subnet used for the secondary peering connection. - VLAN ID: The VLAN identifier for the secondary private connection.
Return to the Azure private peering configuration page.
Enter the Secondary subnet using the subnet recorded from the secondary site.
Click Save to apply the peering configuration.
Verify that the peering Status displays Enabled and the Provider status displays Provisioned.
Create a Virtual Network Gateway for ExpressRoute
A Virtual Network Gateway connects your Azure Virtual Network to the ExpressRoute circuit. It acts as the routing gateway that forwards traffic between Azure VMs and the private connection to Vultr through Console Connect.
Navigate to the Azure Portal.
Search for Virtual network gateways and open the service.
Click Create to start the gateway creation.
On the Basics tab, configure the following settings:
- Subscription: Select your Azure subscription.
- Resource group: Derived from the Virtual Network's resource group.
- Name: Enter a descriptive name for the Virtual Network Gateway.
- Region: Select the same region as your Virtual Network.
- Gateway type: Select ExpressRoute.
- SKU: Select an ExpressRoute-capable SKU based on your throughput and high availability requirements.
- ErGw1AZ: Up to 1 Gbps, zone-redundant.
- ErGw2AZ: Up to 2 Gbps, zone-redundant.
- ErGw3AZ: Up to 10 Gbps, zone-redundant.
- Standard: Up to 1 Gbps, not zone-redundant.
- HighPerformance: Up to 2 Gbps, not zone-redundant.
- UltraPerformance: Up to 10 Gbps, not zone-redundant.
- Virtual network: Select the VNet that contains your Azure virtual machines.
- Gateway subnet address range: Verify that the VNet contains a subnet named GatewaySubnet. If it does not exist, create it with a
/27or larger prefix.
Click Review + create to validate the configuration.
Review the settings and click Create to provision the Virtual Network Gateway.
Virtual Network Gateway provisioning typically takes 30–45 minutes to complete.Note
Connect the Virtual Network Gateway to the ExpressRoute Circuit
After the Virtual Network Gateway is created, link it to the ExpressRoute circuit to enable routing between your Azure VNet and the Vultr infrastructure through Console Connect.
Navigate to the ExpressRoute circuit in the Azure Portal.
From the left navigation menu, select Connections.
Click Add to create a new connection.
On the Basics page, configure the following settings:
- Subscription: Select your Azure subscription.
- Resource group: Select your resource group.
- Connection type: Select ExpressRoute.
Click Next.
Under Resiliency select one of the available options:
- Maximum resiliency (Recommended): Redundancy across multiple edge locations with dual physical links.
- High resiliency: Metro-level redundancy across separate edge locations.
- Standard resiliency: Physical link redundancy within a single edge location.
Select the Virtual Network Gateway created earlier.
Under Connection Details, configure the following settings:
- Name: Enter a descriptive name for the connection.
- ExpressRoute circuit: Select the ExpressRoute circuit.
- Redeem authorization: Leave unchecked unless connecting to a circuit in a different subscription.
- Routing weight: Leave the default value unless traffic prioritization is required.
Click Next to add any tags for identification.
Click Next: Review + create to validate the configurations and click Create to create the connection.
Verify that the connection status changes to Succeeded. At this point, the Virtual Network Gateway is successfully linked to the ExpressRoute circuit, and Azure can route traffic to Vultr through Console Connect.
Configure Route Propagation and User-Defined Routes
Azure virtual networks use route tables to control traffic flow between subnets and external destinations. By default, Azure propagates routes learned from ExpressRoute to all subnets in the virtual network (VNet). Verify that route propagation is enabled and configure User-Defined Routes (UDRs) only if custom routing behavior is required.
Enable Virtual Network Gateway Route Propagation
Route propagation ensures that Azure learns the Vultr VPC subnet routes advertised through the ExpressRoute BGP session. This step allows Azure VMs to automatically route traffic destined for Vultr over the private connection.
- Navigate to the Azure Portal.
- Search for Route tables and select the service.
- Select the route table associated with the subnet containing your Azure VMs.
- From the left navigation menu, select Settings, then click Configuration.
- Verify that Propagate gateway routes is set to Yes.
- If the setting is No, change it to Yes, then click Save.
Verify Effective Routes on the Virtual Machine
Effective routes display the actual routing table applied to a VM's network interface. This step confirms that Azure learned the Vultr VPC routes from the ExpressRoute circuit and can forward traffic to Vultr through the Virtual Network Gateway.
Navigate to your Azure virtual machine in the Azure Portal.
From the left navigation menu, select Networking.
Click the Network Interface name to view the interface details.
From the left navigation menu, select Help, then click Effective routes.
Verify that the Vultr VPC subnet appears in the route table with the following properties:
- Address prefix: The CIDR block of the Vultr VPC.
- Next hop type: Virtual network gateway.
- Next hop IP address: The Virtual Network Gateway IP address.
If the Vultr VPC routes do not appear, verify that the Virtual Network Gateway is connected to the ExpressRoute circuit and that the BGP session is active in Console Connect.
Create a User-Defined Route
User-Defined Routes provide explicit control over traffic routing within Azure Virtual Networks. If route propagation is disabled or if you require custom routing behavior, create a UDR to forward traffic destined for Vultr to the Virtual Network Gateway.
Navigate to Route tables in the Azure Portal.
Select the route table associated with the subnet that contains your Azure virtual machines, or create a new route table.
From the left navigation menu, select Routes.
Click Add to create a new route.
Configure the following settings:
- Route name: Enter a descriptive name (for example,
route-to-vultr). - Address prefix: Enter the CIDR block of your Vultr VPC.
- Next hop type: Select Virtual network gateway.
- Route name: Enter a descriptive name (for example,
Click OK to save the route.
If you created a new route table, associate it with the subnet containing your Azure VMs:
- From the left navigation menu, select Subnets.
- Click Associate to link the route table to the target subnet.
- Select the Virtual Network and subnet, then click OK.
Configure Network Security Groups to Allow Traffic from Vultr
Network Security Groups (NSGs) act as virtual firewalls that control inbound and outbound traffic to Azure resources. By default, NSGs deny all traffic that does not match an explicit allow rule. Create inbound rules to permit traffic from your Vultr VPC subnet to reach Azure VMs over the ExpressRoute connection.
Navigate to the Azure Portal.
Search for Network security groups and select the service.
Select the NSG associated with the Azure VM’s network interface or subnet.
From the left navigation menu, select Inbound security rules.
Click Add to create a new inbound rule.
Configure the following settings for ICMP traffic (ping):
- Source: Select IP Addresses.
- Source IP addresses/CIDR ranges: Enter the CIDR block of your Vultr VPC.
- Source port ranges: Enter
*. - Destination: Select Any or specify the Azure VM's private IP address.
- Service: Select Custom.
- Destination port ranges: Enter
*. - Protocol: Select ICMP.
- Action: Select Allow.
- Priority: Enter a value lower than any deny rules (for example,
100). - Name: Enter a descriptive name (for example,
allow-icmp-from-vultr).
Click Add to save the rule.
Add additional inbound rules as required for your application traffic.
Configure Routes in Vultr
After the ExpressRoute connection is established, you must configure routing within your Vultr Virtual Private Cloud (VPC) to forward traffic toward Console Connect. This step ensures that workloads inside the VPC can reach Azure over the private connection.
Navigate to the Console Connect portal and select the Vultr site associated with your CloudRouter.
Record the Vultr subnet displayed on the site details page for later use.
Obtain the Vultr router IP provided by Vultr Support. This IP acts as the next-hop router for traffic destined to Console Connect.
The router IP forwards traffic from the VPC to the Console Connect subnet. Other routing parameters shown on the Vultr site are preconfigured on the Vultr-managed router to establish BGP sessions with Console Connect and do not require manual changes.NoteDeploy a virtual machine in the VPC attached to Console Connect.
After the instance enters the Running state, connect to it using SSH.
console$ ssh USERNAME@SERVER-IP
Replace
USERNAMEwith the username andSERVER-IPwith the public IP address of the server.List network interfaces and identify the interface attached to the VPC.
console$ ip addr
The output displays the available network interfaces. Identify the interface that has an IP address from your VPC subnet.
...
3: enp8s0: <BROADCAST,MULTICAST,UP,LOWER_UP> mtu 1450 qdisc mq state UP group default qlen 1000
    link/ether 5a:00:05:d3:24:29 brd ff:ff:ff:ff:ff:ff
...
Add a route to reach the Console Connect Vultr subnet.
console$ sudo ip route add CONSOLE_CONNECT_VULTR_SUBNET via VULTR_ROUTER_IP dev INTERFACE_NAME
Replace:
- CONSOLE_CONNECT_VULTR_SUBNET: The subnet defined on the Vultr site in the Console Connect portal.
- VULTR_ROUTER_IP: The router IP provided by Vultr Support (typically the first IP in the VPC range).
- INTERFACE_NAME: The name of the VPC-attached network interface.
Adding a route at the VM level enables connectivity only for that instance. To enable connectivity for all workloads in the VPC, add the route at the VPC level using the Vultr Console.NoteVerify connectivity to the Console Connect network.
console$ ping CONSOLE_CONNECT_VULTR_IP
Replace
CONSOLE_CONNECT_VULTR_IPwith the Console Connect IP listed on the Vultr site. Successful ping responses confirm that the Vultr side is connected to the Console Connect network.Add routes to reach the Azure ExpressRoute peering subnets through Console Connect.
console$ sudo ip route add PRIMARY_AZURE_SUBNET via VULTR_ROUTER_IP dev INTERFACE_NAME $ sudo ip route add SECONDARY_AZURE_SUBNET via VULTR_ROUTER_IP dev INTERFACE_NAME
Replace:
- PRIMARY_AZURE_SUBNET: The primary subnet defined on the first Azure site in the Console Connect portal.
- SECONDARY_AZURE_SUBNET: The secondary subnet defined on the second Azure site in the Console Connect portal.
- VULTR_ROUTER_IP: The router IP provided by Vultr Support.
- INTERFACE_NAME: The VPC-attached network interface.
Verify connectivity to Azure.
console$ ping CONSOLE_CONNECT_AZURE_IP
Replace
CONSOLE_CONNECT_AZURE_IPwith the Azure site IP listed in the Console Connect portal. Successful ping responses confirm that private connectivity between Vultr and Azure is operational.
Conclusion
You have successfully established a private, dedicated network connection between Vultr and Microsoft Azure using Direct Connect via Console Connect. By provisioning a CloudRouter, configuring sites on both platforms, creating an Azure ExpressRoute circuit with private peering, deploying a Virtual Network Gateway, and enabling routing within Vultr, you created a low-latency, secure path for traffic between your Vultr VPC and Azure VNets. For more information about Azure ExpressRoute configuration and advanced routing options, refer to the official Azure ExpressRoute documentation.