
How to Establish a Private Connection Between Vultr and On-premises Servers
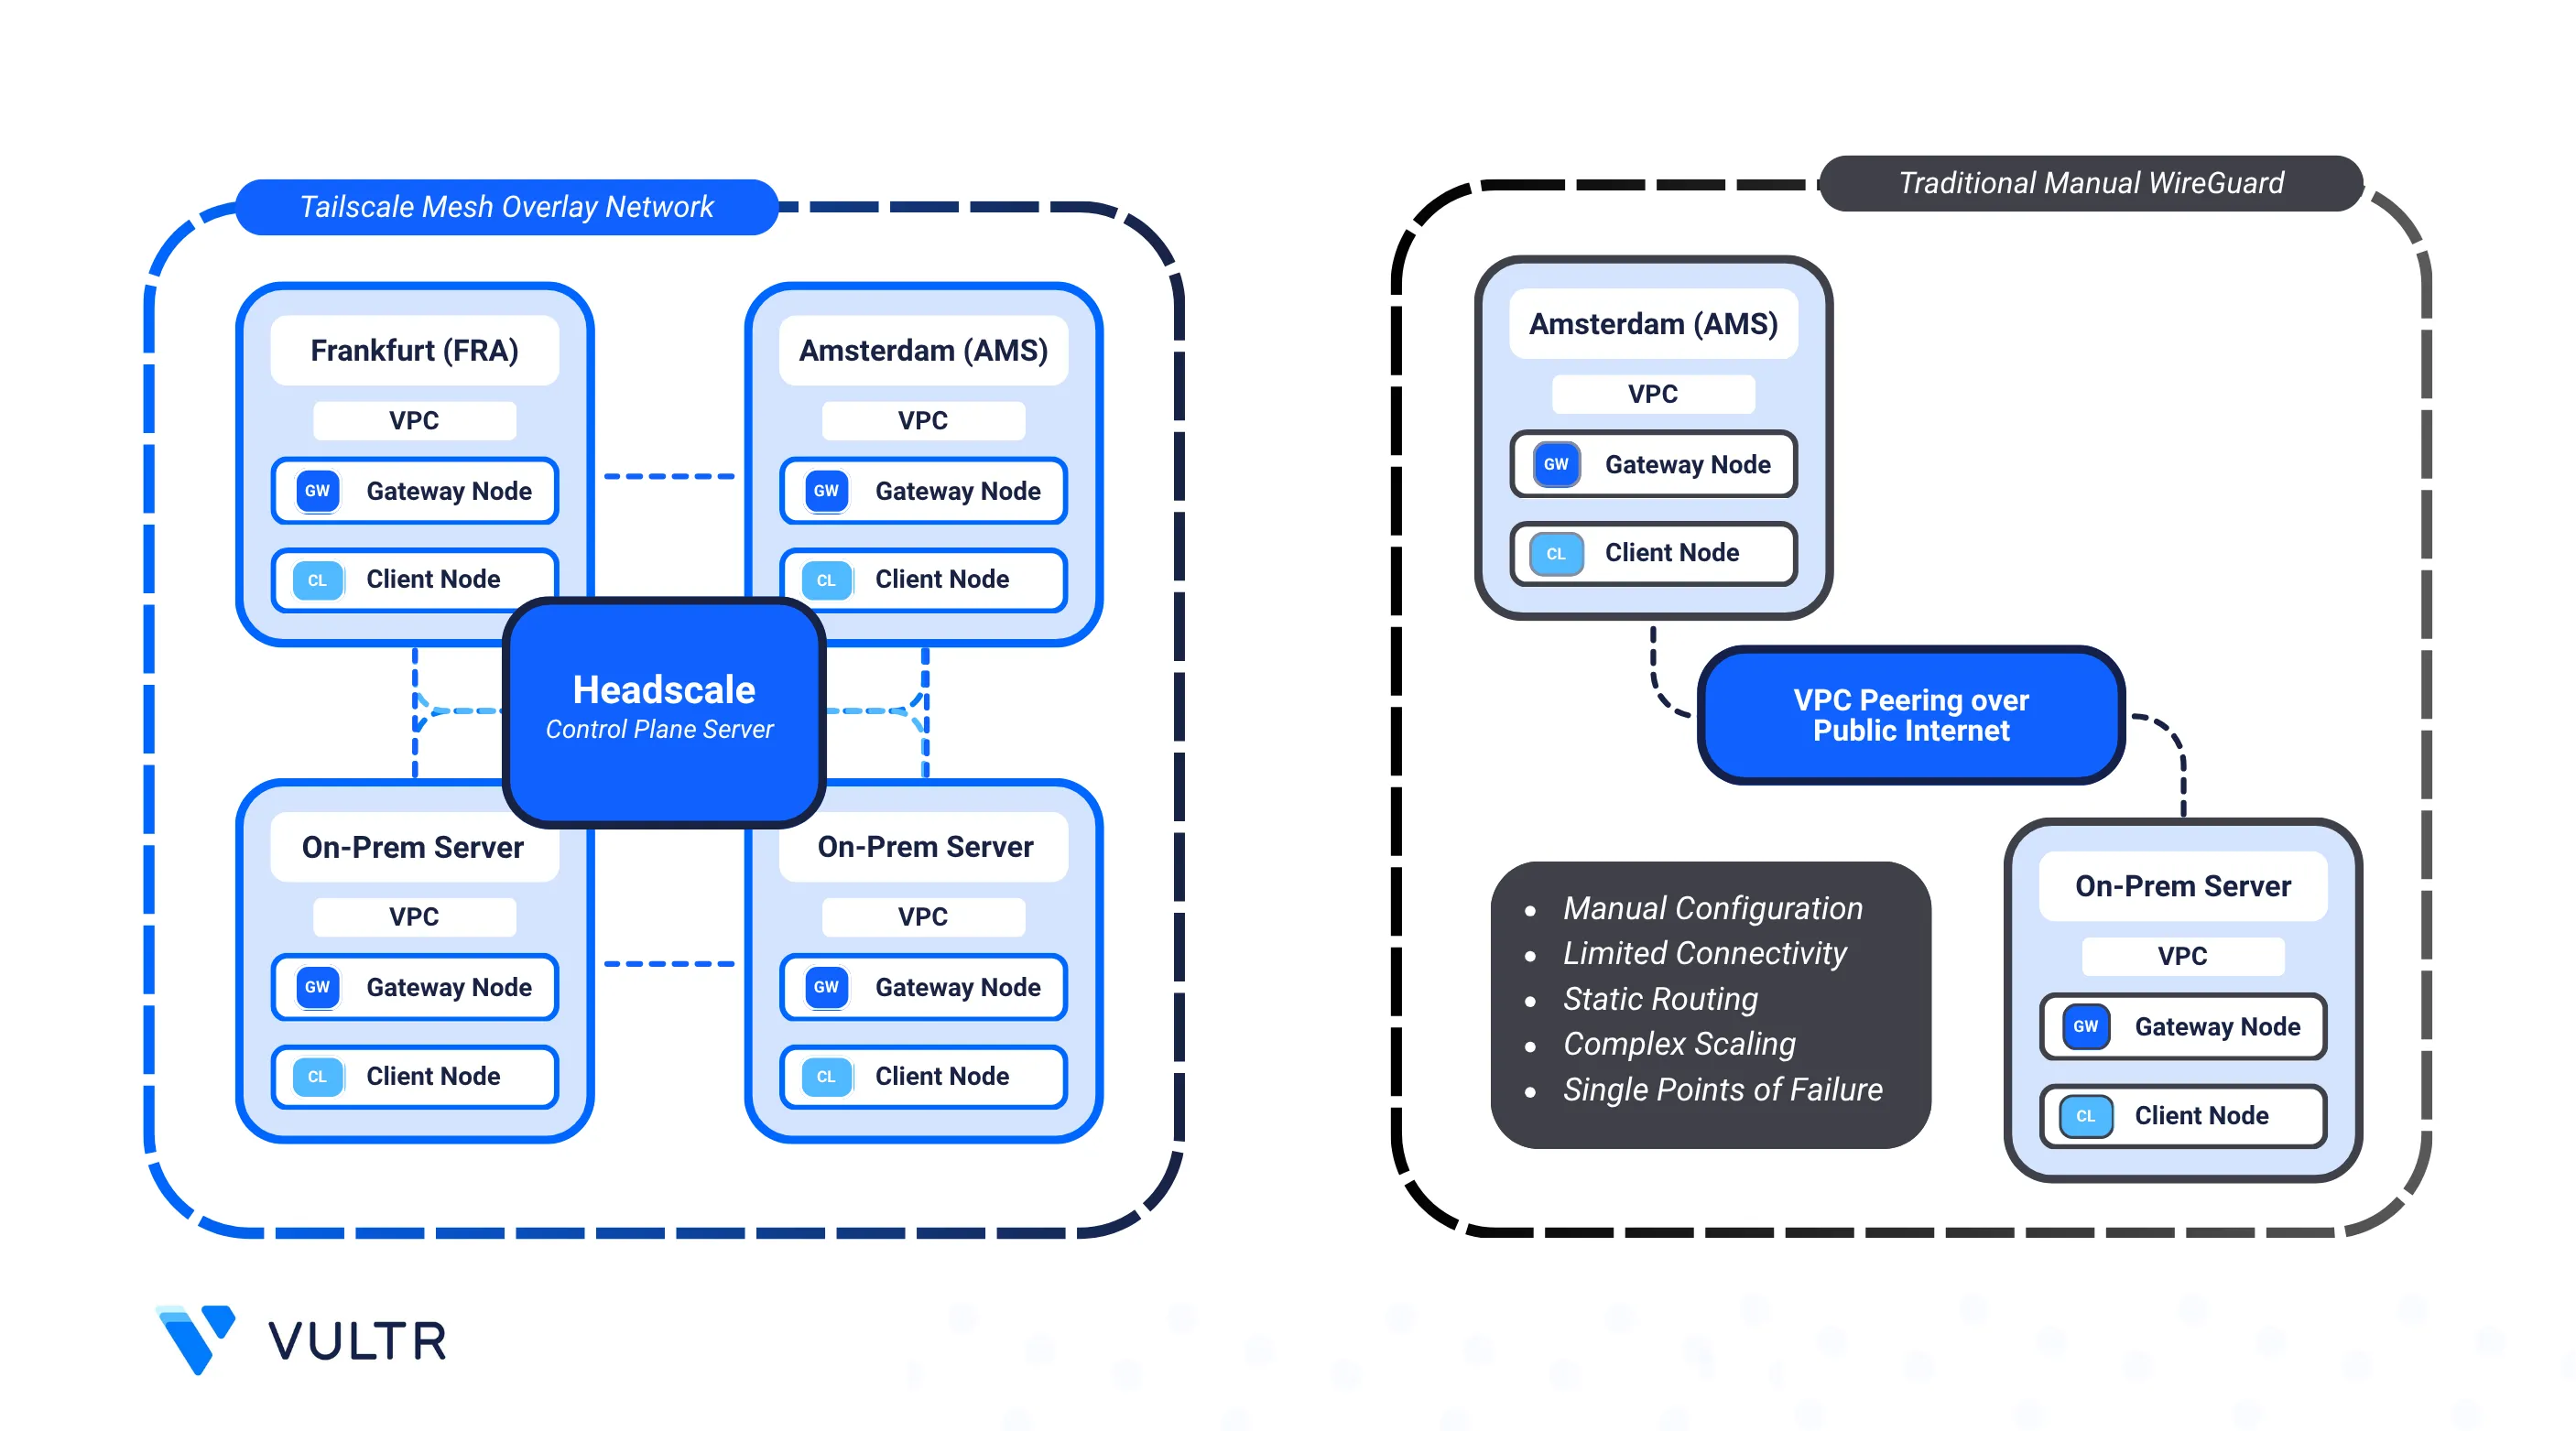
Headscale is an open-source, self-hosted implementation of the Tailscale control plane. It provides a private WireGuard-based mesh VPN that connects devices and services across different environments. Unlike traditional VPNs that force traffic through a central gateway, Headscale with Tailscale establishes peer-to-peer tunnels for secure, low-latency communication.
This guide shows how to extend a Vultr based Headscale mesh to include on-premises servers. By enrolling a local server or workstation (for example, macOS or Linux on your LAN), you can advertise your private subnet and make it accessible to Vultr workloads. The result is a hybrid mesh network where Vultr VPCs and your local network operate as a single secure environment.
Prerequisites
Before you begin, you need to:
- Have an on-premises machine (macOS with Homebrew or Linux with root privileges) that you plan to connect to the mesh.
- Install Terraform CLI.
- Install Ansible CLI.
- Install Git CLI.
Provision the Vultr Mesh with Headscale
You will first deploy the Headscale control server and provision a multi-region Vultr mesh using Terraform and Ansible. This provides the foundation on which you can extend the network to your on-premises.
Clone the Vultr code samples repository and navigate into the VPC peering project directory.
console$ git clone https://github.com/vultr-marketing/code-samples.git $ cd code-samples/vpc-peering/vultr-regions
Open the
terraform.tfvarsfile and add your Vultr API Key. You can also adjust regions, instance plans, or subnets as needed.console$ nano terraform.tfvars
Example variables:
hclvultr_api_key = "YOUR_API_KEY" headscale_region = "ams" user_scheme = "limited" instance_plan = "voc-c-2c-4gb-75s-amd" tailscale_instances = [ { region = "atl" subnet = "10.2.1.0" subnet_mask = 24 }, { region = "ams" subnet = "10.2.5.0" subnet_mask = 24 } ]
The following command uses curl to fetch all Vultr regions along with their identifiers using the public API.Noteconsole$ curl -X GET -s https://api.vultr.com/v2/regions | jq '.regions[] | "\(.id) - \(.city), \(.country)"'
Initialize the Terraform working directory.
console$ terraform init
Apply the manifests to create the infrastructure. When prompted, type yes to approve.
console$ terraform apply
This may take several minutes. When finished, Terraform displays output with the public and private IPs of the provisioned instances and the Headscale control server.
Your output should be similar to the one below:
client_summary = {
    "ams" = {
        "private_ip" = "10.2.5.4"
        "public_ip"  = "192.0.1.2"
        "subnet"     = "10.2.5.0/24"
    }
    "atl" = {
        "private_ip" = "10.2.1.4"
        "public_ip"  = "192.0.1.3"
        "subnet"     = "10.2.1.0/24"
    }
}
headscale_ip = "192.0.1.1"
summary = {
    "ams" = {
        "private_ip" = "10.2.5.3"
        "public_ip"  = "192.0.1.4"
        "subnet"     = "10.2.5.0/24"
    }
    "atl" = {
        "private_ip" = "10.2.1.3"
        "public_ip"  = "192.0.1.5"
        "subnet"     = "10.2.1.0/24"
    }
}
Navigate to the Ansible directory.
console$ cd ansible
Run the playbook to configure the Headscale server and enroll the Vultr gateways into the mesh.
console$ ansible-playbook playbook.yml
To manually add more clients to the mesh network through VPC, select the VPC network and Startup Script namedNoteheadscale-mesh-init-scriptwhile provisioning a new instance. The script currently supports only Debian and RHEL based distributions. For other distributions, you can manually configure FRR or add static routes to integrate them into the private mesh network.
At this stage, your Vultr VPCs are connected through a private WireGuard-based mesh coordinated by Headscale. You can now extend this mesh to include your on-premises servers and services.
Create a Headscale User and Pre-Auth Key for On-Premises Server
To connect an on-premises machine to your Headscale mesh, you first need to create a Headscale user and generate a reusable authentication key.
SSH into the Headscale control server.
console$ ssh -i id_rsa linuxuser@<headscale_ip>
Replace
<headscale_ip>with the public IP of the headscale server from the Terraform output.Create a new Headscale user. You can replace
on-premwith any username you prefer.console$ sudo headscale users create on-prem
Generate a pre-authentication key for the user. This allows the on-premises client to join without an interactive login. The following example creates a key valid for 24 hours.
console$ sudo headscale preauthkeys create --user on-prem --reusable --expiration 24h
Copy the generated key and store it securely for later use.
Pre-authentication keys are shown only once at creation time. If you lose the key, generate a new one.Note
Install and Configure the On-Premises Router
On your on-premises Ubuntu server, run a single script that installs Tailscale, FRR, enables IP forwarding, configures OSPF, and syncs Tailscale routes into the main table. Then connect it to Headscale and advertise your local subnet.
Download and run the on-prem router script.
console$ curl -fsSL https://raw.githubusercontent.com/vultr-marketing/code-samples/refs/heads/main/vpc-peering/vultr-regions/script/onprem-router.sh -o onprem-router.sh $ sudo bash onprem-router.sh
Connect the router to Headscale. Replace the placeholders with your actual values.
console$ sudo tailscale up \ --login-server http://<headscale_ip>:8080 \ --authkey <AUTHKEY> \ --accept-routes \ --advertise-routes <LOCAL_SUBNET>
<headscale_ip>: The public IP of your Headscale server (from Terraform output).<AUTHKEY>: The pre-authentication key you created earlier.<LOCAL_SUBNET>: The local subnet to advertise (for example,192.168.1.0/24).
Approve Advertised Routes in Headscale
When a new peer advertises a local subnet (for example, your on-premises LAN 192.168.1.0/24), Headscale requires an administrator to approve the route before it is enabled. This prevents unauthorized clients from injecting routes into your mesh.
Return to the Headscale control server terminal.
List all routes advertised by peers.
console$ sudo headscale routes list
Your output should be similar to the one below:
ID | Node           | Prefix         | Advertised | Enabled | Primary
1  | gateway-atl    | 10.2.1.0/24    | true        | true    | true
2  | gateway-ams    | 10.2.5.0/24    | true        | true    | true
3  | on-prem-server | 192.168.1.0/24 | true        | false   | false
Here, the on-premises server (
on-prem-server) is advertising192.168.1.0/24but the route is not yet enabled.Approve the new route by referencing its ID.
console$ sudo headscale routes enable -r 3
Replace
3with the actual route ID from your environment.Verify the route is now active.
console$ sudo headscale routes list
Output should show the
Enabledcolumn astrue:ID | Node | Prefix | Advertised | Enabled | Primary 1 | gateway-ams | 10.2.5.0/24 | true | true | true 2 | gateway-atl | 10.2.1.0/24 | true | true | true 3 | on-prem-server | 192.168.1.0/24 | true | true | true
At this point, the on-premises LAN (192.168.1.0/24) is fully reachable across your Vultr Headscale mesh.
Test and Benchmark the Private Network Mesh
After deployment, verify that all regions and your on-premises server are connected through the WireGuard-based mesh managed by Headscale. Use the included Ansible playbook (network_tests.yml) to run automated ping and iperf3 benchmarks across all peers, including the local on-premises system.
Make sure you're in
ansibledirectory and edit yourinventory.ymlfile.console$ vim inventory.yml
Add your on-premises server to the Ansible inventory:
yaml...... onprem: ansible_host: <ONPREM_PUBLIC_IP> # Replace with On-Prem server IP region: onprem ansible_user: <ONPREM_USER> # Replace with SSH username for on-prem server ansible_port: <ONPREM_SSH_PORT> # SSH Port # === Authentication Options === # Option 1: Use SSH password ansible_ssh_pass: <ONPREM_SSH_PASSWORD> # Option 2: Use SSH private key (recommended) # ansible_ssh_private_key_file: <PATH_TO_PRIVATE_KEY>
Save and exit the file.
You only need to choose one authentication method, eitherNoteansible_ssh_passoransible_ssh_private_key_filedepending on your environment and security preference.Run the playbook from your Ansible control node:
console$ ansible-playbook network_tests.yml
The playbook may take 5–10 minutes depending on how many regions and peers (including on-premises) are enrolled. It automatically retries failed tests and aggregates the results into tables.NoteAfter completion, the playbook creates a
network_test_results/directory with:network_results.txt: Combined output of all tests.public_results_table.txt: Tabular summary of region-to-region performance over the public internet.private_results_table.txt: Tabular summary of performance across the Headscale private mesh, including your on-premises subnet.
Review the public internet results.
console$ cat network_test_results/public_results_table.txt
Your output should be similar to the one below:
| From | To     | Download (Mbps) | Upload (Mbps) | Latency (ms)|
|------|--------|----------------|---------------|--------------|
| ams  | atl    |         1426.0 |        1503.0 |      108.999 |
| ams  | onprem |          912.0 |         870.0 |      300.345 |
| atl  | ams    |         1247.0 |        1607.0 |      108.989 |
...
Review the private mesh results, which now include your on-premises node.
console$ cat network_test_results/private_results_table.txt
Your output should be similar to the one below:
| From | To | Download (Mbps) | Upload (Mbps) | Latency (ms)| |------|--------|----------------|---------------|--------------| | ams | atl | 835.0 | 882.0 | 130.228 | | ams | onprem | 512.0 | 478.0 | 314.112 | | atl | ams | 843.0 | 866.0 | 101.428 | ...Public tests usually show higher speeds due to direct internet routing and optimized infrastructure. Private mesh tests use encrypted WireGuard tunnels, which add overhead and may slightly reduce throughput.Note
Conclusion
In this guide, you extended a Vultr-based Headscale deployment to include an on-premises server, created and approved routes, and validated connectivity with benchmarks. Your local subnet now securely integrates into the Vultr mesh, enabling hybrid networking across cloud and on-premises environments through encrypted WireGuard tunnels.