
How to Establish a Private Connection Between Vultr and OVH
Hybrid cloud deployments often need secure, low-latency communication between workloads hosted on different providers. Traditional VPNs can provide connectivity, but their centralized architecture and complex routing often limit scalability and add unnecessary latency.
Headscale, the open-source coordination server for Tailscale, lets you self-host and control your own mesh VPN. Built on WireGuard, Tailscale establishes direct, encrypted tunnels between nodes, eliminating the need for a central relay and giving you full control over identity, routing, and access policies.
By deploying lightweight gateway nodes in Vultr and OVHcloud and automating the process with Terraform and Ansible, you can:
- Build a private, encrypted mesh network spanning Vultr and OVH.
- Manage authentication, routing, and ACLs through a self-hosted Headscale server.
- Automate provisioning and configuration for consistent, repeatable deployments.
In this guide, you configure a fully automated setup that connects Vultr and OVH environments using Headscale, enabling direct peer-to-peer communication without relying on a traditional VPN gateway.
Prerequisites
Before you begin, you need to:
- Have access to a Linux-based instance as a non-root user with sudo privileges.
- Install the command-line tools needed for automation: Terraform, Ansible, and Git.
- Install Vultr CLI and OpenStack CLI to interact with cloud services.
Peer Vultr and OVH with Headscale
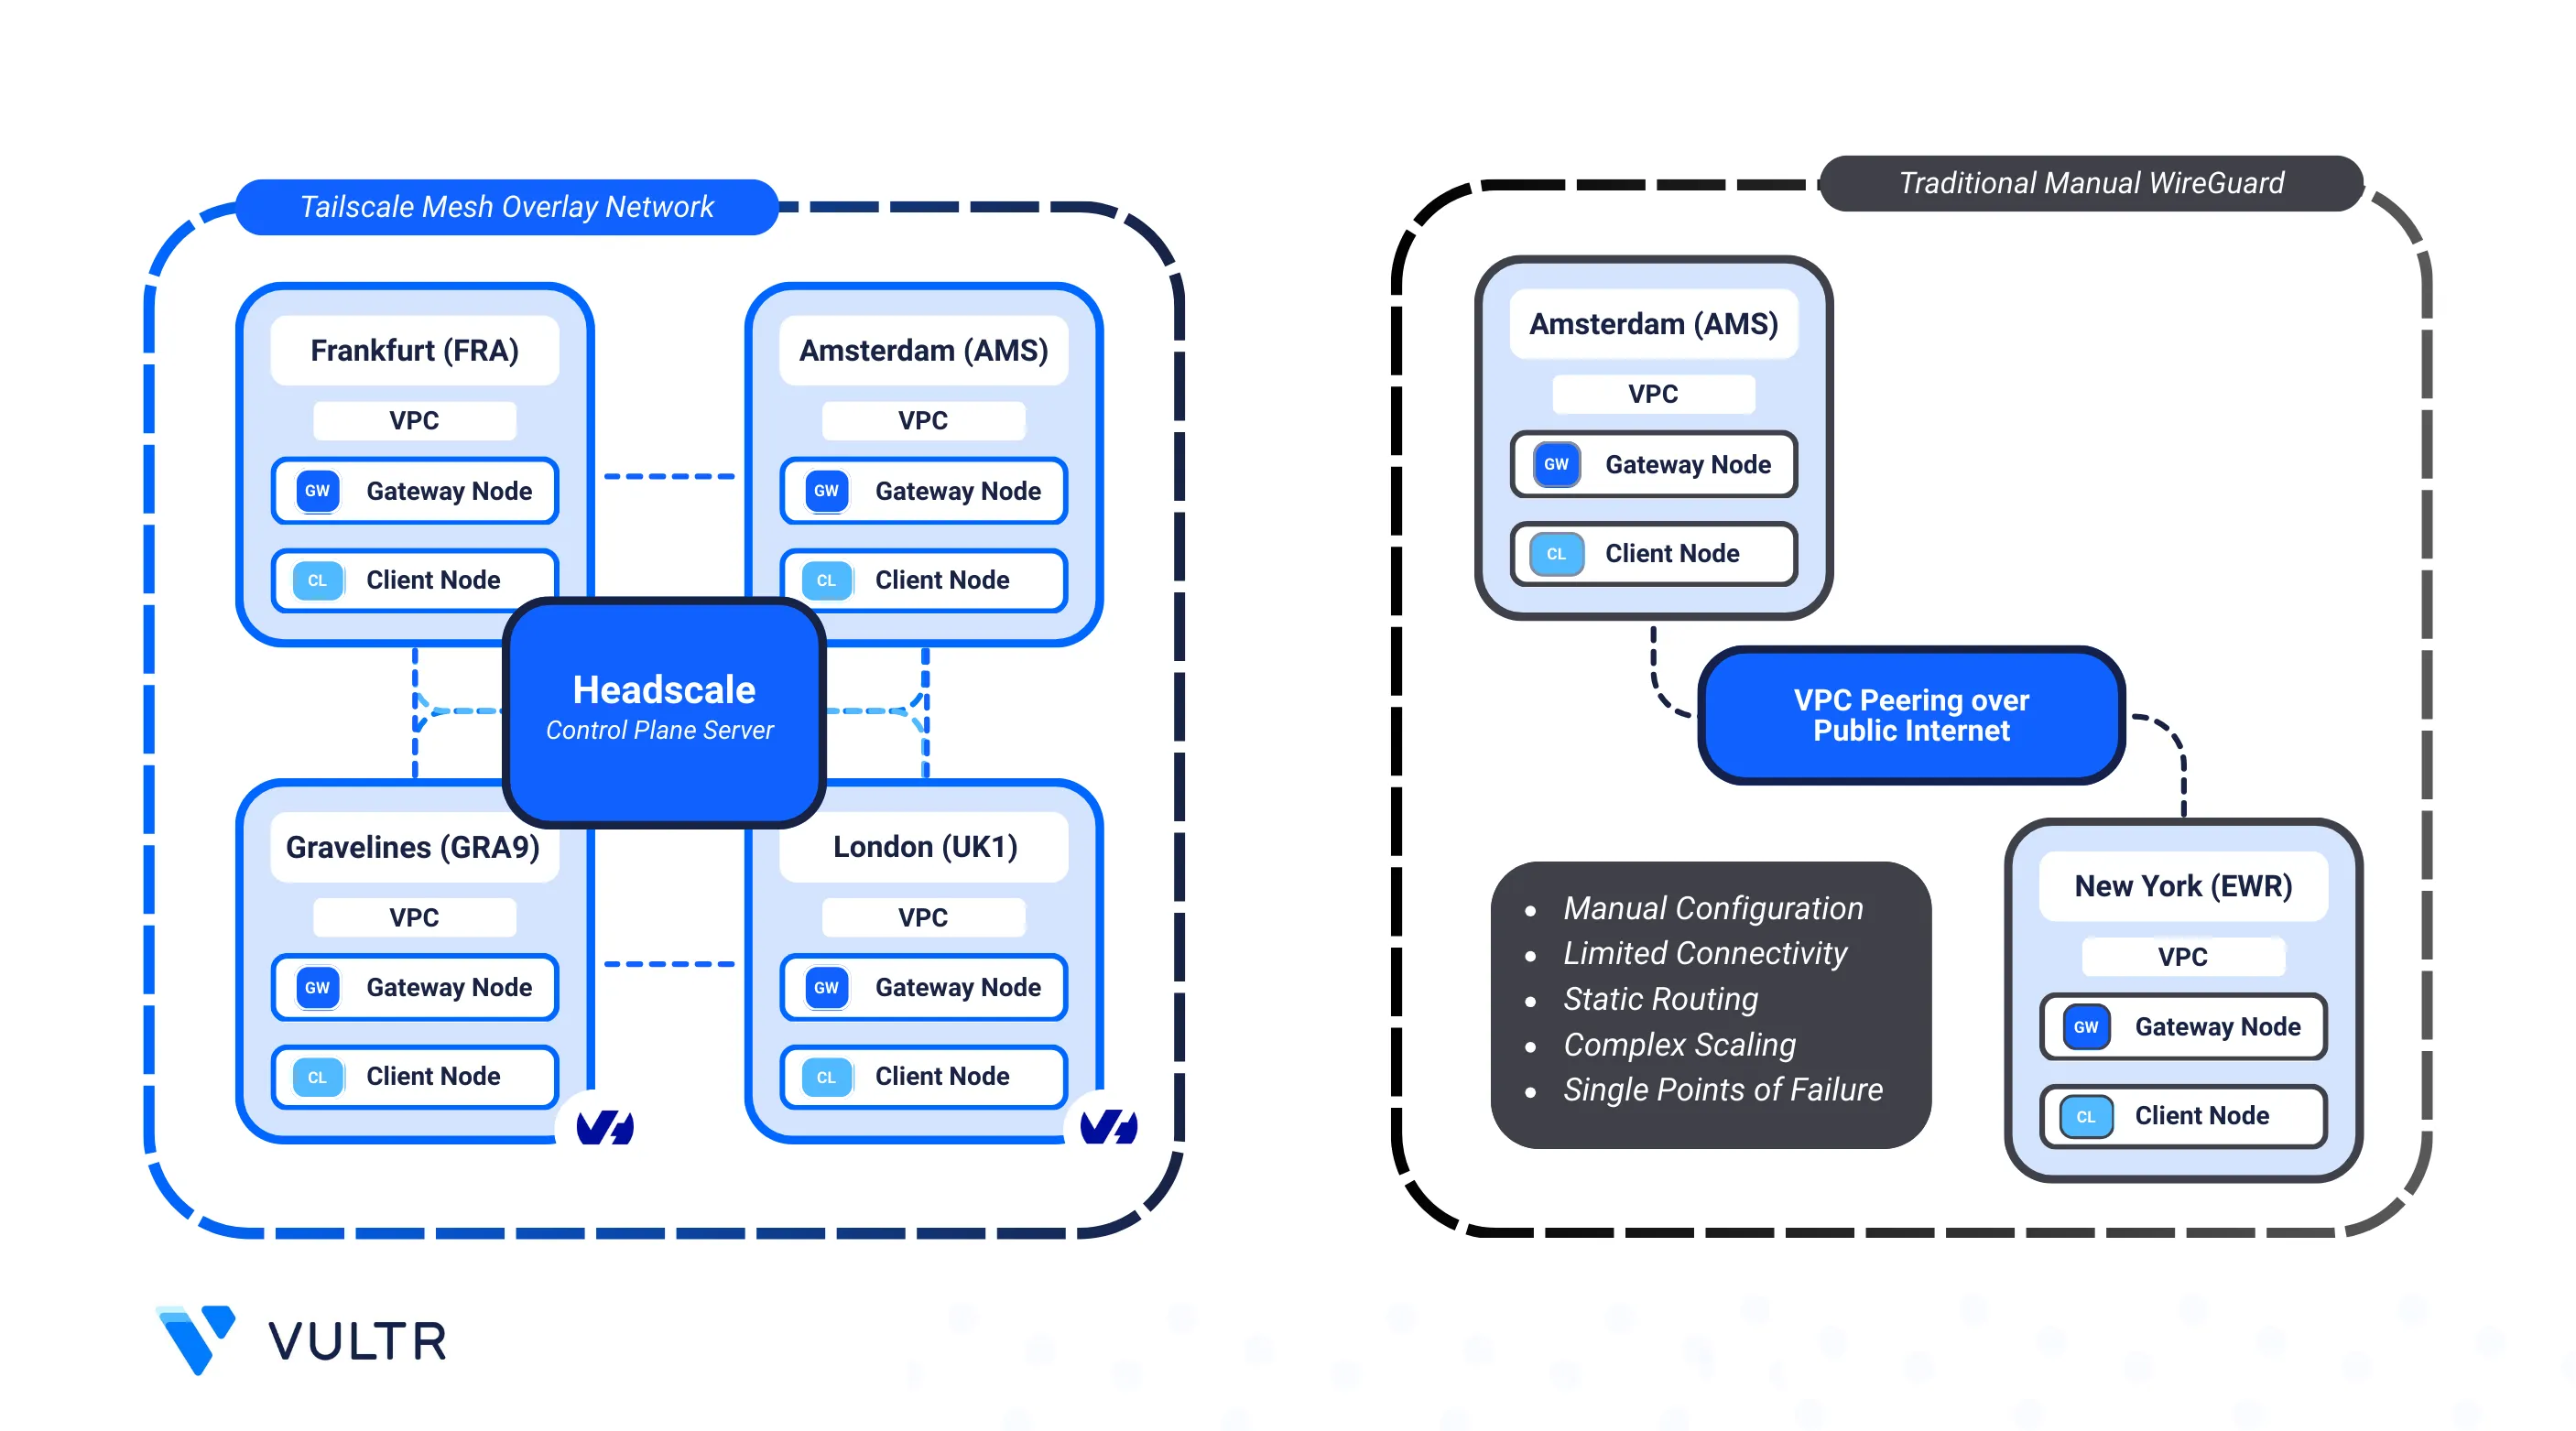
With Tailscale and a self-hosted Headscale server, you can build a decentralized mesh VPN across Vultr and OVH. This design creates direct, encrypted tunnels between regions or providers, enabling secure communication without depending on centralized VPN gateways.
In this setup, each cloud provider runs a Gateway Node that joins the mesh. These gateways connect their respective Virtual Private Clouds (VPCs) so that internal workloads (Client Nodes) in one cloud can securely access resources in the other. This avoids exposing public services and eliminates the need for complex hub-based VPN topologies.
Key Components
- Headscale Controller: The self-hosted coordination server for Tailscale that authenticates nodes and manages encrypted tunnels. In this guide it is hosted on Vultr.
- VPC Networks: Private subnets in Vultr and OVH, each running application workloads and a gateway node.
- Gateway Nodes: One Tailscale peer per Vultr and OVH VPC that connects the mesh across regions.
- Client Nodes: Application VMs in each VPC. They don’t run Tailscale directly; the gateway handles traffic to and from the mesh.
- FRRouting: A routing daemon that advertises and manages routes between the Tailscale gateway and the rest of the VPC.
Automate with Terraform, Ansible, and Cloud-Init
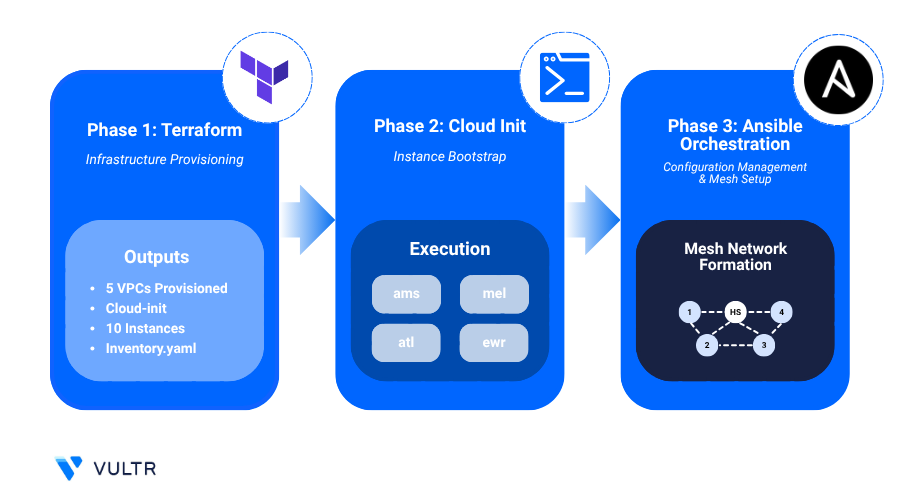
This deployment uses Terraform, Ansible, and Cloud-Init to provide consistent, repeatable provisioning across Vultr and OVH with minimal manual work.
- Terraform: Creates Vultr VPCs, OVH networks/subnets/routers, gateway and client nodes in both the cloud providers, and the Headscale control server.
- Ansible: Registers gateways (
tailscale_servers) with Headscale, advertises VPC subnets, approves routes, injects Tailscale routes into the main routing table, and configures client nodes with FRR/OSPF viascripts/mesh-init.sh. - Cloud-Init: Runs on gateways to install Tailscale and configure FRR so that VPC networks are reachable through the gateway.
Provision a Private Network Mesh Between Vultr and OVH
In this section, you set up the infrastructure with Terraform and configure instances after deployment using the provided Ansible playbooks. The following example uses these regions to illustrate the peering mesh:
| Role | Cloud | Region (Code) |
|---|---|---|
| Headscale control server | Vultr | Amsterdam (ams) |
| Vultr peer/client nodes | Vultr | Bangalore (blr), Frankfurt (fra) |
| OVH peer/client nodes | OVH | Gravelines (GRA9), London (UK1) |
You can expand or reduce the regions to match your requirements. The design supports multiple Vultr and OVH locations in the same mesh.
Configure terraform.tfvars
Clone the GitHub repository and move into the
terraformdirectory forOVH-Vultr.console$ git clone https://github.com/vultr-marketing/code-samples.git $ cd code-samples/vpc-peering/vultr-ovh-regions/terraform
Open the
terraform.tfvarsfile to provide your credentials.console$ nano terraform.tfvars
Add your API keys and adjust region settings as needed.
hcl# Vultr API Key vultr_api_key = "YOUR_VULTR_API_KEY" # OVH OpenStack Application Credential ovh_auth_url = "https://auth.cloud.ovh.net/v3" ovh_project_id = "YOUR_OVH_PROJECT_ID" ovh_application_credential_id = "YOUR_OVH_APP_CRED_ID" ovh_application_credential_secret = "YOUR_OVH_APP_CRED_SECRET" user_scheme = "limited" instance_plan = "voc-c-2c-4gb-75s-amd" instance_os_id = 1743 headscale_region = "ams" vultr_regions = { vultr_1 = { region = "blr" v4_subnet = "10.30.0.0" v4_subnet_mask = 24 } ... } ovh_regions = { ovh_1 = { region = "GRA9" v4_subnet = "10.40.0.0" v4_subnet_mask = 24 flavor_name = "d2-2" } ... }
Populate the Vultr API Key and OVH OpenStack Application Credentials in theNoteterraform.tfvarsfile. See:- OpenStack Keystone: Application Credentials: https://docs.openstack.org/keystone/latest/user/application_credentials.html
Manage Mesh Deployment
Easily extend your mesh to meet evolving infrastructure needs. Add new regions, scale across multiple datacenters, and integrate with additional cloud providers to improve performance, redundancy, and reach.
- Manage Regions: Update the
vultr_regionsandovh_regionsmaps to deploy gateway and client nodes in that locations. - Control Server: Update the
headscale_regionvalue to move the Headscale server to another region if required. Theinstance_planandinstance_os_idsettings are pre-selected for performance and compatibility.
- List available Vultr regions using the API to choose appropriate datacenter locations for your instances.
console
$ curl -X GET -s https://api.vultr.com/v2/regions | jq '.regions[] | "\(.id) - \(.city), \(.country)"'
- List OVH regions using OpenStack CLI to determine where to deploy your instances.
console
$ openstack region list
Initialize and Apply Terraform
Initialize the Terraform working directory.
console$ terraform init
The command above sets up Terraform and downloads any required providers.
Review the execution plan.
console$ terraform plan
Apply the Terraform manifests.
console$ terraform apply
Your output should look similar to the one below:
Do you want to perform these actions?
  Terraform will perform the actions described above.
  Only 'yes' will be accepted to approve.

  Enter a value:
When prompted, type yes to approve and apply the configuration. Provisioning may take up to 5 minutes depending on the number of regions.
Outputs:
client_summary = {
  "blr" = {
    "name" = "vultr-client-blr"
    "private_ip" = "10.30.0.3"
    "provider" = "vultr"
    "public_ip" = "192.18.0.16"
    "subnet" = "10.30.0.0/24"
  }
  ...
  "GRA9" = {
    "name" = "ovh-client-GRA9"
    "private_ip" = "10.40.0.x"
    "provider" = "ovh"
    "public_ip" = "192.8.0.45"
    "subnet" = "10.40.0.0/24"
  }
}
gateway_summary = {
  "blr" = {
    "name" = "vultr-peer-blr"
    "private_ip" = "10.30.0.4"
    "provider" = "vultr"
    "public_ip" = "192.35.0.10"
    "subnet" = "10.30.0.0/24"
  }
  ...
  "GRA9" = {
    "name" = "ovh-peer-GRA9"
    "private_ip" = "10.40.0.x"
    "provider" = "ovh"
    "public_ip" = "192.3.0.7"
    "subnet" = "10.40.0.0/24"
  }
}
headscale_control_server_ip = "192.2.0.5"
These outputs provide important information about your deployed infrastructure:
Client and Gateway Summaries
client_summary: Lists all client nodes (Vultr and OVH) with details such as name, private IP, public IP, provider, and subnet.gateway_summary: Lists all gateway nodes with the same information.
Headscale Control Server IP
headscale_control_server_ip: Displays the public IP of the Headscale control server that manages the mesh.
Run Ansible Playbook
Navigate into the Ansible directory.
console$ cd ../ansible
Terraform generates theNoteinventory.ymlfile in this directory. Ansible uses it to configure the mesh network, listing all Vultr and OVH gateway and client nodes.Run the Ansible playbook to configure the private network mesh.
console$ ansible-playbook playbook.yml
The playbook provisions nodes, creates necessary users and authentication keys, enrolls nodes with advertised network subnets, configures routing, enables IP forwarding, and updates the network routing table without disrupting existing routes.
- Add a new region:
- Add an entry under
vultr_regionsorovh_regionswith the region code and CIDR, similar to how you configured other regions then run the below commands.Running Terraform and Ansible again applies only the new changes. The existing configuration remains intact while the new region is added to the mesh.console$ cd terraform && terraform apply -auto-approve $ cd ../ansible && ansible-playbook playbook.yml
- Add an entry under
- Add new clients:
- Ensure that the new instance is already part of the VPC used for the mesh.
- Edit
ansible/inventory.ymland add the new hosts underclient_serverswith entries foransible_host,ansible_user(linuxuseron Vultr,ubuntuon OVH),region, andsubnet(CIDR). - Run the playbook.
After the playbook completes, the client servers are configured with the necessary tools and settings to communicate with other instances in the mesh.console
$ ansible-playbook playbook.yml
Test and Benchmark the Private Network Mesh
After deployment, verify that Vultr and OVH regions are connected through the WireGuard mesh managed by Headscale. Use the provided Ansible playbooks to run tests across private and public paths, and record results for latency, bandwidth, and overall mesh reliability.
Run the provided Ansible playbook to execute
iperf3andpingtests between regions using both private and public IPs.console$ ansible-playbook network_tests.yml
The network tests may take 5-10 minutes to complete, depending on the number of regions being tested.NoteAfter the playbook finishes, it creates a
network_test_results/directory with the following files:network_results.txt: Consolidated output of all tests, including latency and bandwidth for public and private paths.public_results_table.txt: Tabular summary of region-to-region performance over the public internet.private_results_table.txt: Tabular summary of private mesh performance through Headscale.
Review the test results for the public internet performance between nodes.
console$ cat network_test_results/public_results_table.txt
Your output should be similar to the one below:
| From            | To                  | Download (Mbps) | Upload (Mbps) | Latency (ms) |
|-----------------|---------------------|-----------------|---------------|--------------|
| vultr-peer-blr  | vultr-peer-fra      | 431.87          | 505.06        | 171.45       |
| vultr-peer-blr  | ovh-peer-GRA9       | 88.21           | 104.93        | 224.77       |
Review the Private IP test results to validate the performance over the Tailscale mesh.
console$ cat network_test_results/private_results_table.txt
Your output should be similar to the one below:
| From | To | Download (Mbps) | Upload (Mbps) | Latency (ms) | |-----------------|---------------------|-----------------|---------------|--------------| | vultr-peer-blr | vultr-peer-fra | 249.10 | 386.90 | 157.84 | | vultr-peer-blr | ovh-peer-GRA9 | 29.95 | 72.60 | 219.45 |Public tests usually show higher speeds due to direct internet routing and optimized infrastructure. Private mesh tests use encrypted WireGuard tunnels, which add overhead and may reduce throughput.Note
Conclusion
This guide showed you how to build a secure, multi-region private mesh network between Vultr and OVH with Headscale and Tailscale. Using Terraform and Ansible, you automated provisioning and configuration for consistent deployments across regions. Gateway and client nodes communicated over encrypted, low-latency tunnels, while FRRouting and each provider’s VPC ensured seamless cross-datacenter connectivity.