
Introduction
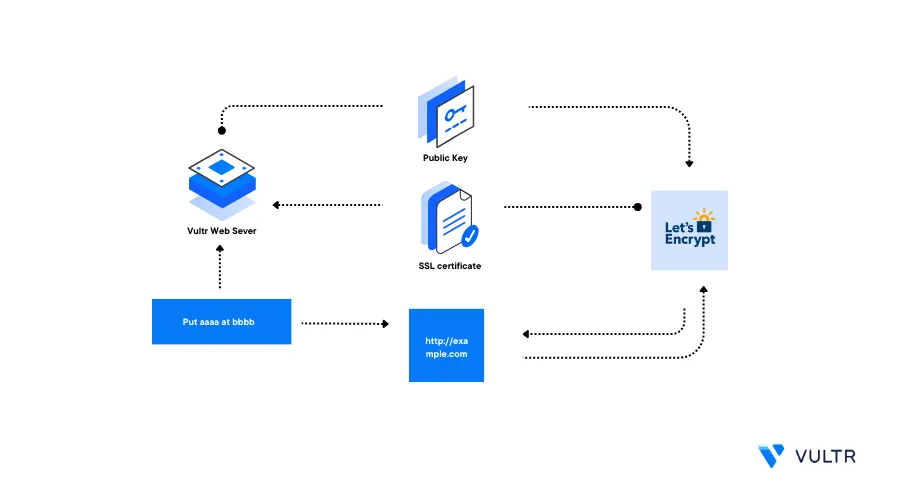
Certbot is a free open-source Let's Encrypt issuer that generates trusted TLS/SSL certificates to protect production servers and applications. Most modern browsers require valid SSL certificates to handle secure HTTPS connections. When installed on your server, Certbot handles the certificate generation and renewal processes for all domain records that point to your server.
This guide explains how you can generate SSL Certificates using Certbot on a Vultr Cloud Server.
Prerequisites
Deploy a Linux server on Vultr to test the Certbot operations
Set up a new domain A record that points to the Server IP Address
Switch to the non-root user account. For example
sysadmin# su sysadmin
Install Certbot
To install Certbot on your server, it's recommended to use the Snappy package manager (snap), but the application can also is also available as a Python package. Depending on your web server stack and desired installation method, install Certbot as described in the optional methods below below.
Install Certbot Using Snap (Recommended)
Snap is a software package manager that enables the quick installation and configuration of applications on a server. Snap is the recommended Certbot installation method, install the tool on your server as described in the steps below.
Install the Snap package manager if it's not available
Ubuntu/Debian:
$ sudo apt install snapdCentOS/Fedora/RHEL distributions:
Enable the EPEL repository
$ sudo dnf install epel-releaseUpdate the server
$ sudo dnf upgradeInstall Snap
$ sudo dnf install snapd
Verify the running Snap version
$ snap --versionOutput:
 snap    2.60.4
 snapd   2.60.4
 series  16
 kernel  6.2.0-33-generic
Using Snap, install Certbot
$ sudo snap install certbot --classicActivate the system-wide Certbot command
$ sudo ln -s /snap/bin/certbot/ /usr/bin/certbotView the installed Certbot version
$ sudo certbot --versionOutput:
certbot 2.7.1
Install Certbot Using Python
Certbot is available as a Python package in the default server repositories. To install Certbot using Python, you must specify the matching web server package to install the correct version to generate SSL certificates on the server. Install Certbot as described in the steps below.
Install the Python Certbot package
Ubuntu/Debian:
$ sudo apt install python3-certbot python3-certbot-apache python3-certbot-nginxCentOS/RHEL distributions:
$ sudo dnf install python3-certbot python3-certbot-apache python3-certbot-nginxThe above installation command installs the Certbot Python package together with the Apache and Nginx web server support modules.
View the installed Certbot version
$ sudo certbot --versionOutput:
certbot 2.7.1
Generate Let's Encrypt SSL Certificates
Certbot uses the following syntax to generate Let's Encrypt SSL Certificates:
certbot [webserver] [options] [domain name] [email_address]Generate a new Let's Encrypt Certificate. Replace
example.com,hello@example.comwith your actual domain name and email address respectively$ sudo certbot --apache -d example.com -d www.example.com -m hello@example.comThe above command generates a new Let's Encrypt SSL certificate and configures the Apache configuration file that matches the domain name. When successful, your output should look like the one below:
 Saving debug log to /var/log/letsencrypt/letsencrypt.log

 - - - - - - - - - - - - - - - - - - - - - - - - - - - - - - - - - - - - - - - -
 Please read the Terms of Service at
 https://letsencrypt.org/documents/LE-SA-v1.3-September-21-2022.pdf. You must
 agree in order to register with the ACME server. Do you agree?
 - - - - - - - - - - - - - - - - - - - - - - - - - - - - - - - - - - - - - - - -
 (Y)es/(N)o:
Enter
Yto accept the terms of service and generate your Let's Encrypt SSL CertificateRequesting a certificate for example.com Successfully received certificate. Certificate is saved at: /etc/letsencrypt/live/example.com/fullchain.pem Key is saved at: /etc/letsencrypt/live/example.com/privkey.pem This certificate expires on 2024-01-11. These files will be updated when the certificate renews. Certbot has set up a scheduled task to automatically renew this certificate in the background. Deploying certificate Successfully deployed certificate for example.com to /etc/nginx/sites-enabled/default Congratulations! You have successfully enabled HTTPS on https://example.comIf you are running Nginx as your web server application, replace
--apachewith--nginxto grant Certbot write privileges to your configuration files$ sudo certbot --nginx -d example.com -d www.example.com -m hello@example.comTo generate Let's Encrypt SSL certificates without a web server, use the
--cert-onlyoption.$ sudo certbot certonly --webroot -d example.com -d www.example.com -m hello@example.com -w /var/www/htmlThe above command generates SSL certificates without a web server application and uses the
/var/www/htmlas the webroot directory to authenticate the domain nameWhen generated, verify that new
.pemcertificate files are available in the/etc/letsencrypt/live/directory$ sudo ls /etc/letsncrypt/live/example.com/Output:
cert.pem chain.pem fullchain.pem privkey.pem READMEIf you generate SSL certificates with the
--cert-onlyoption, configure your web application to use the generated filesDepending on your web server configuration, view your host configuration file and verify that new Certbot rules are available. For example, view the default Nginx configuration file
$ sudo cat /etc/nginx/sites-enabled/defaultVerify that new Certbot HTTPS configuration rules are available in the file:
 listen [::]:443 ssl ipv6only=on; # managed by Certbot
 listen 443 ssl; # managed by Certbot
 ssl_certificate /etc/letsencrypt/live/example.com/fullchain.pem; # managed by Certbot
 ssl_certificate_key /etc/letsencrypt/live/example.com/privkey.pem; # managed by Certbot
 include /etc/letsencrypt/options-ssl-nginx.conf; # managed by Certbot
 ssl_dhparam /etc/letsencrypt/ssl-dhparams.pem; # managed by Certbot
Auto Renew SSL Certificates
Let's Encrypt SSL Certificates have a default time to live period of 90 days. Every 90 days Certbot automatically renews your SSL certificates before they expire to keep them up to date. Whenever you generate a new certificate, Certbot creates a matching Cronjob or systemd timer that checks for your certificate expiry date and renews it before the expiry date. Verify the renewal process as described below.
Test the Certbot automatic renewal process
$ sudo certbot renew --dry-runYour certificate renewal output should look like the one below:
 Saving debug log to /var/log/letsencrypt/letsencrypt.log

 - - - - - - - - - - - - - - - - - - - - - - - - - - - - - - - - - - - - - - - -
 Processing /etc/letsencrypt/renewal/example.com.conf
 - - - - - - - - - - - - - - - - - - - - - - - - - - - - - - - - - - - - - - - -
 Account registered.
 Simulating renewal of an existing certificate for example.com

 - - - - - - - - - - - - - - - - - - - - - - - - - - - - - - - - - - - - - - - -
 Congratulations, all simulated renewals succeeded:
 /etc/letsencrypt/live/example.com/fullchain.pem (success)
 - - - - - - - - - - - - - - - - - - - - - - - - - - - - - - - - - - - - - - - -
As listed in the above simulation output, Certbot automatically renews your SSL Certificates before they expire
View the list of systemd timers
$ sudo systemctl list-timersVerify that a Certbot is available and runs after every 90 days:
 NEXT                        LEFT                LAST                        PASSED       UNIT                           ACTIVATES
 Fri 2023-10-13 17:42:23 UTC 10h left            Thu 2023-10-12 17:42:23 UTC 13h ago      systemd-tmpfiles-clean.timer   systemd-tmpfiles-clean.service
 Fri 2023-10-13 19:23:00 UTC 12h left            -                           -            snap.certbot.renew.timer       snap.certbot.renew.service
You have tested the Certbot SSL certificate renewal process, every 90 days, the Let's Encrypt client attempts to renew your certificate if the domain correctly points to your server
Test
Using a web browser such as Chrome, visit your configured domain name using the HTTPS protocol
https://example.comClick the Security button in your browser URL bar
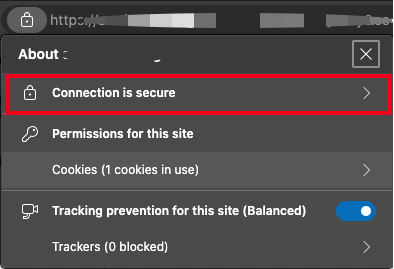
Select the Connection is secure option to reveal the connection details
Click the Certificate is Valid prompt to view the SSL certificate
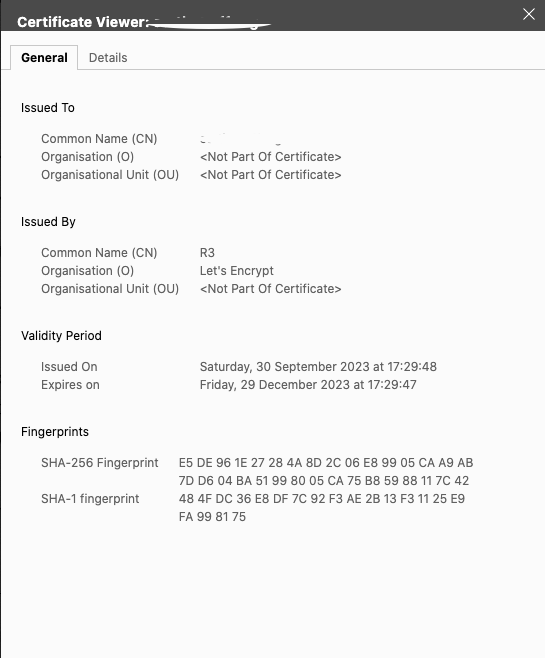
Verify that the certificate Validity Period matches 90 days between the Issued On and Expires On period
Conclusion
You have installed Certbot and generated Let's Encrypt certificates for your configured domain name on a Vultr Cloud Server. Depending on your web server stack, you can generate SSL certificates for multiple domains using Certbot on your server. For more information on how to use Certbot, visit the official documentation.
No comments yet.