
How to Install and Use Kubectl to Manage a VKE Cluster
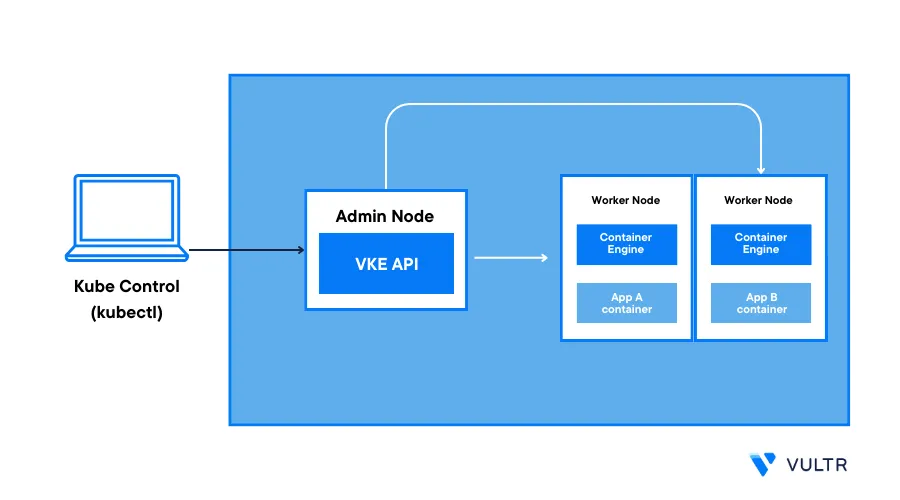
kubectl, or Kube Control, is a command-line tool for interacting with Kubernetes clusters. It allows system administrators and developers to deploy, manage, and monitor applications within a Kubernetes cluster. kubectl uses the Kubernetes API to communicate with a Kubernetes cluster's control plane and perform various management actions. Using kubectl, you can create, update, and delete resources such as pods, services, and deployments through a command-line interface.
This guide explains how to install and use kubectl to manage a Vultr Kubernetes Engine (VKE) cluster.
Prerequisites
Before you begin:
Install kubectl
kubectl tool is available on major operating systems such as Windows, Linux, and macOS. In this section, you will install kubectl to connect and manage your Kubernetes clusters.
kubectl is unavailable in the apt or dnf package repositories of Debian/Ubuntu and CentOS/RHEL based distributions. You can install kubectl using the snap package manager or manually add the latest binary to your system.
Install kubectl Using snap
Install the kubectl using the snap package manager on your Linux machine.
$ sudo snap install kubectl --classic
Install kubectl Binary
To manually install kubectl, download the latest kubectl binary using the following command.
console$ curl -LO "https://dl.k8s.io/release/$(curl -L -s https://dl.k8s.io/release/stable.txt)/bin/linux/amd64/kubectl"
Grant execute permissions on the binary.
console$ chmod +x kubectl
To activate
kubectlas a system-wide command, move the downloaded binary to the/usr/local/bindirectory.console$ sudo cp kubectl /usr/local/bin/
To install kubectl on your Windows machine, install Chocolatey or the Windows Package Manager to download the kubectl files to your computer. To install kubectl, open the Windows Start Menu, search and open a new Windows PowerShell session, and use the following options.
To install kubectl using Chocolatey, use the following command.
pwsh> choco install kubernetes-cli
To install kubectl using the Windows Package Manager, run the following command.
pwsh> winget install -e --id CNCF.kubectl
To manually install the application:
Download the latest kubectl binary.
pwsh> Invoke-WebRequest -Uri "http://dl.k8s.io/release/$(Invoke-WebRequest -Uri http://dl.k8s.io/release/stable.txt).txt/bin/windows/amd64/kubectl.exe" -OutFile kubectl.exe
Copy the downloaded file to a directory in your system's PATH.
pwsh> copy "C:\path\to\kubectl.exe" "C:\bin"
On macOS, install the Homebrew package manager and use it to install kubectl as described in the following steps.
Using brew, install kubectl.
console% brew install kubectl
To manually install kubectl:
Download the latest binary using
curl.console% curl -LO "https://dl.k8s.io/release/$(curl -L -s https://dl.k8s.io/release/stable.txt)/bin/darwin/amd64/kubectl"
Grant execute permissions on the file.
console% chmod +x kubectl
To activate the system-wide
kubectlcommand, move the file to the/usr/local/bindirectory.console% sudo cp kubectl /usr/local/bin/
Verify the kubectl Installation
When kubectl is available as a system-wide command on your management machine, verify the installed version to confirm that it works correctly.
$ kubectl version
You should see the client version of your kubectl installation.
Connect to a VKE Cluster Using kubectl
To connect to a VKE cluster using kubectl, download your cluster configuration file and configure kubectl to use the downloaded YAML file, as described in the steps below.
Log in to the Vultr Console and navigate to the Kubernetes section.
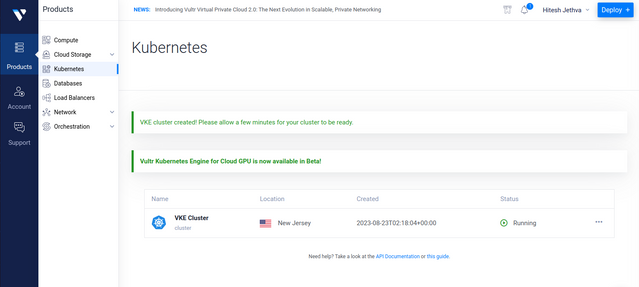
Find and select the Kubernetes cluster you intend to access
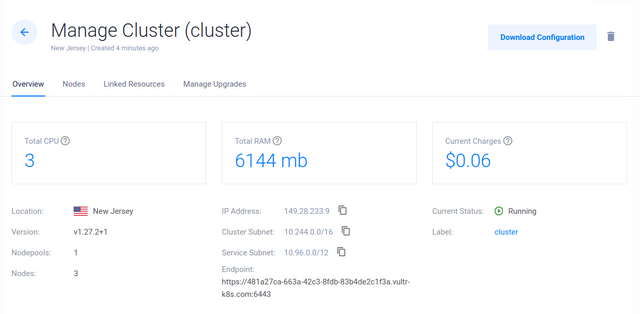
On the cluster dashboard, click Download Configuration to download a copy of the cluster YAML file to your computer
Open a new terminal session and switch to the directory where you downloaded the VKE configuration file. For example
/Downloads.console$ cd ~/Downloads
Create a
.kubedirectory in your user home directory if it does not exist.console$ mkdir ~/.kube
Back up the original
configfileCopy your downloaded VKE configuration file to the
.kubedirectory and rename it toconfig.console$ cp ~/Downloads/vke.yaml ~/.kube/config
View your VKE cluster nodes to verify that kubectl connects to the cluster correctly.
console$ kubectl get nodes
You should see your nodes listed in the output.
Use the
cluster-infoparameter to display information about the Kubernetes cluster, including the endpoints of the control plane components.console$ kubectl cluster-info
The above command should print detailed information about your Vultr Kubernetes Engine cluster.
Use kubectl To Manage a VKE Cluster
Using kubectl ensures that your interactions with the VKE cluster are secure, authenticated, and aligned with the best practices for Kubernetes cluster management. In this section, apply basic kubectl commands to manage your VKE cluster and carry out essential tasks like retrieving information, managing resources, scaling applications, checking resource status, and viewing the cluster logs.
Resources are various components used to run and manage containerized applications in the Kubernetes cluster. They are the building blocks of applications and workloads. This section covers kubectl commands and how to manage various resources in Kubernetes using kubectl.
Create Resources in Cluster
Create a new deployment using a specific Docker image.
console$ kubectl create deployment <deployment-name> --image=<image-name>
Create a resource using a YAML manifest file.
console$ kubectl create -f <filename.yaml>
Update the image of a deployment's container.
console$ kubectl set image deployment/<deployment-name> <container-name>=<new-image>
Replace
<deployment-name>and<image-name>with the actual names in your environment.
List Cluster Resources
Common resources in a Kubernetes cluster include nodes, pods, services, deployments, configMaps, and secrets. The kubectl get command lists any resources within the VKE cluster.
List all cluster nodes.
console$ kubectl get nodes
View a list of all pods in the default namespace.
console$ kubectl get pods
View all pods in a specific namespace.
console$ kubectl get pods -n <namespace>
List pods from all cluster namespaces.
console$ kubectl get pods --all-namespaces
Get a list of all deployments in the cluster.
console$ kubectl get deployments
List all cluster services.
console$ kubectl get services
Describe Resources in Cluster
To get more information about any Kubernetes cluster resources, use the kubectl describe command followed by the resource name as described in the steps below.
Displays detailed information about a specific pod.
console$ kubectl describe pod <pod-name>
Print detailed information about a specific node.
console$ kubectl describe node <node-name>
Shows detailed information about a service.
console$ kubectl describe service <service-name>
Replace
<pod-name>,<service-name>, and<node-name>with the actual names in your environment.
Delete Resources in Cluster
To remove any resources from the Kubernetes cluster, use the kubectl delete command followed by the resource name as described in the steps below.
Delete a specific pod in the cluster.
console$ kubectl delete pod <pod-name>
Remove a specific cluster.
console$ kubectl delete svc <service name>
Delete a specific deployment in the cluster.
console$ kubectl delete deployment <deployment-name>
Replace <pod-name>, <deployment name>, and <service name> with the actual resource names in your VKE cluster.
Create and Manage Namespace in Cluster
Namespace is a Kubernetes feature used to organize clusters into virtual sub-clusters. It provides a way to apply access controls and permissions at the namespace level.
Create a new namespace in the cluster.
console$ kubectl create namespace <namespace-name>
List all namespaces in the cluster.
console$ kubectl get namespaces
Delete a specific namespace from the cluster.
console$ kubectl delete namespace <namespace-name>
Replace
<namespace-name>with the actual names in your environment.
ConfigMap and Secret Management
ConfigMap and Secret are objects in Kubernetes that inject configuration data into a container during container start-up. A Secret is an API object used to store sensitive information such as passwords, SSH keys, and other confidential information. A ConfigMap stores non-sensitive configuration data in configuration files.
Create a ConfigMap from a file.
console$ kubectl create configmap <configmap-name> --from-file=<file-path>:
List all ConfigMaps in the default namespace.
console$ kubectl get configmaps
Delete a specific ConfigMap.
console$ kubectl delete configmap <configmap-name>
Create a Secret from literal values.
console$ kubectl create secret generic <secret-name> --from-literal=key=value
List all secrets in the default namespace.
console$ kubectl get secrets
Delete a specific secret.
console$ kubectl delete secret <secret-name>
Scale Applications
You can use the
kubectl scale deploymentcommand, followed by the deployment name and replica numbers, to scale a deployment to a specified number of replicas.console$ kubectl scale deployment <deployment-name> --replicas=<desired-replicas>
Edit an existing deployment to update an application.
console$ kubectl edit deployment <deployment-name>
View Cluster Logs
You can use the kubectl logs command to view cluster logs of individual pods.
View logs of a specific pod.
console$ kubectl logs <pod-name>
View logs of a container within a pod.
console$ kubectl logs <pod-name> -c <container-name>
Stream logs from a pod in real-time.
console$ kubectl logs -f <pod-name>
Use the
--previousflag with thekubectlcommand to view the logs of previous instances.console$ kubectl logs --previous <pod-name>
Use the
--timestampsflag to view a pod's logs and the timestamps in the log output.console$ kubectl logs --timestamps <pod-name>
Replace
<pod-name>and<container-name>with the actual names in your environment.
This section explores the advanced kubectl commands that offer greater control and flexibility when managing your Kubernetes cluster.
Run Commands Within Pods
The kubectl exec command allows you to check the status and contents of containers running in your Kubernetes clusters. It will help you to inspect and troubleshoot applications running inside the Kubernetes cluster.
Below is the basic syntax to execute a command within a pod.
$ kubectl exec -it <pod-name> -c <container-name> -- <command>
Below is what the command does.
-it: Start an interactive terminal shell.<pod-name>: Name of the pod.-c <container-name>: Specify the container name running within your pod.-- <command>: Specify the command you want to run inside the container.
For example, start an interactive shell within a specific container using the following command.
$ kubectl exec -it <pod-name> -c <container-name> -- /bin/sh
List files in a specific directory of the container.
$ kubectl exec -it <pod-name> -c <container-name> -- ls /app
Replace <pod-name> and <container-name> with the actual names in your environment.
Enable Port forwarding for Local Access to Kubernetes Cluster Resources
Port forwarding is a Kubernetes feature that lets you access an application running on your Kubernetes from your local machine. It's handy for testing applications during development.
Below is the basic syntax for port forwarding from your cluster to your local machine's port.
console$ kubectl port-forward <service-name> <local-port>:<service-port>
The following command forwards traffic from port
8000on the service namedmy-serviceto port8080on your local machine.console$ kubectl port-forward my-service 8080:8000
After executing the above command, you can access the
my-serviceservice using at URLhttp://localhost:8080in your local web browser.
Manage Resource Quotas
Resource Quotas in Kubernetes allow you to manage and assign resources within namespaces in your Kubernetes cluster.
View Resource Quotas in a namespace.
console$ kubectl get resourcequota -n <namespace>
View the used quotas within a namespace.
console$ kubectl describe resourcequota -n <namespace>
Edit your existing Resource Quotas.
console$ kubectl edit resourcequota <resource-quota-name> -n <namespace>
Deletes a Resource Quota within a namespace.
console$ kubectl delete resourcequota <resource-quota-name> -n <namespace>
Drain Nodes for Maintenance
Node maintenance is essential when you perform updates, patches, or any other tasks on a node. kubectl helps you to drain nodes for maintenance via the command line.
Identify the node that you want to drain.
console$ kubectl get nodes
Pick your node from the above list and mark it as unscheduled to prevent new workloads from being placed on it while you perform maintenance.
console$ kubectl cordon <node-name>
Drain the node for maintenance to remove pods that are running on the node.
console$ kubectl drain <node-name>
The above command will reschedule pods for other nodes in the cluster before maintenance begins.
Here are some additional flags that you can use with
kubectl draincommand:--force: Forcefully drains the node.--timeout: Specify the timeout period for the drain operation.--ignore-daemonsets: Evict DaemonSet pods during draining.
Mark the node as schedulable again after completing the maintenance process.
console$ kubectl uncordon <node-name>
Conclusion
In this guide, you have installed kubectl on your local machine and configured it to interact with the Vultr Kubernetes engine. Then, you learned how to use kubectl to manage resources, scale applications, check status, and view logs in a Kubernetes cluster. Using kubectl effectively is essential for system administrators working with the Kubernetes cluster.