Introduction
GitLab Runner is an open-source software system that runs CI/CD jobs and sends the results to GitLab. The runner application is installed and configured on the machine you want to use for builds. Each project in GitLab can have its own runners, and each runner is a container that can be started and stopped as you need.
Kubernetes is an open-source software system that automates applications deployment, scaling, and maintains containerized applications. It works by grouping application containers into logical units for access and management.
GitLab runner on Kubernetes is used to manage CI/CD projects. This tutorial explains how to install GitLab Runner on Vultr Kubernetes Engine.
Prerequisites
To follow through this tutorial, you need the following:
- A GitLab account
- A deployed Vultr Kubernetes Engine cluster with at least 3 nodes
- The
kubectlCLI installed and configured in your machine - Helm client installed locally on your machine
- Git installed on your machine
Setting Up GitLab Runner
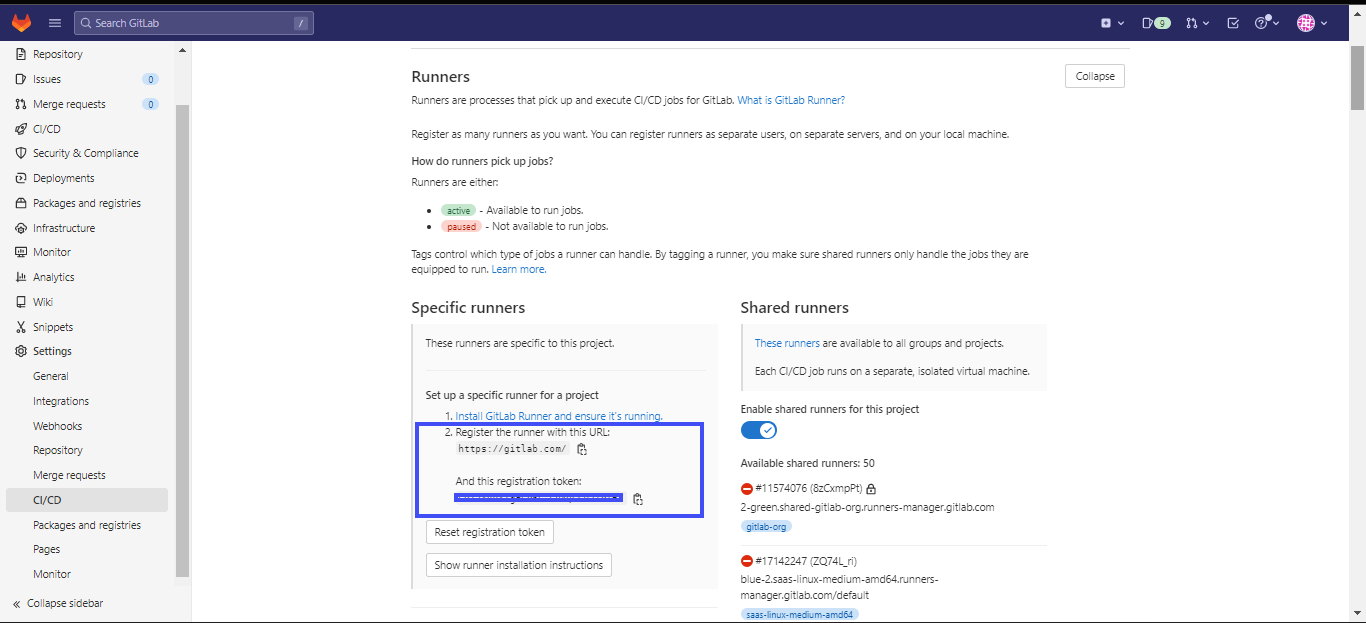
Get the runner details from GitLab. These are the runner URL and the token. The token is used to authenticate the runner to GitLab. On your project's directory, get the details from Settings > CI/CD > Runners settings page, as shown below.

Copy the runner URL and the registration token and save them for later GitLab runner configuration.
Install the Runner on Vultr Kubernetes Engine (VKE)
To deploy the runner on your VKE cluster, you have to configure access to the cluster. This is done using a kubeconfig file. The kubeconfig file is used to provide access to Kubernetes API servers. It is used by kubectl and other Kubernetes components to find the appropriate API server and authenticate.
Get the kubeconfig file for your VKE cluster.
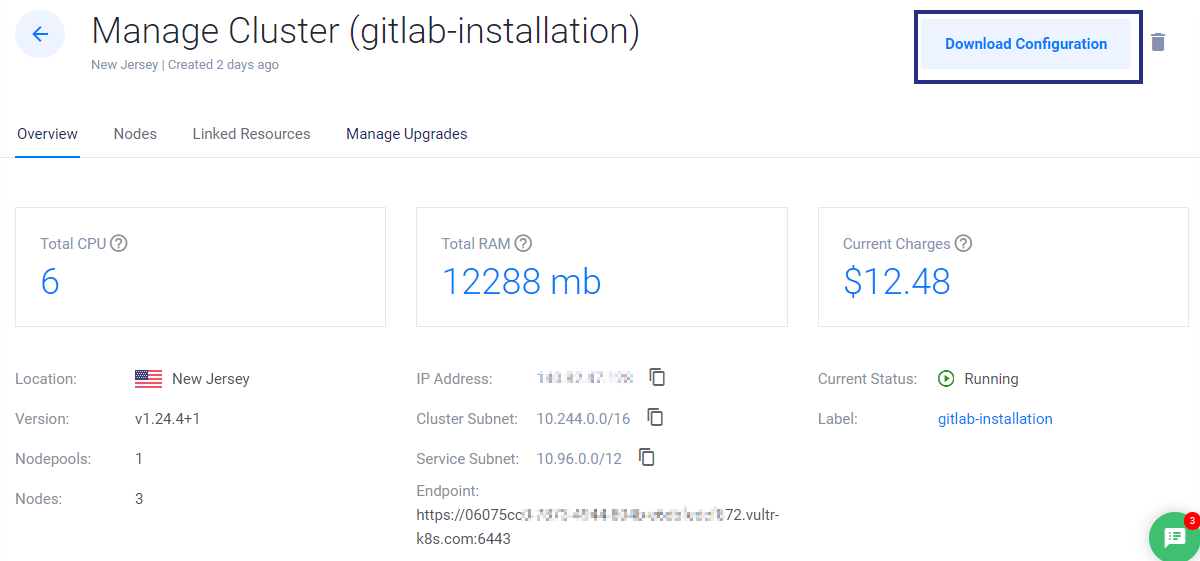
- In you Vultr account, navigate to Products > Kubernetes > {Your cluster} > Overview.
- Click the Download Configuration button on the top right of the dashboard.

Run the following command to access your VKE cluster:
$ kubectl --kubeconfig={PATH TO THE VKE CLUSTER CONFIG FILE} get nodesExpected output:
 NAME                         STATUS   ROLES    AGE   VERSION
 gitlab-runner-1e796f3ba099   Ready    <none>   18d   v1.24.4
 gitlab-runner-4c11d4f0a353   Ready    <none>   18d   v1.24.4
 gitlab-runner-4ca2d1cacafb   Ready    <none>   18d   v1.24.4
Create a namespace called gitlab-runner using the kubectl as shown below:
$ kubectl --kubeconfig={PATH TO THE VKE CLUSTER CONFIG FILE} create namespace gitlabA namespace is used to isolate resources within a single Kubernetes cluster. For example, you can use namespaces to deploy multiple applications to the same cluster without interfering with each other. This helps with maintenance and future upgrades.
Obtain a copy of the Helm chart of GitLab Runner by running the command below:
git clone https://gitlab.com/gitlab-org/charts/gitlab-runner.gitOr, run the command below if you are using an ssh key.
git clone git@gitlab.com:gitlab-org/charts/gitlab-runner.gitNavigate to the cloned repository and configure your GitLab Runner in the
values.yamlfile as follows:## GitLab Runner Image image: registry.gitlab.com/gitlab-org/gitlab-runner:alpine-v15.3.0 ## Specify a imagePullPolicy for the main runner deployment imagePullPolicy: IfNotPresent ## Timeout, in seconds, for liveness and readiness probes of a runner pod. probeTimeoutSeconds: 300 ## The GitLab Server URL (with protocol) that want to register the runner against ## gitlabUrl: http://gitlab.com/ ## The Registration Token for adding new Runners to the GitLab Server. ## runnerRegistrationToken: "Token" ## For RBAC support: rbac: create: true ## rules: - resources: ["configmaps", "pods", "pods/attach", "secrets", "services"] verbs: ["get", "list", "watch", "create", "patch", "update", "delete"] - apiGroups: [""] resources: ["pods/exec"] verbs: ["create", "patch", "delete"] ## Configuration for the Pods that the runner launches for each new job ## runners: config: | [[runners]] [runners.kubernetes] namespace = "{{.Release.Namespace}}" image = "ubuntu:16.04"NOTE To avoid the
Readiness probe failederror, configure thetemplates\deployment.yamlfile as follows:livenessProbe: ... initialDelaySeconds: 300 ... readinessProbe: ... initialDelaySeconds: 300 ...After configuring the Helm Chart, deploy the runner using the following command:
helm --kubeconfig={PATH_TO_VKE_CLUSTER_CONFIG FILE} install --namespace <NAMESPACE> gitlab-runner -f <PATH_TO_CONFIG_VALUES_FILE> gitlab/gitlab-runnerExpected Output:
 NAME: gitlab-runner
 LAST DEPLOYED: Thu Nov 17 17:22:08 2022
 NAMESPACE: gitlab
 STATUS: deployed
 REVISION: 1
 TEST SUITE: None
 NOTES:
 Your GitLab Runner should now be registered against the GitLab instance reachable at: "https://gitlab.com/"

 Runner namespace "gitlab" was found in runners.config template.
Where:
<NAMESPACE>is the Kubernetes namespace.<PATH_TO_CONFIG_VALUES_FILE>is the path to the helm chart. In this case,*.tgzfile.
Check the status of the pod or deployment by running the command below:
kubectl --kubeconfig={PATH_TO_VKE_CLUSTER_CONFIG FILE} describe pods gitlab-runner --namespace=<NAMESPACE>Expected Output:
 ...
 Events:
   Type    Reason     Age   From               Message
   ----    ------     ----  ----               -------
   Normal  Scheduled  30s   default-scheduler  Successfully assigned gitlab-b/gitlab-runner-85d94848d7-zs5q9 to gitlab-runner-4c11d4f0a353
   Normal  Pulling    30s   kubelet            Pulling image "registry.gitlab.com/gitlab-org/gitlab-runner:alpine-v15.3.0"
   Normal  Pulled     25s   kubelet            Successfully pulled image "registry.gitlab.com/gitlab-org/gitlab-runner:alpine-v15.3.0" in 4.909922707s
   Normal  Created    25s   kubelet            Created container gitlab-runner
   Normal  Started    25s   kubelet            Started container gitlab-runner
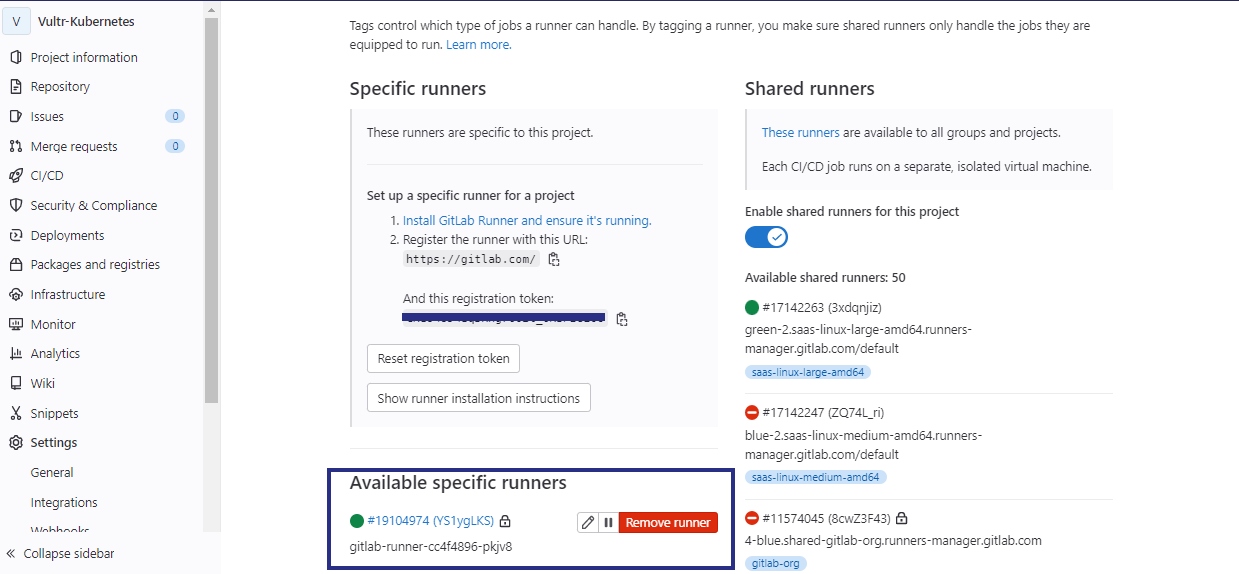
To check if the pods have been started, go to GitLab under the registered GitLab runners. The runner will be displayed as shown in the figure below.

Conclusion
You've finished installing GitLab Runner in Vultr Kubernetes Engine (VKE) cluster using Helm Chart. You can now manage your CD/CI projects using the runner you've just installed.