
How to Install Mastodon on a Vultr Cloud Server
Introduction
Mastodon is an open-source decentralized social network that fronts full data control, and ease of use as its key features. In this article you’ll install and secure Mastodon on a Ubuntu 22.04 Vultr Cloud Server.
Prerequisites
Before you begin, be sure to:
- Deploy a Ubuntu 22.04 server on Vultr with at least:
- 4GB RAM
- 2VCPus
- Create a new domain A record pointing to the server.
- Update the server.
- Use SSH to access the server with a non-root sudo user account.
Setup the Mastodon Database
Mastodon requires a PostgreSQL database to store files and application data. You can either install PostgreSQL on your server, or deploy a Vultr managed database for PostgreSQL to avoid any bottlenecks in your production environment. For this article, use a Vultr managed database for PostgreSQL.
Install the PostgreSQL client package.
$ sudo apt install postgresql-clientLogin to your PostgreSQL database server. Replace the following example values with your actual Vultr database details.
$ psql -h example.vultrdb.com -p 5432 -U vultradmin postgresIf installed on the same server, run the following command to login.
$ sudo -u postgres -i psqlCreate the Mastodon database.
CREATE DATABASE mastodondb;Create a new database user.
CREATE USER mastodon_user;Assign the user a strong password.
ALTER USER mastodon_user WITH ENCRYPTED PASSWORD 'strong-password';Grant the user database creation privileges.
ALTER USER mastodon_user createdb;Grant the user ownership privileges to the mastodon database.
ALTER DATABASE mastodondb OWNER TO mastodon_user;Exit the PostgreSQL console.
\q
Install Postfix and setup SMTP Relay
To send emails from your Mastodon server, you need to install Postfix and setup SMTP relay on the server. If you have an existing mail server, configure it to act as your SMTP relay host. Also, you can use a free email service provider such as Sendinblue, Mailjet or Mailchimp to act as the relay host. For this article, create a Sendinblue account to act as the SMTP relay host then setup Postfix as described below.
Login to your Sendinblue account.
Click your account in the top right corner and select Senders & IP from the list.
Click Domains within the senders, domains and dedicated IPs section.
Click Add a domain, and enter your domain in thedomain name field, then click save to generate DNS records.
If you host domain DNS on Vultr, access the DNS panel, and create the records to authenticate your account.
When added, click Verify & authenticate to approve your domain.
Navigate back to Senders & IP, select Senders, and click Add a sender.
Assign your sender account a name, for example
Mastodon on Vultr, then enter the email address to assign the Mastodon sender address in the From email field. For example,noreply@mastodon.example.com, and click save your sender details.Navigate to Transactional on the main menu bar.
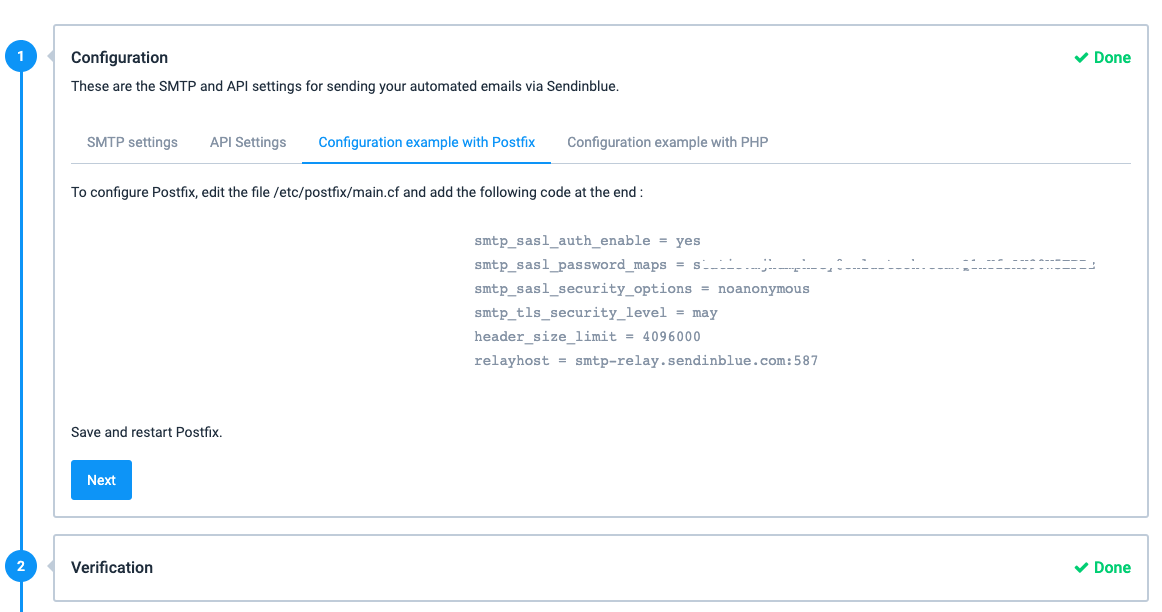
Within the configuration section, copy your Login and encrypted password in the SMTP Settings field.
Click the Configuration example with Postfix tab, select and copy the generated code snippet.
Access your Vultr server SSH session.
Update the server.
$ sudo apt updateInstall Postfix and the
libsasl2-modulespackage.$ sudo apt install postfix libsasl2-modules -yWhen prompted for the mail configuration type, keep Internet Site selected, and press enter to proceed. Enter your domain name in the System mail name field and press enter to install Postfix.
Using a text editor such as
nano, edit the main Postfix configuration file.$ sudo nano /etc/postfix/main.cfPaste your Sendinblue Postfix code at the end of the file. For example:
 smtp_sasl_auth_enable = yes
 smtp_sasl_password_maps = static:user:password
 smtp_sasl_security_options = noanonymous
 smtp_tls_security_level = may
 header_size_limit = 4096000
 relayhost = smtp-relay.sendinblue.com:587
Find the following line.
relayhost =Comment it by adding
#at the start of the line to avoid configuration errors as below.#relayhost =Save and close the file.
Create the
sasl_passwdfile in the Postfix directory as below.$ sudo touch /etc/postfix/sasl_passwdEdit the file.
$ sudo nano /etc/postfix/sasl_passwdAdd the following contents. Replace
example-user:passwordwith the details you copied earlier on step 10.[smtp-relay.sendinblue.com]:587 example-user:passwordSave and close the file.
Create a corresponding hash db file using
postmap.$ sudo postmap /etc/postfix/sasl_passwdRestart Postfix to save settings.
$ sudo systemctl restart postfixTo test that your SMTP settings work, install the
mailxpackage, and send a test email to your active email address as below.Install mailx
$ sudo apt install bsd-mailxSend the test email. Replace
hello@example.comwith your active email address.$ echo "Hello, your SMTP configuration Works." | mailx -r noreply@mastodon.example.com -s Testing SMTP hello@example.comIf your SMTP settings are correct, you should receive an email from
noreply@mastodon.yourdomain.com
Download and Prepare Mastodon
Install Nginx to work as the main web server application.
$ sudo apt install nginx -yMastodon requires NodeJS version 16, run its repository installer.
$ curl -sL https://deb.nodesource.com/setup_16.x | sudo bash -Install NodeJS
$ sudo apt install nodejsInstall Ruby, Ruby, Redis® Server and all necessary Mastodon dependencies.
$ sudo apt install git gem ruby ruby-dev build-essential bundler npm libidn11-dev libjemalloc-dev libpq-dev rbenv redis-server pngquant jhead jpegoptim gifsicle imagemagick ffmpeg libpq-dev libxml2-dev libxslt1-dev file g++ libprotobuf-dev protobuf-compiler pkg-config gcc autoconf libgdbm-dev -yUsing npm, install the yarn package.
$ sudo npm install --global yarnClone the Mastodon GitHub repository.
$ git clone https://github.com/mastodon/mastodon.gitMove the created
mastodondirectory to a more central directory like/var/www/.$ sudo mv mastodon/ /var/www/Create a new Mastodon user with no login access on the server.
$ sudo adduser mastodon-user --system --group --disabled-loginGrant the user ownership privileges to the
mastodondirectory.$ sudo chown -R mastodon-user:mastodon-user /var/www/mastodon/Navigate to the
mastodondirectory.$ cd /var/www/mastodon/Visit the Mastodon GitHub releases page and keep note of the latest version, then, install it as the
mastodonuser as below.$ sudo -u mastodon-user git checkout <version>
For example, to install version v4.0.2, run the following command.
$ sudo -u mastodon-user git checkout v4.0.2Install and Configure Mastodon
Verify that you’re operating in the
mastodondirectory.$ pwdInstall the Ruby dependency manager
bundler.$ sudo gem install bundlerInstall Mastodon dependency packages.
  $ sudo -u mastodon-user bundle config deployment 'true'

  $ sudo -u mastodon-user bundle config without 'development test'

  $ sudo -u mastodon-user bundle install -j$(getconf _NPROCESSORS_ONLN)
Start the Mastodon installation wizard.
$ sudo -u mastodon-user RAILS_ENV=production bundle exec rake mastodon:setupYou should receive the following output:
  Your instance is identified by its domain name. Changing it afterward will break things.
  Domain name:
Reply to each of the prompts and press enter as follows:
*
Domain name:Enter your Mastodon domain name. This article usesmastodon.example.com. *Enable single user mode:N to allow multiple user registrations, enter Y for personal use. *Are you using Docker to run Mastodon:N *PostgreSQL host:Enter your Vultr managed database for PostgreSQL host URL, or127.0.0.1if you installed PostgreSQL locally on the server. *PostgreSQL port:The Vultr managed database for PostgreSQL port. Keep5432for local PostgreSQL. *PostgreSQL database:Enter the Mastodon database you created earlier. *PostgreSQL user:Mastodon database user. *PostgreSQL user password:The Mastodon database user password. *Redis® host:127.0.0.1Redis® port:6379 *Redis® password:Press enter as the local Redis® instance has no password. *Do you want to store uploaded files on the cloud?Enter Yes to fill in your Vultr Object Storage details, No to store all Mastodon files directly on your server storage. *Do you want to send emails from localhost?Enter Yes to use the Postfix configuration. *E-mail address to send e-mails from”:noreply@mastodon.example.comdepending on the sender address you set in the Postfixsasl_passwdconfiguration. *Send a test e-mail with this configuration right now?Enter Yes to send a test message to your email address.Send test e-mail to:Enter your active email address to receive the test email.This configuration will be written to .env.production Save configuration?: Yes to save all changes to the environment file.The final step is compiling CSS/JS assets. This may take a while and consume a lot of RAM. Compile the assets now?: Yes to start installing Mastodon.Do you want to create an admin user straight away?: Yes to setup the Mastodon administrator.Username:Enter your desired administrator username,adminby default.E-mail:Enter your active email address.
When installation is complete, an auto generated password displays for your administrator account, select and copy it to your clipboard.
Security
Mastodon listens on the local host port 3000 and 4000, to secure your production server, verify that these ports are not accessible through the public interface. Instead, allow the HTTP port 80, and HTTPS port 443 on your firewall to access Mastodon through your domain name by setting up the Nginx reverse proxy as described in this section.
Verify that Uncomplicated Firewall (UFW) is running on your Ubuntu server.
$ sudo ufw statusIf inactive, allow the SSH port
22, and start the firewall.$ sudo ufw allow 22/tcp && sudo ufw enableShow the firewall table, and verify that Mastodon ports
3000,4000are not allowed through the firewall.$ sudo ufw statusAllow the HTTP port
80.$ sudo ufw allow 80/tcpAllow the HTTPS port
443.$ sudo ufw allow 443/tcpRestart the firewall to load changes.
$ sudo ufw reload
Optional: Configure the Vultr Firewall
To tighten your Mastodon production server security, configure the Vultr Firewall to operate on top of your existing server firewall as below.
Access your Vultr account.
On the Products panel, find and click Firewall panel on the navigation menu.
Click Add Firewall Group, assign your group a unique description, for example
production server rulesto create the firewall group.On the Manage Firewall Group panel, navigate to the Inbound IPV4 Rules section.
Click the +
Add Firewall RuleAction to allow SSH access as your first rule. To tighten server security, edit the rule, and select MyIP as the source.Click the Protocol drop down, and select HTTP from the common applications list, then, click the + Action button to add the firewall rule.
Select HTTPS from the Protocol drop down, keep Anywhere as the source, and click the + Action button to save rule.
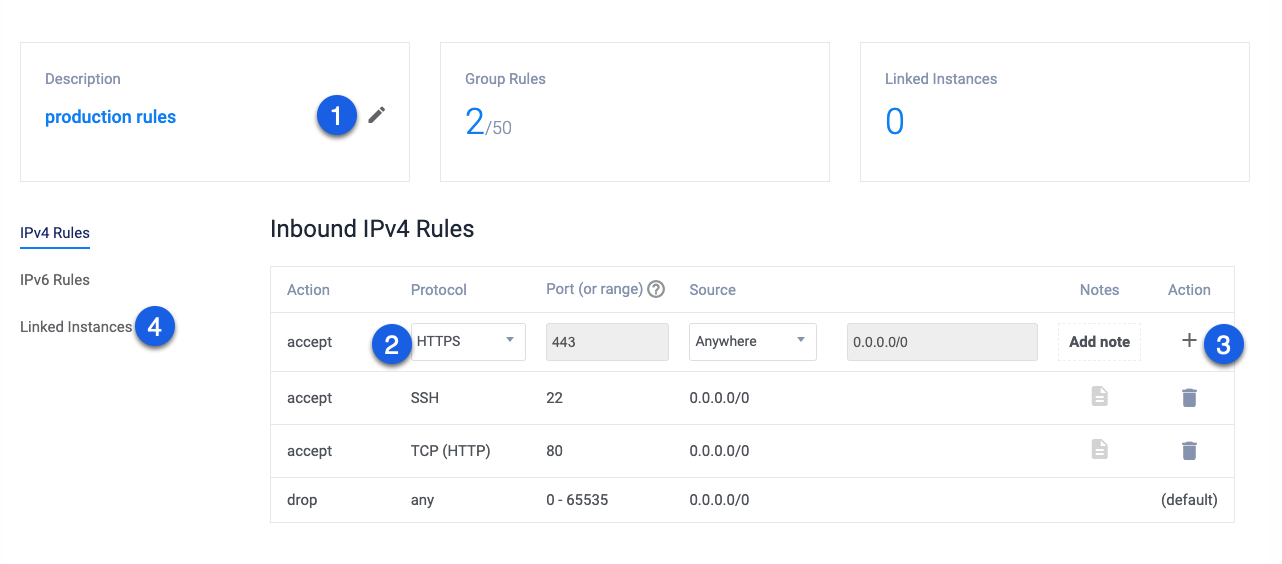
Click Linked Instances on the left navigation list, select your Mastodon server from the list, and click the +
Add Linked Instancebutton to apply changes.
To tighten your server security with more firewall rules, please visit the Vultr Firewall documentation.
Generate SSL Certificates
To secure Mastodon, you need to serve all application requests over HTTPS instead of plain HTTP. To enable HTTPS, generate free SSL certificates from a trusted authority like Let’s Encrypt as described in this section.
Install the
snapddaemon.$ sudo apt install snapdInstall the Certbot Let’s Encrypt application.
$ sudo snap install --classic certbotActivate the system-wide
certbotcommand.$ sudo ln -s /snap/bin/certbot /usr/bin/certbotTemporarily stop Nginx to avoid conflicts on port 80.
$ sudo systemctl stop nginxGenerate a free SSL Certificate. Replace
mastodon.example.comwith the domain name pointed to your server.$ sudo certbot certonly --standalone -d mastodon.example.com -m hello@example.com --agree-tosWhen successful, the SSL certificate files are present in the
/etc/letsencrypt/live/directory.Restart Nginx
$ sudo systemctl restart nginxTest that the certificate auto renews upon expiry.
$ sudo certbot renew --dry-run
Setup Nginx as a Reverse Proxy
Navigate to the Mastodon files directory.
$ cd /var/www/mastodon/Copy the Mastodon Nginx configuration template to the Nginx
conf.ddirectory.$ sudo cp dist/nginx.conf /etc/nginx/conf.d/mastodon.confEdit the new Mastodon Nginx configuration file.
$ sudo nano /etc/nginx/conf.d/mastodon.confFind the following lines in both
server {blocks.server_name example.com; root /home/mastodon/live/public;Change the
server_namedirective to your domain name, androotto your Mastodon directory as below.server_name mastodon.example.com; root /var/www/mastodon/;Find the following two lines within the
listen 443server block.# ssl_certificate /etc/letsencrypt/live/example.com/fullchain.pem; # ssl_certificate_key /etc/letsencrypt/live/example.com/privkey.pem;Uncomment them by removing the
#key, then, changeexample.comto your domain as below.ssl_certificate /etc/letsencrypt/live/mastodon.example.com/fullchain.pem; ssl_certificate_key /etc/letsencrypt/live/mastodon.example.com/privkey.pem;Save and close the file.
For the setting to be successful, verify that your domain is present in the
/etc/letsencrypt/live/directory, else, request for an SSL certificate without the Nginx plugin to avoid Nginx errors.Test your Nginx configuration for errors.
$ sudo nginx -tIf the command returns any error, please verify that you made the correct configuration changes as described above.
Restart Nginx for changes to take effect.
$ sudo systemctl restart nginx
Setup Mastodon as a System Service
To install and start Mastodon as a system service, edit the system template files using the sed stream editor, and setup the services as below.
Verify that the Mastodon system template files are available.
$ ls /var/www/mastodon/dist/Change the default user entry in all service template files to your Mastodon user account as below.
$ sudo sed -i '7s/mastodon/mastodon-user/' /var/www/mastodon/dist/mastodon*.serviceChange the working directory in all files from
/home/mastodon/liveto your Mastodon directory/var/www/mastodon/.$ sudo sed -i 's/home\/mastodon\/live/var\/www\/mastodon/g' /var/www/mastodon/dist/mastodon*.serviceChange the bundle directory in all files from
/home/mastodon/.rbenv/shims/bundleto/usr/local/bin/bundle.$ sudo sed -i 's/home\/mastodon\/.rbenv\/shims/usr\/local\/bin/g' /var/www/mastodon/dist/mastodon*.serviceCopy all service files to the
/etc/systemd/system/directory.$ sudo cp /var/www/mastodon/dist/mastodon*.service /etc/systemd/system/Reload the systemd daemon to enable the files.
$ sudo systemctl daemon-reloadEnable each of the 3 Mastodon services to start at boot time.
  $ sudo systemctl enable mastodon-web

  $ sudo systemctl enable mastodon-sidekiq

  $ sudo systemctl enable mastodon-streaming
Start all Mastodon services.
  $ sudo systemctl start mastodon-web

  $ sudo systemctl start mastodon-sidekiq

  $ sudo systemctl start mastodon-streaming
Verify that all services are up and running.
  $ sudo systemctl status mastodon-web

  $ sudo systemctl status mastodon-sidekiq

  $ sudo systemctl status mastodon-streaming
Verify that Mastodon is listening on port
3000.$ sudo ss -lnpt | grep 3000Output:
LISTEN 0 1024 127.0.0.1:3000 0.0.0.0:* users:(("ruby2.7",pid=76286,fd=5),("ruby2.7",pid=76282,fd=5),("ruby2.7",pid=76216,fd=5))
Test
Using a web browser like Google Chrome, visit your Mastodon server domain.
https://mastodon.example.comTo test that new users can register on your Mastodon server, click Create account.
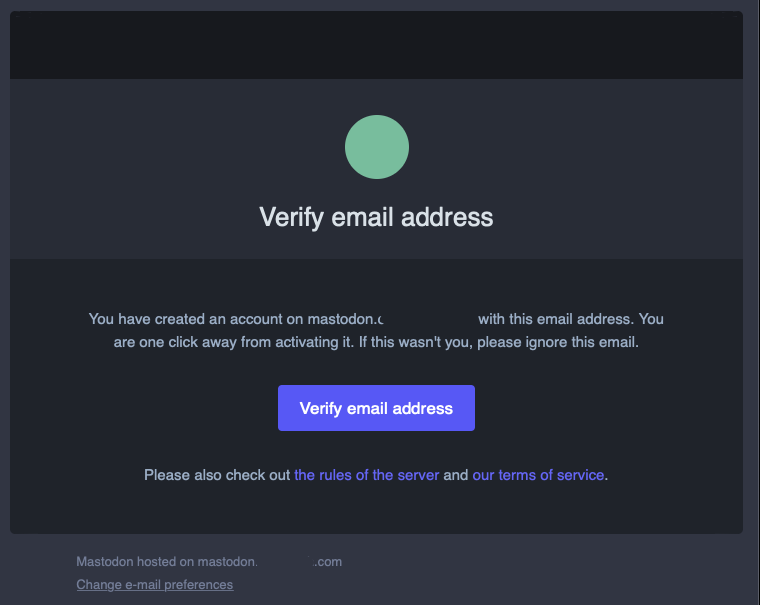
Fill-in your user details, and enter your non-administrator email to sign up.
Check your email inbox, and click the Verify email address button to approve your new user registration.
Log out the user, then, Log in using the administrator username and password you created during installation.
Start managing your Mastodon server.
Troubleshooting Common Issues
During and after installation of Mastodon on your server, you may receive any of the following errors, if you encounter any of them, fix them using the recommendations below.
Mastodon unable to send mails
Verify that you setup Postfix correctly, and you are able to send emails through your relay host. To investigate why emails are not sent from your Mastodon server, visit the following URL while logged in with the administrator account.
https://mastodon.example.com/sidekiq/retriesDepending on your results, view the Postfix mail log and check for any reported errors.
$ sudo cat /var/log/mail.logAn error occurred while installing charlock_holmes (0.7.7), and Bundler cannot continue
You may receive this error while installing Mastodon, to clear it, please install all required dependencies using the following command.
Database connection could not be established with this configuration, try again. connection to server on socket "/var/run/postgresql/.s.PGSQL.5432" failed: FATAL:
You may receive this error if you are running PostgreSQL on your server, to clear it, please enter
127.0.0.1as your database host.Mastodon Runtime Error
If the Mastodon returns any runtime errors, please check the systemd journals for errors.
  sudo journalctl -eu mastodon-web

  sudo journalctl -eu mastodon-streaming

  sudo journalctl -eu mastodon-sidekiq
Mastodon not loading
Verify that Nginx is up and running.
$ sudo systemctl status nginxVerify that all Mastodon services are active and running.
  $ sudo systemctl status mastodon-web

  $ sudo systemctl status mastodon-sidekiq

  $ sudo systemctl status mastodon-streaming
Backup Mastodon
To keep ahead of any potential server or application failures, it’s important to backup the following Mastodon data:.
- Mastodon PostgreSQL database
- Environment
.env.productionfile - User and system files
- Local Redis® database
In your home directory, create a new Mastodon backup files directory.
$ mkdir ~/mastodon-backupBackup the Mastodon PostgreSQL database using
pg_dump.$ pg_dump -F t -h example.vultrdb.com -p 5432 -U vultradmin -d matodondb -f ~/mastodon-backup/database.tarFor local PostgreSQL.
$ sudo -u postgres -i pg_dump -F t mastodondb > ~/mastodon-backup/database.tarMake a full backup of the Mastodon directory.
$ cp -r /var/www/mastodon/ ~/mastodon-backup/mastodon-filesBack up the Redis® database.
$ cp /var/lib/redis/dump.rdb ~/mastodon-backup/mastodon-redis.rdbTo easily back up all necessary Mastodon files, and replace any existing files in your target directory, create a new
backup.shfile.$ nano backup.shAdd the following contents to the file.
  #!/bin/sh/

  echo " Hello, This Vultr Script will help you backup your local Mastodon PostgreSQL Database, Files and Redis® Database"

  echo "Please enter the target directory where you'd like to create the backup files directory"

  read directory

  echo "The mastodon-backup directory will be stored in: $directory"

  mkdir $directory/mastodon-backup

  echo "Please enter your local Mastodon PostgreSQL database name"

  read dbname

  echo "!!!!Backing up the PostgreSQL database $dbname!!!!"

  sudo -u postgres -i pg_dump -F t mastodondb > $directory/mastodon-backup/mastodon-database.tar

  echo "!!!!Backing up the Mastodon Redis® Database!!!!"

  cp /var/lib/redis/dump.rdb $directory/mastodon-backup/mastodon-redisdb.rdb

  echo "!!!!Making a Full Backup of the Mastodon files directory!!!!"

  cp -r /var/www/mastodon $directory/mastodon-backup/mastodon-files

  echo " Done! Backup Successful"
Save and close the file.
Run the script.
$ bash backup.sh
Upgrade Mastodon
Before upgrading Mastodon, please make a full backup to recover your instance in case your upgrade breaks.
Navigate to the Mastodon directory.
$ cd /var/www/mastodon/Fetch new Mastodon release tags.
$ sudo -u mastodon-user git fetch --tagsUpgrade to the latest version. For example, to upgrade to
v4.0.2, run the following command.$ sudo -u mastodon-user git checkout v4.0.2Migrate the database.
$ sudo -u mastodon-user RAILS_ENV=production bundle exec rake db:migrateCompile Mastodon assets.
  $ sudo -u mastodon-user bundle install -j$(getconf _NPROCESSORS_ONLN)

  $ sudo -u mastodon-user RAILS_ENV=production bundle exec rails assets:precompile
When successful, migrate the database again.
$ sudo -u mastodon-user RAILS_ENV=production bundle exec rake db:migrateRestart the web process.
$ sudo systemctl restart mastodon-webRestart the streaming API.
$ sudo systemctl restart mastodon-streamingRestart background workers.
$ sudo systemctl restart mastodon-sidekiq
Conclusion
You have installed Mastodon on a Vultr Cloud server, for more configuration options, please visit the official Mastodon documentation.