
How to Install Nginx, MySQL, PHP (LEMP Stack) on Ubuntu 26.04
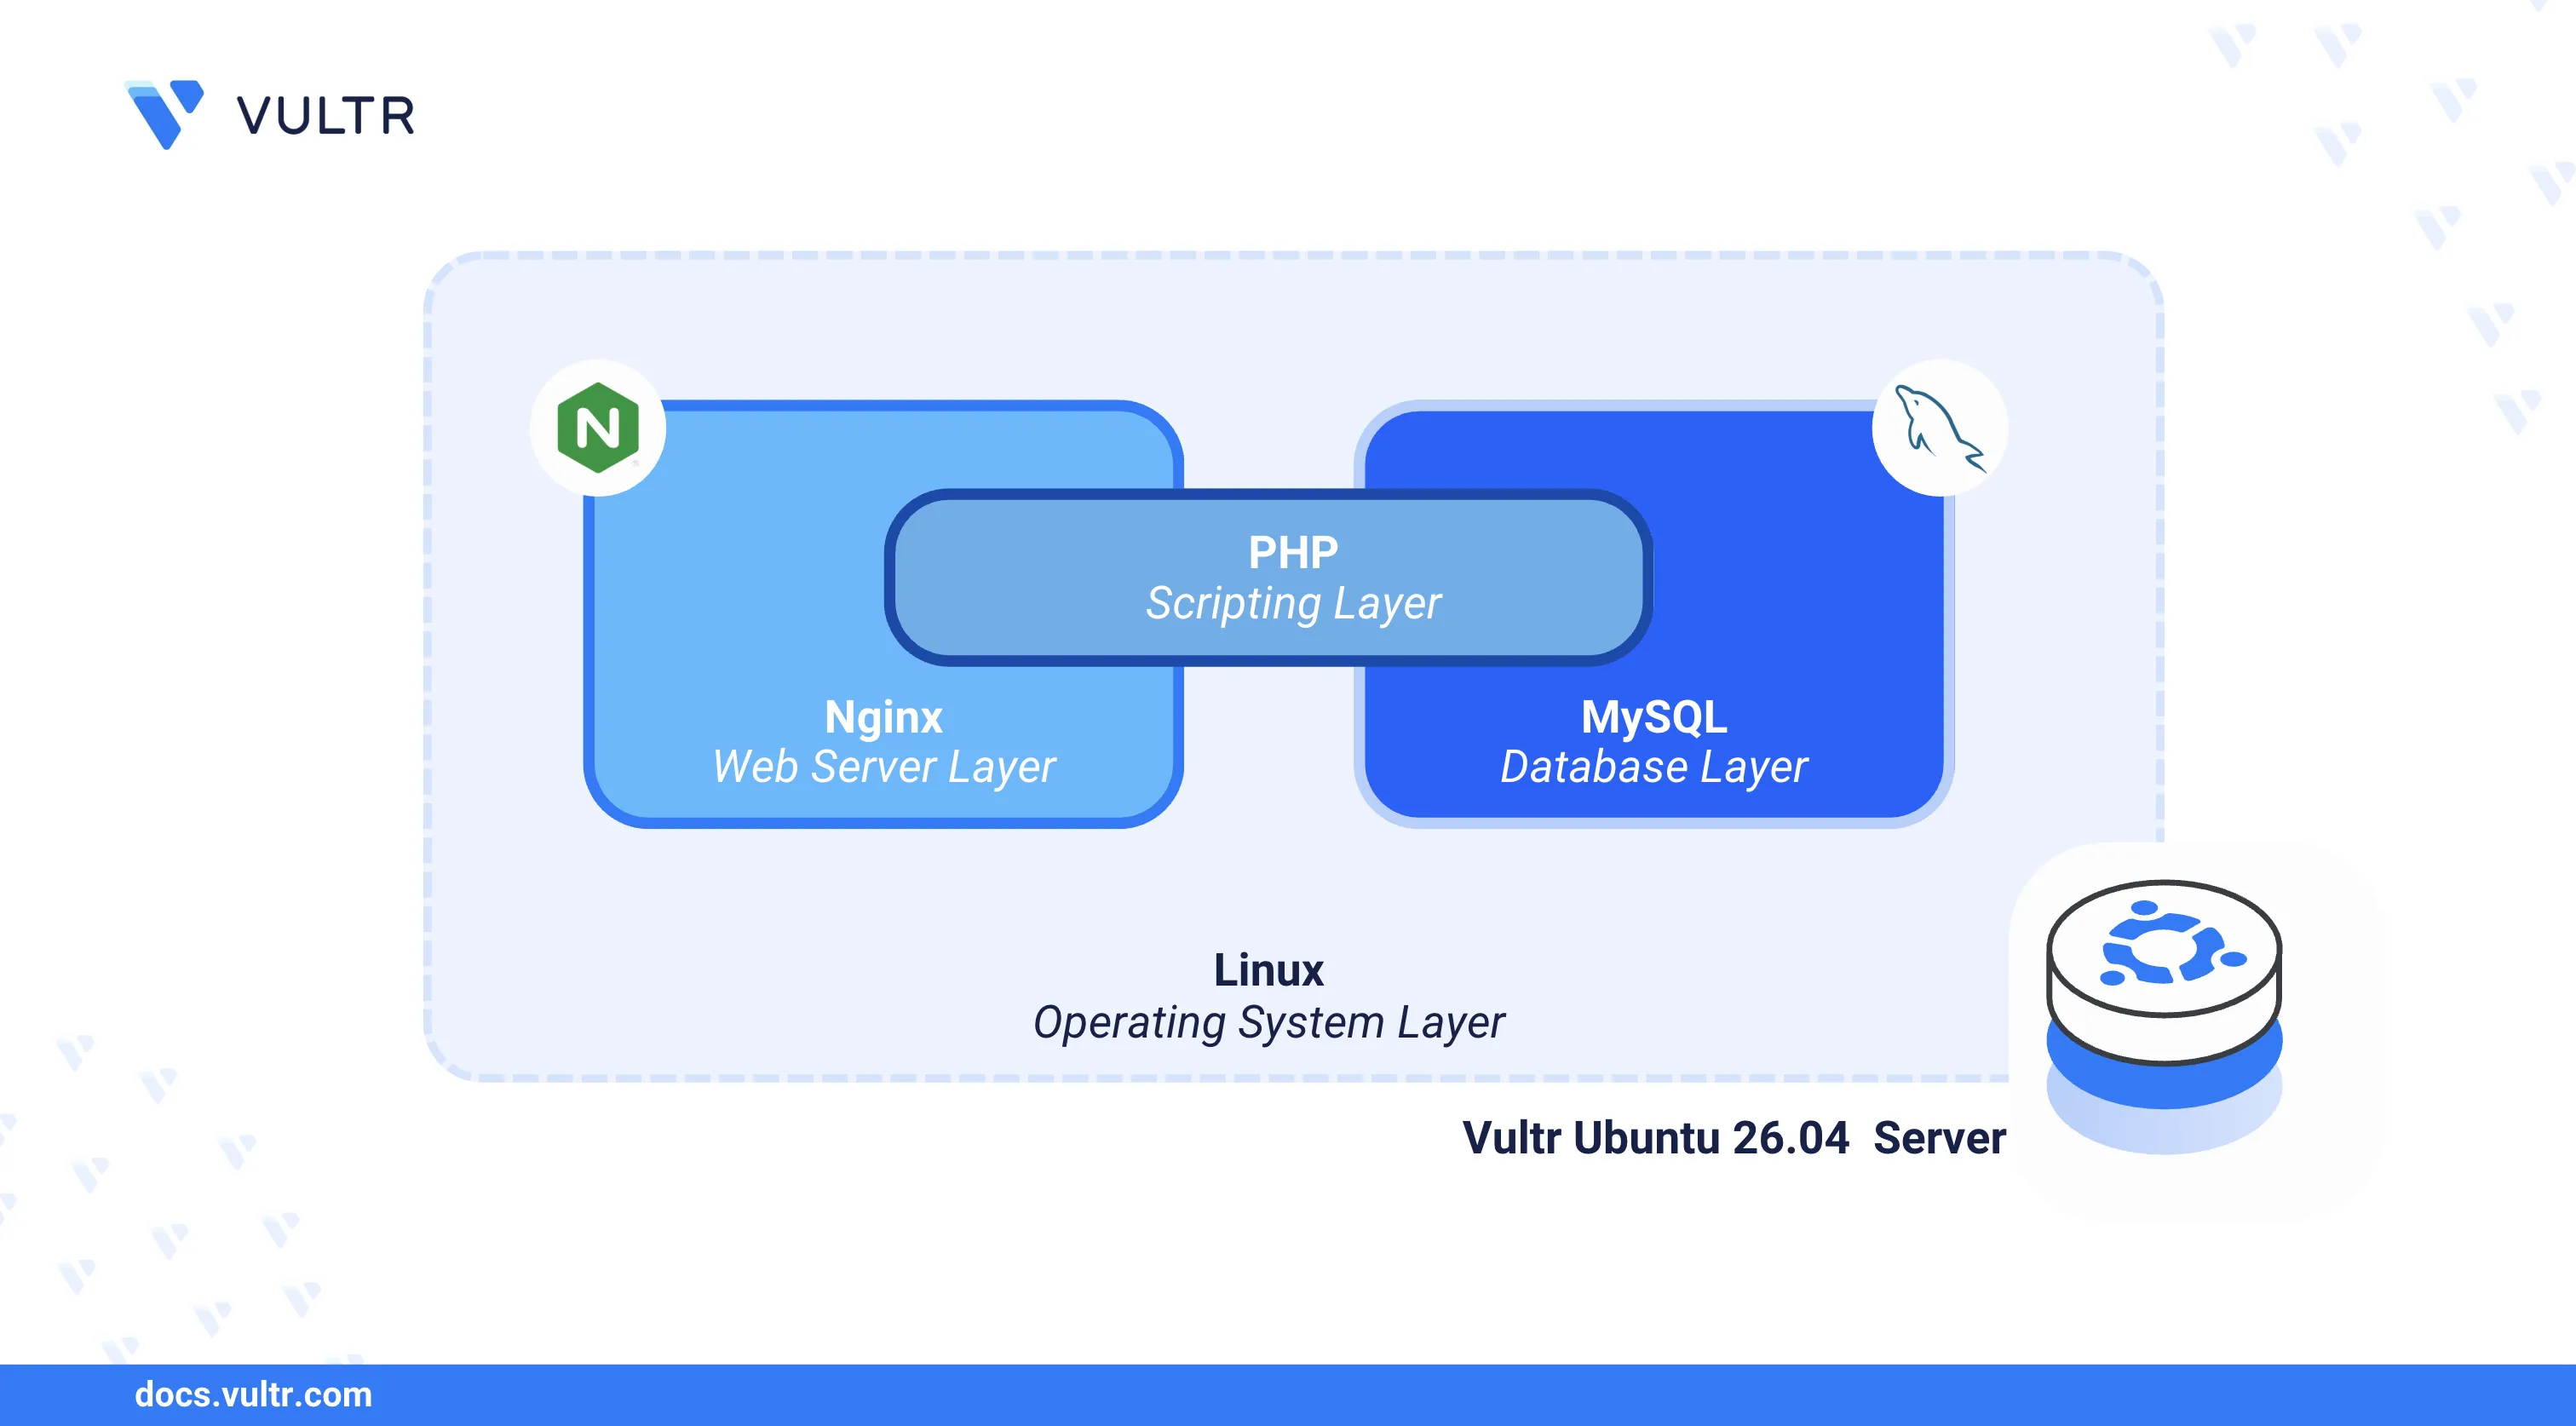
LEMP is a web application stack consisting of Linux, Nginx, MySQL, and PHP. Nginx handles HTTP requests and serves static content, MySQL stores and manages relational data, and PHP processes server-side logic to generate dynamic web pages. Together, these components form a complete platform for hosting web applications such as content management systems, e-commerce platforms, and custom web services.
This article explains how to install the LEMP stack on an Ubuntu 26.04 server. It covers setting up each component, configuring Nginx to process PHP requests through PHP-FPM, securing the server with firewall rules and a Let's Encrypt SSL certificate, and testing the stack with a sample PHP application that queries a MySQL database.
Prerequisites
Before you begin, you need to:
- Have access to an Ubuntu 26.04 server instance as a non-root user with sudo privileges.
- Have a domain A record pointing to the server's public IP address. For example,
app.example.com.
Install Nginx
Nginx is available in the default Ubuntu 26.04 APT repositories. The following steps install the web server and verify that the service is running.
Update the APT package index.
console$ sudo apt update
Install Nginx.
console$ sudo apt install nginx -y
Enable Nginx to start automatically at boot time.
console$ sudo systemctl enable nginx
Start the Nginx service.
console$ sudo systemctl start nginx
Verify that Nginx is active and running.
console$ sudo systemctl status nginx
The output should display
active (running), confirming that Nginx is operational.
Install MySQL
MySQL is included in the default Ubuntu 26.04 repositories. The following steps install the database server, enable the service, and run the secure installation script to harden the default configuration.
Install the MySQL server package.
console$ sudo apt install mysql-server -y
Enable MySQL to start automatically at boot time.
console$ sudo systemctl enable mysql
Start the MySQL service.
console$ sudo systemctl start mysql
Verify that MySQL is active and running.
console$ sudo systemctl status mysql
The output should display
active (running), confirming that the MySQL server is operational.Run the MySQL secure installation script to remove insecure defaults.
console$ sudo mysql_secure_installation
Respond to each prompt as described below:
- VALIDATE PASSWORD COMPONENT: Enter Y and press Enter to activate password validation.
- Password Validation Policy: Enter 2 to require strong passwords.
- Remove anonymous users?: Enter Y to delete anonymous database accounts.
- Disallow root login remotely?: Enter Y to restrict root access to the local server.
- Remove test database and access to it?: Enter Y to drop the default test database.
- Reload privilege tables now?: Enter Y to refresh the privilege tables and apply all changes.
Open the MySQL server configuration file.
console$ sudo nano /etc/mysql/mysql.conf.d/mysqld.cnf
Add the following directive under the
[mysqld]section to activate themysql_native_passwordauthentication plugin.inimysql_native_password=ON
Save and close the file.
Restart MySQL to load the updated configuration.
console$ sudo systemctl restart mysql
Access the MySQL console as the
rootsystem user.console$ sudo mysql
Set a strong password for the root account. Replace
your_strong_passwordwith a secure password that meets your validation policy.sqlmysql> ALTER USER 'root'@'localhost' IDENTIFIED WITH mysql_native_password BY 'your_strong_password';
Reload the privilege tables to apply the password change.
sqlmysql> FLUSH PRIVILEGES;
Exit the MySQL console.
sqlmysql> EXIT;
Install PHP
PHP-FPM (FastCGI Process Manager) enables Nginx to process PHP scripts by forwarding requests through a Unix socket. The following steps install PHP, PHP-FPM, and the MySQL extension required for database connectivity.
Install PHP, PHP-FPM, and essential modules.
console$ sudo apt install php php-fpm php-mysql php-cli -y
The command installs the following packages:
php-fpm: Manages PHP worker processes for handling web server requests.php-mysql: Enables PHP to connect to MySQL databases.php-cli: Provides the PHP command-line interpreter for running scripts in the terminal.
Confirm the installed PHP version.
console$ php -v
Your output should be similar to the one below:
PHP 8.5.2 (cli) (built: Jan 21 2026 17:35:28) (NTS)
Copyright (c) The PHP Group
Built by Ubuntu
Zend Engine v4.5.2, Copyright (c) Zend Technologies
    with Zend OPcache v8.5.2, Copyright (c), by Zend Technologies
Enable PHP-FPM to start automatically at boot time.
console$ sudo systemctl enable php8.5-fpm
Start the PHP-FPM service.
console$ sudo systemctl start php8.5-fpm
Verify that PHP-FPM is active and running.
console$ sudo systemctl status php8.5-fpm
The output should display
active (running), confirming that PHP-FPM is operational.
Set Up Firewall Rules
Uncomplicated Firewall (UFW) is active by default on Ubuntu 26.04. The following steps open ports for HTTP and HTTPS traffic so that Nginx can serve web applications.
Allow HTTP traffic on port
80.console$ sudo ufw allow 80/tcp
Allow HTTPS traffic on port
443.console$ sudo ufw allow 443/tcp
Verify the active firewall rules.
console$ sudo ufw status
Your output should be similar to the one below:
Status: active

To                         Action      From
--                         ------      ----
22/tcp                     ALLOW       Anywhere
80/tcp                     ALLOW       Anywhere
443/tcp                    ALLOW       Anywhere
22/tcp (v6)                ALLOW       Anywhere (v6)
80/tcp (v6)                ALLOW       Anywhere (v6)
443/tcp (v6)               ALLOW       Anywhere (v6)
Configure Nginx with PHP-FPM
Nginx does not process PHP scripts natively. It forwards PHP requests to PHP-FPM through a Unix socket for execution. The following steps create a virtual host configuration that connects Nginx to PHP-FPM and serves a PHP application.
Unlink the default Nginx virtual host configuration.
console$ sudo unlink /etc/nginx/sites-enabled/default
Create a new virtual host configuration file. Replace
app.example.comwith your actual domain name.console$ sudo nano /etc/nginx/sites-available/app.example.com.conf
Add the following configuration to the file.
iniserver { listen 80; listen [::]:80; server_name app.example.com; root /var/www/html; index index.php index.html; location / { try_files $uri $uri/ =404; } location ~ \.php$ { include snippets/fastcgi-php.conf; fastcgi_pass unix:/run/php/php8.5-fpm.sock; } }
Save and close the file.
Within the configuration:
server_name: Defines the domain that triggers this virtual host.root: Sets the directory from which Nginx serves files.location ~ \.php$: Matches requests ending in.phpand forwards them to PHP-FPM.include snippets/fastcgi-php.conf: Loads the predefined FastCGI directives for PHP processing.fastcgi_pass: Specifies the PHP-FPM Unix socket path for communication.
Enable the virtual host by creating a symbolic link.
console$ sudo ln -s /etc/nginx/sites-available/app.example.com.conf /etc/nginx/sites-enabled/
Test the Nginx configuration for syntax errors.
console$ sudo nginx -t
The output should confirm that the configuration syntax is ok and the test is successful.
Restart Nginx to activate the virtual host.
console$ sudo systemctl restart nginx
Secure the Server with SSL
SSL certificates encrypt communication between the client browser and the Nginx web server over HTTPS. The following steps install Certbot and generate a trusted Let's Encrypt SSL certificate for your domain.
Install the Certbot Let's Encrypt client and the Nginx plugin.
console$ sudo apt install certbot python3-certbot-nginx -y
Generate an SSL certificate for your domain. Replace
app.example.comwith your actual domain name.console$ sudo certbot --nginx -d app.example.com --agree-tos
Follow the on-screen prompts to complete the certificate generation. Certbot automatically updates the Nginx virtual host configuration to enable HTTPS.
Verify that the automatic renewal process is configured correctly.
console$ sudo certbot renew --dry-run
Test the LEMP Stack
A working LEMP stack allows PHP to query data from MySQL and return dynamic content through Nginx. The following steps create a sample database, insert a test record, and build a PHP application that retrieves and displays the data in a web browser.
Log in to the MySQL console as the
rootuser.console$ mysql -u root -p
Enter the root password you configured earlier.
Create a new database named
example_db.sqlmysql> CREATE DATABASE example_db;
Create a database user named
example_userwith a strong password. Replacestrong_passwordwith your desired password.sqlmysql> CREATE USER 'example_user'@'localhost' IDENTIFIED BY 'strong_password';
Grant the user full privileges on the
example_dbdatabase.sqlmysql> GRANT ALL PRIVILEGES ON example_db.* TO 'example_user'@'localhost';
Reload the privilege tables.
sqlmysql> FLUSH PRIVILEGES;
Switch to the
example_dbdatabase.sqlmysql> USE example_db;
Create a table named
messageswith an auto-incrementing ID and a text column.sqlmysql> CREATE TABLE messages ( id INT AUTO_INCREMENT PRIMARY KEY, content VARCHAR(255) NOT NULL );
Insert a sample record into the table.
sqlmysql> INSERT INTO messages (content) VALUES ('Hello World from LEMP Stack');
Verify that the record exists.
sqlmysql> SELECT * FROM messages;
Your output should be similar to the one below:
+----+-----------------------------+
| id | content                     |
+----+-----------------------------+
|  1 | Hello World from LEMP Stack |
+----+-----------------------------+
1 row in set (0.00 sec)
Exit the MySQL console.
sqlmysql> EXIT;
Create a PHP test file in the web root directory.
console$ sudo nano /var/www/html/test.php
Add the following PHP code to the file. Replace
strong_passwordwith theexample_userpassword you set earlier.php<?php $servername = "localhost"; $username = "example_user"; $password = "strong_password"; $dbname = "example_db"; $conn = new mysqli($servername, $username, $password, $dbname); if ($conn->connect_error) { die("Database connection failed: " . $conn->connect_error); } $sql = "SELECT content FROM messages"; $result = $conn->query($sql); if ($result->num_rows > 0) { $row = $result->fetch_assoc(); echo "<h1>" . $row["content"] . "</h1>"; } else { echo "<h1>No records found.</h1>"; } $conn->close(); ?>
Save and close the file.
This script connects to the
example_dbdatabase, queries themessagestable, and displays the result as an HTML heading.Access the test page in a web browser. Replace
app.example.comwith your actual domain name.https://app.example.com/test.phpThe browser displays the message Hello World from LEMP Stack, confirming that Nginx, MySQL, and PHP are working together.
Conclusion
You have deployed and secured the LEMP stack on an Ubuntu 26.04 server. Nginx serves web requests, PHP-FPM processes dynamic content, and MySQL manages the application data. This stack supports multiple virtual hosts and integrates with frameworks such as Laravel and WordPress. For more configuration options, refer to the following resources: