
How to Install Odoo on Ubuntu 20.04

Introduction
Odoo is an open-source, self-hosted ERP business suite with modules for accounting, CRM, sales, purchasing, Point of Sale, E-Commerce, project management, inventory, and more. This guide explains how to install Odoo on Ubuntu 20.04.
Prerequisites
- Deploy a fully updated Ubuntu 20.04 cloud VPS server at Vultr.
- Create a non-root user with sudo access.
- This guide uses example_user as the non-root account.
1. Set Up the Installation Environment
Connect to your server as the non-root example_user account via SSH.
Update the system packages.
$ sudo apt updateInstall Git.
$ sudo apt install git -yInstall Pip.
$ sudo apt install python3-pip -yInstall other required dependencies.
 $ sudo apt install -y build-essential wget python3-dev python3-venv \
 python3-wheel libfreetype6-dev libxml2-dev libzip-dev libldap2-dev libsasl2-dev \
 python3-setuptools node-less libjpeg-dev zlib1g-dev libpq-dev \
 libxslt1-dev libldap2-dev libtiff5-dev libjpeg8-dev libopenjp2-7-dev \
 liblcms2-dev libwebp-dev libharfbuzz-dev libfribidi-dev libxcb1-dev
Create a new
odoouser.$ sudo adduser odoo
2. Install and Configure PostgreSQL
Download and add PostgreSQL Repositories.
 $ sudo sh -c 'echo "deb http://apt.postgresql.org/pub/repos/apt/ `lsb_release -cs`-pgdg main" >> /etc/apt/sources.list.d/pgdg.list'

 $ wget -q https://www.postgresql.org/media/keys/ACCC4CF8.asc -O - | sudo apt-key add -
Install PostgreSQL.
$ sudo apt install postgresql postgresql-contrib -yStart the database server.
$ sudo systemctl start postgresqlEnable the database server to start automatically on system boot.
$ sudo systemctl enable postgresqlChange the default PostgreSQL password.
$ sudo passwd postgresSwitch to the
postgresuser.$ su - postgresCreate a database user named
odoo.$ createuser odooGo to the PostgreSQL interactive shell.
$ psqlGive the database user
odoopermission to create databases.ALTER USER odoo WITH CREATEDB;Exit the interactive shell.
\qReturn to the non-root example_user account.
$ exit
3. Install Wkhtmltopdf
Wkhtmltopdf is a group of open-source command-line tools for rendering HTML pages into PDF and other image formats. It enables Odoo to print PDF reports.
Download Wkhtmltopdf from GitHub.
$ sudo wget https://github.com/wkhtmltopdf/packaging/releases/download/0.12.6-1/wkhtmltox_0.12.6-1.bionic_amd64.debInstall Wkhtmltopdf.
$ sudo apt install ./wkhtmltox_0.12.6-1.bionic_amd64.deb -y
4. Install Odoo
At the time of this writing, Odoo 14 is the latest version.
Create a directory for Odoo and set the owner to the Odoo user.
 $ sudo mkdir -p /opt/odoo/odoo
 $ sudo chown -R odoo /opt/odoo
 $ sudo chgrp -R odoo /opt/odoo
Switch to the
odoouser account.$ sudo su - odooClone the Odoo 14 source code from GitHub to
/opt/odoo/odoodirectory.$ git clone https://www.github.com/odoo/odoo --depth 1 --branch 14.0 /opt/odoo/odooCreate a new Python virtual environment for Odoo.
 $ cd /opt/odoo
 $ python3 -m venv odoo-venv
Activate the virtual environment.
$ source odoo-venv/bin/activateInstall all required Python modules with pip3.
 $ pip3 install wheel
 $ pip3 install -r odoo/requirements.txt
Deactivate the environment.
$ deactivateCreate a new directory for 3rd party add-ons.
$ mkdir /opt/odoo/odoo-custom-addonsSwitch back to your non-root example_user account.
$ exitCreate a configuration file.
$ sudo nano /etc/odoo.confAdd the following code to the file. Change
StrongMasterPasswordto a unique password.[options] ; This is the password that allows database operations: admin_passwd = StrongMasterPassword db_host = False db_port = False db_user = odoo db_password = False addons_path = /opt/odoo/odoo/addons,/opt/odoo/odoo-custom-addonsClose and save the file.
5. Create a Service Unit File
Create a service unit file called
odoo.service.$ sudo nano /etc/systemd/system/odoo.serviceAdd the following code to the file. Close and save the file.
 [Unit]
 Description=Odoo14
 Requires=postgresql.service
 After=network.target postgresql.service

 [Service]
 Type=simple
 SyslogIdentifier=odoo
 PermissionsStartOnly=true
 User=odoo
 Group=odoo
 ExecStart=/opt/odoo/odoo-venv/bin/python3 /opt/odoo/odoo/odoo-bin -c /etc/odoo.conf
 StandardOutput=journal+console

 [Install]
 WantedBy=multi-user.target
Reload system daemon for changes to take effect.
$ sudo systemctl daemon-reloadStart the Odoo service.
$ sudo systemctl start odooEnable the service to start on system boot.
$ sudo systemctl enable odooCheck the service status.
$ sudo systemctl status odoo
6. Access Web Interface
To access the Odoo web interface, navigate to your server's IP address at port 8069 in your web browser. For example, http://192.0.2.11:8069. You should see the database setup screen:
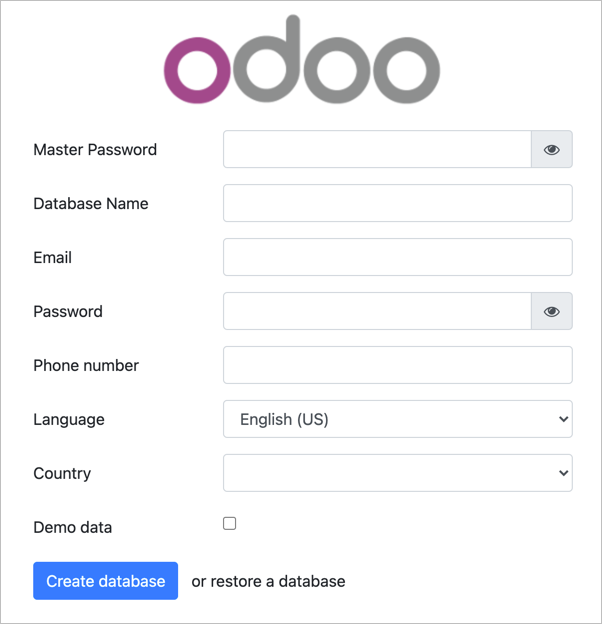
- Enter the admin_password value you chose in
/etc/odoo.conffor the Master Password field. - Enter the other information as desired for your installation.
Conclusion
You have installed Odoo. You can now access the Dashboard and configure it to begin managing your business.
More Information
To learn more about Odoo, go to the official documentation page.