
How to Install Python and Pip on Windows
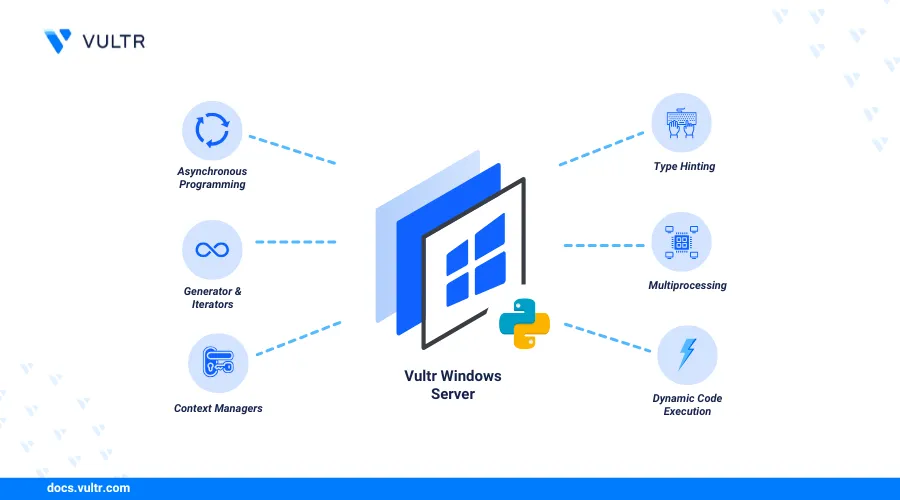
Python is a high-level general-purpose programming language known for its simplicity, readability, and versatility. Python is used in web development, data science, artificial intelligence, and automation tasks. Python works with PIP, a package installer for managing external libraries and dependencies required in applications depending on your project needs.
This article explains how to install Python and Pip on Windows. You will install Python and manage multiple versions using graphical and terminal-based methods. In addition, you will create isolated development virtual environments to install specific libraries with Pip depending on your project needs.
Prerequisites
Before you begin, you need to:
- Have access to a Windows workstation as a user with Administrator privileges.
Install Python on Windows
You can install Python on Windows through multiple methods, including graphical and CLI steps. You can use the Windows store on desktop workstations, the Chocolatey package manager, or download the latest .exe Python package for Windows. Follow the steps below to install Python on Windows using any of the supported methods.
Microsoft Store is the default source for installing Python on Windows desktop workstations. Running python in a Powershell window opens the store to install Python. Follow the steps below to install Python using the Microsoft Store.
Open the Windows start menu, search for Microsoft Store and click Open to launch the store.
Enter
pythonin the search bar and press ENTER.Select your desired Python version published by the Python Software Foundation.
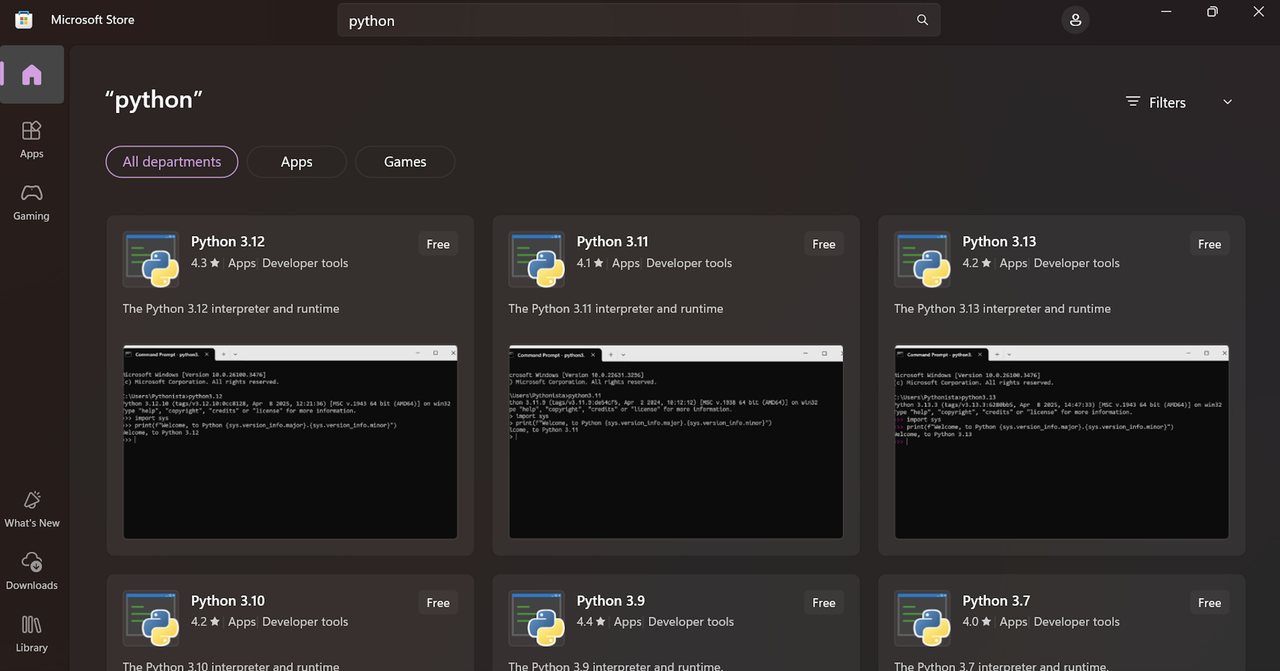
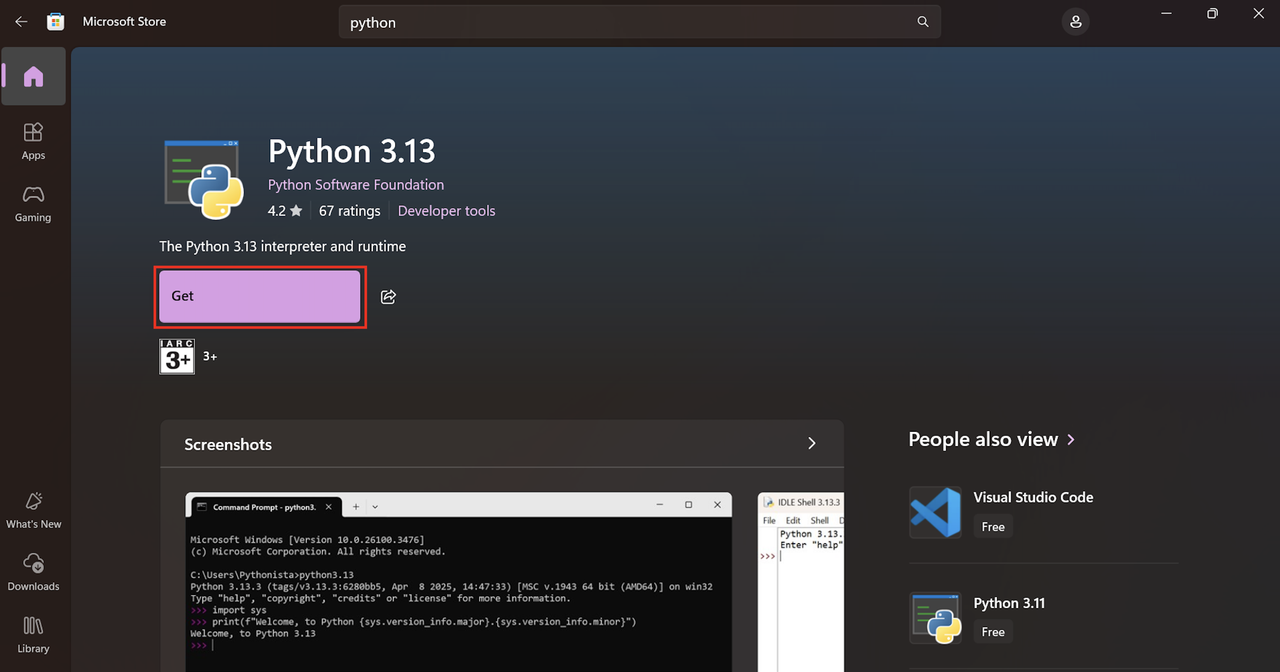
Click Get to download and install the Python.
Verify that the installation is successful.
Open the Windows start menu, search for Command Prompt and click Open to launch a new terminal window.
Verify the installed Python version on your Windows workstation.
pwsh> python --version
Your output should be similar to the one below:
Python 3.13.3
Chocolatey is an open-source package manager for Windows that simplifies software installations and configuration. Installing Python with Chocolatey ensures that all configuration tasks, such as setting system environment PATH variables, are handled automatically. Follow the steps below to install Python using Chocolatey on Windows.
Open the Windows start menu, search for PowerShell, right click on Windows PowerShell, and select Run as administrator.
Verify the installed Chocolatey version.
pwsh> choco --version
Your output should be similar to the one below:
2.4.3Run the following command to install Chocolatey if it's not available on your system.
pwsh> Set-ExecutionPolicy Bypass -Scope Process -Force; [System.Net.ServicePointManager]::SecurityProtocol = [System.Net.ServicePointManager] ::SecurityProtocol -bor 3072; iex ((New-Object System.Net.WebClient).DownloadString('https://community.chocolatey.org/install.ps1'))
Close and reopen Windows PowerShell when the installation is successful to apply the system-wide changes.
Import the Chocolatey PowerShell module into the active session.
pwsh> Import-Module $env:ChocolateyInstall\helpers\chocolateyProfile.psm1
List all available Python versions in the Chocolatey package sources.
pwsh> choco list python --all
Install the latest available Python version.
pwsh> choco install python -y
Run the following command to install a specific Python version such as
3.12.x.pwsh> choco install python312 -y
Refresh the system environment variables.
pwsh> refreshenv
Verify the installed Python version.
pwsh> python --version
Your output should be similar to the one below:
Python 3.13.3Verify the installed Pip version.
pwsh> pip --version
Your output should be similar to the one below:
pip 25.0.1 from C:\Python313\Lib\site-packages\pip (python 3.13)Open the Python shell.
pwsh> python
Verify that your prompt changes to the Python shell similar to the one below.
Python 3.13.3 (tags/v3.13.3:6280bb5, Apr  8 2025, 14:47:33) [MSC v.1943 64 bit (AMD64)] on win32
Type "help", "copyright", "credits" or "license" for more information.
>>>
Print a message using Python and verify that the installation is successful.
python>>> print("Greetings from Vultr")
Output:
Greetings from VultrExit the Python shell.
python>>> exit()
You can install Python on Windows using a .exe Python Installer package downloaded from the official website with a graphical installation window. Follow the steps below to check your system architecture, download the correct Python installer, and install Python on Windows.
Open the Windows start menu, search and open Windows PowerShell.
Run the following command to display the system type.
pwsh> (systeminfo | Select-String "System Type").ToString().Split(":")[1].Trim()
Your output should be similar to the one below:
x64-based PCThe Windows OS type is 64-bit based on the above
x64-based PCoutput, allowing you to install 64-bit applications on the workstation.Open your web browser and
Visit the official Python releases page for Windows.
Verify the latest release (based on the date) within the Stable Releases section and click your target Python version.
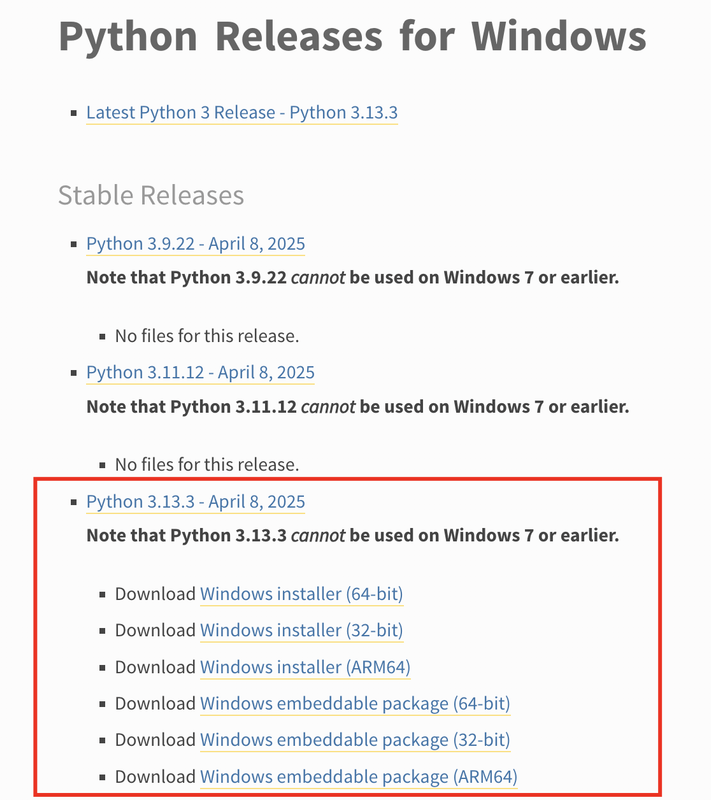
Navigate to the Files section and click the installer type that matches your Windows system architecture, such as
Windows installer (64-bit).Verify that the
.exePython installer download is successful and locate it in your Downloads folder.Press Win + E to open File Explorer, then navigate to your Downloads folder.
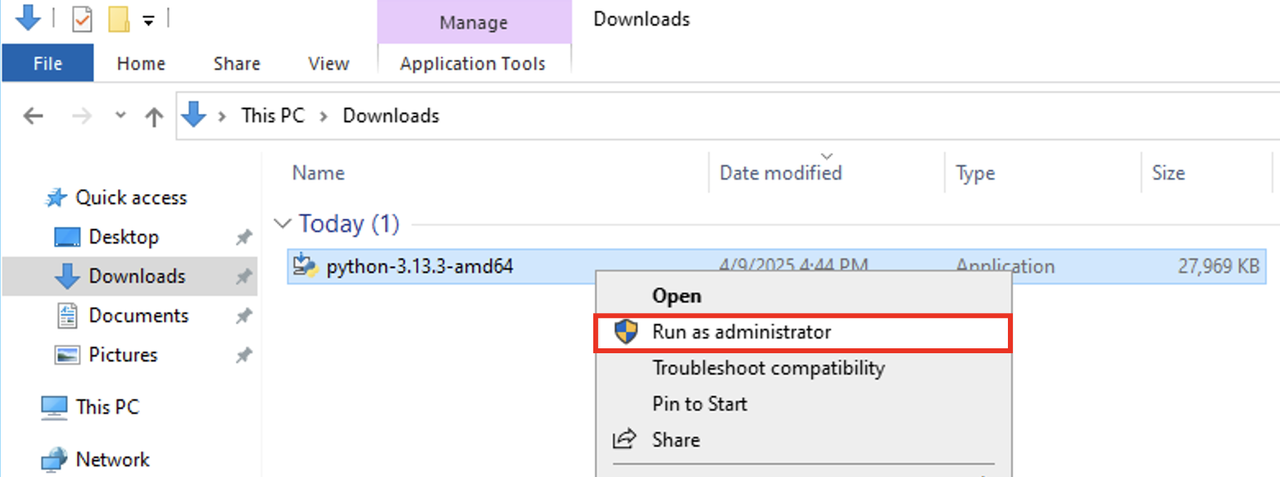
Run the downloaded
.exePython installer, such as python-3.13.3-amd64 as an administrator.Right-click the file and select Run as administrator to launch the installer with elevated privileges.
Check the
Use admin privileges when installing py.exeandAdd python.exe to PATHoptions in the Install Python window.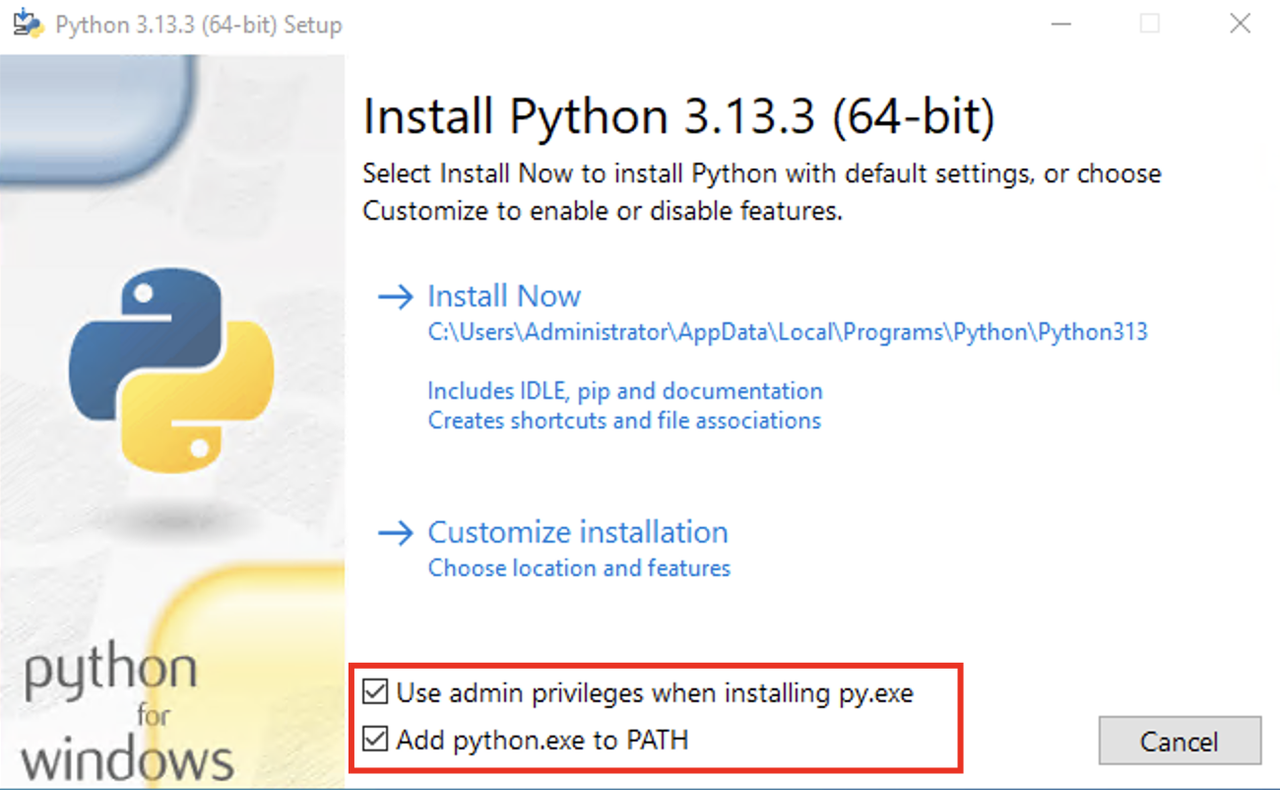
Click Install Now to install Python with the recommended settings and packages, or click Customize installation to set custom values.
Monitor the installation process and verify that a
Setup was successfulpage displays in the installer.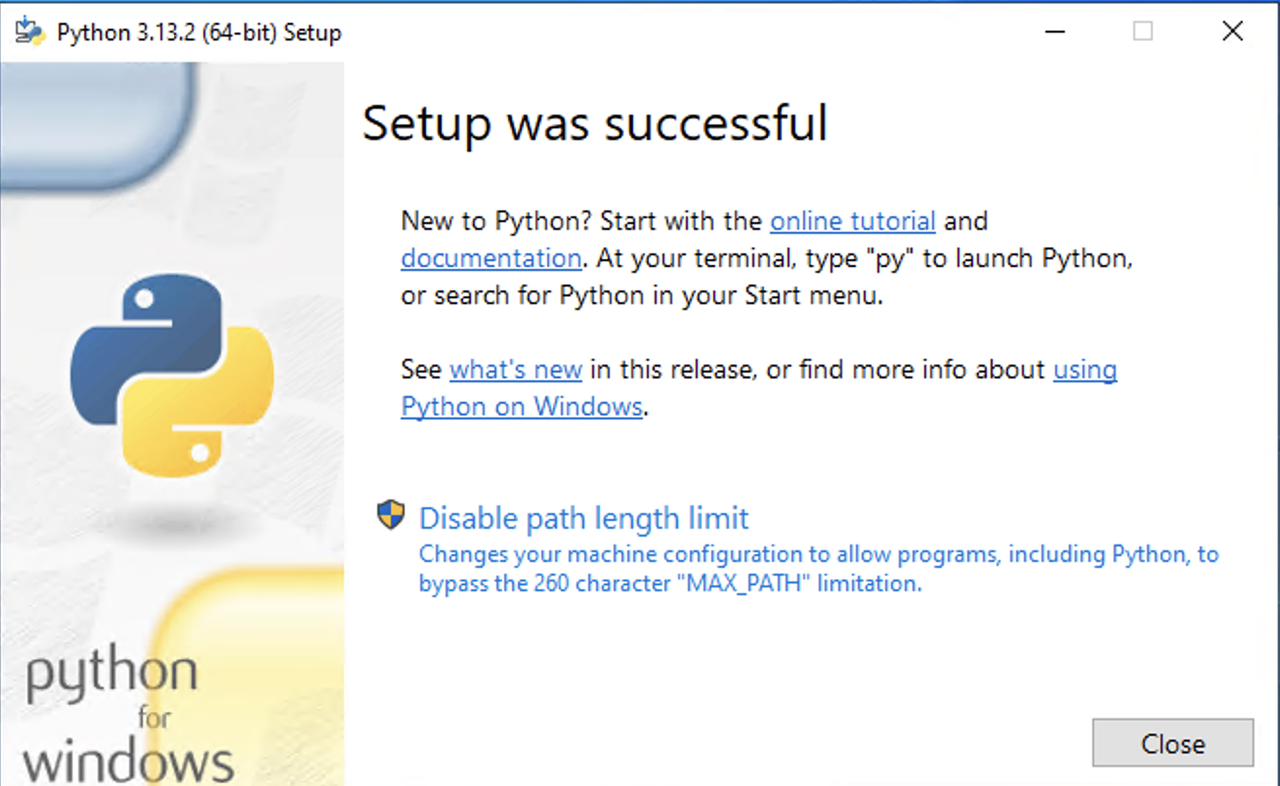
Open the Windows start menu, search and open Command Prompt.
Verify the installed Python version.
pwsh> python --version
Your output should be similar to the one below:
Python 3.13.3
Install and Manage Multiple Python Versions
You can install multiple Python versions on Windows, allowing you to run different projects on your workstation. Multiple Python versions enable you to work on different projects that require specific Python versions. You can install multiple Python versions with all supported methods, including Chocolatey, Windows Store, or the Python installer package. Follow the steps below to install and manage multiple Python versions using Chocolatey on your Windows workstation.
Run Windows PowerShell as an administrator.
Install Python 3.12 (if it's not already installed).
pwsh> choco install python312 -y
Install additional versions by changing the version suffix in the package name. For example, install
Python 3.11.pwsh> choco install python311 -y
Repeat the above installation steps for every version you'd like to install on your Windows workstation.
Manage Installed Python Versions Using Python Version Launcher
Windows includes the Python Launcher (py) application, which allows you to manage and invoke multiple installed Python versions from the command line. Managing Python versions is useful when working with multiple projects that require different Python versions.
Open a new Windows PowerShell session.
List all installed Python versions.
pwsh> py --list
Your output should be similar to the one below:
-V:3.13 *        Python 3.13 (64-bit)
-V:3.12          Python 3.12 (64-bit)
-V:3.11          Python 3.11 (64-bit)
Run a specific Python version, such as
3.13, using thepylauncher to open the Python shell. Replace3.13with the target Python version you'd like to access.pwsh> py -3.13
Run a script with a specific Python version. For example, run the
hello.pyscript with Python 3.12.pwsh> py -3.12 /path/to/your/python/script.py
Check the active Python version.
pwsh> py --version
Your output should be similar to the one below:
Python 3.13.3Open the
py.inifile and change the Python defaults option to change the default version on Windows.pwsh> %USERPROFILE%\AppData\Local\py.ini
How to Use Python on Windows
You can use Python on Windows after installing it using any supported method. Running Python programs and commands requires Windows PowerShell or an IDE such as IDLE or VSCode that supports the Python language. You can also run Python directly using the Windows Command Prompt or PowerShell. Follow the steps below to use Python on Windows.
Open the Windows Powershell.
Verify the active Python version.
pwsh> python --version
Enter
pythonto open the Python shell.pwsh> python
Print a
Greetings from Vultrmessage using Python.python>>> print("Greetings from Vultr")
Output:
Greetings from VultrExit the Python shell.
python>>> exit()
Create a test
hello.pyscript to verify that Python has access to the system directories.pwsh> "print('Greetings from Vultr!')" > hello.py
Execute the file using Python.
pwsh> python hello.py
Python includes IDLE (Integrated Development and Learning Environment), a built-in graphical application for running Python code. You can use IDLE to access the Python shell and run multiple commands or execute application files. Follow the steps below to open and use IDLE in Windows.
Open the Windows start menu, search for IDLE and open it.
Verify that IDLE opens with a default Python shell. Run the following command to print a message using Python.
python>>> print("Greetings from Vultr")
Output:
Greetings from VultrClick File and select New File to create a new Python script.
Enter your Python code.
Press Ctrl + S to save the file with a
.pyextension.Press F5 to execute the Python script.
Create and Manage Virtual Environments Using Python in Windows
Python virtual environments allow you to manage dependencies for individual projects. This prevents version conflicts between packages required by different applications. Follow the steps below to install the virtualenv module, create and manage virtual environments using Python.
Check the default Python version.
pwsh> python --version
Your output should be similar to the one below:
Python 3.13.3Install the
virtualenvmodule usingpipfor the default Python version.pwsh> python -m pip install virtualenv
Specify a Python version, such as
python3.12to install thevirtualenvmodule.pwsh> python3.12 -m pip install virtualenv
Create a new
venvvirtual environment using the default Python version. Replacevenvwith your desired virtual environment name.pwsh> python -m virtualenv venv
Activate the
venvvirtual environment.pwsh> venv\Scripts\activate
Verify that your terminal prompt changes to the
venvvirtual environment.pwsh(venv) PS C:\path\to\your\project>
Use Pip to install a package such as
requestsin the virtual environment.pwsh> pip install requests
List all installed packages in the virtual environment.
pwsh> pip list
Your output should be similar to the one below:
Package            Version
------------------ ---------
certifi            2025.1.31
charset-normalizer 3.4.1
idna               3.10
pip                25.0.1
requests           2.32.3
urllib3            2.3.0
Deactivate the virtual environment.
pwsh> deactivate
Upgrade Pip on Windows
Python's package manager, Pip, is typically included when you install Python through Chocolatey or the official installer. You may need to install or upgrade Pip manually when managing multiple Python versions. Follow the steps below to verify the installed Pip version and upgrade it on your Windows workstation.
Verify the installed Pip version.
pwsh> pip --version
Your output should be similar to the one below:
pip 24.3.1 from C:\Python313\Lib\site-packages\pip (python 3.13)Upgrade Pip.
pwsh> python -m pip install --upgrade pip
Verify the upgraded Pip version.
pwsh> pip --version
Your output should be similar to the one below:
pip 25.0.1 from C:\Python313\Lib\site-packages\pip (python 3.13)
Conclusion
You have installed Python and pip on Windows using terminal and graphical-based methods. You can use Python in existing applications, create virtual environments and set up new Python applications with compatible tools, including IDEs and the Windows PowerShell. Visit the Python documentation for more information and configuration options.