How to Integrate the ONLYOFFICE Docs and Nextcloud Marketplace Apps
Introduction
ONLYOFFICE Docs is an open-source office suite that comprises collaborative editors for text documents, spreadsheets, and presentations, form creator, PDF viewer, and converter. The core format is OOXML, so the editors are compatible with DOCX, XLSX, and PPTX files. You can connect and use the suite within multiple cloud services, including CMS frameworks (WordPress, Strapi, Drupal), collaboration platforms (ONLYOFFICE Workspace, Nextcloud, Seafile, Confluence, Alfresco), issue trackers (Jira, Redmine), e-learning solutions (Moodle, Chamilo, HumHub), and others.
Netxcloud is an open-source content management platform. You can also store and share documents, make audio and video calls, and manage tasks, emails, and calendars. Netxcloud apps ecosystem allows you to add various tools such as Markdown Editor, Maps, Notes, and more.
When you connect ONLYOFFICE Docs to the Nextcloud instance, you can edit and co-author Office documents from the Nextcloud frontend.
Prerequisites
- ONLYOFFICE Docs (Docs) v7.1
- Nextcloud v24
- ONLYOFFICE connector for Nextcloud
Step 1: Install ONLYOFFICE Docs and Nextcloud
Both solutions are available on the Vultr Marketplace as One-Click Apps.
- Deploy both ONLYOFFICE Docs and Nextcloud, following the usual steps and choosing the appropriate options such as server type, location, size, auto backups. Make sure to deploy both servers in the same Vultr location.
- Locate the server IP address and root password for each Marketplace App on the server information page.
- Finalize the configuration for the Nextcloud server following this guide.
- To finalize the configuration for ONLYOFFICE Docs, use an SSH client like OpenSSH.
Enter
ssh root@your_instance_ipin the terminal and typeyes.If you haven't generated SSH keys, you are required to enter the root password.
If you have multiple SSH keys, specify the path to your private key:
$ ssh -i /path/to/private/key root@your_instance_ipThe onlyoffice-document-server Docker container will be started automatically.
Step 2: Enable HTTPS
To switch ONLYOFFICE Docs to HTTPS, get a Let's Encrypt SSL/TLS certificate using certbot.
Install certbot.
 $ sudo snap install --classic certbot
 $ sudo ln -s /snap/bin/certbot /usr/bin/certbot
Get and install the SSL certificate.
 $ docker stop <CONTAINER ID>

 $ certbot certonly --standalone --agree-tos --no-eff-email --email youremail@example -d example.com

 $ mkdir -p /app/onlyoffice/DocumentServer/data/certs

 $ cp /etc/letsencrypt/live/<your-domain.com>/fullchain.pem onlyoffice.crt

 $ cp /etc/letsencrypt/live/<your-domain.com>/privkey.pem onlyoffice.key

 $ chmod 400 /app/onlyoffice/DocumentServer/data/certs/onlyoffice.key

 $ docker start <CONTAINER ID>
Once done, ONLYOFFICE Docs will be available at https://<your domain name>/.
Step 3: Install ONLYOFFICE connector for Nextcloud
You have two options for this installation.
Option 1 (Easiest)
Download the latest version of the connector (integration app) from the official Nextcloud App Store.
Option 2 (Advanced)
Clone the application source code and compile it yourself.
$ git clone https://github.com/ONLYOFFICE/onlyoffice-nextcloud.git onlyoffice

$ cd onlyoffice

$ git submodule update --init --recursive
Move the onlyoffice folder to the Nextcloud server apps/ directory:
$ cp -r /root/onlyoffice/ /var/www/html/apps/Go to the apps/ directory:
$ cd /var/www/html/appsChange the owner to update the application from Nextcloud web interface:
$ chown -R www-data:www-data onlyofficeStep 4: Configure Nextcloud
Access your Nextcloud, open the page with Disabled apps, and click the Enable button for the ONLYOFFICE application.
Nextcloud administrators can install the integration app right from the in-built application market. To do that, click your user icon in the upper right corner, switch to + Apps, find ONLYOFFICE in the list of available applications (section 'Office & text'), and click the Download and enable button.
Step 5: Configure ONLYOFFICE Docs in Nextcloud
In Nextcloud, click your user icon in the upper right corner, go to Settings and find the ONLYOFFICE settings page in the Administration section.
In the Server settings, specify the address of ONLYOFFICE Docs. Make sure the Nextcloud server address is accessible from ONLYOFFICE Docs for correct work.
To protect documents from unauthorized access, enter the secret key in the corresponding field. Specify the same secret key in the ONLYOFFICE Docs config file to enable the validation.
Sometimes your network configuration might not allow the requests between installed Nextcloud and ONLYOFFICE Docs using the public addresses. The Advanced server settings section allows you to set the ONLYOFFICE Docs address for internal requests from Nextcloud server and the returning Nextcloud address for internal requests from ONLYOFFICE Docs.
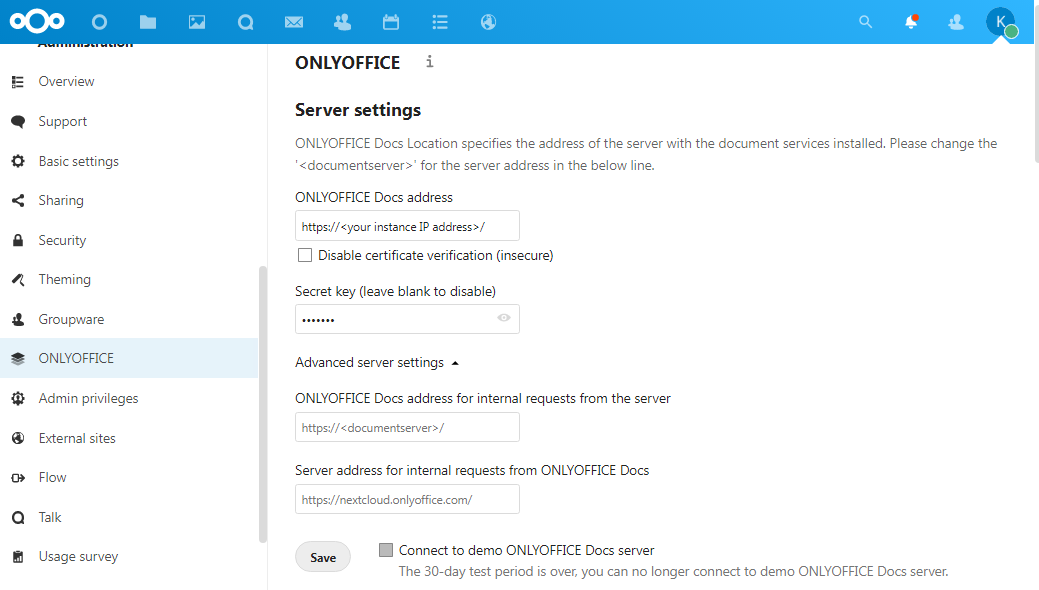
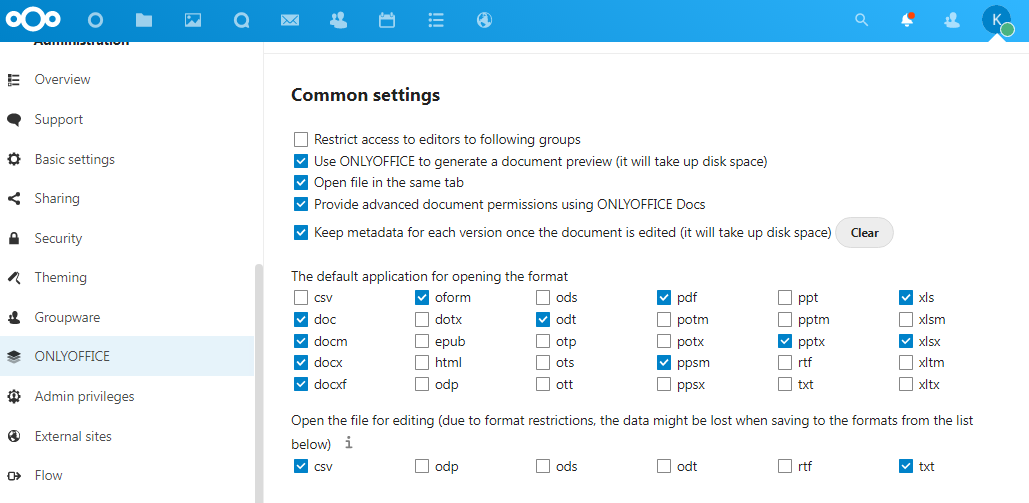
Save the settings and continue with the Common settings.
- Restrict access to the editors to user groups within your instance.
- Let ONLYOFFICE generate a document preview.
- Enable or disable the Open file in the same tab option.
- Activate the option to share documents using advanced permissions (Comment, Review, Custom filter).
- Enable the option to keep metadata and display changes for each document version in the version history.
- Select file formats that are opened with ONLYOFFICE by default.
All docx, xlsx and pptx files are opened directly for editing; all other formats require a preliminary conversion. The Open the file for editing setting allows you to select csv, odp, ods, odt, rtf and txt formats to be to auto-converted and opened directly for editing as well.
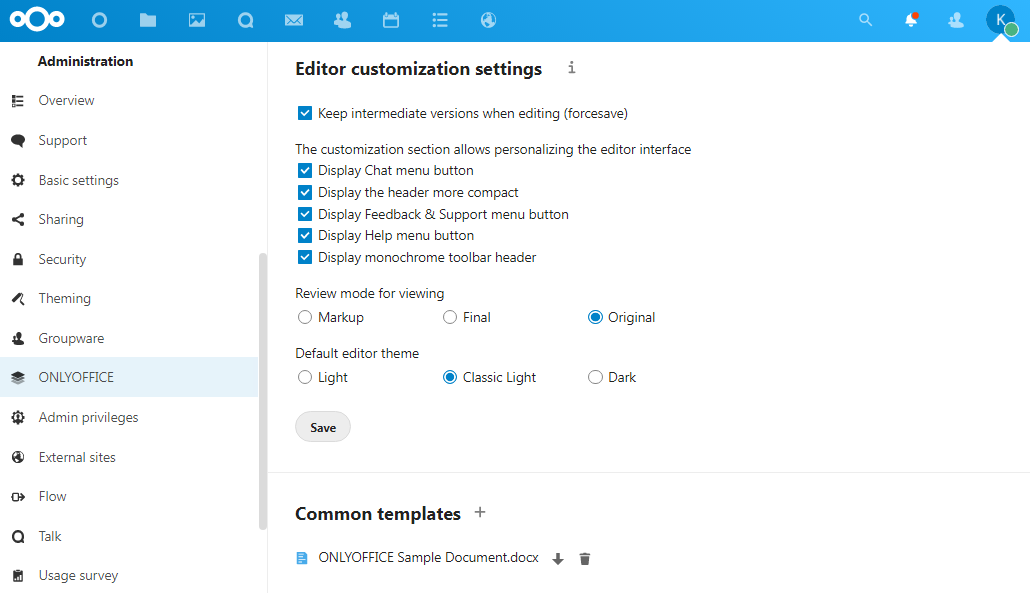
Scroll down to the Editor customization settings section.
- Activate Force Save to send all changes to the storage directly when clicking the Save button in the editors.
- Adjust the editor interface and change the presence or absence of the additional buttons.
- Select one of the Review modes for viewing. It allows users to see the changes made in the reviewed document when it's shared for viewing. With Final mode you will see the document with all the proposed changes accepted. With Markup, the proposed changes are highlighted. With Original, you'll see the initial version of a document with no changes.
- Set the default editor theme (Light/Classic Light/Dark).
In the Common templates section, you click the plus icon and upload docx, xlsx, or pptx templates for creating new documents.
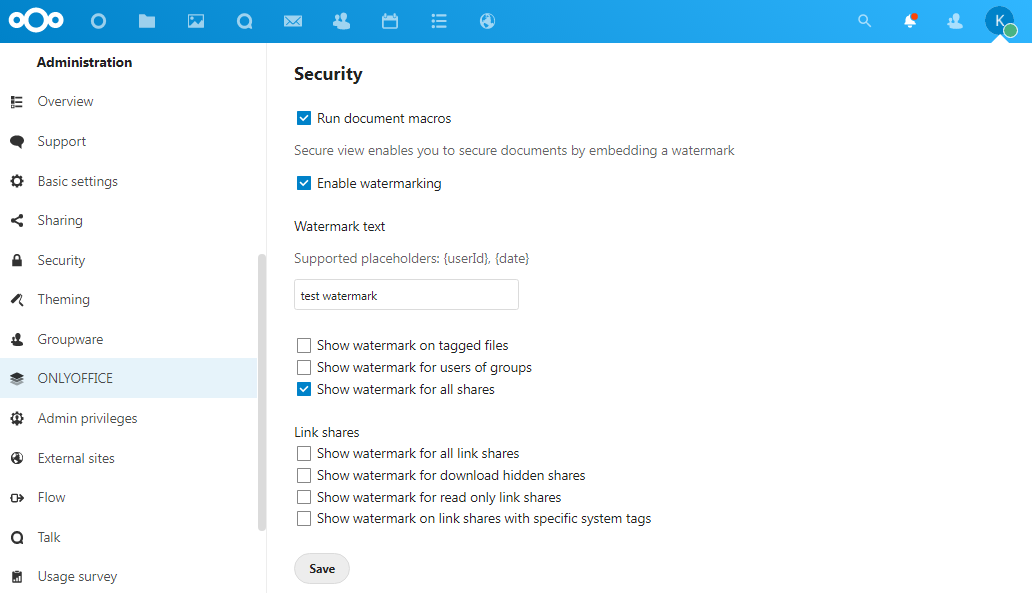
Step 6: Enhance Data Security
In the Security settings, enable or disable the use of macros, and activate watermarking to protect any confidential or sensitive information documents might contain.
You can replace the default watermark text with your own using the supported placeholders {userId} and {date}. These placeholders will be displayed individually for each user when opening a file.
You can also define groups to differentiate users for whom the watermark will be displayed and select types of shares where the watermark has to be shown.
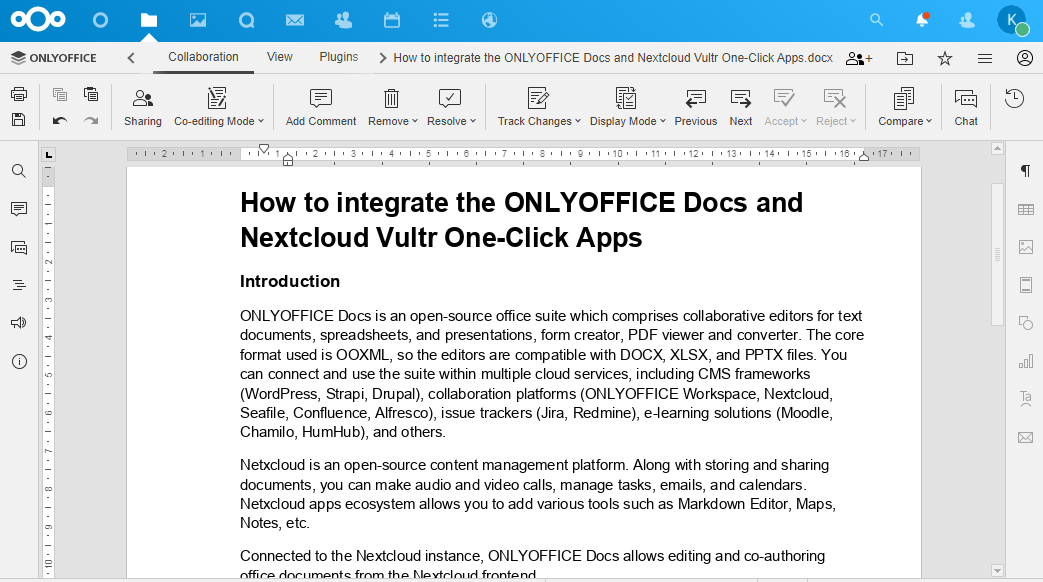
Step 7: Create and Edit Files
With ONLYOFFICE Docs integrated, you can:
- Create documents, spreadsheets, presentations, or form templates by clicking the plus (+) button.
- View, edit and collaborate on documents.
- Co-author docs shared between different Nextcloud instances (Federated Cloud Sharing).
- Work with the right sidebar panel to track activities and share documents with other users.
- Share documents in a Talk chat per Drag & Drop.
Conclusion
You have connected the ONLYOFFICE Docs and Nextcloud Vultr One-Click Apps, and now you can start editing and collaborating on documents without switching between the applications.