
How to Invite and Grant Access to a User Using IAM in a Vultr Organization
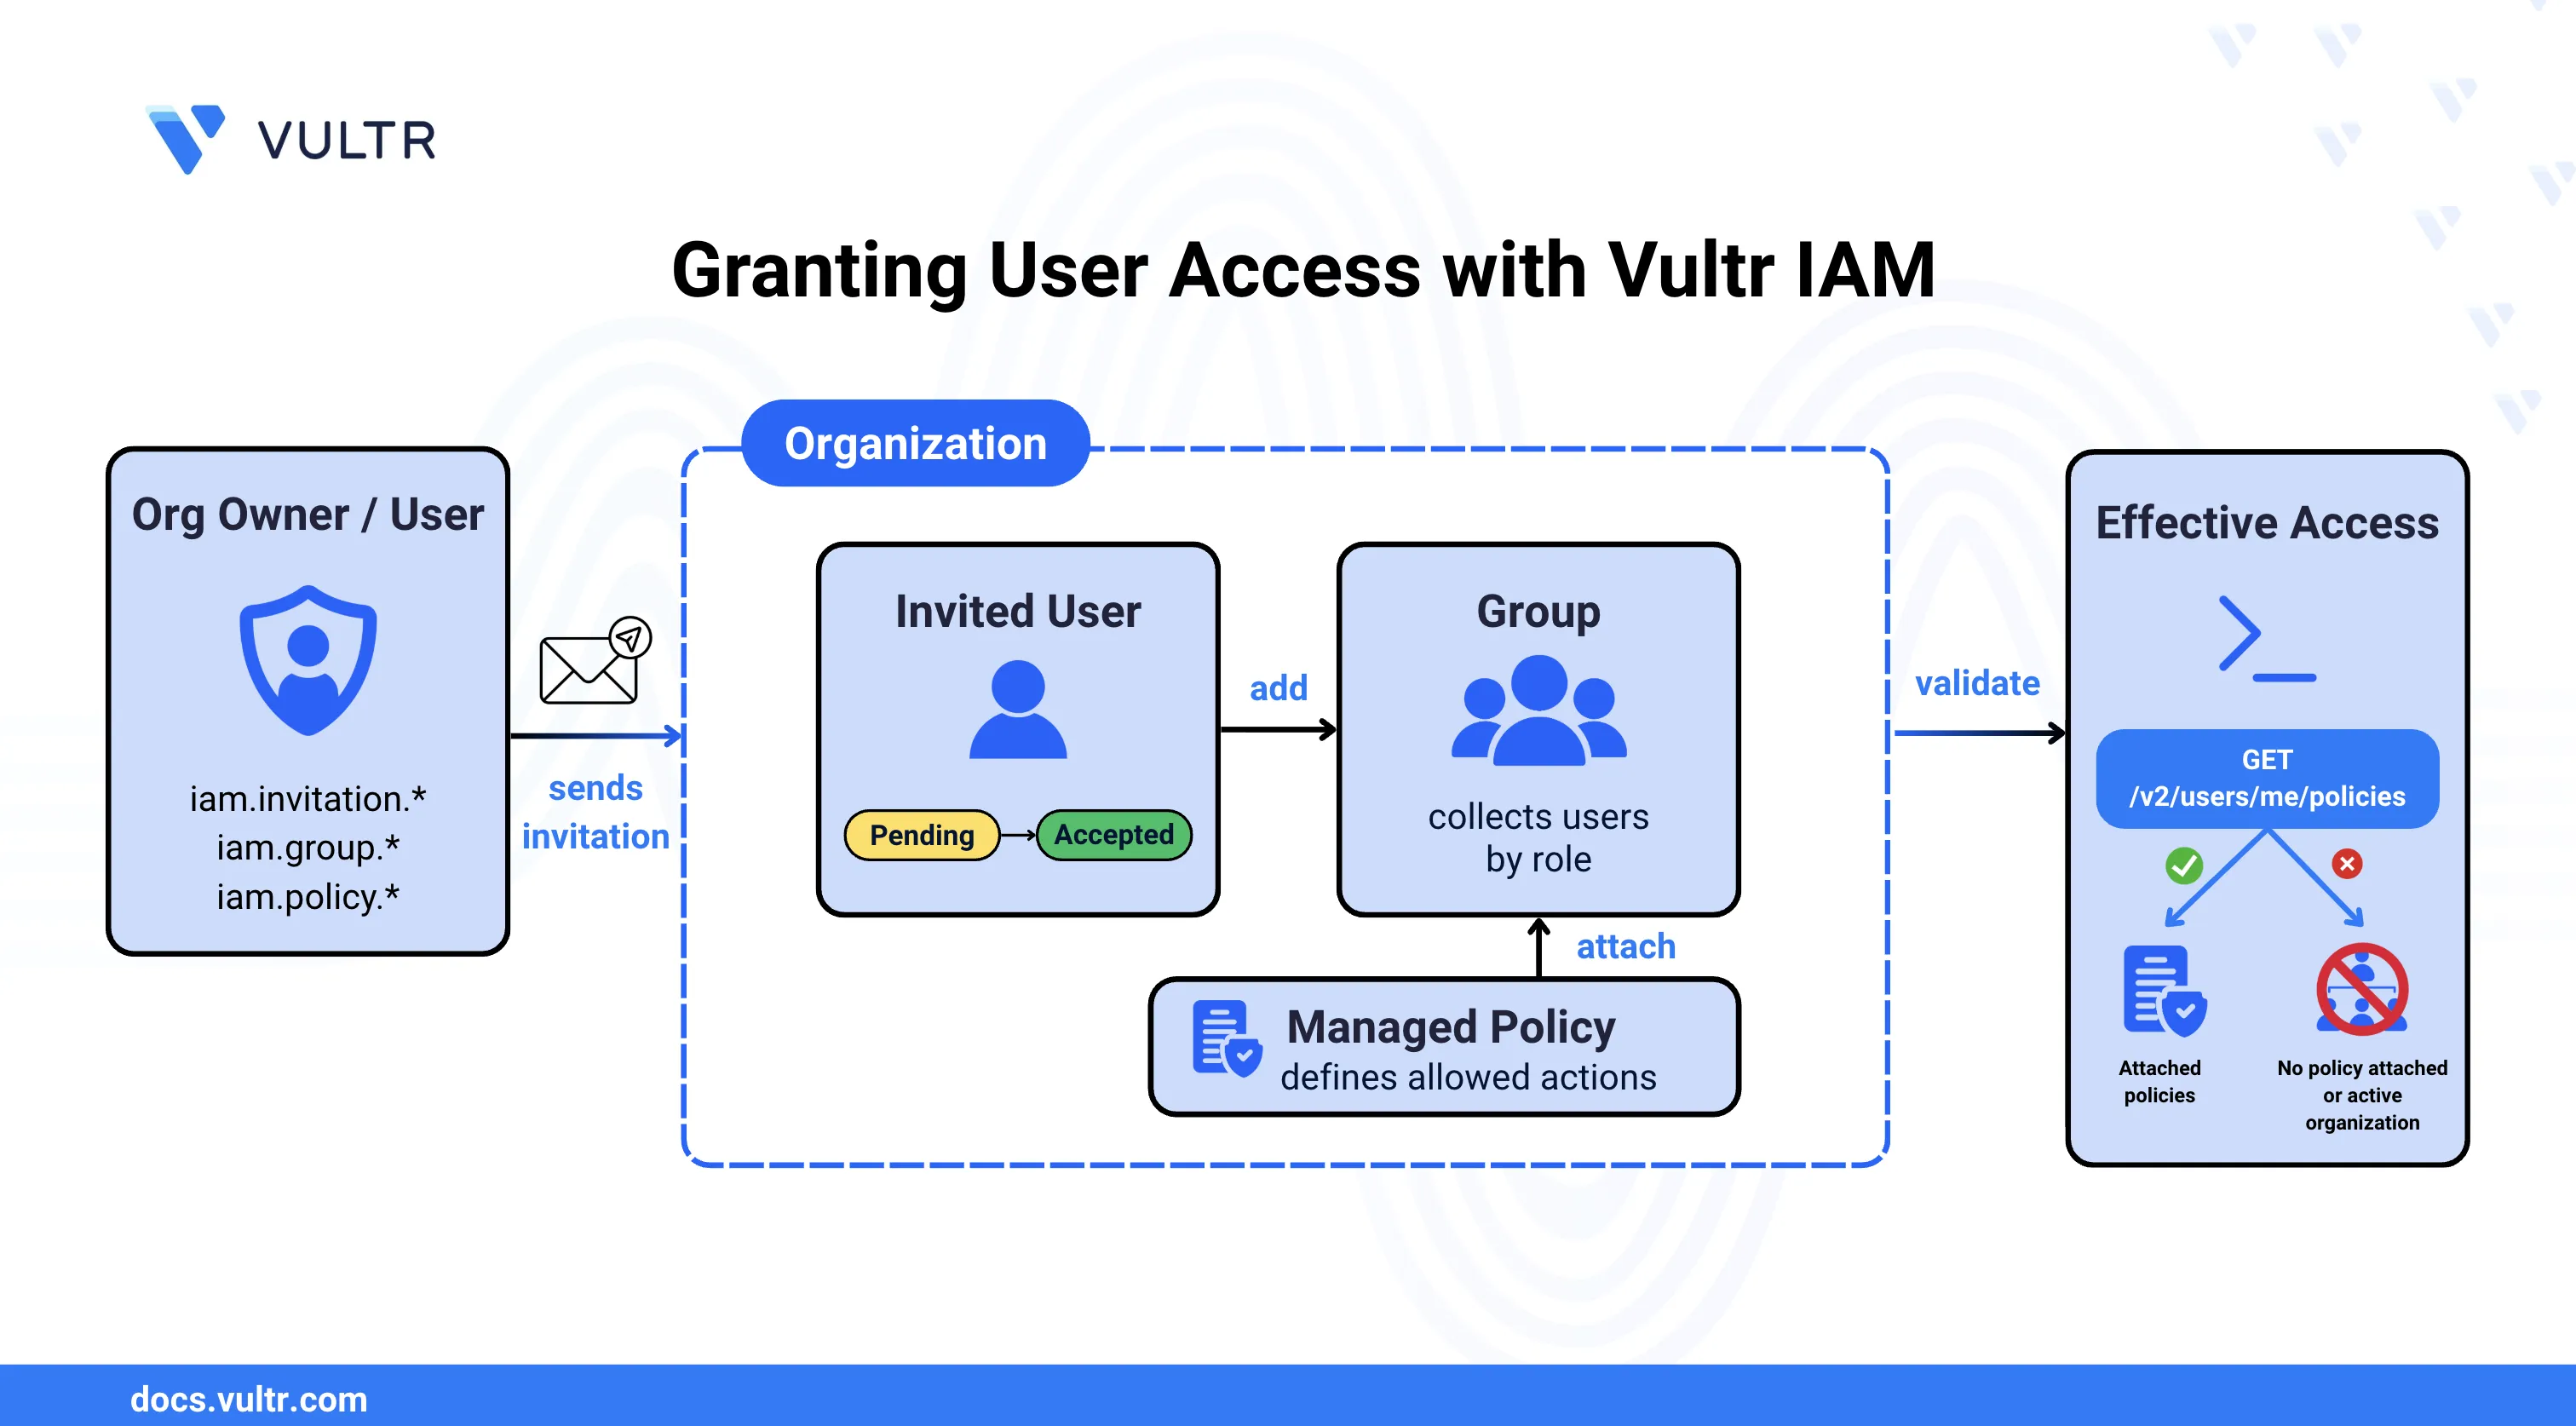
Identity and Access Management (IAM) in Vultr controls which users can access an organization and what actions they can perform on its resources. An organization grants access through a chain of components. Users join the organization, groups collect users with similar responsibilities, and policies attached to those groups (directly or through roles) define the specific permissions each member receives.
This guide explains how to invite a new organization member and grant them access. It covers sending the invitation, creating a group, attaching a managed policy to the group, confirming the user's acceptance, adding the user to the group, and validating the user's access. It also explains why a newly invited user can see a No Active Organization screen on first login, and how to avoid that outcome.
Prerequisites
Before you begin, you need to:
- Have access to a Vultr account with an existing organization.
- Be the organization's root user, or have an account with
iam.group.*,iam.policy.*, andiam.invitation.*permissions. - Have the Vultr API key for your organization, required for the effective access check at the end of this guide.
- Know the email address of the person you want to add to the organization.
Understand the Access Model
Joining an organization does not, by itself, grant a user any permissions. If an invitation goes out with no role, group, or policy selected, the user joins the organization with no assigned access, and the Vultr Console displays a blank No Active Organization screen when they log in. To let a user view or manage resources, attach a policy to them, either directly, through a role, or through a group. Without an attached policy, the user account exists in the organization but cannot access any of its resources.
Organization
  └── User (invited, status: Pending)
  └── Group (created)
        └── Policy (attached to the group)
  └── User accepts invite (status: Active)
  └── User added to Group
Invite the User to the Organization
Inviting a user sends them an email invitation to join the organization. The invitation only grants organization membership. It does not, by itself, grant any permissions.
Log in to the Vultr Console.
Click the organization name in the top navigation bar.
Click Manage Organization.
Click the Users tab.
Click the Add User button.
In the Add User panel, select the Invite Type as User.
Enter the user's Email Address.
Click Review and Invite.
Review the invitation details and click Send Invitation.
The invitation is sent to the user's email address. The user appears in the Invitations section with a status of Invite Pending until they accept.
- Invitations expire after 3 days if not accepted. Resend the invitation from the Invitations section if the user does not respond in time.
- You can also select existing roles, groups, or policies directly in the Add User panel before sending the invitation. Vultr applies them automatically after the user accepts, which skips the separate group-attachment step covered later in this guide.
For more detail on this step, including the Vultr API method, refer to How to Invite a User to an Organization.
Create a Group for the User's Role
A group lets you assign permissions once and apply them to every member, instead of repeating the same policy and role attachments for each individual user.
Click the Groups tab in Manage Organization.
Click the + button to add a group.
Enter the Group Name and Group Description.
Click Review.
Review the details and click Add Group.
The group is created and appears in the Groups list with no members and no attached policies yet.
For more detail on this step, including the Vultr API method, refer to How to Create a Group.
Attach a Managed Policy to the Group
Vultr provides a set of managed policies covering common access patterns, so you do not need to write a policy document from scratch for standard roles. Attaching a managed policy grants every current and future member of the group the permissions it defines.
Click the Permission Policies tab in Manage Organization.
Select a managed policy that matches the access level the user needs.
In the Attached Entities section, click the + button.
Search for and select the group you created.
Click Attach Entities.
The group appears in the Attached Entities list, and all current and future members inherit the policy's permissions.
For more detail on this step, including the Vultr API method, refer to How to Attach a Policy to a Group.
Confirm Invitation Acceptance
A user must hold an Active status before you can add them to a group. Confirm that the user accepted the invitation before moving on to the next step.
Click the Users tab in Manage Organization.
Locate the invited user in the list.
Verify that the status changes from Invite Pending to Active. Status updates as soon as the user accepts the invitation.
Add the User to the Group
Adding the user to the group connects their organization membership to the permissions attached to the group in the earlier step.
Click the Users tab in Manage Organization.
Click the name of the now-active user.
In the Groups section, click the + icon.
In the Add to Groups panel, select the group you created.
Click Add User to Groups.
The user immediately inherits the group's permissions.
For more detail on this step, including the Vultr API method, refer to How to Add a User to a Group.
Understand the "No Active Organization" Screen
A user who accepts an organization invitation and logs in before being added to any group, and without a role or policy attached directly, has a valid membership but zero permissions. The Vultr Console responds to this state by displaying a No Active Organization screen on the organization page, with the message "We currently do not have your organization details", because the user has nowhere to navigate, even though the invitation itself succeeded.
This is the most common point of confusion in user provisioning. The user successfully joined the organization, but the lack of any assigned access makes the Console behave as if no organization is available to them. If a user reports a No Active Organization screen after accepting an invite, verify the following items.
- The user's status in the Users tab shows Active, not Invite Pending.
- The user belongs to at least one group that has a policy attached, or has a role or policy attached directly.
Validate the User's Effective Access
Effective access combines every policy a user receives directly, through a role, and through group membership. Validating it confirms that the group and policy configured earlier actually reach the user, rather than relying on the individual attachment steps alone. The Vultr Console has no screen for this check, so use the Vultr API.
Send a GET request to the List Current User's Groups endpoint using an API key scoped to the newly provisioned user.
$ curl "https://api.vultr.com/v2/users/me/groups" \
    -X GET \
    -H "Authorization: Bearer ${VULTR_API_KEY}"
The response contains the group you added the user to. If the response is empty, recheck the group membership and the policy attachment, because an empty result on this endpoint is what produces the No Active Organization screen for that user.
Conclusion
You have invited a new member to your organization and given them working access through a managed policy attached to a group. The member can view and manage the resources their policy permits, without encountering a No Active Organization screen on login. For more information, refer to the Vultr IAM documentation.