
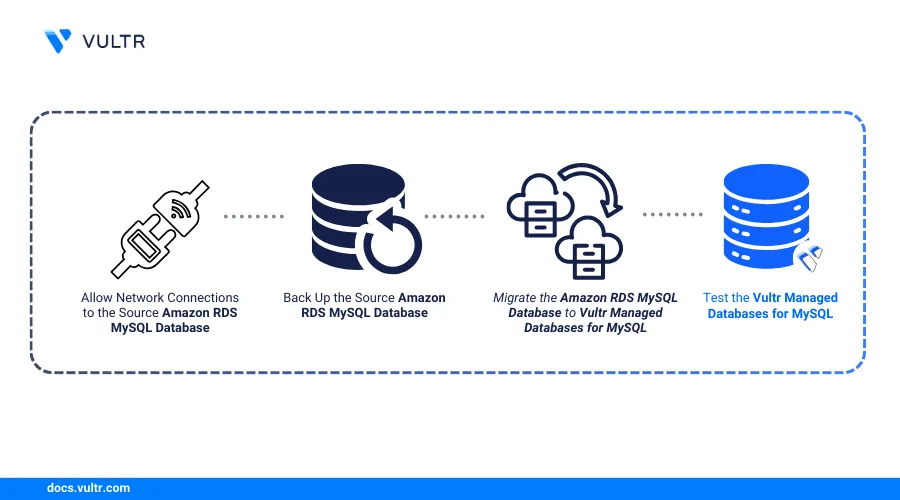
How to Migrate Amazon RDS for MySQL to Vultr Managed Databases for MySQL
Managed database services offer scalable, reliable, and secure database solutions without the complexity of self-management. Vultr Managed Databases for MySQL offers a cost-effective solution with predictable pricing, automated backups, and seamless integration with other Vultr services. Amazon RDS for MySQL is a popular managed database service, while Vultr Managed Databases for MySQL offer better functionality with competitive pricing and a developer-friendly interface, enabling you to focus on building applications rather than managing infrastructure.
Follow this guide to migrate Amazon RDS MySQL Databases to Vultr Managed Databases for MySQL with minimal downtime.
Prerequisites
Before you begin, you need to:
- Have access to an existing Amazon RDS MySQL Database.
- Provision a Vultr Managed Databases for MySQL Cluster with the same MySQL version, and a similar or higher size as your source Amazon RDS MySQL Database.
- Install MySQL Workbench or the
mysqlclient tool on your workstation).
Allow Network Connections to the Source Amazon RDS MySQL Database
Amazon RDS Databases only accept VPC connections by default. Follow the steps below to allow network connections from your management workstation's public IP address to avoid connectivity issues during migration.
Navigate to the Amazon RDS Console.
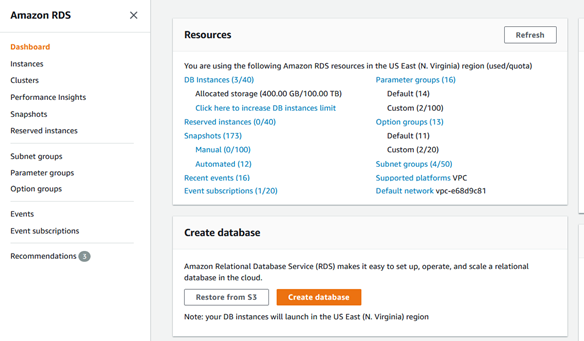
Open your target RDS instance.
Under the Connectivity & Security tab, locate the VPC security groups section.
Select the security group linked to your RDS instance.
Edit the Inbound rules and allow access from your public IP (0.0.0.0/0 for unrestricted access, or specify your workstation's IP).
Back Up the Source Amazon RDS MySQL Database
Before migrating your MySQL database from Amazon RDS to Vultr, create a backup of your Amazon RDS database. This ensures you have a restore point in case of any errors during migration. You can back up your Amazon RDS MySQL database using the mysqldump command-line utility or the AWS Management Console. Follow the steps below to back up your source Amazon RDS database using the mysqldump utility that allows you to export the database schema and data into a SQL file.
Log in to your source Amazon RDS MySQL database using the
mysqlconnection string. Enter your RDS password when prompted.console$ mysql -h <aws-rds-endpoint> -u <aws-rds-username> -p
List all available databases and note the target databases to migrate.
sqlmysql> SHOW DATABASES;
Your output should be similar to the one below.
+--------------------+
| Database           |
+--------------------+
| information_schema |
| mysql              |
| performance_schema |
| sys                |
| testmigrationdb    |
+--------------------+
5 rows in set (0.21 sec)
Exit the MySQL console.
sqlmysql> EXIT;
Back up all databases in your source Amazon RDS instance to a single
all-databases-backup.sqlfile. Replace<aws-rds-endpoint>and<username>with your actual Amazon RDS instance details.console$ mysqldump -h <aws-rds-endpoint> \ -u <username> -p --all-databases --set-gtid-purged=OFF \ --single-transaction --triggers > all-databases-backup.sql
Use the following command to backup a specific database to a single
.sqlfile.console$ mysqldump -h <aws-rds-endpoint> \ -u <username> -p <database-name> --set-gtid-purged=OFF \ --single-transaction --triggers > <backup-name.sql>
List files in your working directory and verify that the
all-databases-backup.sqlis available when the backup is successful.console$ ls -lh all-databases-backup.sql
Compress the backup file with
gzipfor improved file transfer.console$ gzip all-databases-backup.sql
Migrate the Amazon RDS MySQL Database to Vultr Managed Databases for MySQL
You can migrate the source Amazon RDS MySQL database to your destination Vultr Managed Databases for MySQL using two methods, live replication and backup restoration. The Vultr Console, and MySQL Workbench to perform a live migration of all databases to your Vultr Managed Databases for MySQL cluster. Follow the steps below to migrate the source Amazon RDS MySQL using the Vultr Console or MySQL Workbench.
Log in to the Vultr Console.
Click Products and select Databases.
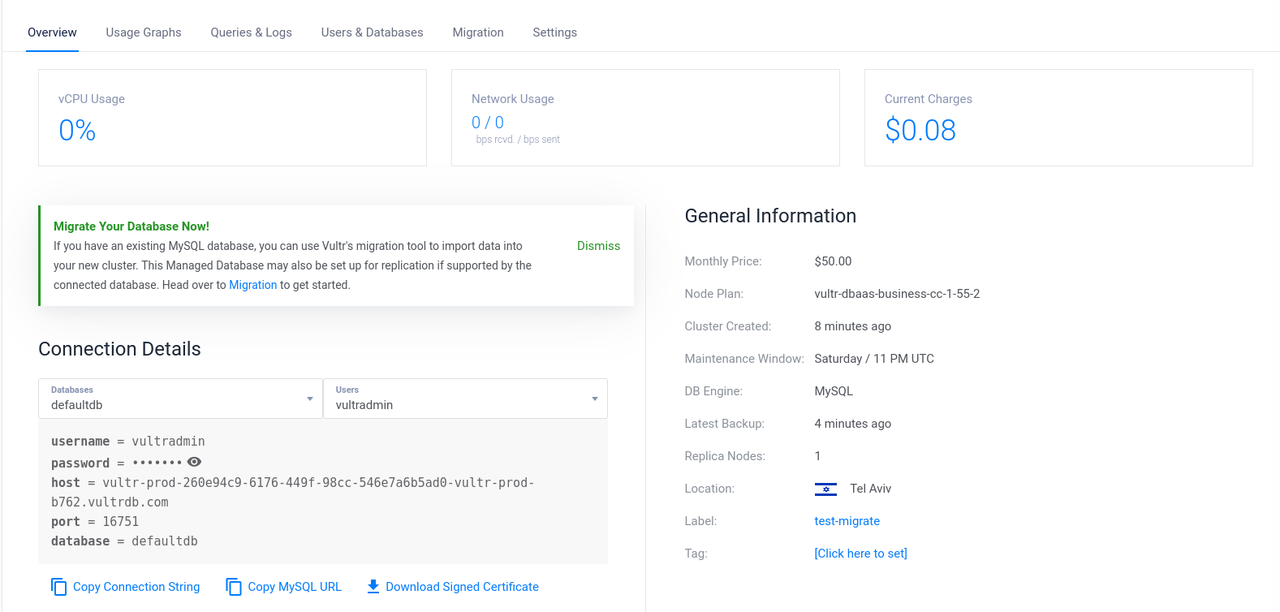
Click your target Vultr Managed Databases for MySQL to open its management page.
Verify the access credentials within the Connection Details section to use when migrating to the Vultr Managed Databases for MySQL cluster.
Follow the steps below to migrate your source RDS database using the Vultr Console.
Log in to the Vultr Console.
Click Products and select Databases.
Click your target Vultr Managed Databases for MySQL cluster to open its management page.
Navigate to the Migration tab.
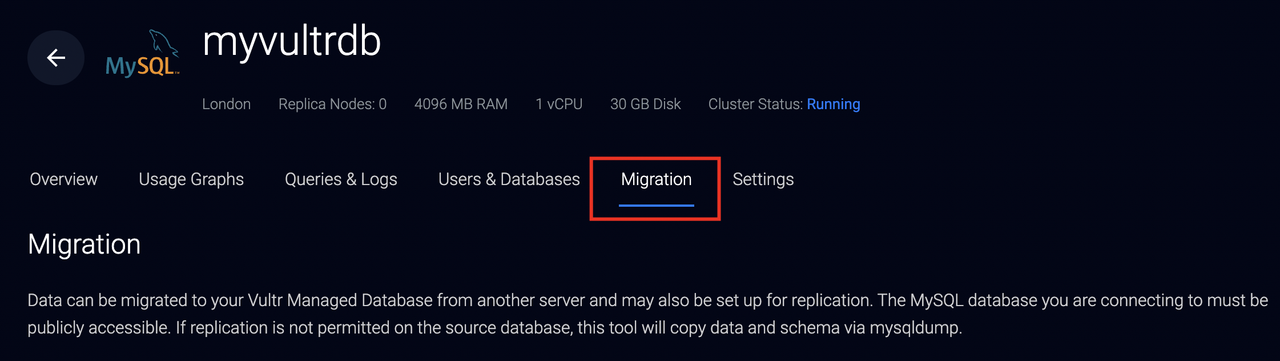
Enter your source Amazon RDS database connection details in the respective fields.
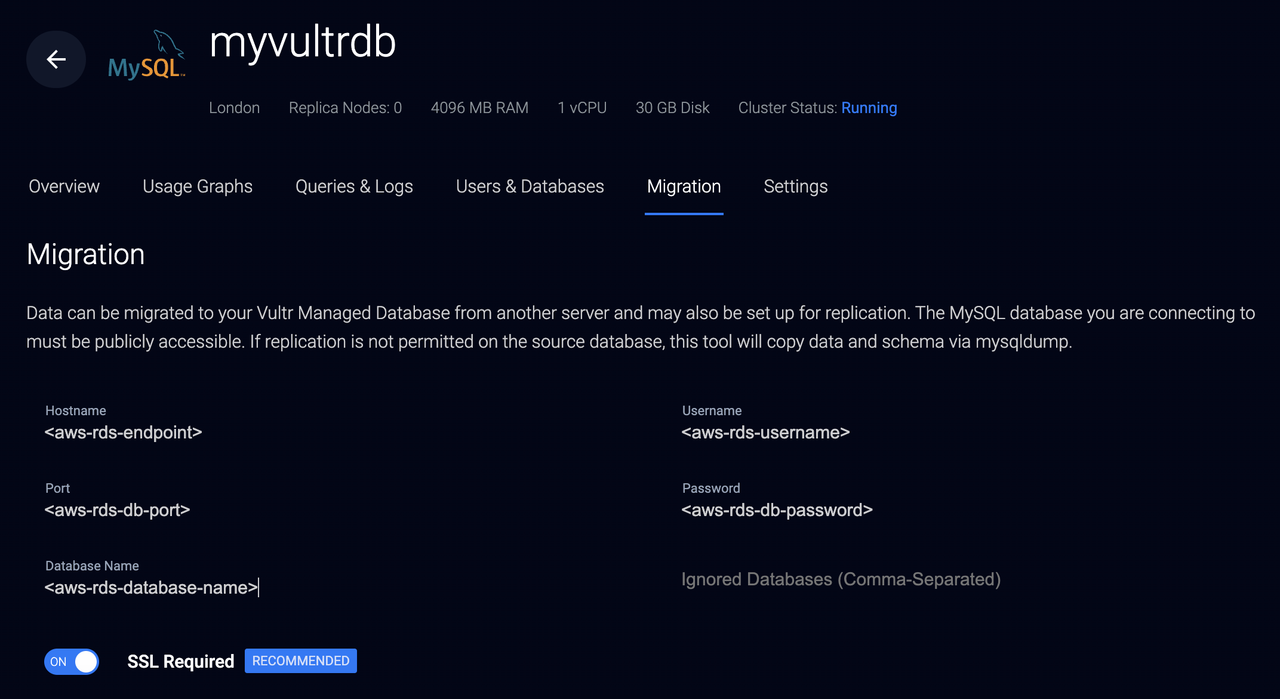
Click Test Connection to validate your connection details.
Click Begin Migration when the connection is successful.
Wait for the migration process to complete and verify that a confirmation message displays in your cluster's management page.
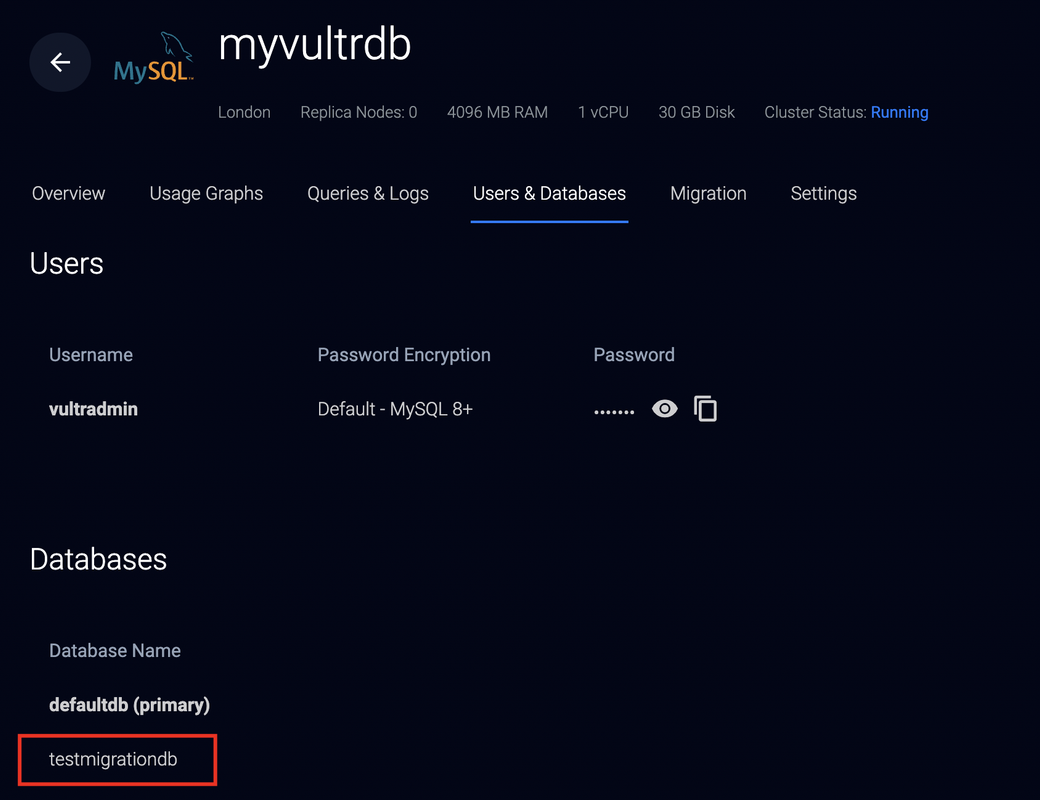
Navigate to the Users and Databases tab and verify that your migrated database is available in the Databases section.
Navigate back to the Migration tab and detach the Amazon RDS connection from Vultr after migrating all databases.
Follow the steps below to migrate your source Amazon RDS Database to a Vultr Managed Databases for MySQL cluster.
Download and install MySQL Workbench on your workstation if it's not already installed.
Open MySQL Workbench.
Click Migration on the left navigation menu.
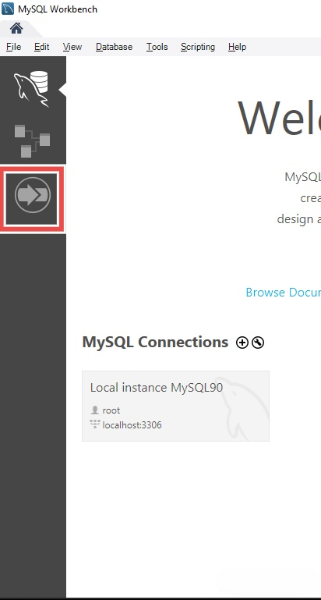
Click Start Migration at the bottom of the Overview section.
Enter the following details on the Source Selection page in MySQL Workbench.
Keep
MySQLas the database system,Standard (TCP/IP)as the connection method.Enter your source Amazon RDS database details in the parameters section, including the following.
- Hostname:
<aws-rds-endpoint> - Username:
<aws-rds-username> - Port:
<aws-rds-db-port>
Replace
<aws-rds-endpoint>,<aws-rds-username>, and<aws-rds-db-port>with your Amazon RDS instance's endpoint, username and port respectively.- Hostname:
Click Store in Vault, enter your Amazon RDS database password and click OK to save it.

Click Test Connection to test the connection to your RDS instance.
Click Next to proceed to target selection.
Keep
Standard (TCP/IP)as the connection method and enter your destination Vultr Managed Databases for MySQL credentials in the respective fields.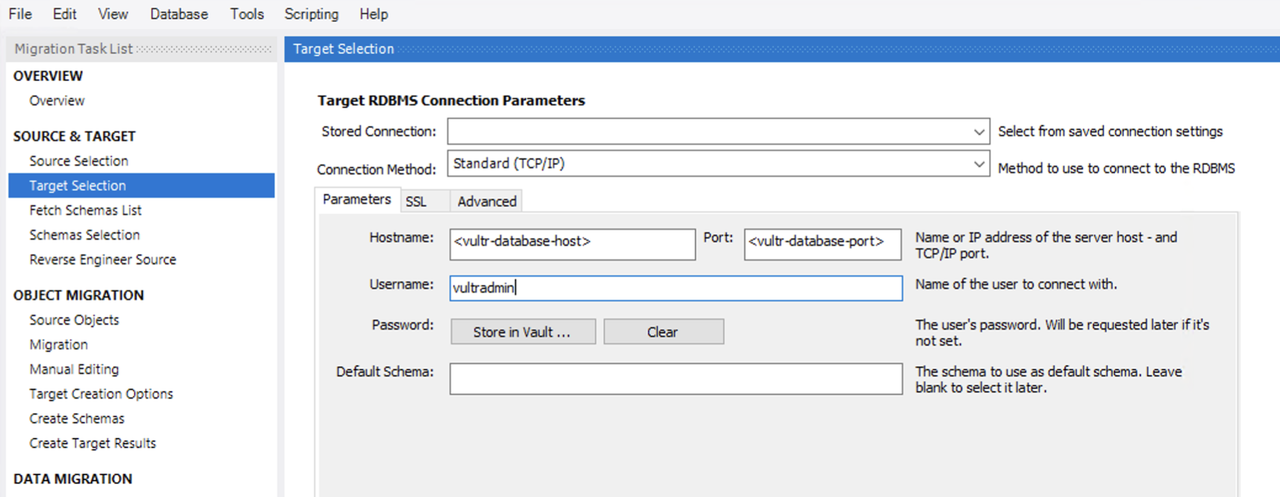
Click Store in Vault, enter your Vultr Managed Databases for MySQL password and click OK to save it.
Click Test Connection to test the connection to your Vultr Managed Databases for MySQL.
Click Next when the test connection is successful.
Select all your target databases from the
Schemas Selectionlist to migrate.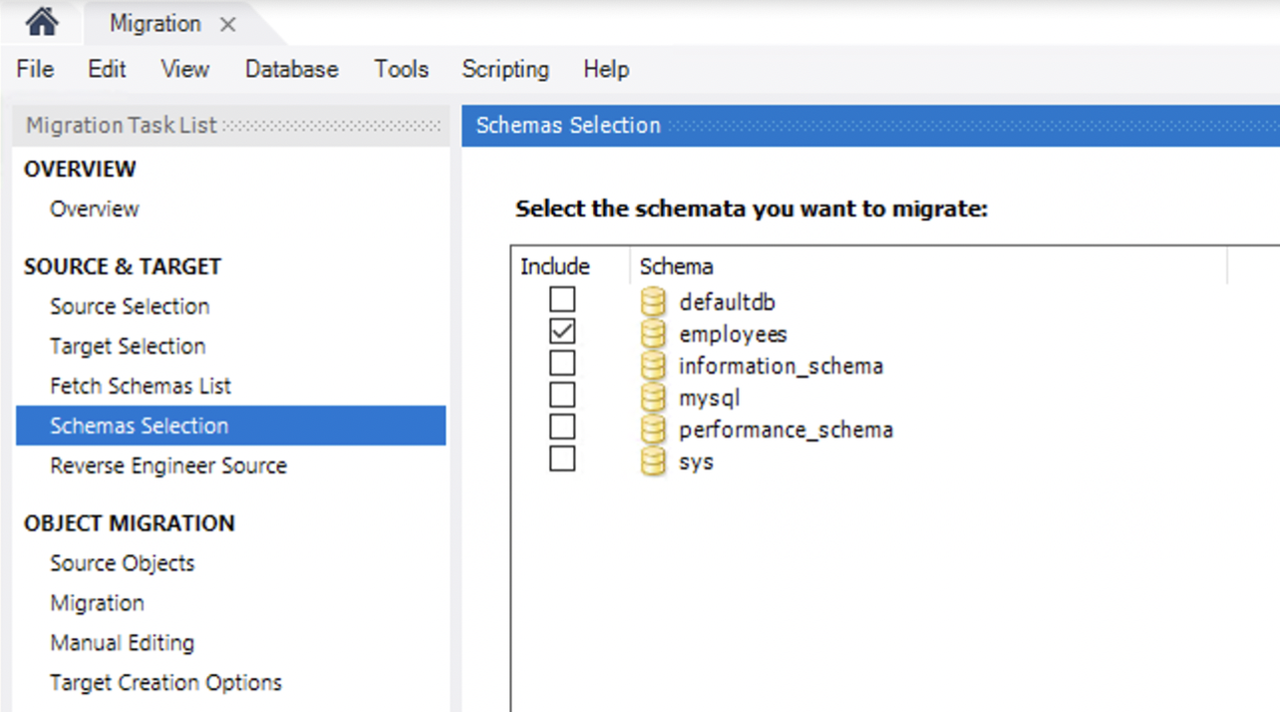
Click Next to map the tables, columns, constraints, and relationships for documentation and migration planning.
Keep the default selections in the Object Migration section and keep
Migrate Table Objectsselected.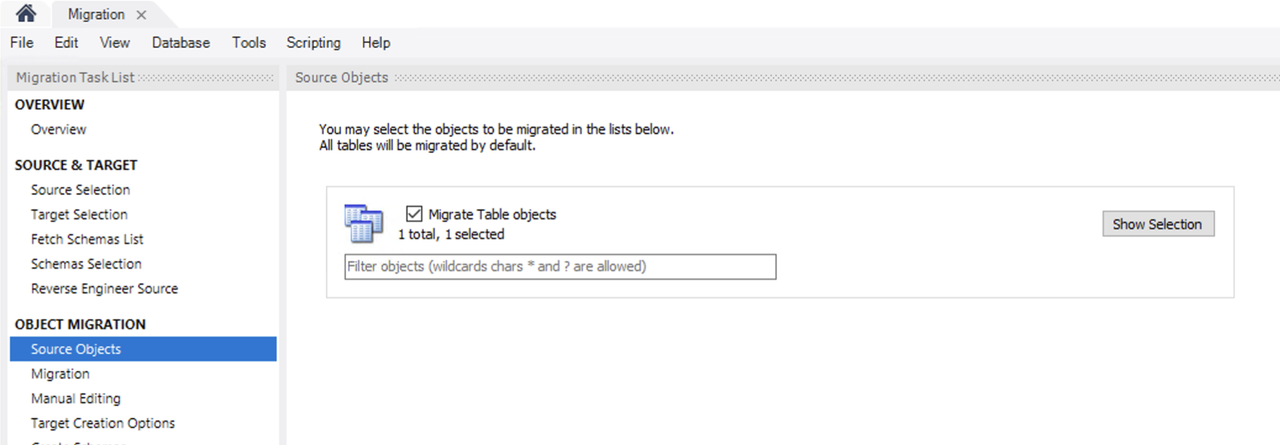
Click Next to navigate to the Manual Editing options and verify any migration issues.
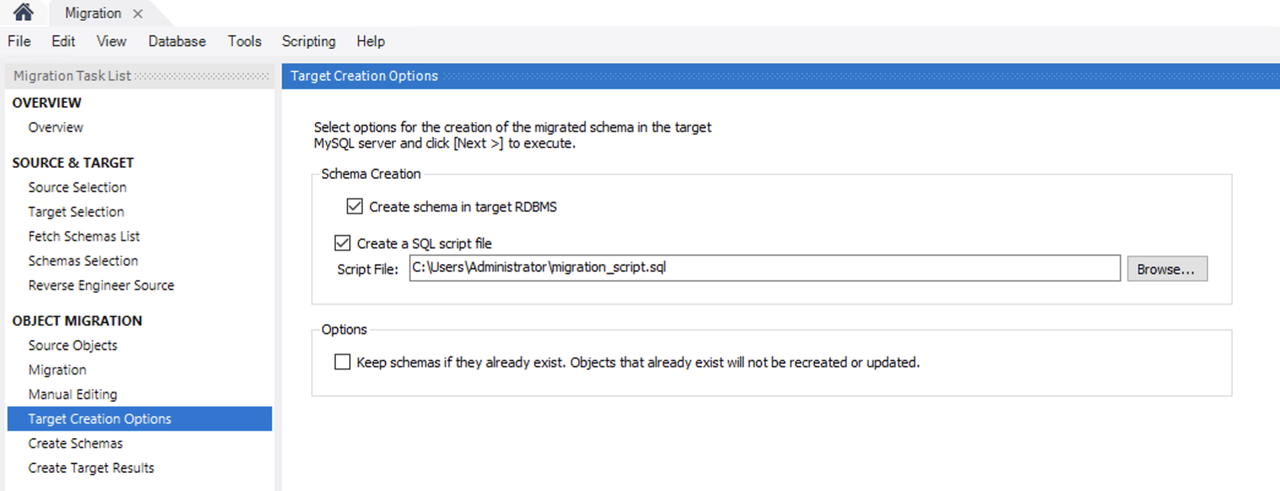
Click Next to access the Target Creation Options.
Check the Create schema in target RDMS and Create a SQL script file options to create an SQL script file.
Check the Keep schemas if they already exist option and click Next to start the migration process.
When the migration is successful, click Next to specify the data transfer options.
Keep the Online copy of table data to target RDMS checked and click Next to keep a copy of the migration in your Vultr Managed Databases for MySQL cluster.
Verify the migration report and click Finish to close the migration window.
Test the Vultr Managed Databases for MySQL
It's important to verify the migrated data on your destination Vultr Managed Databases for MySQL and transfer any missing databases from your source Amazon RDS Databases. This ensures that all databases are migrated and your destination cluster is functional before cutting over existing applications. Follow the steps below to test the Vultr Managed Databases for MySQL cluster and verify that the migration is successful.
Log in to your Vultr Managed Databases for MySQL using the
mysqlconnection string and enter your password when prompted.console$ mysql -h <vultr-database-host> -P <vultr-database-port> -u vultradmin -p
Replace the following example entries in the above command:
<vultr-database-host>with your Vultr Managed Databases for MySQL hostname.<vultr-database-port>with your Vultr Managed Databases for MySQL port.vultradminwith your Vultr Managed Databases for MySQL username.
Check the MySQL database version and verify that it matches your source Amazon RDS database version.
sqlmysql> SELECT @@version;
Your output should be similar to the one below.
+-----------+
| @@version |
+-----------+
| 8.0.35    |
+-----------+
1 row in set (0.17 sec)
List all available databases and verify that they match with your source Amazon RDS databases.
sqlmysql> SHOW DATABASES;
Your output should be similar to the one below.
+--------------------+
| Database           |
+--------------------+
| defaultdb          |
| information_schema |
| mysql              |
| performance_schema |
| sys                |
| testmigrationdb    |
+--------------------+
6 rows in set (0.13 sec)
Switch to any of the migrated databases, such as
testmigrationdb.sqlmysql> USE testmigrationdb;
List all tables in the database and verify the schema structure.
sqlmysql> SHOW TABLES;
Your output should be similar to the one below.
+---------------------------+
| Tables_in_testmigrationdb |
+---------------------------+
| employees                 |
+---------------------------+
Run the following query to count the number of rows in a table and verify that they match with your source RDS database. Replace
employeeswith your actual table name.sqlmysql> SELECT COUNT(*) FROM employees;
Your output should be similar to the one below.
+----------+
| COUNT(*) |
+----------+
|    10000 |
+----------+
Exit the MySQL console.
sqlmysql> EXIT;
Cutover Applications to the Vultr Managed Databases for MySQL
Follow the recommendations below when cutting over applications to your Vultr Managed Databases for MySQL cluster.
Cutover WordPress Applications:
Navigate to the WordPress installation directory.
console$ cd /path/to/wordpress/directory/
Create a backup of the configuration file to ensure safe rollback in case of any issues.
console$ sudo cp wp-config.php wp-config.ORIG
Open the configuration file using a text editor such as
nano.console$ sudo nano wp-config.php
Update database credentials. Locate the following section and replace the values with your Vultr Managed Databases for MySQL credentials.
php/** The name of the database for WordPress */ define('DB_NAME', '<example-wordpress-db>'); /** MySQL database username */ define('DB_USER', '<example-user>'); /** MySQL database password */ define('DB_PASSWORD', '<example-password>'); /** MySQL hostname */ define( 'DB_HOST', '<vultr-database-host>'); /** MySQL port */ define( 'DB_PORT', '<vultr-database-port>');
Replace the following values:
<example-wordpress-db>with the database name in your Vultr Managed Databases cluster.<example-user>with the appropriate database username.<example-password>with the password of your database user.<vultr-database-host>with the host of your Vultr Managed Databases for MySQL cluster.<vultr-database-port>with the Vultr Managed Databases for MySQL cluster port.
Save and close the file.
Restart the web server to apply the configuration changes. The command may vary depending on the web server and Linux distribution in use.
For Apache:
On Debian-based systems (Ubuntu, Debian):
console$ sudo systemctl restart apache2
On RHEL-based systems (CentOS, Rocky Linux, AlmaLinux):
console$ sudo systemctl restart httpd
For Nginx:
On all major distributions:
console$ sudo systemctl restart nginx
If your system uses an alternative init system, such as SysVinit or OpenRC, use the appropriate restart command. Refer to your distribution’s documentation for more information.
Dockerize the application cutover:
If your application runs within a Docker container, you'll need to update the database connection settings in the Docker Compose file.
Open your
docker-compose.yamlfile.console$ sudo nano docker-compose.yaml
Locate the environment variables that store database connection details and update them with your Vultr Managed Databases for MySQL credentials.
Update the database connection variables with your Vultr Managed Databases for MySQL credentials.
yamlservices: your-app: environment: MYSQL_HOST: "<vultr-database-host>" MYSQL_USER: "<example-user>" MYSQL_PASSWORD: "<example-password>" MYSQL_DATABASE: "<example-wordpress-db>" MYSQL_PORT: "<vultr-database-port>"
Save and close the file.
Restart the Docker containers to apply the new database settings:
console$ sudo docker-compose down && docker-compose up -d
For applications built with Node.js, Python, or PHP, visit the respective documentation resources to update the database connection strings using environment variables or configuration files.
Conclusion
You have migrated your MySQL database from Amazon RDS to a Vultr Managed Databases for MySQL cluster. You migrated the databases with live replication using the Vultr Console and direct backup transfers with MySQL Workbench. Migrating your source database lets you configure existing application to connect to the new Vultr Managed Databases for MySQL cluster. Delete the old Amazon RDS instance to prevent additional costs when the migration to your Vultr Managed Databases for MySQL is successful. Visit the Vultr Managed Databases for MySQL documentation for more information.