
How to Migrate Google Cloud Storage (GCS) to Vultr Object Storage
Object Storage is a critical storage solution that lets you store and continuously access data, which is a critical component for business and developers. Buckets store unstructured data, such as images, videos, logs, or backups, offering a scalable and efficient way to handle large volumes of data. Migrating data from Google Cloud Storage buckets to Vultr Object Storage allows you to expand your storage with multiple locations and performance benefits to match your business or project needs.
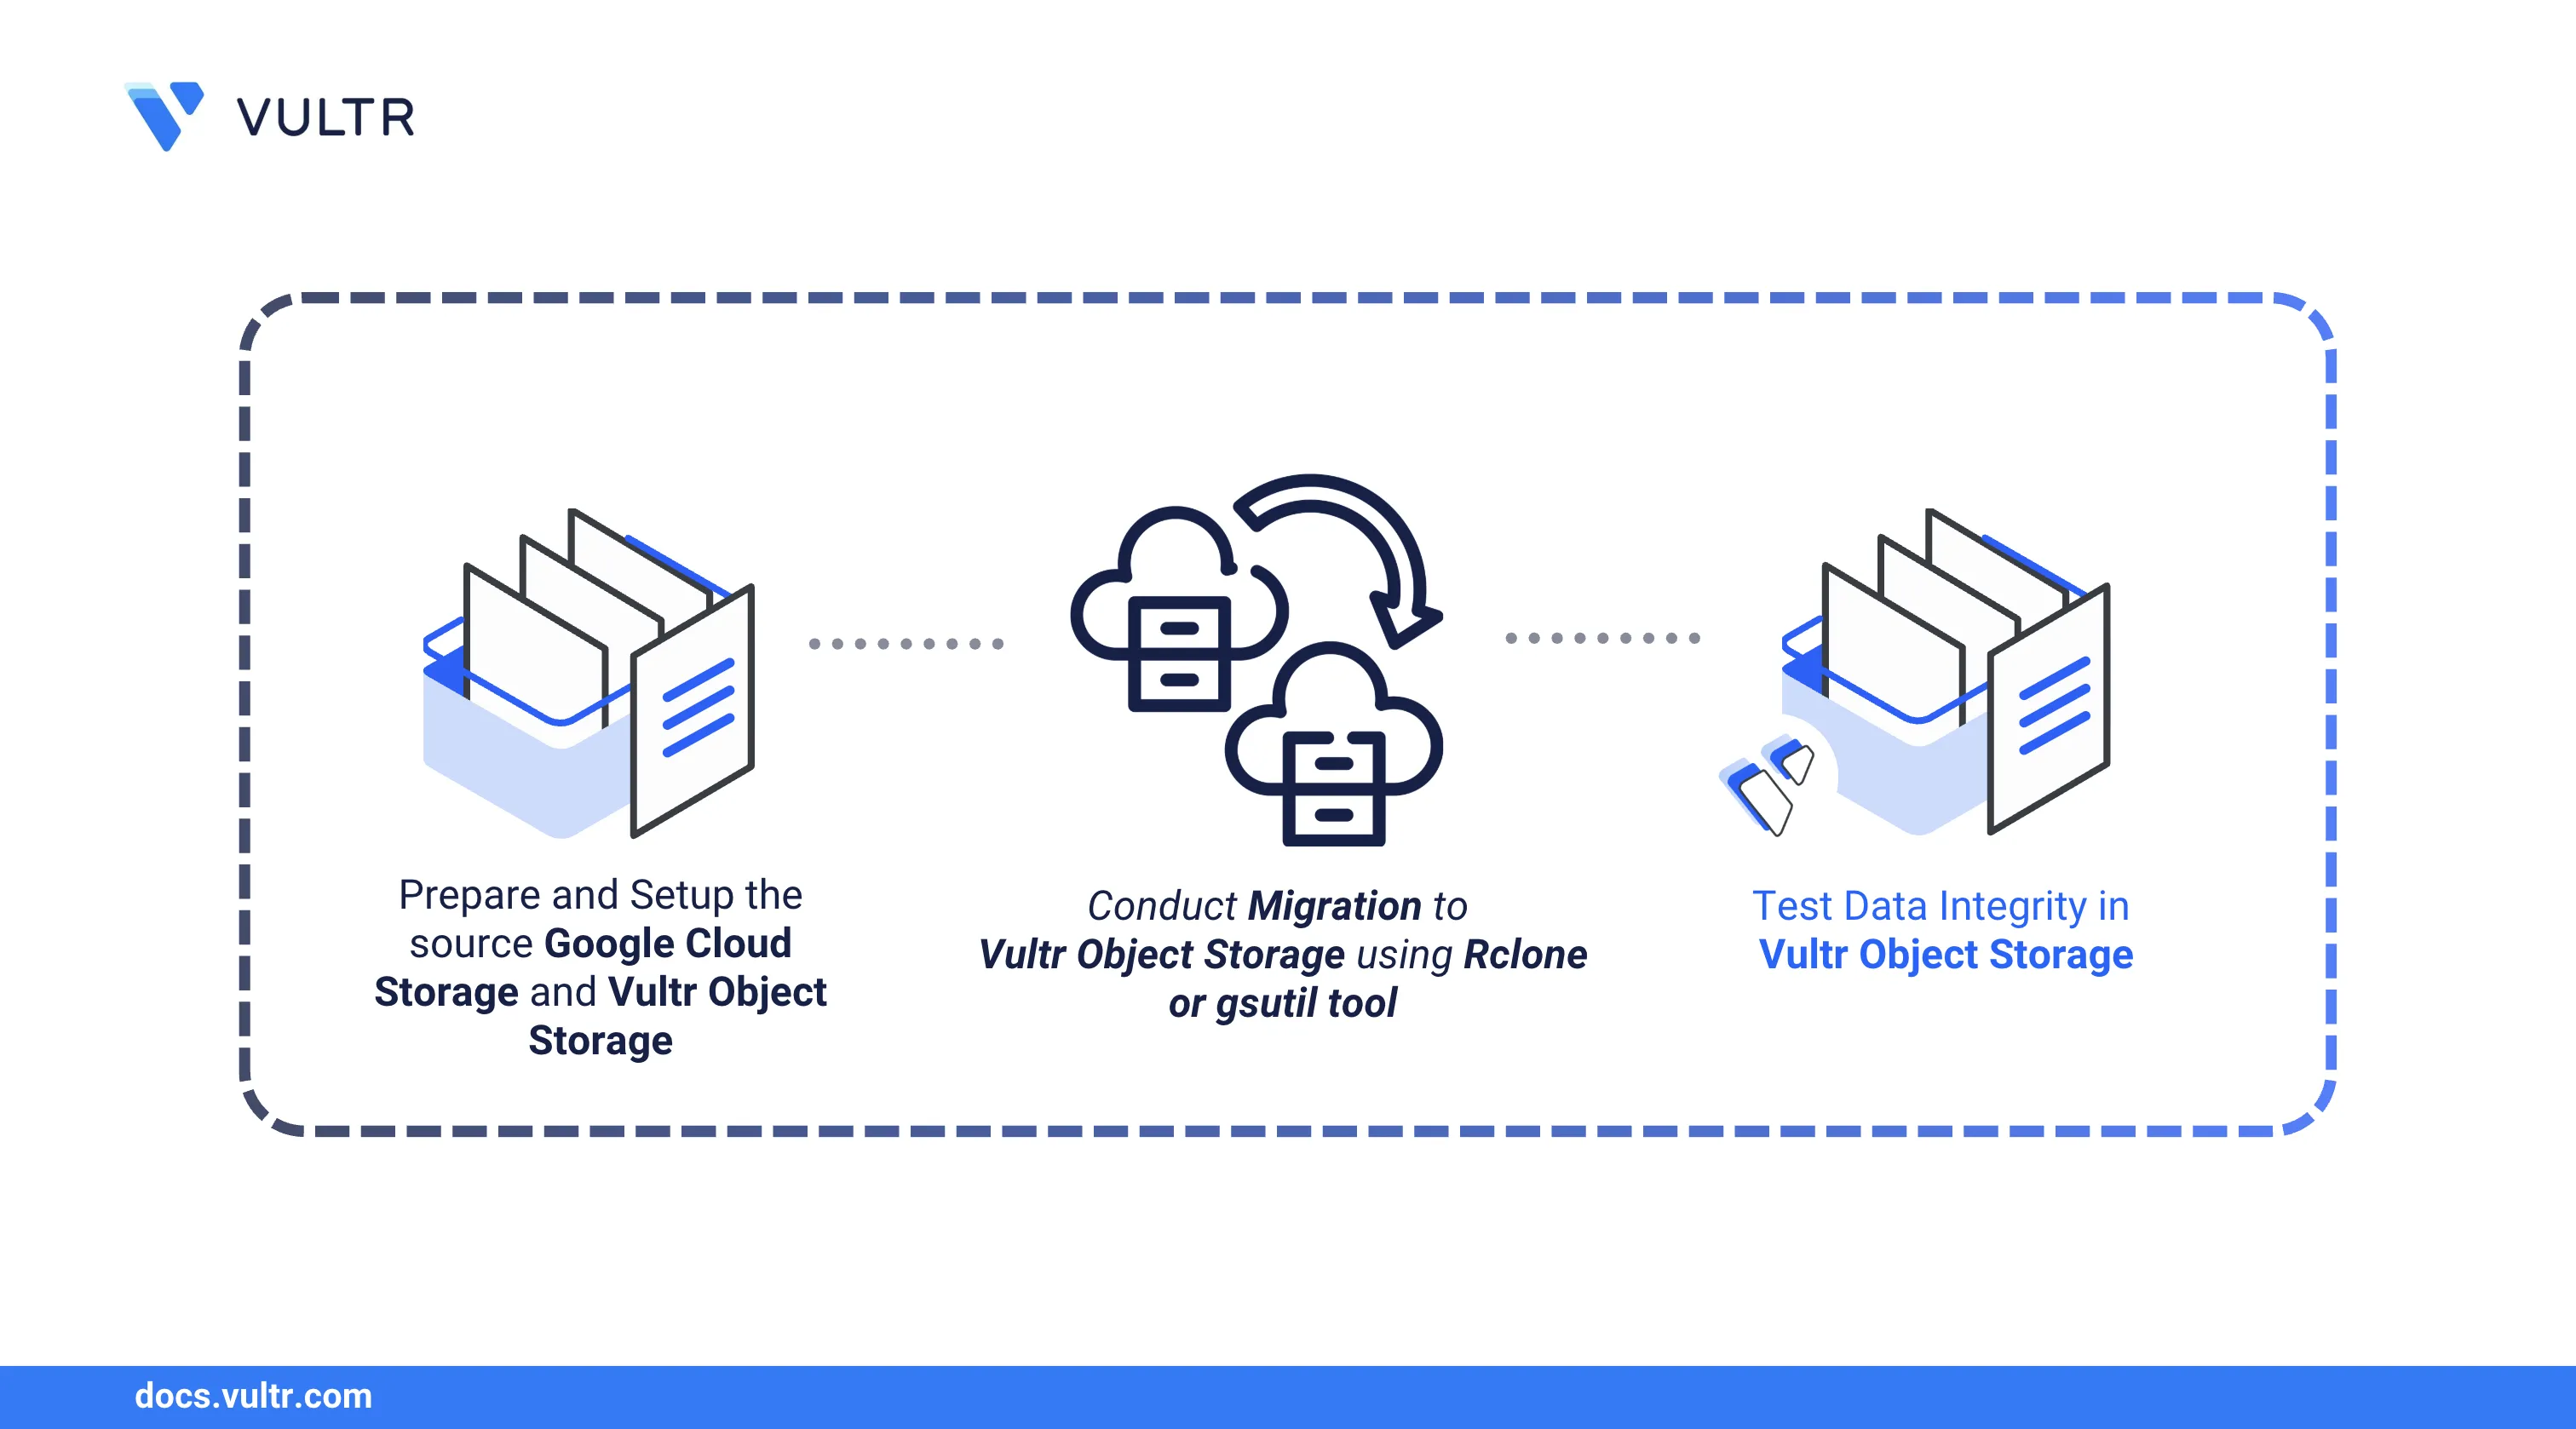
Follow this guide to migrate your data from your Google Cloud Storage bucket to a Vultr Object Storage bucket. You will use Rclone or gsutil to migrate existing buckets to your destination Vultr Object Storage subscription.
Prerequisites
Before you begin, you need to:
Have access to an Ubuntu instanceas a non-root sudo user to use as the migration workstation.
Have an existing Google Cloud Storage bucket with your source data files.
Provision a Vultr Object Storage subscription and create a bucket.
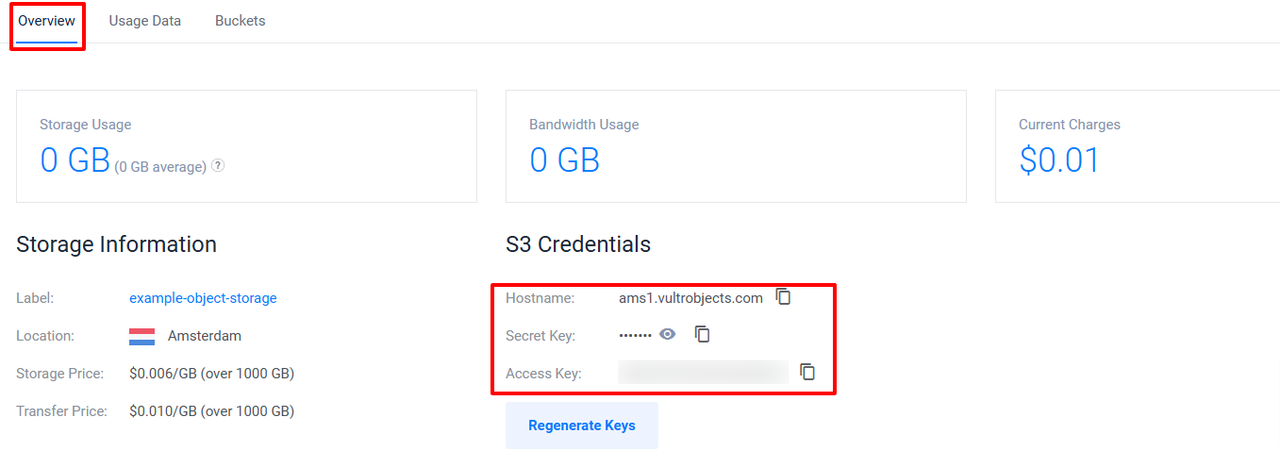
Open your Vultr Object Storage subscription's management page and copy the hostname, secret key, and access key details.
Verify the Source Google Cloud Storage Bucket Information
Follow the steps below to verify your source Google Cloud Storage bucket information to migrate to Vultr Object Storage.
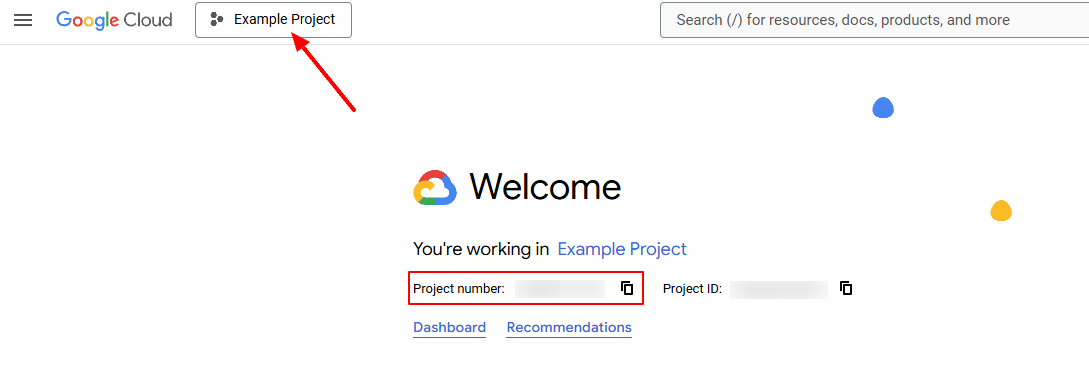
Log in to Google Cloud Console.
Select your target project that contains your Google Cloud Storage bucket.
Copy your project number to the clipboard.
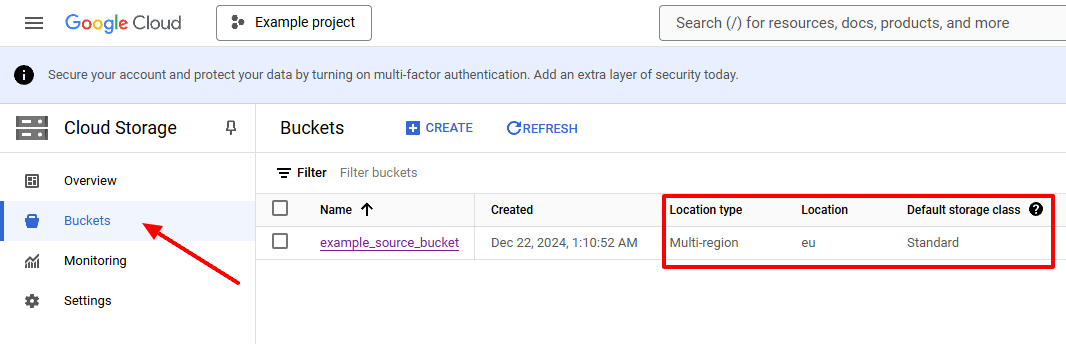
Click Cloud Storage.
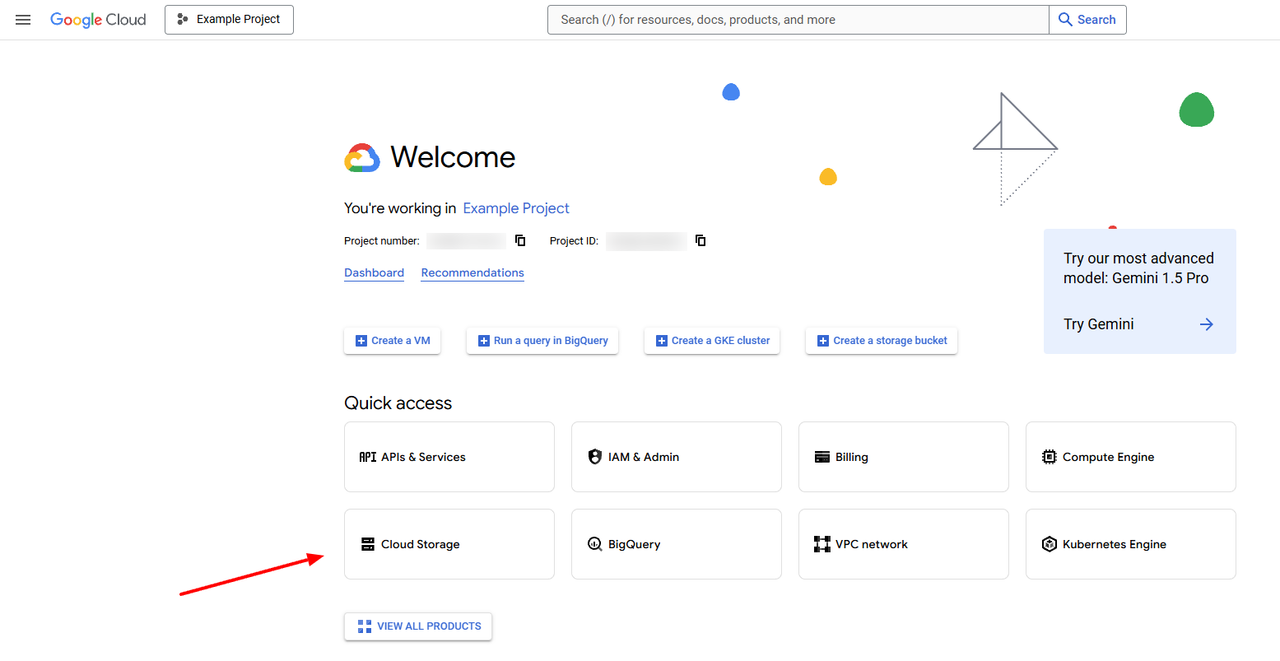
Click Buckets on the left navigation menu.
Note of your target bucket's Location type, Location, and Default storage class information to configure on your workstation.
Choose a Migration Method
You can migrate data from Google Cloud Storage buckets to Vultr Object Storage using two methods, Rclone and gsutil.
- Rclone: An open-source tool used to manage files on cloud storage. You can use Rclone to migrate cloud storage buckets and verify the data integrity for each transfer.
- gsutil: A legacy Google Cloud Storage tool used to perform bucket and object management tasks, including creating, uploading, listing, moving, and managing buckets.
Choose a migration method to install on your migration workstation and use it to transfer data to your Vultr Object Storage subscription.
Set Up the Migration Workstation
Follow the steps below to install and configure Rclone or gsutil, depending on your selected migration method.
Update the APT package index.
console$ sudo apt update
Download the latest Rclone installation script.
console$ curl -O https://rclone.org/install.sh
Run the installation script.
console$ sudo bash install.sh
Verify the installed Rclone version.
console$ rclone version
Your output should be similar to the one below.
rclone v1.69.0
- os/version: ubuntu 24.04 (64 bit)
- os/kernel: 6.8.0-52-generic (x86_64)
- os/type: linux
- os/arch: amd64
- go/version: go1.23.4
- go/linking: static
- go/tags: none
Generate a new Rclone configuration.
console$ rclone config file
Copy the generated configuration file path in your output similar to the one below.
Configuration file doesn't exist, but rclone will use this path:
/home/linuxuser/.config/rclone/rclone.conf
Open the Rclone configuration file.
console$ nano ~/.config/rclone/rclone.conf
Add the following configurations to the
rclone.conffile. ReplaceYOUR_ACCESS_KEY,YOUR_SECRET_ACCESS_KEY, andYOUR_ENDPOINT_URLwith your actual Vultr Object Storage details.ini[vultr] type = s3 provider = Other env_auth = false access_key_id = YOUR_ACCESS_KEY secret_access_key = YOUR_SECRET_ACCESS_KEY region = endpoint = YOUR_ENDPOINT_URL location_constraint = acl = private server_side_encryption = storage_class =
Save and exit the file.
The above configuration creates a new connection to your Vultr Object Storage subscription using the specified connection credentials.
List all buckets in your Vultr Object Storage subscription to test the connection.
console$ rclone lsd vultr:
Your output should be similar to the one below.
-1 2000-01-01 00:00:00 -1 example_destination_bucketOpen the interactive Rclone configuration.
console$ rclone config
Output:
Current remotes:

Name                 Type
====                 ====

e) Edit existing remote
n) New remote
d) Delete remote
r) Rename remote
c) Copy remote
s) Set configuration password
q) Quit config
Enter
nto create a new remote configuration.e/n/d/r/c/s/q> nSpecify a new name for tthe remote connection. For example,
gcs.Enter name for new remote. name>Find
Google Cloud Storage (this is not Google Drive)from the list of cloud storage providers and enter its number to configure it.Option Storage. Type of storage to configure. Choose a number from below, or type in your own value. ... 19 / Google Cloud Storage (this is not Google Drive) \ (google cloud storage) ... Storage>At the prompt, enter the corresponding number (for instance,
19).Press Enter to keep the OAuth client ID empty.
Option client_id.
OAuth Client Id.
Leave blank normally.
Enter a value. Press Enter to leave empty.
client_id>
Press Enter to keep the OAuth client secret empty.
Option client_secret.
OAuth Client Secret.
Leave blank normally.
Enter a value. Press Enter to leave empty.
client_secret>
Enter your GCP project number.
Option project_number.
Project number.
Optional - needed only for list/create/delete buckets - see your developer console.
Enter a value. Press Enter to leave empty.
project_number>
Press Enter to keep the user project empty.
Option user_project.
User project.
Optional - needed only for requester pays.
Enter a value. Press Enter to leave empty.
user_project>
Press Enter to keep the service account path empty.
Option service_account_file.
Service Account Credentials JSON file path.
Leave blank normally.
Needed only if you want use SA instead of interactive login.
Leading ~ will be expanded in the file name as will environment variables such as ${RCLONE_CONFIG_DIR}.
Enter a value. Press Enter to leave empty.
service_account_file>
Press Enter to restrict anonymous bucket access.
Option anonymous.
Access public buckets and objects without credentials.
Set to 'true' if you just want to download files and don't configure credentials.
Enter a boolean value (true or false). Press Enter for the default (false).
anonymous>
Press Enter to keep the access control list for new objects empty.
Option object_acl.
Access Control List for new objects.
Choose a number from below, or type in your own value.
Press Enter to leave empty.
   / Object owner gets OWNER access.
 1 | All Authenticated Users get READER access.
   \ (authenticatedRead)
   / Object owner gets OWNER access.
 2 | Project team owners get OWNER access.
   \ (bucketOwnerFullControl)
   / Object owner gets OWNER access.
 3 | Project team owners get READER access.
   \ (bucketOwnerRead)
   / Object owner gets OWNER access.
 4 | Default if left blank.
   \ (private)
   / Object owner gets OWNER access.
 5 | Project team members get access according to their roles.
   \ (projectPrivate)
   / Object owner gets OWNER access.
 6 | All Users get READER access.
   \ (publicRead)
object_acl>
Press Enter to keep the access control list for new buckets empty.
Option bucket_acl.
Access Control List for new buckets.
Choose a number from below, or type in your own value.
Press Enter to leave empty.
   / Project team owners get OWNER access.
 1 | All Authenticated Users get READER access.
   \ (authenticatedRead)
   / Project team owners get OWNER access.
 2 | Default if left blank.
   \ (private)
...
bucket_acl>
Press Enter to continue with the bucket policy only set to
false.Option bucket_policy_only. Access checks should use bucket-level IAM policies. If you want to upload objects to a bucket with Bucket Policy Only set then you will need to set this. When it is set, rclone: - ignores ACLs set on buckets - ignores ACLs set on objects - creates buckets with Bucket Policy Only set Docs: https://cloud.google.com/storage/docs/bucket-policy-only Enter a boolean value (true or false). Press Enter for the default (false). bucket_policy_only>Find your Google Cloud Storage bucket location from the list, enter the corresponding location number, and press Enter.
Option location.
Location for the newly created buckets.
Choose a number from below, or type in your own value.
Press Enter to leave empty.
1 / Empty for default location (US)
\ ()
2 / Multi-regional location for Asia
\ (asia)
3 / Multi-regional location for Europe
\ (eu)
4 / Multi-regional location for United States
...
location>
Find your storage class from the list and enter the corresponding number. If your storage class is
Standard, select any of the following options.Regional storage class: For buckets stored in a single region.Multi-regional storage class: For buckets distributed across multiple regions.
Option storage_class.
The storage class to use when storing objects in Google Cloud Storage.
Choose a number from below, or type in your own value.
Press Enter to leave empty.
1 / Default
  \ ()
2 / Multi-regional storage class
  \ (MULTI_REGIONAL)
3 / Regional storage class
  \ (REGIONAL)
4 / Nearline storage class
  \ (NEARLINE)
5 / Coldline storage class
  \ (COLDLINE)
6 / Archive storage class
  \ (ARCHIVE)
7 / Durable reduced availability storage class
  \ (DURABLE_REDUCED_AVAILABILITY)
storage_class>
Enter
1to continue and manually enter your credentials.Option env_auth. Get GCP IAM credentials from runtime (environment variables or instance meta data if no env vars). Only applies if service_account_file and service_account_credentials is blank. Choose a number from below, or type in your own boolean value (true or false). Press Enter for the default (false). 1 / Enter credentials in the next step. \ (false) 2 / Get GCP IAM credentials from the environment (env vars or IAM). \ (true) env_auth>Enter
nto proceed without editing the advanced configuration.Edit advanced config? y/n>Enter
nto start the Google Cloud account authentication.Use web browser to automatically authenticate rclone with remote? * Say Y if the machine running rclone has a web browser you can use * Say N if running rclone on a (remote) machine without web browser access If not sure try Y. If Y failed, try N. y) Yes (default) n) No y/n>Your output should be similar to the one below.
2025/03/19 18:30:43 NOTICE: Make sure your Redirect URL is set to "http://127.0.0.1:53682/" in your custom config.
2025/03/19 18:30:43 ERROR : Failed to open browser automatically (exec: "xdg-open": executable file not found in $PATH) - please go to the following link: http://127.0.0.1:53682/auth?state=Yi582ar0tYjlvqze3y_3sQ
2025/03/19 18:30:43 NOTICE: Log in and authorize rclone for access
2025/03/19 18:30:43 NOTICE: Waiting for code...
Copy the generated URL from the second line of the command output.
Open a new terminal on your local workstation.
Set up port forwarding to your remote migration workstation. Replace
192.0.2.1with the IP address of your migration server andlinuxuserwith your non-root username.console$ ssh -L 53682:localhost:53682 linuxuser@192.0.2.1
The above command opens a connection to your server and forwards port
53682to your local workstation address. Port forwarding routes all requests tolocalhost:53682on your local machine to port53682on the remote server's.Enter your user's SSH password when prompted.
linuxuser@192.0.2.1's password:
Paste the Rclone URL you copied earlier in a web browser such a Chrome to log in to your Google account.
http://127.0.0.1:53682/auth?state=asLQ...Sign in with your Google Cloud account.
Grant Rclone access to your account.
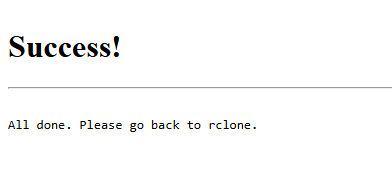
Verify that a success message displays in your web browser to complete the authentication.
Close the web page.
Press Ctrl + C in your terminal to exit the port forwarding session.
Navigate to your Rclone configuration terminal.
Verify that Rclone successfully adds your login credentials to the configuration.
2025/03/19 18:31:32 NOTICE: Got code
Configuration complete.
Options:
- type: google cloud storage
- project_number: 14082920324
- location: asia-southeast1
- storage_class: REGIONAL
- token: {"access_token":"ya29.a0AeXRPp50uCYeI..............","token_type":"Bearer","refresh_token":"1//0eutCa31ItSEKCgYIARAAGA4SNwF-L9IrgXJDM5I4Jr1AokMIxKpT_5siQgC5c6cf9TybC_Gt6094pBmLCC0x_-m4E63CuRzByfs","expiry":"2025-03-19T19:31:31.410881765Z"}
Keep this "gcs" remote?
y) Yes this is OK (default)
e) Edit this remote
d) Delete this remote
y/e/d>
...
Enter
yand press Enter to save the configuration.Enter
qto quit the configuration.e) Edit existing remote n) New remote d) Delete remote r) Rename remote c) Copy remote s) Set configuration password q) Quit config e/n/d/r/c/s/q>
List all available Google Cloud Storage buckets to test your configuration.
console$ rclone lsd gcs:
Your output should be similar to the one below when successful.
-1 2000-01-01 00:00:00 -1 example_source_bucketList all Rclone remotes and verify that your configuration is active.
console$ rclone listremotes
Output:
vultr:
gcs:
Install all required dependencies for the Google Cloud SDK package.
console$ sudo apt-get install apt-transport-https ca-certificates gnupg curl
Download the Google Cloud SDK repository GPG key.
console$ curl https://packages.cloud.google.com/apt/doc/apt-key.gpg -o apt-key.gpg
Add the GPG key to your server.
console$ sudo gpg --dearmor -o /usr/share/keyrings/cloud.google.gpg apt-key.gpg
Add the Google Cloud SDK repository to your APT repository sources.
console$ echo "deb [signed-by=/usr/share/keyrings/cloud.google.gpg] https://packages.cloud.google.com/apt cloud-sdk main" | sudo tee -a /etc/apt/sources.list.d/google-cloud-sdk.list
Update the APT package index.
console$ sudo apt update
Install the Google Cloud SDK.
console$ sudo apt install google-cloud-cli -y
Verify the installed SDK version.
console$ gcloud version
Your output should be similar to the one below.
gcloud version
Google Cloud SDK 504.0.1
alpha 2024.12.19
beta 2024.12.19
bq 2.1.11
bundled-python3-unix 3.11.9
core 2024.12.19
gcloud-crc32c 1.0.0
gsutil 5.33
Log in to Google Cloud SDK with your Google account.
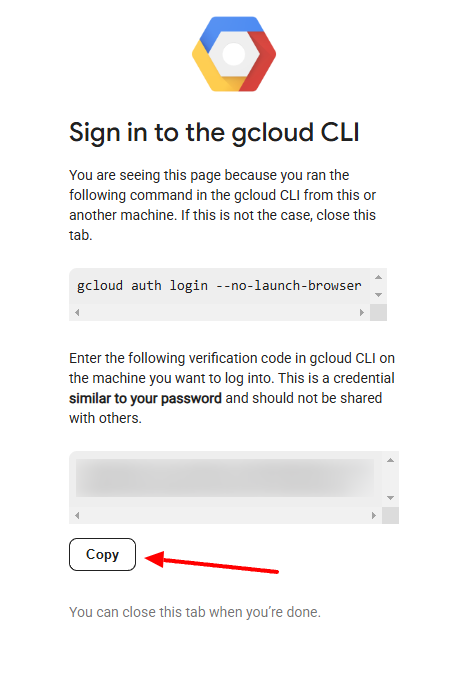
console$ gcloud auth login
Copy the generated Google sign in link in your output and paste it in your web browser to login with your Google Account.
Go to the following link in your browser and complete the sign-in prompts:

    https://accounts.google.com/o/oauth2/auth?response_type=code&client_id=432...

Once finished, enter the verification code provided in your browser:
Copy the generated verification code and paste it into your terminal to log in.
Verify that Gsutil displays a confirmation message similar to the one below.
You are now logged in as [exampleuser@gmail.com].
Your current project is [project-abc123].  You can change this setting by running:
  $ gcloud config set project PROJECT_ID
View all projects associated with your Google account.
console$ gcloud projects list
Your output should be similar to the one below.
PROJECT_ID               NAME              PROJECT_NUMBER
project-abc123           Example Project   123456789012
project-xyz789           Demo Project      987654321098
Copy the
PROJECT_IDof your target project that contains the source storage bucket.Set your target project as the default to use with gsutil. Replace
project-abc123in with your actual project ID.console$ gcloud config set project project-abc123
Output:
Updated property [core/project].List all available GCS buckets to test the connection.
console$ gsutil ls gs://
Your output should be similar to the one below.
gs://example_source_bucket/Open the
.botoconfiguration file which includes the gsutil connection configurations.console$ nano ~/.boto
Add the following configurations at the end of the file to configure your Vultr Object Storage details. Replace
YOUR_ACCESS_KEY_ID,YOUR_SECRET_ACCESS_KEY, andYOUR_ENDPOINT_URLwith your actual Vultr Object Storage details.ini[Credentials] aws_access_key_id = YOUR_ACCESS_KEY_ID aws_secret_access_key = YOUR_SECRET_ACCESS_KEY [Boto] https_validate_certificates = True [s3] provider=Other host = YOUR_ENDPOINT_URL calling_format = boto.s3.connection.OrdinaryCallingFormat signature_version = s3v4
The above configuration creates a new connection to the destination Vultr Object Storage bucket using the specified connection details.
List all available Vultr storage buckets to test the connection.
console$ gsutil ls s3://
Your output should be similar to the one below.
s3://example_destination_bucket/
Migrate Google Cloud Storage Buckets to Vultr Object Storage
Follow the steps below to migrate your Google Cloud Storage buckets to Vultr Object Storage using your desired migration method.
Transfer all objects in your GCS bucket to your Vultr Object Storage subscription.
console$ rclone sync gcs: vultr: -v
Monitor the migration process and wait for the transfer to complete, depending on your bucket size.
Transfer objects from your GCS bucket to a specific Vultr Object Storage bucket. Replace
example_source_bucketwith your GCS bucket andexample_destination_bucketwith your destination bucket name.console$ rclone sync gcs:example_source_bucket vultr:example_destination_bucket -v
Your output should be similar to the one below when successful.
2025/03/19 19:39:21 INFO  : test.txt: Copied (new)
2025/03/19 19:39:21 INFO  : image.png: Copied (new)
2025/03/19 19:39:21 INFO  : web_app/index.html: Copied (new)
2025/03/19 19:39:21 INFO  :
Transferred:             22 B / 22 B, 100%, 0 B/s, ETA -
Transferred:            3 / 3, 100%
Elapsed time:         0.4s
If the file transfer command is interrupted or unexpectedly stops due to an error, run the rclone command again to start the transfer again.
console$ rclone sync gcs:example_source_bucket vultr:example_destination_bucket -v
Copy all files from your GCS bucket to the destination Vultr Object Storage bucket. Replace
example_source_bucketwith your GCS bucket andexample_destination_bucketwith your destination Vultr Object Storage bucket.console$ gsutil -o "GSUtil:check_hashes=never" -m cp -r gs://example_source_bucket/ s3://example_destination_bucket
The above command copies all objects recursively from the GCS bucket to the Vultr Object Storage bucket. It uses multithreading to ensure maximum transfer speed.
Your output should be similar to the one below when the migration is successful.
Copying gs://example_source_bucket/Test.txt [Content-Type=text/plain]...
Copying gs://example_source_bucket/image.png [Content-Type=text/plain]...
Copying gs://example_source_bucket/web_app/index.html [Content-Type=text/plain]...
/ [3/3 files][   22.0 B/   22.0 B] 100% Done
Operation completed over 3 objects/22.0 B.
If the file transfer command gets interrupted or unexpectedly stops due to an error, run the gsutil command again to resume the transfer.
console$ gsutil -o "GSUtil:check_hashes=never" -m cp -r gs://example_source_bucket/ s3://example_destination_bucket
Gsutil creates a folder with your source bucket name in your destination bucket that contains all migrated objects. Run the following command to transfer all objects to the root directory of your destination Vultr Object Storage bucket.
console$ gsutil -m mv -r s3://example_destination_bucket/example_source_bucket/* s3://example_destination_bucket/
Your output should be similar to the one below when the transfer is successful.
Copying gs://example_destination_bucket/example_source_bucket/Test.txt [Content-Type=text/plain]...
Copying gs://example_destination_bucket/example_source_bucket/image.png [Content-Type=text/plain]...
Copying gs://example_destination_bucket/example_source_bucket/web_app/index.html [Content-Type=text/plain]...
Removing gs://example_destination_bucket/example_source_bucket/Test.txt
Removing gs://example_destination_bucket/example_source_bucket/image.png
Removing gs://example_destination_bucket/example_source_bucket/web_app/index.html
/ [3/3 files][   22.0 B/   22.0 B] 100% Done
Test the Destination Vultr Object Storage Subscription
Follow the steps below to test your Vultr Object Storage subscription and verify the migrated data integrity, depending on your migration method.
Check for file differences between the source GCS bucket and the destination Vultr Object Storage bucket.
console$ rclone check gcs:example_source_bucket/ vultr:example_destination_bucket/
If the above command returns a
0 differences foundprompt, the buckets match, and your migration is successful.2025/01/03 19:44:55 NOTICE: S3 bucket example_destination_bucket: 0 differences found 2025/01/03 19:44:55 NOTICE: S3 bucket example_destination_bucket: 3 matching filesIf you receive file differences similar to the ones below, run the
rclone synccommand to migrate the missing files.2025/03/19 20:14:20 ERROR : test.txt: sizes differ 2025/03/19 20:14:20 NOTICE: S3 bucket testbucket3434: 1 differences found 2025/03/19 20:14:20 NOTICE: S3 bucket testbucket3434: 1 errors while checking 2025/03/19 20:14:20 NOTICE: S3 bucket testbucket3434: 2 matching files 2025/03/19 20:14:20 NOTICE: Failed to check: 1 differences found
Synchronize the GCS bucket with the destination Vultr Object Storage bucket to check for any file differences.
console$ gsutil -m rsync -r -d -c -n gs://example_source_bucket s3://example_destination_bucket
Your output should be similar to the one below if the migration completes without any errors.
Building synchronization state...
Starting synchronization...
If the command returns transfer errors, transfer the files again and test the buckets again.
Building synchronization state...
Starting synchronization...
Would copy gs://example_source_bucket/Test.txt to s3://example_destination_bucket/Test.txt
Would copy gs://example_source_bucket//image.jpg to s3://example_destination_bucket//image.jpg
Conclusion
You have migrated data from your Google Cloud Storage bucket to a Vultr Object Storage subscription. You can use rclone or gsutil to migrate all existing data, verify the data integrity, and cut over your applications to Vultr Object Storage. Visit the Vultr Object Storage documentation for more bucket configuration options.