Introduction
This guide explains how you can migrate your AWS Cloud Database to Vultr with minimal downtime to the source database applications. Vultr's Managed Databases for PostgreSQL offer reduced costs, easy management and backups, scheduled updates, quick scaling, straightforward monitoring, and automated failover to replica nodes in case of database failures.
You can migrate your AWS source database to a Vultr Managed Database for PostgreSQL with the pg_dump command line tool or pgAdmin for a graphical migration process.
Prerequisites
Before your start, make sure you:
- Verify that your source AWS Cloud Database accepts connections from any source
0.0.0.0/0. - Deploy a fresh Vultr Managed Database for PostgreSQL with the same size as your AWS database.
- Verify the target PostgreSQL database is the same or a higher version than the source database.
Migrate with pg_dump
pg_dump is a Postgres backup utility tool that exports a single database to a script file. The pg_dumpall variant exports all databases along with any existing roles using the following syntax.
pg_dump -Ft --host [hostname] --port [port] --username [dbuser] --dbname [database] -f [backup file path]Verify that the
pg_dumputility is available on your computer.$ pg_dump --versionOutput:
pg_dump (PostgreSQL) 14.5 (Ubuntu 14.5-0ubuntu0.22.04.1)If unavailable, please install the
postgresql-clienttool.Export your source database. Replace
examplewith your actual database details.$ pg_dump -Ft --host=example.rds.amazonaws.com --username=example-user --password --dbname=exampledb > pgtovultr.sqlWhen complete, verify that the file is available in your working directory.
$ lsExport the database roles.
$ pg_dumpall --roles-only --host=example.rds.amazonaws.com --username=example-user --password > pgroles.sqlLog in to your Vultr Postgres database.
$ psql --host=vultr-prod.vultrdb.com --username=example-user --password --dbname=postgresCreate a new database with the same name as your source database.
CREATE DATABASE example-db;Exit the console.
\qImport database roles to your Vultr database.
$ pg_restore --host=vultr-prod.vultrdb.com --username=example-user --dbname=example-db pgroles.sqlImport the database to your target Vultr Postgres Database.
$ pg_restore --host=vultr-prod.vultrdb.com --username=example-user --dbname=example-db pgtovultr.sqlOR
$ psql --host=vultr-prod.vultrdb.com --username=example-user --dbname=example-db < pgtovultr.sql
Migrate with pgAdmin
Log in to your pgAdmin interface.
https://pgadmin.example.comClick Servers on the left navigation menu, and expand your source database server.
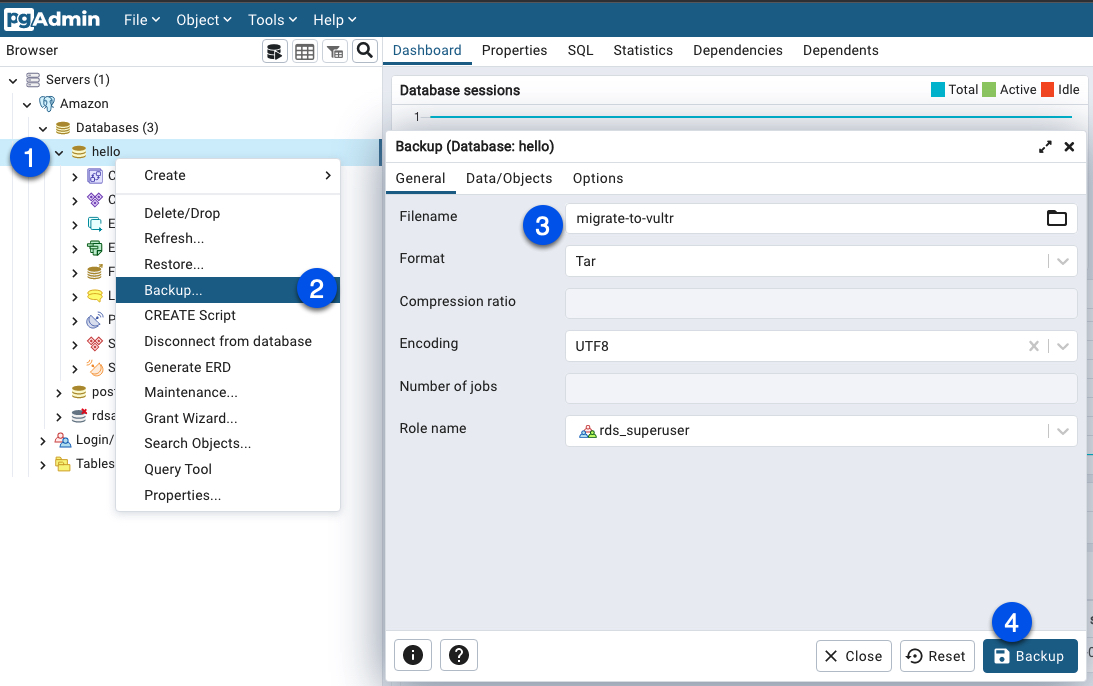
Expand Databases, and right-click your target database.
Click Backup from the drop-down list of options.
In the open popup, enter your desired filename for the database backup file.
Click the Format drop-down, and select
tarfrom the list.Set the encoding to
UTF8and select your Role name to export with the database.Click Backup to start exporting your database and save it to your computer when complete.

To import the database to your target Vultr database, add a new Postgres server and fill in your Vultr database details in the connection tab.
When ready, expand your Vultr database server on the left navigation menu.
Right-click Databases, mouse over the Create option, and click Database to open a new pop-up window.
Enter a Database name that matches your source database, and click Save to create.
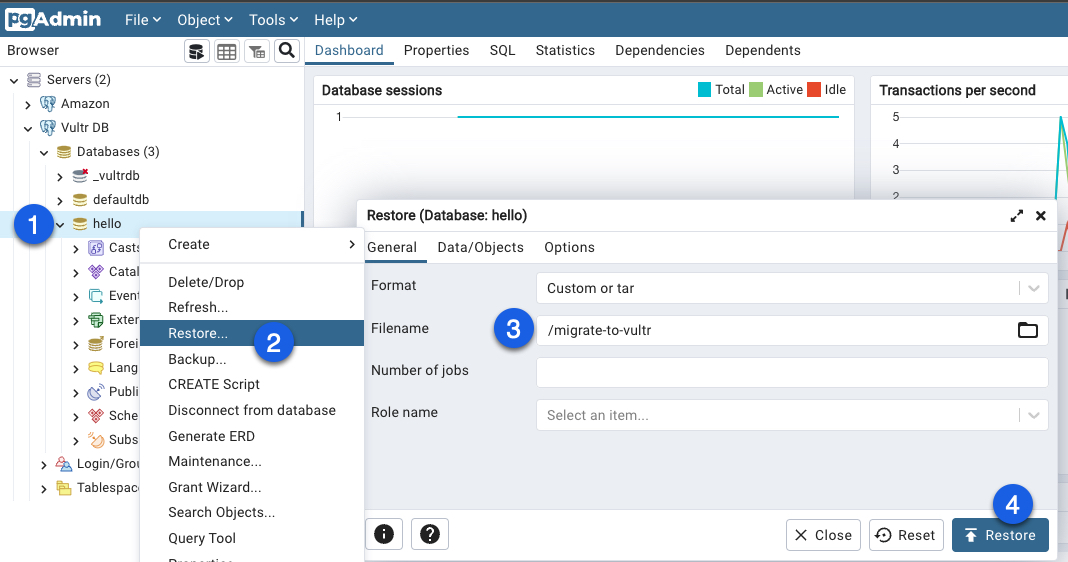
When created, right-click the new database and select Restore from the list of options.
In the open Restore (Database:) pop-up window, click the file icon in the Filename field to browse your exported database files.
Select your database user in the Role name field, then, click Restore to start importing your database. When complete, your source database and exported roles are ready to use with your new Vultr database.

Test the Migration
Using the PostgreSQL
psqlclient tool, log in to your Vultr Postgres database.$ sudo psql --host=vultr-prod.vultrdb.com --username=example-user --password --dbname=postgresView available databases.
\lSwitch to your target database.
\c example-dbDisplay tables in the database.
\dtVerify that table data matches your source database.
SELECT * FROM example-table LIMIT 10;Quit the
psqlclient.\q
Update Applications
Depending on the applications using your source database, cut over requests to your new database by editing the application's configuration files. Please refer to your application's official documentation on how to edit your database connection settings.
Conclusion
In this article, you have migrated an AWS PostgreSQL database to a Vultr Managed Database. Depending on your database size, you can choose between the command line or graphical tools to safely migrate your database with no downtime to the applications using your database. For each migrated database, you can access logs and available databases through the Vultr customer portal. For more information about Vultr Managed Databases for PostgreSQL, see the Reference Guide