
How to Provision Cloud Infrastructure on Vultr using Crossplane
Introduction
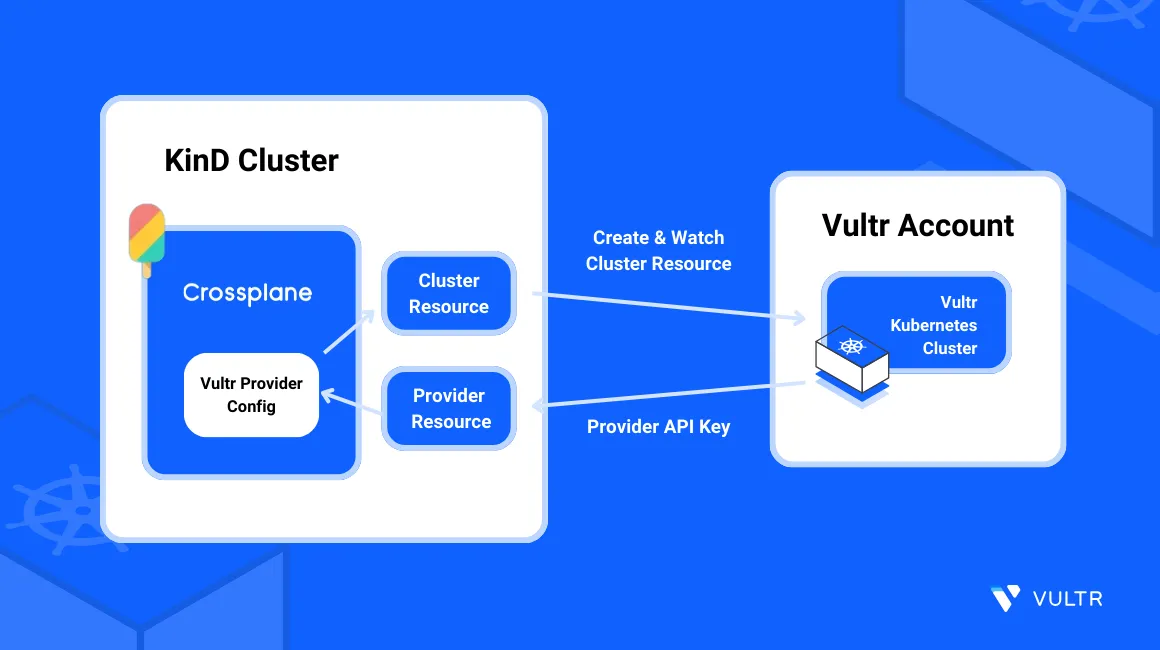
Crossplane is a cloud-native framework that offers an extensible backend for provisioning and managing infrastructure resources across cloud providers. Crossplane acts as a controller that extends Kubernetes with a cloud-agnostic way to define and manage external cloud resources. This process enables organizations to provision, configure, and manage the lifecycle of infrastructure resources using manifest files.
This guide explains how to provision cloud infrastructure resources on Vultr using Crossplane. You will leverage the Vultr Kubernetes Engine (VKE) to externally deploy cloud resources such as Managed Databases, Cloud Compute instances and Vultr Object Storage using Kubernetes cluster definitions. This unified deployment approach promotes consistency, reproducibility, and scalability across multiple infrastructure environments.
Prerequisites
Before you begin:
Deploy a Vultr Kubernetes Engine (VKE) cluster with at least three nodes to use as the management cluster.
Deploy a Vultr Ubuntu server to use as the management workstation.
Access the server using SSH as a non-root user with sudo privileges.
Install and configure Kubectl to access the VKE cluster.
Install the Helm Package Manager using Snap.
console$ sudo snap install helm --classic
Enable your Vultr Account API Key
Crossplane securely authenticates and deploys resources to your Vultr account using an API key. For each Crossplane resource request triggered from your Kubernetes cluster, the provider configuration validates the composition settings and authenticates with your Vultr API Key to successfully apply the resource to your Vultr account. Follow the steps below to enable your Vultr API Key and enable Crossplane to deploy resources using your VKE cluster IP.
Open the Vultr Console.
Click Account on the left navigation menu to access your Vultr account settings.
Find and select API within the OTHER section to access your Vultr account API settings.
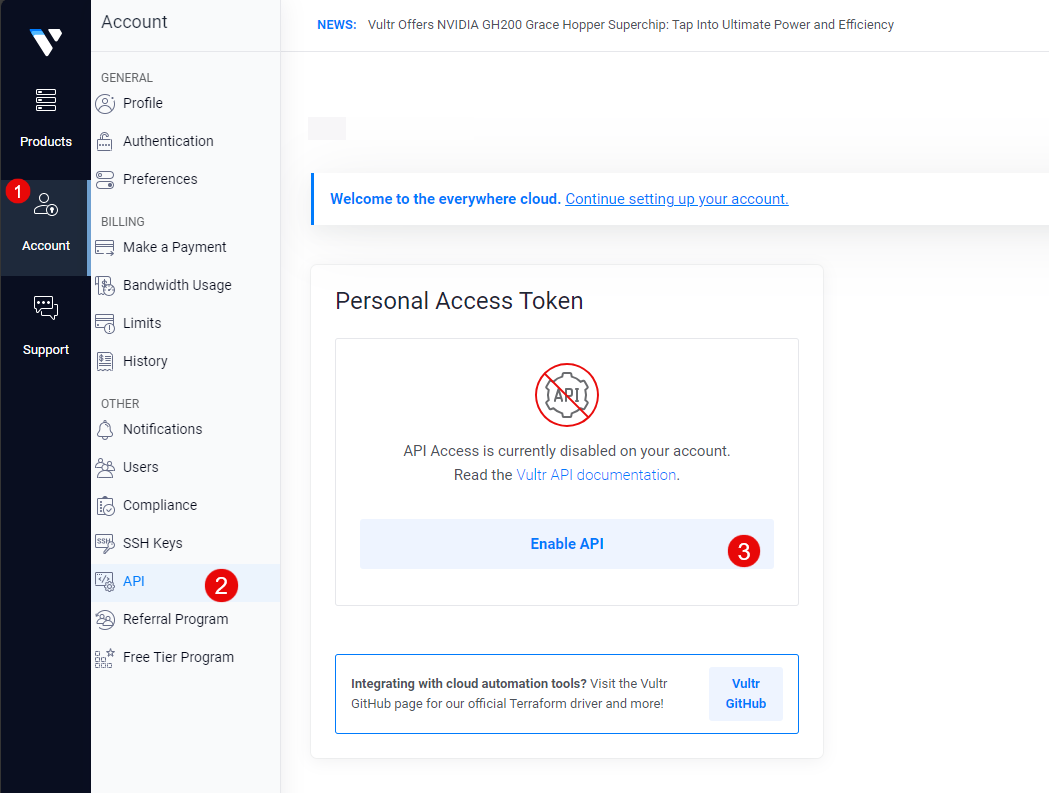
Click Enable API to allow API access on your Vultr account and generate a new Personal Access Token.
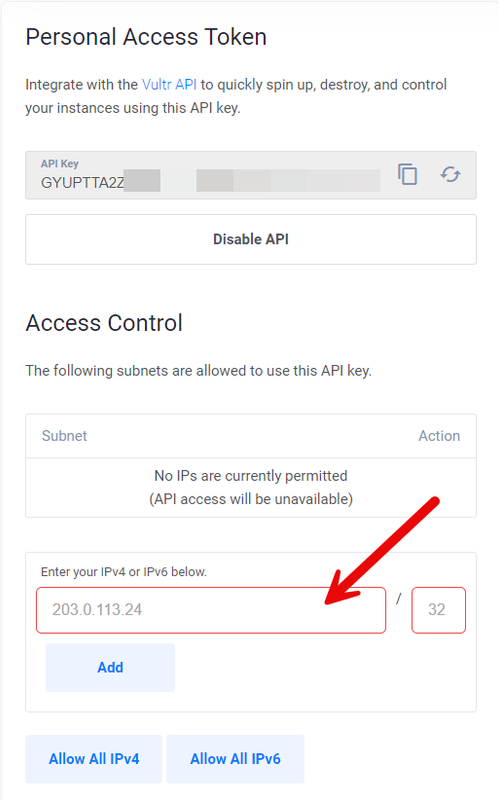
When successful, click the Copy API Key to Clipboard symbol to copy your generated Vultr API Key.
Navigate to Products and click Kubernetes on the left navigation menu to view your cluster IP address.
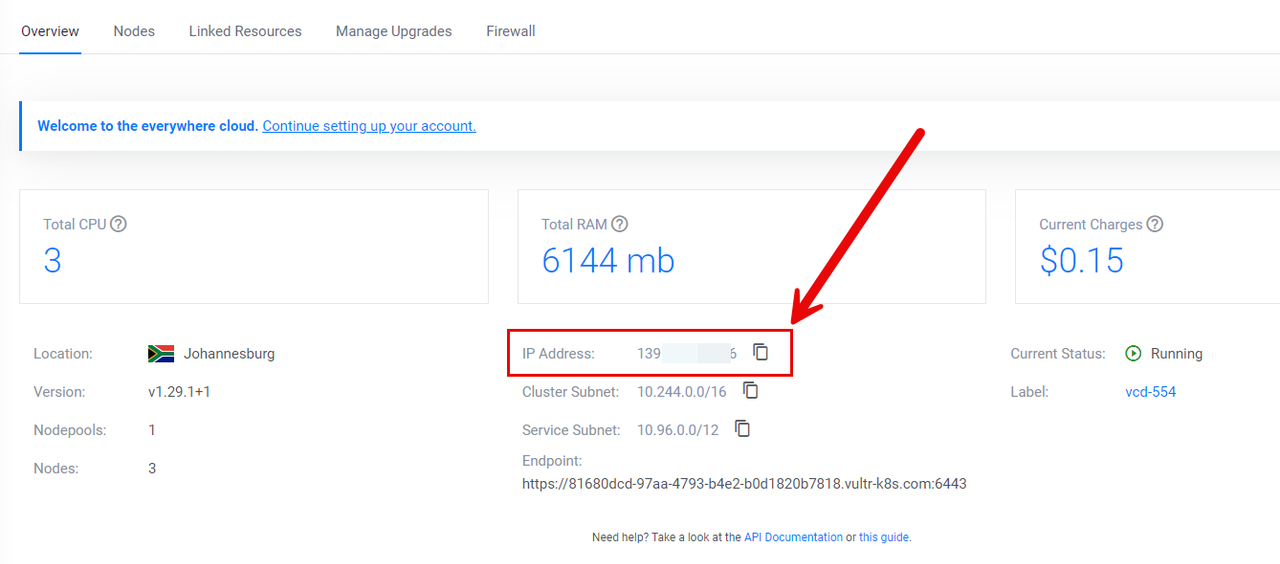
Click your VKE cluster to access the control panel and copy the public IP Address value to your clipboard.
Access your Vultr API settings page, and paste the cluster IP Address value in the Enter your IPV4 or IPV6 below field. For example,
192.0.2.100.Enter your cluster IP subnet in the
/field to correctly match your VKE IP. For example,30depending on your cluster IP class.Click Add to grant your VKE cluster IP access to the Vultr API Key.
In case you experience cluster authentication failures with your Vultr API key, view your cluster nodes and copy the IP address value of the main node to grant access to the API key. For example:
console$ kubectl get nodes -o wide
Your output should look like the one below:
NAME                STATUS   ROLES    AGE     VERSION   INTERNAL-IP   EXTERNAL-IP      OS-IMAGE                         KERNEL-VERSION           CONTAINER-RUNTIME
test-764cbc49849c   Ready    <none>   6h45m   v1.29.1   10.49.128.5   192.0.2.100   Debian GNU/Linux 11 (bullseye)   6.1.0-0.deb11.13-amd64   containerd://1.7.12
test-7f84715eba5a   Ready    <none>   6h45m   v1.29.1   10.49.128.4   192.0.2.101   Debian GNU/Linux 11 (bullseye)   6.1.0-0.deb11.13-amd64   containerd://1.7.12
test-c85fada5be6e   Ready    <none>   6h45m   v1.29.1   10.49.128.6   192.0.2.102     Debian GNU/Linux 11 (bullseye)   6.1.0-0.deb11.13-amd64   containerd://1.7.12
Within the above output, the cluster uses the main node IP
192.0.2.100for external communications. Grant the IP access to your Vultr API key with a generic/30subnet or the corresponding public IP subnet. To allow the full cluster IP network range for example,192.0.2.0, use the classful IP classful subnet value depending on the public IP address of your VKE cluster:| Address Class | Subnet | Address Range | | Class A | /8 |
1.0.0.1to126.255.255.254| | Class B | /16 |128.0.1.1to191.255.254.254| | Class C | /24 |192.0.0.1to223.255.255.254|To correctly use Crossplane in your VKE cluster, verify that the correct IP address is allowed in your API Access Control section. When enabled, the Crossplane can access your Vultr account with the API key and deploy resources using your cluster IP.Note
Install Crossplane
View your VKE cluster nodes to verify that you are connected to the cluster.
console$ kubectl get nodes
Output:
NAME                STATUS   ROLES    AGE     VERSION
test-764cbc49849c   Ready    <none>   6h52m   v1.29.1
test-7f84715eba5a   Ready    <none>   6h52m   v1.29.1
test-c85fada5be6e   Ready    <none>   6h52m   v1.29.1
Create a new directory to store your Crossplane configuration files.
console$ mkdir vultr-crossplane
Switch to the directory.
console$ cd vultr-crossplane
Add the Crossplane repository to your Helm sources.
console$ helm repo add crossplane-stable https://charts.crossplane.io/stable
Update the Helm repository index.
console$ helm repo update
Install Crossplane to your VKE cluster using Helm.
console$ helm install crossplane --namespace crossplane-system --create-namespace crossplane-stable/crossplane
When successful, your output should look like the one below:
NAMESPACE: crossplane-system
STATUS: deployed
REVISION: 1
TEST SUITE: None
NOTES:
Release: crossplane

Chart Name: crossplane
Chart Description: Crossplane is an open source Kubernetes add-on that enables platform teams to assemble infrastructure from multiple vendors, and expose higher level self-service APIs for application teams to consume.
Chart Version: 1.15.0
Chart Application Version: 1.15.0

Kube Version: v1.29.1
View information about all resources deployed in the Crossplane namespace
crossplane-systemto verify that the installation is successful.console$ kubectl get all -n crossplane-system
Your output should be similar to the one below:
NAME                                           READY   STATUS    RESTARTS   AGE
pod/crossplane-b96ddf55d-jrvsn                 1/1     Running   0          88s
pod/crossplane-rbac-manager-86f6976998-dfdrq   1/1     Running   0          88s

NAME                          TYPE        CLUSTER-IP      EXTERNAL-IP   PORT(S)    AGE
service/crossplane-webhooks   ClusterIP   10.111.16.248   <none>        9443/TCP   90s

NAME                                      READY   UP-TO-DATE   AVAILABLE   AGE
deployment.apps/crossplane                1/1     1            1           90s
deployment.apps/crossplane-rbac-manager   1/1     1            1           90s

NAME                                                 DESIRED   CURRENT   READY   AGE
replicaset.apps/crossplane-b96ddf55d                 1         1         1       90s
replicaset.apps/crossplane-rbac-manager-86f6976998   1         1         1       90s
Configure Crossplane
To provision resources, configure Crossplane with the Vultr provider extension to enable your Vultr account API key to manage cloud resources from your VKE cluster. The Vultr Crossplane provider enables the provision of cloud resources such as instances, storage volumes, networks, and firewalls to your Vultr account. Follow the steps below to configure Crossplane with the Vultr provider configuration and API key.
Create a new resource file
provider.yamlto define the Vultr Crossplane provider values.console$ nano provider.yaml
Add the following contents to the file.
yamlapiVersion: pkg.crossplane.io/v1 kind: Provider metadata: name: provider-vultr spec: package: xpkg.upbound.io/crossplane-contrib/provider-vultr:v0.2.0
The above configuration creates a new Vultr Crossplane provider resource with the following values:
apiVersion: Specifies the Crossplane API version to use with the Provider resource.kind: Sets the Kubernetes resource type.name: Sets the resource name for indentification within the cluster.package: Specifies the provider package URL to use with Crossplane. For example,provider-vultr:v0.2.0uses the Vultr provider package versionv0.2.0.
Apply resource configuration to your cluster.
console$ kubectl apply -f provider.yaml
Wait for at least
90 secondsand view the cluster provider resources to verify that the Vultr Crosssplane provider status is healthy.console$ kubectl get providers
Output:
NAME             INSTALLED   HEALTHY   PACKAGE                                                    AGE
provider-vultr   True        True      xpkg.upbound.io/crossplane-contrib/provider-vultr:v0.2.0   41s
Create a new secret resource file
vultr-secret.yamlto store the Vultr API key.console$ nano vultr-secret.yaml
Add the following contents to the file. Replace
R2dpexamplekeywith your actual Vultr API key.yamlapiVersion: v1 kind: Secret metadata: name: vultr-creds namespace: crossplane-system type: Opaque stringData: credentials: | { "api_key": "R2dpexamplekey" }
Apply the resource to your cluster.
console$ kubectl apply -f vultr-secret.yaml
Create a new provider manifest
providerconfig.yamlto define how Crossplane authenticates with your Vultr API key.console$ nano providerconfig.yaml
Add the following contents to the file.
yamlapiVersion: vultr.upbound.io/v1beta1 kind: ProviderConfig metadata: name: vultr-crossplane-config spec: credentials: source: Secret secretRef: name: vultr-creds namespace: crossplane-system key: credentials
Apply the provider configuration to your cluster.
console$ kubectl apply -f providerconfig.yaml
Verify that the provider configuration is available in your cluster.
console$ kubectl get providerconfig
Output:
NAME                      AGE
default                   2m11s
vultr-crossplane-config   14s
You have set up the configured Crossplane with valid Vultr values to provision resources to your account. For each Crossplane request, the application uses the provider configuration to reference the Vultr API key and deploy resources using the Vultr provider profile.
Provision Vultr Cloud Compute Instances using Crossplane
Follow the steps below to create Vultr Compute instances using Crossplane and the Vultr API Key.
Create a new resource file
compute.yamlto define your Cloud Compute instance specifications.console$ nano compute.yaml
Add the following configurations to the file.
yamlapiVersion: vultr.vultr.upbound.io/v1alpha1 kind: Instance metadata: annotations: meta.upbound.io/example-id: vultr/v1alpha1/instance labels: testing.upbound.io/example-name: my_instance name: linux-instance spec: forProvider: osId: 387 plan: vc2-1c-1gb region: sgp label: example-linux-server
Save and close the file.
The above configuration creates a new Vultr Cloud Compute instance the resource label
example-linux-serverand the followingvc2-1c-1gbplan specifications:- vCPUS: 1 vCPU
- Memory: 1 GB
- Storage: 25 GB
- Location: Singapore
sgp
To modify your instance specifications, run the following Curl requests using the Vultr API to view all supported values.
- List Vultr Cloud Compute plans:
$ curl "https://api.vultr.com/v2/regions/ewr/availability" \ -X GET \ -H "Authorization: Bearer ${VULTR_API_KEY}"- List Vultr regions:
$ curl "https://api.vultr.com/v2/regions" \ -X GET \ -H "Authorization: Bearer ${VULTR_API_KEY}"- List supported operating systems:
$ curl "https://api.vultr.com/v2/os" \
  -X GET \
  -H "Authorization: Bearer ${VULTR_API_KEY}"
Within the instance configuration:
apiVersion: Specifies the Vultr Crossplace Provider API version to use with the instance configuration.kind: Sets the Kubernetes resource type.labels: Sets the cluster resource identification labels. For example,testing.upbound.io/example-name: my_instancesets the Vultr instance name tomy_instancewhilename: linux-instancesets the cluster resource name tolinux-instance.forProvider: Sets the Vultr provider resource specifications to provision the instance.osId: Sets the target operating system to deploy with the server. For example,387sets Ubuntu 20.04 as the instance operating system.plan: Defines the Vultr plan to apply to the instance. For example,vc2-1c-1gbdeploys the instance with1 CPU coreand1GB of RAM.region: Sets the target Vultr region by shortcode to deploy the instance. For example,sgpsets the deployment location to Singapore.label: Sets the Vultr instance name.
Apply the Vultr instance resource file to your cluster.
console$ kubectl apply -f compute.yaml
Wait for at least
3minutes for the deployment process to complete, then view your Crossplane instance resources using the following command.console$ kubectl get instances
When the Vultr Cloud Compute instance successfully deploys on your Vultr account, the resource
READYvalue changes to TRUE similar to the output below:NAME READY SYNCED EXTERNAL-NAME AGE linux-instance True True 368b5f49-6de4-45fa-9e61-c5770100dc73 2m7sAccess the Vultr Console and navigate to Products -> Compute to verify that your instance is available.
 Crossplane deploys Vultr instances to your account using your configuration and assigned resource values. When you delete resource from your cluster, Crossplane destroys the matching instance ID on your Vultr account. For example, when you runNote
kubectl delete instance linux-instance, Crossplane destroys the cluster resource together with the associated Vultr instance.
Deploy Vultr Managed Databases with Crossplane
Crossplane provisions Vultr Managed Databases to your Vultr account using the database engine, and backend compute plan specifications associated with your resource configuration. Follow the steps below to deploy a Vultr Managed Database for PostgreSQL with Crossplane to your Vultr account.
Create a new resource file
db.yamlto define your Vultr Managed Database for PostgreSQL specifications.console$ nano db.yaml
Add the following contents to the file.
yamlapiVersion: database.vultr.upbound.io/v1alpha1 kind: Database metadata: annotations: meta.upbound.io/example-id: database/v1alpha1/database labels: testing.upbound.io/example-name: my_database name: my-database spec: forProvider: databaseEngine: pg databaseEngineVersion: "15" label: my_managed_database plan: vultr-dbaas-startup-cc-1-55-2 region: ewr
Save and close the file.
The above configuration creates a new Vultr Managed Database for PostgreSQL with the following
vultr-dbaas-startup-cc-1-55-2starter plan specifications:- Managed Database engine: PostgreSQL
pg - Database version: PostgreSQL version
15 - Managed Database label:
my_managed_database - Backend Compute plan: vCPUs
1, memory2GB, storage55 GB, monthly cost$30 - Vultr location: New Jersey
ewr
To view other supported Vultr Managed Database specification values, run the following API requests.
- List Vultr Managed Database plans:
$ curl "https://api.vultr.com/v2/databases/plans" \ -X GET \ -H "Authorization: Bearer ${VULTR_API_KEY}"- List Vultr Managed Database locations:
$ curl "https://api.vultr.com/v2/regions" \
  -X GET \
  -H "Authorization: Bearer ${VULTR_API_KEY}"
Within the resource configuration:
name: Specifies the database resource name for identification within the cluster.databaseEngine: Sets the Vultr Managed Database engine. For example,pgenables the PostgreSQL database engine.databaseEngineVersion: Specifies the database engine version to install.label: Specifies a label for the database instance.plan: Specifies the plan or size of the database instance. The planvultr-dbaas-startup-cc-1-55-2represents a specific database plan or configuration.region: Specifies the region to deploy the Managed Database instance. The region ID valueewrsets the Newark, New Jersey Vultr location as the target deployment region.
- Managed Database engine: PostgreSQL
Apply the resource file to your cluster to create the Vultr Managed Database for PostgreSQL.
console$ kubectl apply -f db.yaml
Wait for at least
5minutes for the Vultr Managed Database deployment process to complete, then view the cluster database resources to verify the Crossplane resource status.console$ kubectl get database
Output:
NAME          READY   SYNCED   EXTERNAL-NAME                          AGE
my-database   True    True     a3734fe9-ecc3-4b10-8003-a9c808e99409   6m11s
Access the Vultr Console and navigate to Products -> Databases to verify that the managed database is available.

Add new Databases to the Vultr Managed Database
Create a new environment variable to store your Vultr API Key. Replace
R2dpexamplekeywith your actual API key.console$ export VULTR_API_KEY=R2dpexamplekey
Run the following Curl request to list all available Vultr Managed Databases on your account.
$ curl "https://api.vultr.com/v2/databases" \
  -X GET \
  -H "Authorization: Bearer ${VULTR_API_KEY}"
Find your target Vultr Managed Database ID value within the request output similar to the one below:
{"databases":[{"id":"8968-3b-4aa-81-be57","date_created":"2024-02-18 15:48:18","plan":"vultr-dbaas-startup-cc-1-55-2","plan_disk":55,"plan_ram":2048,"plan_vcpus":1,"plan_replicas":0,"region":"EWR","database_engine":"pg","database_engine_version":"15","vpc_id":"","status":"Running","label":"my_managed_database",.........................Within the above output, the Vultr Managed Database runs with the ID:
8968-3b-4aa-81-be57, use the ID value to create a new database, replicas and users using Crossplane.Create a new resource file
exampledb.yamlto store the new database valuesconsole$ nano exampledb.yaml
Add the following contents to the file. Replace
8968-3b-4aa-81-be57with your actual Vultr Managed Database ID.yamlapiVersion: database.vultr.upbound.io/v1alpha1 kind: DB metadata: annotations: meta.upbound.io/example-id: database/v1alpha1/db labels: testing.upbound.io/example-name: my_database_db name: new-example-db spec: forProvider: databaseId: 8968-3b-4aa-81-be57 name: example_db
Save and close the file.
The above configuration creates a new database with the following values:
- Target Vultr Managed Database ID:
8968-3b-4aa-81-be57 - New Database Name:
example_db
Within the configuration:
kind: Specifies the Crossplane resource type. The valueDBspecifies a database resource.labels: name: Sets the resource name for identification within the cluster.databaseId: Specifies the target Vultr Managed Database to create the new database.name: Sets the new database name.
- Target Vultr Managed Database ID:
Apply the resource to add the new database to your existing Vultr Managed Database cluster.
console$ kubectl apply -f exampledb.yaml
View the cluster
DBresource type and verify that the database is available.console$ kubectl get db
Output:
NAME             READY   SYNCED   EXTERNAL-NAME   AGE
new-example-db   True    True     example_db      32m
Access your Vultr Managed Database control panel and navigate to the Databases tab to verify that the new database is available.

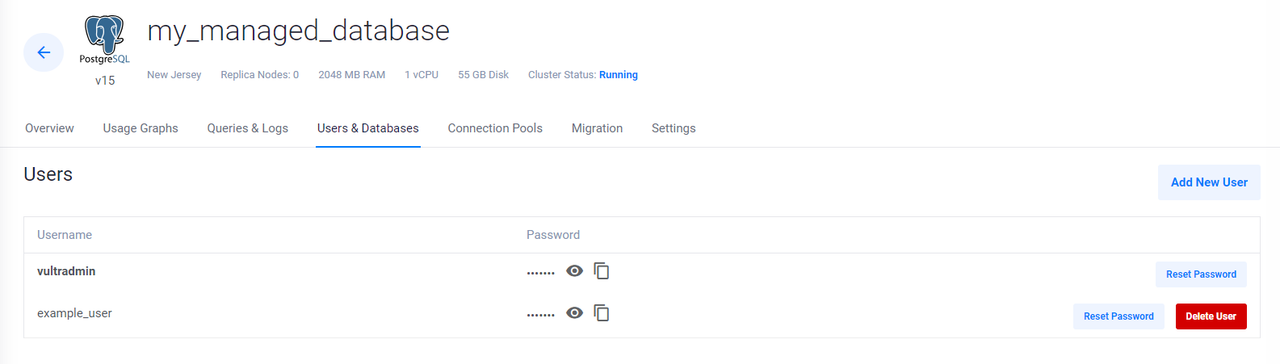
Create New Vultr Managed Database Users
Create a new resource file
dbuser.yamlto define the Managed Database user details.console$ nano dbuser.yaml
Add the following contents to the file. Replace
8968-3b-4aa-81-be57with your actual Vultr Managed Database ID.yamlapiVersion: database.vultr.upbound.io/v1alpha1 kind: User metadata: annotations: meta.upbound.io/example-id: database/v1alpha1/user labels: testing.upbound.io/example-name: my_database_user name: new-database-user spec: forProvider: databaseId: 8968-3b-4aa-81-be57 password: strongpassword244 username: example_user
Save and close the file.
The above configuration creates a new Vultr Managed Database user with the following details:
- Database user password:
strongpassword244 - Database user name:
example_user
Within the configuration:
kind: Sets the Crossplane resource type. The valueUserspecifies a new database user configuration.labels: name: Sets the Crossplane database user resource name.databaseId: Specifies the target Vultr Managed Database for the new user.password: Sets the Vultr Managed Database user password.username: Sets the Vultr Managed Database user name.
- Database user password:
Apply the resource file to your cluster to create the new Vultr Managed Database user.
console$ kubectl apply -f dbuser.yaml
View the Crossplane
userresource definition to verify that the new user is available.console$ kubectl get user
Output:
NAME                READY   SYNCED   EXTERNAL-NAME   AGE
new-database-user   True    True     example_user    3m39s
Access your Vultr Managed Database Control Panel and navigate to the Database Users tab to verify that the new user is available
Provision Vultr Object Storage with Crossplane
Create a new resource file
objectstorage.yamlto store your Vultr Object Storage specifications.console$ nano objectstorage.yaml
Add the following contents to the file.
yamlapiVersion: vultr.vultr.upbound.io/v1alpha1 kind: ObjectStorage metadata: annotations: meta.upbound.io/example-id: vultr/v1alpha1/objectstorage labels: testing.upbound.io/example-name: my-example-storage name: example-storage spec: forProvider: clusterId: 6 label: sample-object-storage
Save and close the file.
The above configuration creates a new Vultr Object Storage with the following values:
- Object Storage name:
sample-object-storage - Storage Location: Amsterdam
6. To view the list of supported Vultr Object Storage cluster location IDs, run the following API request:
console$ curl "https://api.vultr.com/v2/object-storage/clusters" \ -X GET \ -H "Authorization: Bearer ${VULTR_API_KEY}"
Within the configuration:
kind: Sets the resource type as Vultr Object Storage.labels: name: Sets the Crossplane resource name for identification within the cluster.clusterId: Sets the target Vultr location to deploy Object Storage.label: Specifies the Vultr Object Storage name.
- Object Storage name:
Apply the resource to your cluster to create your Vultr Object Storage
console$ kubectl apply -f objectstorage.yaml
Wait for at least
3minutes for the Vultr Object Storage deployment process to complete, then view the Crossplane objects resources to verify that your new object storage instance is availableconsole$ kubectl get objectstorage
Output:
NAME              READY   SYNCED   EXTERNAL-NAME                          AGE
example-storage   True    True     1b0c8489-a64d-4c9c-859c-26e226ff539c   59s
Access the Vultr Console and navigate to Products -> Storage -> Object Storage to verify the resource is available.

Provision Vultr Block Storage with Crossplane
Create a new resource file
blockstorage.yamlto store your Vultr Block Storage values.console$ nano blockstorage.yaml
Add the following contents to the file.
yamlapiVersion: block.vultr.upbound.io/v1alpha1 kind: Storage metadata: annotations: meta.upbound.io/example-id: block/v1alpha1/storage labels: testing.upbound.io/example-name: my_blockstorage name: my-example-blockstorage spec: forProvider: label: example-block-storage region: ewr sizeGb: 10
Save and close the file.
The above configuration creates a new Vultr Block Storage volume with the following specifications:
- Vultr Object Storage Name:
example-block-storage - Size:
10 GB - Vultr location: New Jersey
ewr
Within the configuration:
kind: Sets the Block Storage definition as the Crossplane resource type.labels: name: Sets the Crossplane resource name for identification within the cluster.label: Specifies the Vultr Block Storage volume name.region: Sets the Vultr location to deploy the Object Storage instance.sizeGb: Specifies the Vultr Block Storage volume size in Gigabytes. For example,10creates a10 GBvolume.
- Vultr Object Storage Name:
Apply the resource file to your cluster to create Vultr Block Storage volume.
console$ kubectl apply -f blockstorage.yaml
Wait for at least
3minutes for the Vultr Block Storage deployment process to complete, then view the Crossplane storage resources and verify that the volume is available.console$ kubectl get storage
Output:
NAME                      READY   SYNCED   EXTERNAL-NAME                          AGE
my-example-blockstorage   True    True     9bbf83e6-4a3c-49ed-9912-859b86a16c1d   53s
Access the Vultr Console and navigate to Products -> Storage -> Block Storage to verify that the new volume is available.

Deploy Kubernetes Clusters with Crossplane
Create a new resource file
vkecluster.yamlto define the new VKE cluster specifications.console$ nano vkecluster.yaml
Add the following contents to the file.
yamlapiVersion: kubernetes.vultr.upbound.io/v1alpha1 kind: Kubernetes metadata: annotations: meta.upbound.io/example-id: kubernetes/v1alpha1/kubernetes labels: testing.upbound.io/example-name: my-vke-cluster name: my-vke-cluster spec: forProvider: label: example-vke-cluster nodePools: - autoScaler: false label: my_cluster maxNodes: 2 minNodes: 1 nodeQuantity: 1 plan: vc2-1c-2gb region: man version: v1.29.1+1
Save and close the file.
The above configuration creates a new Vultr Kubernetes Engine (VKE) cluster resource with the following specifications:
- Crossplane resource label:
my-vke-cluster - VKE cluster name:
example-vke-cluster - Number of Nodes:
1nodes - Auto-Scaling: Yes
- Cluster Nodes Compute plan:
vc2-1c-2gb-1vCPU,2 GBmemory - Vultr location: Manchester, United Kingdom
man - Kubernetes version:
v1.29.1+1 - VKE nodes name:
my_cluster_nodes
Within the configuration:
kind: Sets the Crossplane resource type. The valueKubernetesdefines a VKE cluster resource.labels: name: Specifies the Crossplane resource name for identification within the cluster.label: Sets the VKE cluster name.nodePools: Specifies the cluster worker node specifications.autoScaler: Enables or disables auto-scaling of the VKE cluster. The valueTrueenables auto-scaling of the cluster nodes.label: Sets the VKE nodes label.maxNodes: Specifies the maximum number of nodes when scaling the VKE cluster.minNodes: Sets the minimum number of nodes when downscaling the VKE cluster.nodeQuantity: Specifies the maximum number of nodes on the VKE cluster.plan: Specifies the VKE nodes Cloud Compute plan.region: Sets the Vultr location to deploy the VKE cluster.version: Specifies the Kubernetes version to deploy on the VKE cluster.
- Crossplane resource label:
Apply the resource to your cluster to create the VKE cluster.
console$ kubectl apply -f vkecluster.yaml
Wait for at least
5minutes for the VKE cluster deployment process to complete, then view the Crossplane resources to verify that your VKE cluster resource is available.console$ kubectl get kubernetes
Output:
NAME                  READY   SYNCED   EXTERNAL-NAME   AGE
my-vke-cluster        False   True                     10m
Navigate to Products -> Kubernetes and verify that the new VKE cluster is available.

Troubleshooting
Crossplane may fail to deploy specific resources on your Vultr account depending on your resource definitions or access to the Vultr API key. Depending on your cluster configuration, view your resource configuration to verify the logged error entries. For example, if you deploy a Vultr Cloud Compute instance with a True synced value, but a False ready value, access the Vultr Console and verify your instance status.
```
NAME             READY   SYNCED   EXTERNAL-NAME   AGE
linux-instance   False   True                     26s
```
If Crossplane fails to provision resources to your Vultr account. View the resource logs to verify the latest error entries. For example, view the
linux-instanceresource status and latest log entries.console$ kubectl describe instance linux-instance
Depending on the possible cause of the Crossplane error, your resource output may be similar to the one below:
Status:
  At Provider:
  Conditions:
    Last Transition Time:  2024-02-18T20:36:33Z
    Reason:                Creating
    Status:                False
    Type:                  Ready
    Last Transition Time:  2024-02-18T20:36:33Z
    Reason:                ReconcileSuccess
    Status:                True
    Type:                  Synced
    Last Transition Time:  2024-02-18T20:37:42Z
    Reason:                Finished
    Status:                True
    Type:                  AsyncOperation
    Last Transition Time:  2024-02-18T20:36:34Z
    Message:               apply failed: error creating server: {"error":"Unauthorized IP address: 192.0.2.100","status":401}:
    Reason:                ApplyFailure
    Status:                False
    Type:                  LastAsyncOperation
Events:
  Type    Reason                   Age                From                                                    Message
  ----    ------                   ----               ----                                                    -------
  Normal  CreatedExternalResource  17s (x3 over 85s)  managed/vultr.vultr.upbound.io/v1alpha1, kind=instance  Successfully requested creation of external resource
  Normal  PendingExternalResource  8s (x14 over 84s)  managed/vultr.vultr.upbound.io/v1alpha1, kind=instance  Waiting for external resource existence to be confirmed
Based on the above Crossplane error message, the VKE cluster IP address is not authorized to deploy resources to your Vultr account. Open the Vultr Console and add your VKE cluster IP to the allowed addresses list to grant Crossplane access to your Vultr account.
When deploying Vultr Managed Databases resources such as users, Crossplane may fail to synchronize with the database cluster similar to the output below:
NAME                READY   SYNCED   EXTERNAL-NAME   AGE
new-database-user   False   True                     6s
Describe the Crossplane resource to view the possible source of the error. For example, view the database user resource
new-database-userlogs.console$ kubectl describe user new-database-user
Your output should look like the one below:
Status:
  At Provider:
  Conditions:
    Last Transition Time:  2024-02-18T21:32:24Z
    Reason:                Creating
    Status:                False
    Type:                  Ready
    Last Transition Time:  2024-02-18T21:32:24Z
    Reason:                ReconcileSuccess
    Status:                True
    Type:                  Synced
    Last Transition Time:  2024-02-18T21:33:34Z
    Reason:                Finished
    Status:                True
    Type:                  AsyncOperation
    Last Transition Time:  2024-02-18T21:32:25Z
    Message:               apply failed: error creating database user: {"message":"Not a valid Database Subscription ID!"}:
    Reason:                ApplyFailure
    Status:                False
    Type:                  LastAsyncOperation
Events:
  Type    Reason                   Age                From                                                   Message
  ----    ------                   ----               ----                                                   -------
  Normal  CreatedExternalResource  4s (x3 over 72s)   managed/database.vultr.upbound.io/v1alpha1, kind=user  Successfully requested creation of external resource
  Normal  PendingExternalResource  1s (x12 over 70s)  managed/database.vultr.upbound.io/v1alpha1, kind=user  Waiting for external resource existence to be confirmed
Within the above output, Crossplane logs a database subscription ID error. This means, the resource database ID does not match any valid Vultr Managed Databases linked to your account. Run the following Curl request to view your target database ID.
console$ curl "https://api.vultr.com/v2/databases" \ -X GET \ -H "Authorization: Bearer ${VULTR_API_KEY}"
Conclusion
You have provisioned infrastructure resources on your Vultr account using Crossplane. Depending on your infrastructure needs, Crossplane uses declarative YAML files to provision resources using your provider API key similar to other solutions such as Terraform and Terragrunt. For more information about Crossplane, visit the official documentation. To explore additional Vultr Crossplane configuration samples, visit the provider repository.