
How to Scan for Open Ports and Vulnerabilities with Nmap
Nmap (Network Mapper) is an open-source network discovery tool that identifies hosts, services, and potential security issues. It is an essential tool for system administrators and developers to map their server’s network. It lets you see which ports are open, what services are running, and what operating system is used on the target system.
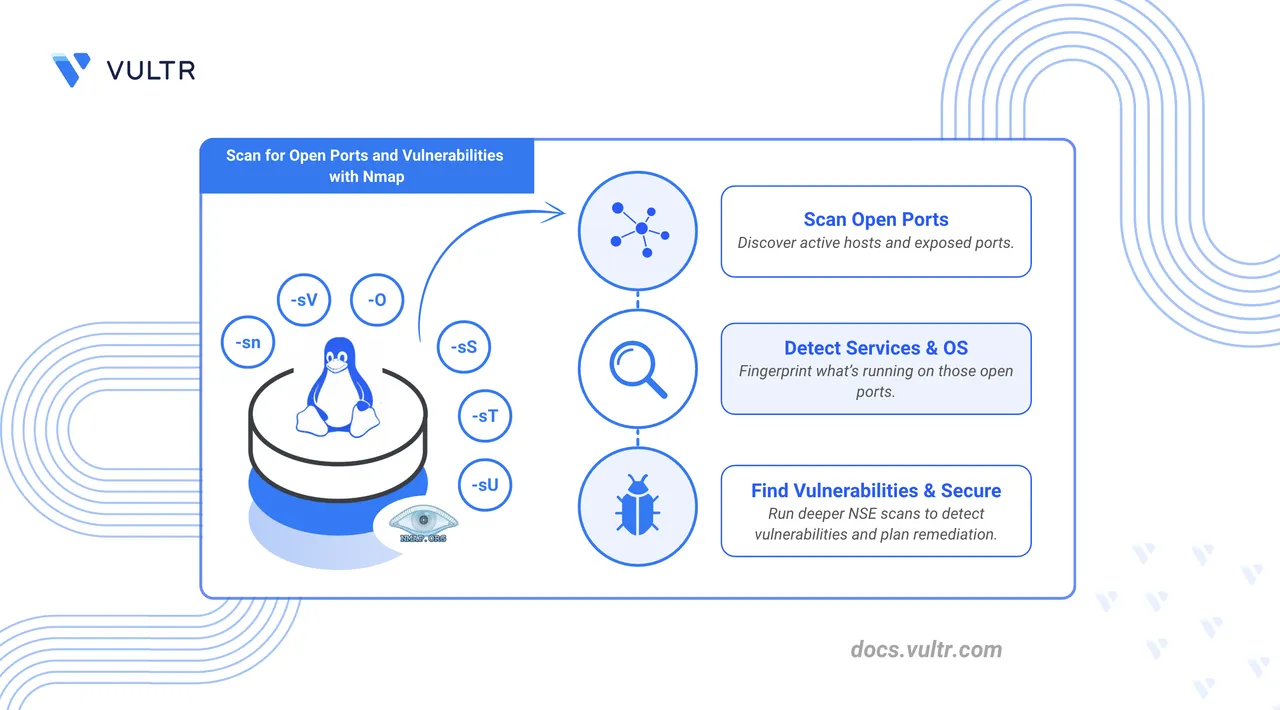
In this article, you will learn key security tasks with Nmap, including scanning a host for open ports, identifying services running on those ports, and detecting vulnerabilities using the Nmap Scripting Engine (NSE). You will also learn how to interpret the output and take basic security measures.
Prerequisites
Before you begin:
- Have access to a Linux-based server as a non-root user with sudo privileges.
Install
nmapaccording to your operating system.On Debian/Ubuntu-based systems:
console$ sudo apt update && sudo apt install -y nmap
On Rocky Linux and other RHEL-based systems:
console$ sudo dnf install -y nmap
Once installed, verify the installation using the command below.
console$ nmap --version
You should see output similar to the following:
Nmap version 7.94SVN ( https://nmap.org )
Platform: x86_64-pc-linux-gnu
Compiled with: liblua-5.4.6 openssl-3.0.13 libssh2-1.11.0 libz-1.3 libpcre2-10.42 libpcap-1.10.4 nmap-libdnet-1.12 ipv6
Compiled without:
Available nsock engines: epoll poll select
nmap Command
This section explains the nmap command's syntax and its options.
Command Syntax
nmap [SCAN TYPES...] [OPTIONS] TARGETWhere,
[SCAN TYPES...]: Defines how Nmap scans. This group controls if and how Nmap probes the target for open ports.[OPTIONS]: One or more optional flags and parameters that modify Nmap's behavior. They control the output's scope, speed, and verbosity.TARGET: The hosts or networks to be scanned. You can provide a single IP, an IP range, a hostname, or a subnet.
Scan Types
Below are the most commonly used scan types. Some require you to run Nmap with root privileges.
| Option | Description |
|---|---|
-sS |
TCP SYN scan (default, root) |
-sT |
TCP connect scan |
-sU |
UDP scan |
-sn |
Host discovery only (no port scan) |
-sV |
Detect service versions |
-O |
Detect operating system |
-A |
Aggressive scan (enables -sV, -O, -sC) |
Command Options
Below are some of the options that you can use with Nmap.
| Option | Flag | Description |
|---|---|---|
| Port Specification | -p |
Specify which ports to scan, like -p 22,80,443. |
| Fast Scan | -F |
Scans only the 100 most common ports instead of the default 1000. |
| Verbose Output | -v |
Provides detailed output. |
Perform a Basic Port Scan
In this section, you’ll run an Nmap scan to identify all open TCP ports, which are potential entry points to the server. This article uses localhost as the target. You can replace this with an IP address or a hostname you have explicit permission to scan.
A basic scan checks the 1,000 most common ports. Perform a basic scan using the command below.
$ sudo nmap localhost
Sample Output:
Starting Nmap 7.94SVN ( https://nmap.org ) at 2025-10-03 21:49 UTC
Nmap scan report for localhost (127.0.0.1)
Host is up (0.000011s latency).
Other addresses for localhost (not scanned): ::1
Not shown: 997 closed tcp ports (reset)
PORT     STATE SERVICE
22/tcp   open  ssh
3001/tcp open  nessus
5432/tcp open  postgresql

Nmap done: 1 IP address (1 host up) scanned in 0.07 seconds
Understanding the Output:
- Not shown: 997 closed tcp ports: These ports are closed or filtered.
- PORT: Port number and protocol.
- STATE: Whether the port is open, closed, or filtered.
- SERVICE: The service Nmap detected running on the port (when identifiable).
In this example, open ports include:
- 22 (SSH)
- 3001 (reported as nessus)
- 5432 (PostgreSQL)
Scan for Service Versions and Operating Systems
Nmap can also reveal detailed service information on open ports, including version numbers. This helps detect outdated or vulnerable services.
Use the -sV flag to probe open ports for running services:
$ sudo nmap -sV localhost
Sample Output:
Starting Nmap 7.94SVN ( https://nmap.org ) at 2025-10-03 21:56 UTC
Nmap scan report for localhost (127.0.0.1)
Host is up (0.000011s latency).
Other addresses for localhost (not scanned): ::1
Not shown: 997 closed tcp ports (reset)
PORT     STATE SERVICE    VERSION
22/tcp   open  ssh        OpenSSH 9.6p1 Ubuntu 3ubuntu13.13 (Ubuntu Linux; protocol 2.0)
3001/tcp open  nessus?
5432/tcp open  postgresql PostgreSQL DB 9.6.0 or later
This scan shows specific versions for detected services, such as OpenSSH 9.6p1 and PostgreSQL 9.6.0 or later. The question mark after Nessus indicates that Nmap is unsure, and the service identification may require further verification.
Scan for Vulnerabilities Using the Nmap Scripting Engine (NSE)
The Nmap Scripting Engine (NSE) allows Nmap to use scripts to automate various networking tasks, including vulnerability scanning. The vuln script category tests services for known vulnerabilities. This section covers installing vsftpd, an FTP server, intentionally creating a vulnerability, and then detecting and mitigating it using Nmap’s scripting engine.
Install vsftpd.
On Ubuntu/Debian-based systems.
console$ sudo apt install -y vsftpd
On Rocky Linux/RHEL-based systems.
console$ sudo dnf install -y vsftpd
Enable anonymous login for vsftpd to create a vulnerability.
Edit the vsftpd configuration file.
console$ sudo nano /etc/vsftpd.conf
Find the line
anonymous_enable=NOand change the value fromNOtoYES.Save and close the file.
Restart vsftpd.
console$ sudo systemctl restart vsftpd
Now that you've intentionally created this issue, you can use a specific Nmap script to detect it. The
ftp-anonscript is part of the NSE and automatically tests whether an FTP server allows anonymous login.Run a vulnerability scan using
ftp-anonon port21, the port used by vsftpd.console$ sudo nmap -p 21 --script ftp-anon localhost
Sample output:
Starting Nmap 7.94SVN ( https://nmap.org ) at 2025-08-22 11:04 UTC
Nmap scan report for localhost (127.0.0.1)
Host is up (0.00010s latency).
Other addresses for localhost (not scanned): ::1

PORT   STATE SERVICE
21/tcp open  ftp
|_ftp-anon: Anonymous FTP login allowed (FTP code 230)

Nmap done: 1 IP address (1 host up) scanned in 0.14 seconds
The scan detected an issue:
Anonymous FTP login allowed (FTP code 230).
Steps to Mitigate
You should take action on the detected issues. In this case, you need to turn off the anonymous login.
Edit the configuration file.
console$ sudo nano /etc/vsftpd.conf
Find the line
anonymous_enable=YESand change the value fromYEStoNO.Save and exit the file.
Restart the service to apply the changes.
console$ sudo systemctl restart vsftpd
Run a Nmap scan on port
21again.console$ sudo nmap -p 21 --script ftp-anon localhost
Output:
Starting Nmap 7.94SVN ( https://nmap.org ) at 2025-08-22 11:19 UTC
Nmap scan report for localhost (127.0.0.1)
Host is up (0.00010s latency).
Other addresses for localhost (not scanned): ::1

PORT   STATE SERVICE
21/tcp open  ftp

Nmap done: 1 IP address (1 host up) scanned in 2.53 seconds
Conclusion
This article explained how to use the Nmap command to scan for open ports and vulnerabilities. You performed an Nmap scan, identified vulnerabilities, and fixed them. For more information, refer to the Nmap official documentation.