How to Set Up Agent Sandboxing on Vultr Cloud Compute
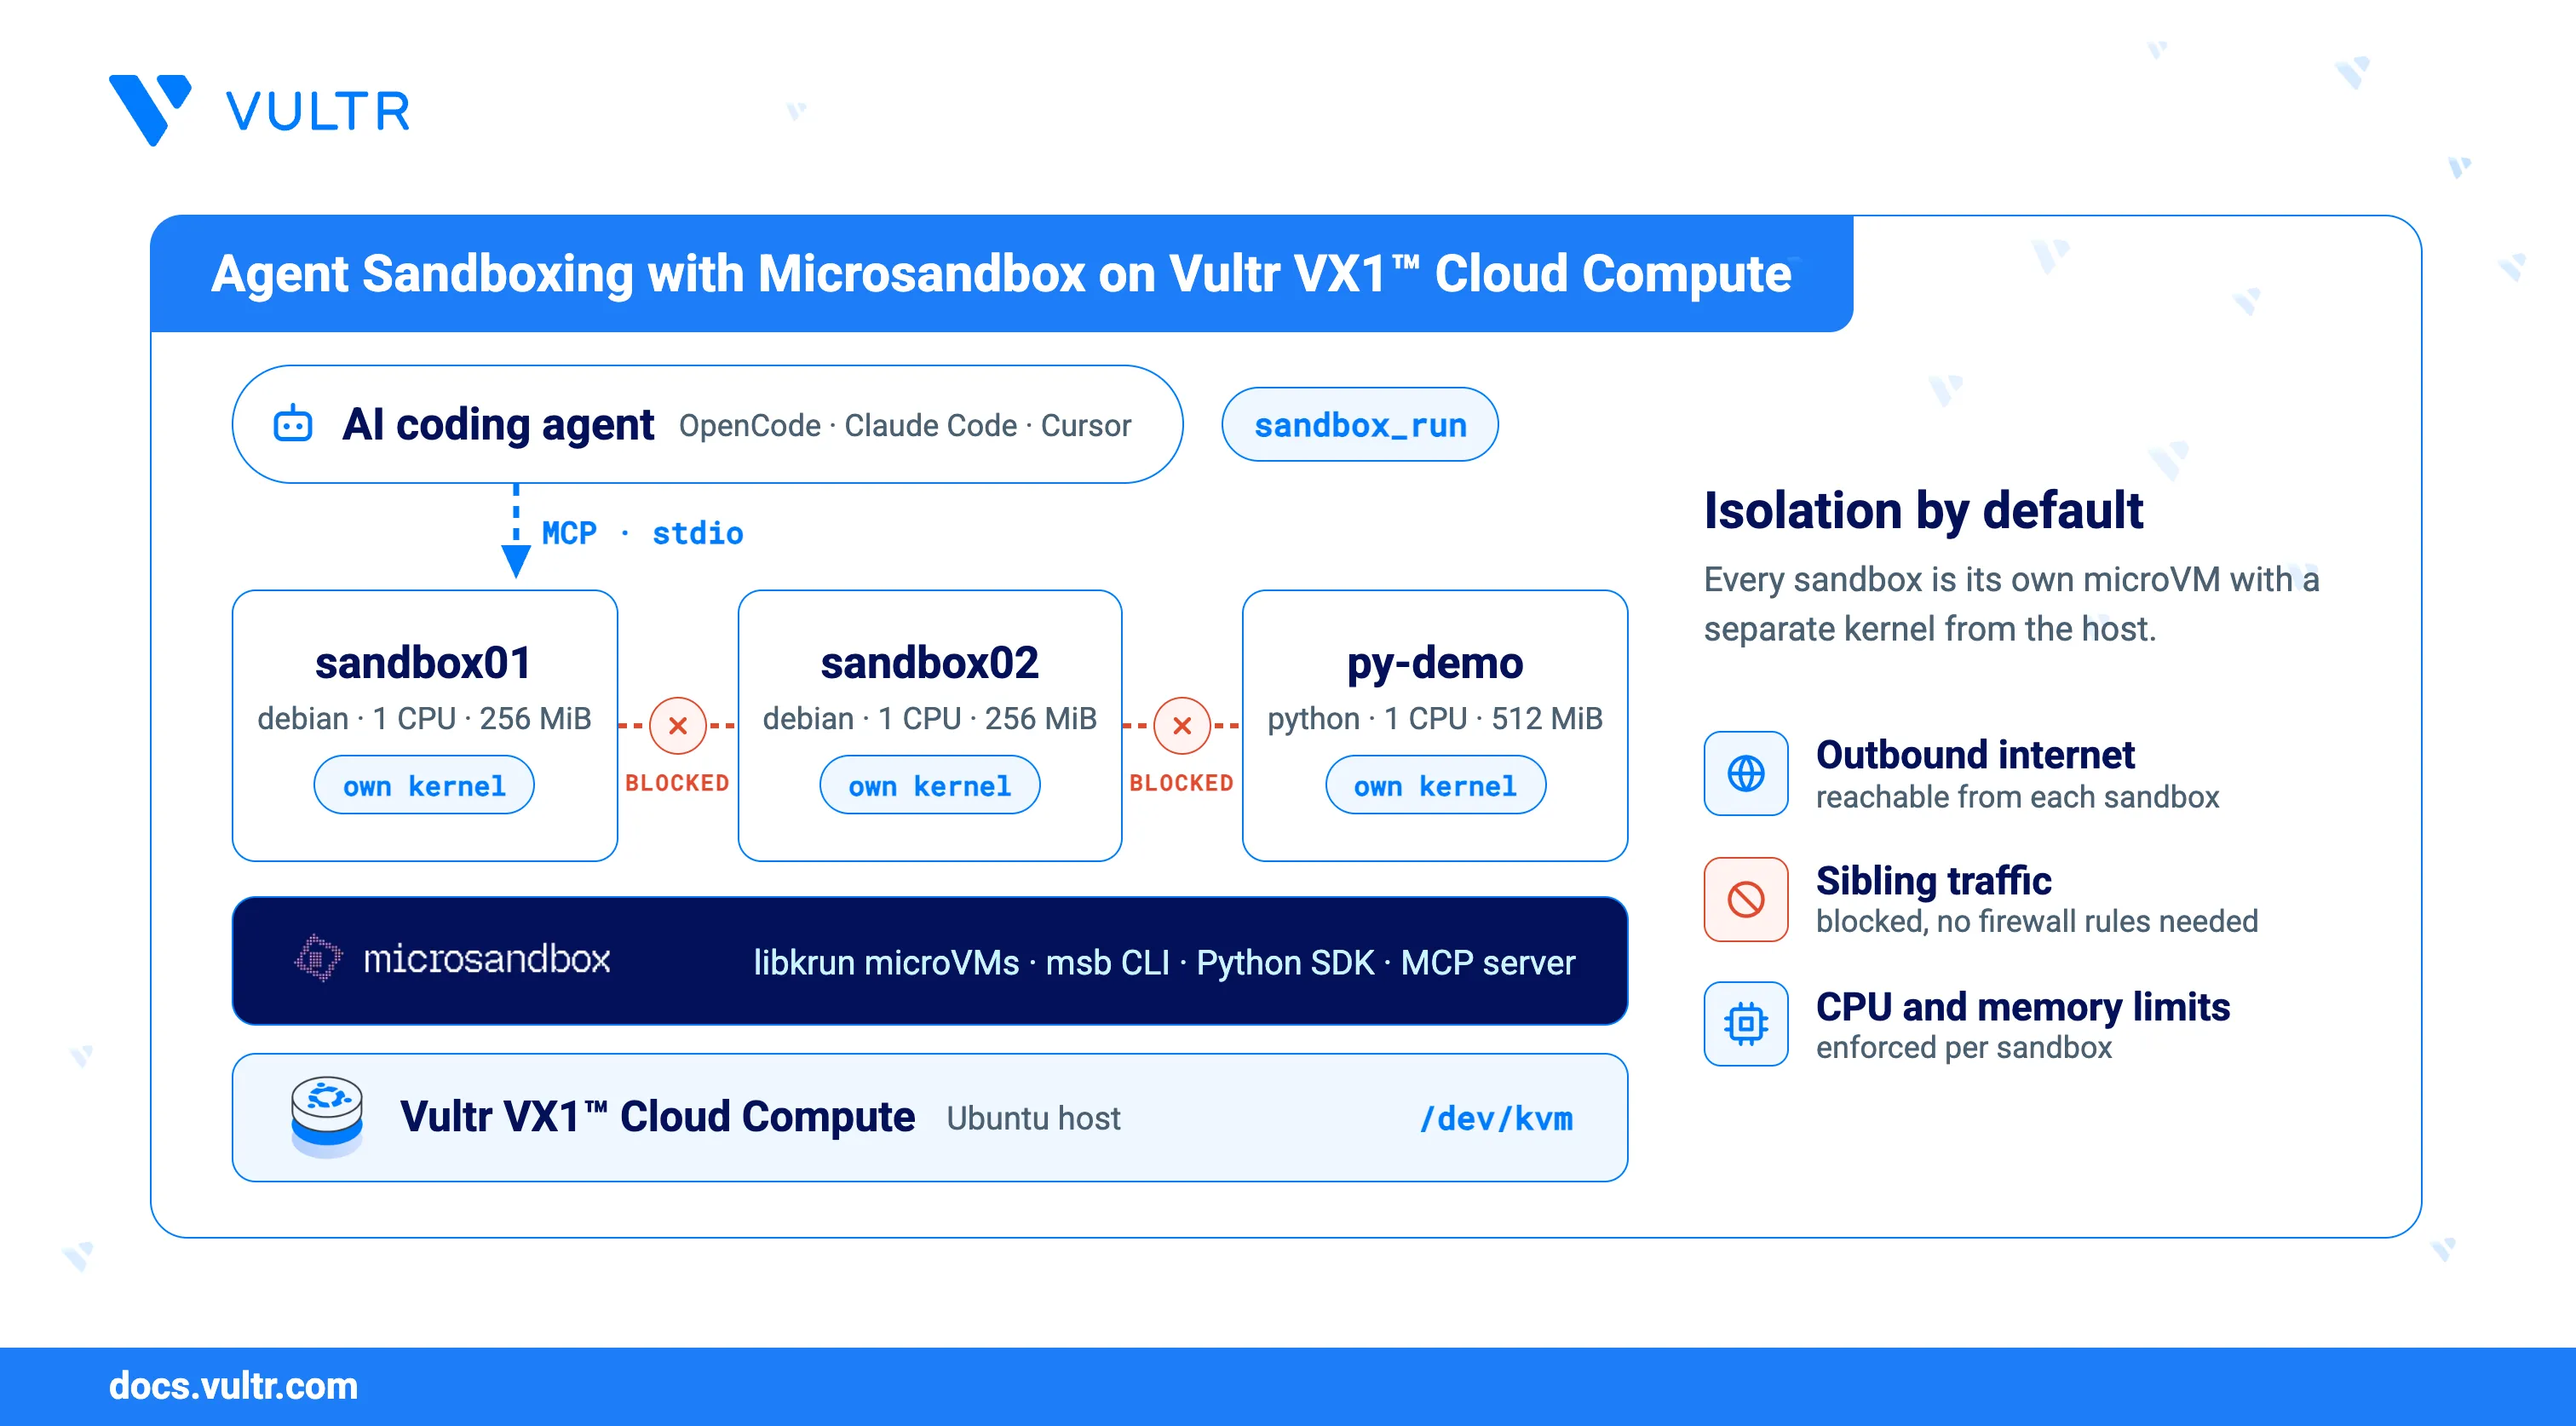
Agent sandboxing runs code an AI agent generates inside an isolated environment, so a bug, a prompt-injection attack, or malicious output cannot reach the host. Microsandbox is an open-source platform built for this, launching each sandbox as its own microVM on libkrun over the Kernel-based Virtual Machine (KVM), with a separate kernel from the host rather than the shared-kernel isolation a container provides.
This guide explains how to set up agent sandboxing on a Vultr VX1™ Cloud Compute instance using Microsandbox. It covers installing the msb CLI, running sandboxes with resource limits and network isolation, using the Python SDK, and connecting a coding agent through Microsandbox's Model Context Protocol (MCP) server so the agent creates and uses its own sandboxes on demand.
Prerequisites
Before you begin, you need to:
- Have access to a Vultr VX1™ Cloud Compute instance running Ubuntu 24.04 as a non-root user with sudo privileges.
- Have OpenCode or another AI coding agent installed.
- Have a Vultr Serverless Inference API key, required if using OpenCode as the coding agent.
Verify Host Virtualization Support
Microsandbox relies directly on KVM, so the host needs a CPU virtualization flag and a usable /dev/kvm device before the installer runs.
Add the current user to the
kvmgroup.CONSOLEApply the new group membership to the current shell.
CONSOLEConfirm the new group membership is active.
CONSOLEVerify that
kvmappears in the group list.Verify the KVM device is present on the host.
CONSOLEVerify the output reports a character device that belongs to the
kvmgroup.
Install Microsandbox
Microsandbox ships as a single binary with a bundled libkrunfw library. A shell script installs both, rather than a package manager.
Run the install script.
CONSOLEThe script downloads the
msbbinary, verifies its checksum, and installs it along withlibkrunfwto~/.microsandbox, then linksmsbandmicrosandboxinto~/.local/bin.Log out and log back in over SSH for the updated PATH to take effect.
Verify the installed version.
CONSOLERun the built-in host check.
CONSOLEVerify the output reports checks for CPU virtualization, the KVM device, and KVM access, similar to the one below:
Note
The reflink warning is informational. Ubuntu's default ext4 filesystem does not support reflink clones, so Microsandbox falls back to sparse copies for each sandbox root.
Run Sandboxes
A sandbox starts from a standard Open Container Initiative (OCI) image, the same format Docker and other container runtimes use, and runs as its own microVM rather than a container. A detached sandbox keeps running in the background so an agent can send it multiple commands over time, while explicit CPU and memory limits prevent a single sandbox from exhausting the host.
Boot a sandbox from the
debianimage and run a command inside it.CONSOLEVerify the output reports the echoed text, then the sandbox exits.
Create a named, detached sandbox with explicit CPU and memory limits.
CONSOLEConfirm the limits are in effect.
CONSOLEVerify the output reports the configured CPU and memory allocation, similar to the one below:
Run a command inside the detached sandbox.
CONSOLEThe output displays the sandbox's hostname.
Verify the sandbox has outbound internet access by default.
CONSOLEVerify the output reports
REACHABLE.
Verify Sandbox Isolation
Microsandbox denies traffic between separate microVMs by default, which is the property that matters most when several untrusted agent sandboxes run on the same host.
Create a second detached sandbox.
CONSOLEList running sandboxes to confirm both are present.
CONSOLEVerify the output reports both
sandbox01andsandbox02as running.Note the first sandbox's IP address.
CONSOLEInstall
netcatin the first sandbox.CONSOLEStart a listener in the background.
CONSOLEVerify the output reports
launched.Confirm the listener is reachable from inside the same sandbox.
CONSOLEVerify the output reports
LOCAL-OKbefore continuing.Install
netcatin the second sandbox.CONSOLEFrom the second sandbox, attempt to reach the first sandbox's listener. Replace
SANDBOX_IPwith the first sandbox's IP address from the earlier step.CONSOLEVerify the output reports
BLOCKED. Each sandbox reaches the public internet, but not its siblings, and the host needs no firewall rules to enforce this.
Create Sandboxes Using the Python SDK
The Python SDK creates a sandbox, runs code inside it, and tears it down directly from a script, instead of the msb CLI from earlier sections.
Install the virtual environment module for the system Python.
CONSOLECreate a project directory.
CONSOLECreate a virtual environment inside the project directory.
CONSOLEActivate the virtual environment.
CONSOLEInstall the
microsandboxpackage.CONSOLECreate a file named
demo.py.CONSOLEAdd the following code to the file:
PYTHONSave and close the file.
This example demonstrates the core lifecycle:
Sandbox.create(...): Boots a new microVM sandbox with the given name, image, and resource limits.async with: Stops and removes the sandbox automatically when the block exits.replace=True: Replaces an existing sandbox with the same name.sandbox.exec(...): Runs a command inside the sandbox and returns its output.- The
hostname/uname -acall: Confirms the code runs inside the sandbox rather than on the host.
Run the script.
CONSOLEVerify the output reports the printed text, an exit code of
0, and a sandbox identity that differs from the host's own, similar to the one below:Deactivate the virtual environment.
CONSOLE
Note
Microsandbox also provides SDKs for TypeScript, Rust, and Go. See the official SDK documentation for details.
Connect a Coding Agent to Microsandbox via MCP
Microsandbox ships an MCP server that exposes the sandbox lifecycle as tools an AI coding agent can call directly, instead of a human running msb commands.
Add the NodeSource repository for Node.js 22.
CONSOLEInstall Node.js from that repository.
CONSOLEVerify the version.
CONSOLEVerify the output reports v22 or later. Microsandbox's MCP server requires Node.js 22 or later, and other versions may not work.
Use Vultr Serverless Inference as OpenCode's model provider and register the Microsandbox MCP server by adding the following to
opencode.json.JSONReplace
VULTR_INFERENCE_API_KEYwith a Serverless Inference API key, andMODEL_IDandMODEL_NAMEwith a model ID and display name listed on the VSI page.Open OpenCode.
CONSOLEUse the following prompt to test it.
TEXTVerify the agent calls the
sandbox_runtool and reports output similar to the one below:Note
To confirm the code runs inside a separate microVM, ask for
hostnameanduname -atoo. Both differ from the host's own values.
Register Other Agents to MCP Server
For any other MCP-compatible agent, refer to that agent's own MCP documentation for its config file's location and exact format.
Restart any existing session of the agent after registering the server, since most agents load MCP configuration only at startup.
Manage Running Sandboxes
The msb CLI includes commands beyond running and inspecting a sandbox, for copying files in and out, reviewing accumulated output, checking resource usage, connecting over SSH, and refreshing an idle timeout. Replace SANDBOX_NAME with the name of the sandbox to target.
Copy a file from the host into the sandbox.
CONSOLEA
SANDBOX:/absolute/pathargument addresses a path inside the sandbox rather than the host.Copy a file back out of the sandbox.
CONSOLEReview the sandbox's logs.
CONSOLEmsb logsaccumulates output from everymsb execcall against the sandbox. Add-fto follow new output, or--since 10mto limit the window.Check live resource usage.
CONSOLEVerify the output reports CPU, memory, disk, and network throughput against the limits set at creation, similar to the one below:
Connect to the sandbox over SSH.
CONSOLEMicrosandbox exposes SSH over the same vsock channel used for exec, so the guest image needs no SSH server installed.
Reset the idle-timeout clock on a long-running sandbox without sending it any other traffic.
CONSOLEUseful when a sandbox is waiting on something outside Microsandbox's view, such as a slow API call, so idle-timeout does not stop it early.
Stop a sandbox.
CONSOLERemove a stopped sandbox.
CONSOLE
Conclusion
You have installed Microsandbox on a Vultr VX1™ Cloud Compute instance and used it, from the msb CLI, the Python SDK, and an MCP-connected coding agent, to run isolated microVM sandboxes with enforced CPU and memory limits and confirmed network isolation between them. The msb CLI manages the rest of a sandbox's lifecycle, from file transfer to logs, metrics, and SSH access. For image building and snapshotting, visit the official Microsandbox documentation.
Tags:Open Source


0 Comments
Be the first to comment and share your perspective with the community.