
How to Set Up High Availability Using Vultr Reserved IP and BGP
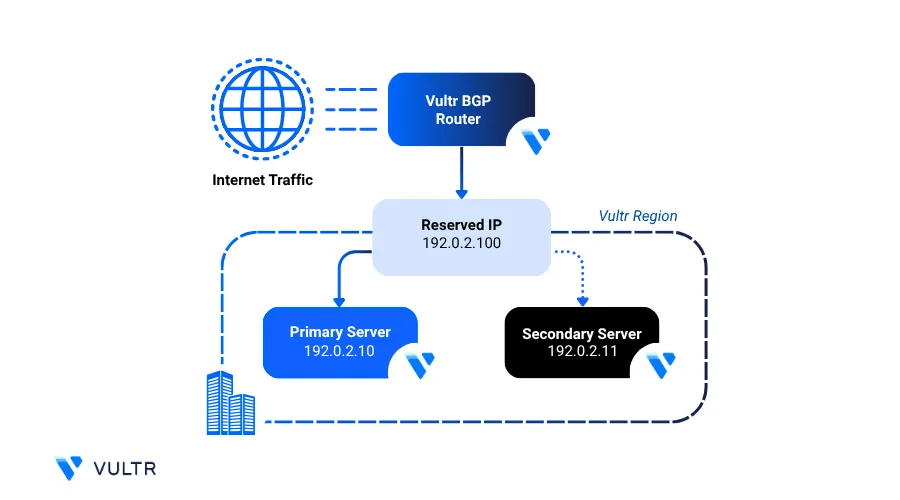
Setting up high availability ensures that your application remains accessible, even if one of your instances becomes unavailable. On Vultr, you can set up high availability by combining Reserved IPs with Border Gateway Protocol (BGP) routing. This setup enables automatic traffic failover between multiple compute instances within the same region.
This guide explains how to configure Reserved IPs with BGP using BIRD 2.0, a high-performance BGP routing daemon with enhanced security and performance features.
Prerequisites
Before you begin, ensure you:
Have access to BGP on your Vultr account. If BGP is not enabled, request access through the Vultr Console.
Have access to Reserved IPv4 and IPv6 addresses to use with BGP.
Have access to two Ubuntu 24.04 instances deployed in the same region.
Reference Configuration Values
This guide uses the following example values. Replace these with your actual IP addresses as needed:
- Server 1
- IPv4 address:
192.0.2.2 - IPv6 address:
2001:db8:1234:5678::1
- IPv4 address:
- Server 2
- IPv4 address:
192.0.2.3 - IPv6 address:
2001:db8:1234:5678::2
- IPv4 address:
- Reserved IPs
- IPv4:
192.0.2.4/32 - IPv6:
2001:db8:1234:5678::3/64
- IPv4:
Vultr BGP Information
Use the following BGP configuration values to configure your setup, depending on whether you're using Cloud Compute instance or Bare Metal instance.
| Configuration Parameter | Cloud Compute Instance | Bare Metal Instance |
|---|---|---|
| BGP Private Instance ASN | Assigned by Vultr Support | Assigned by Vultr Support |
| BGP Password | Assigned by Vultr Support | Assigned by Vultr Support |
| BGP Vultr ASN | 64515 |
20473 |
| BGP Neighbor IP (IPv4) | 169.254.169.254 |
169.254.1.1 |
| BGP Neighbor IP (IPv6) | 2001:19f0:ffff::1 |
2001:19f0:ffff::1 |
Configure High Availability with Reserved IP
In this section, you have to configure Reserved IPs by creating a virtual network interface, installing and configuring BIRD 2.0 for BGP routing, and verifying connectivity with Vultr's BGP service. This setup allows your Reserved IP to move between instances, enabling high availability and automatic failover within the same region.
Create a Virtual Interface for Reserved IP
Create a new virtual network interface on each instance and assign your Reserved IPv4 and IPv6 addresses to it. This allows the server to handle traffic for the Reserved IP, even if it’s not the primary network interface.
Create a new virtual network interface.
console$ sudo ip link add dev ha-ip type dummy
Bring up the
ha-ipinterface.console$ sudo ip link set ha-ip up
Assign your Reserved IP addresses to the interface.
console$ sudo ip addr add dev ha-ip 192.0.2.4/32 $ sudo ip addr add dev ha-ip 2001:db8:1234:5678::3/64
Replace
192.0.2.4and2001:db8:1234:5678::3/64with your actual Reserved IPv4 and IPv6 addresses.Verify the interface configuration.
console$ ip addr show dev ha-ip
Your output should be similar to the one below:
3: ha-ip: <BROADCAST,NOARP,UP,LOWER_UP> mtu 1500 qdisc noqueue state UNKNOWN group default qlen 1000
    link/ether 3e:5c:2f:ac:54:f4 brd ff:ff:ff:ff:ff:ff
    inet 192.0.2.4/32 scope global ha-ip
       valid_lft forever preferred_lft forever
    inet6 2001:db8:1234:5678::3/64 scope global
......
Configure BIRD 2.0 - BGP Routing Daemon
Follow these steps to install and configure BIRD 2.0, a BGP routing daemon that advertises your Reserved IP addresses using BGP.
Allow incoming BGP traffic on TCP port
179.console$ sudo ufw allow 179 $ sudo ufw status verbose
Confirm that the firewall is active and port
179is allowed through.Update the server package index.
console$ sudo apt update
Install the BIRD 2.0 package.
console$ sudo apt install -y bird2
View the installed BIRD version.
console$ bird --version
This above command displays the installed version of BIRD.
Back up the default BIRD configuration.
console$ sudo cp -pvr /etc/bird/bird.conf /etc/bird/bird.conf.bak
Edit the BIRD configuration file.
console$ sudo nano /etc/bird/bird.conf
Replace the file contents with the following configuration.
inilog syslog all; router id <SERVER-IPv4-Address>; protocol device { } protocol direct { ipv4; ipv6; interface "ha-ip"; } protocol kernel { ipv4 { export all; }; } protocol kernel { ipv6 { export all; }; } protocol static { ipv4; } protocol static { ipv6; } protocol bgp vultr_ipv4 { local as <BGP-Private-Instance-ASN>; source address <SERVER-IPv4-Address>; ipv4 { import none; export all; }; graceful restart on; multihop 2; neighbor 169.254.169.254 as 64515; password "<BGP-PASSWORD>"; } protocol bgp vultr_ipv6 { local as <BGP-Private-Instance-ASN>; source address <SERVER-IPv6-Address>; ipv6 { import none; export all; }; graceful restart on; multihop 2; neighbor 2001:19f0:ffff::1 as 64515; password "<BGP-PASSWORD>"; }
In the above configuration:
- router id: Set this to your server's main IPv4 address.
- protocol device: Enables BIRD to track kernel network interfaces.
- protocol direct: Advertises directly connected IP addresses on the
ha-ipinterface. - protocol kernel: Synchronizes routes between the kernel and BIRD. Both IPv4 and IPv6 routes are exported to the system's routing table.
- protocol static: Enables static routing entries for both IPv4 and IPv6 (required even if empty).
- protocol bgp vultr_ipv4: Configures the BGP session for IPv4.
- local as: Set this to private BGP ASN assigned by Vultr team.
- source address: Set to your server's IPv4 address.
- neighbor: Set to Vultr's BGP IPv4 neighbor IP (
169.254.169.254) and ASN (64515). - password: Use the BGP session password provided by Vultr Support.
- protocol bgp vultr_ipv6: Configures the BGP session for IPv6.
- local as: Set this to private BGP ASN assigned by Vultr team.
- source address: Set to your server's IPv6 address.
- neighbor: Set to Vultr's BGP IPv6 neighbor IP (
2001:19f0:ffff::1) and ASN (64515). - password: Use the same BGP session password provided by Vultr Support.
Restart BIRD 2.0 service to apply the configuration changes.
console$ sudo systemctl restart bird
Verify BGP Connectivity
After configuring BIRD, verify that your BGP sessions are successfully established with Vultr's neighbor peers. A successful connection indicates that your Reserved IPs are now being advertised to Vultr's routing system.
Check the BGP session status for IPv4 and IPv6.
console$ sudo birdc show proto all vultr_ipv4 $ sudo birdc show proto all vultr_ipv6
Your output should be similar to the one below:
## IPv4
BIRD 2.14 ready.
Name       Proto      Table      State  Since         Info
vultr_ipv4 BGP        ---        up     00:55:04.084  Established
  BGP state:          Established
    Neighbor address: 169.254.169.254
......
## IPv6
BIRD 2.14 ready.
Name       Proto      Table      State  Since         Info
vultr_ipv6 BGP        ---        up     00:55:04.084  Established
  BGP state:          Established
    Neighbor address: 2001:19f0:ffff::1
......
If both sessions show
State: upandBGP state: Established, BIRD is successfully connected to Vultr's BGP peers.Verify that BIRD is advertising the Reserved IP routes.
console$ sudo birdc show route
Your output should be similar to the one below:
BIRD 2.14 ready.
Table master4:
192.0.2.4/32    unicast [direct1 00:55:03.560] * (240)
        dev ha-ip

Table master6:
2001:db8:1234:5678::3/64 unicast [direct1 00:55:03.560] * (240)
        dev ha-ip
This confirms that your Reserved IPv4 and IPv6 addresses are bound to the
ha-ipinterface and advertised to the network.
Test the High Availability
Use the steps below to test if your Reserved IP fails over correctly and responds to traffic as expected.
Open a new terminal on your local machine and ping the Reserved IPs.
console$ ping 192.0.2.4 $ ping 2001:db8:1234:5678::3
Your output should be similar to the one below:
## IPv4
PING 192.0.2.4 (192.0.2.4) 56(84) bytes of data.
64 bytes from 192.0.2.4: icmp_seq=1 ttl=54 time=47.6 ms
64 bytes from 192.0.2.4: icmp_seq=2 ttl=54 time=48.4 ms
...
## IPv6
PING 2001:db8:1234:5678::3 (2001:db8:1234:5678::3) 56 data bytes
64 bytes from 2001:db8:1234:5678::3: icmp_seq=1 ttl=59 time=49.6 ms
64 bytes from 2001:db8:1234:5678::3: icmp_seq=2 ttl=59 time=51.4 ms
This confirms the Reserved IPs are reachable from outside your instance.
On the primary instance, bring down the virtual interface (
ha-ip).console$ sudo ip link set ha-ip down
The ping command in your second terminal should stop receiving replies, simulating a failure.
Bring the
ha-ipinterface back up.console$ sudo ip link set ha-ip up
The ping should resume, confirming that traffic correctly routes through the instance when the interface is up.
Use BGP Prepends to Assign Traffic Priority
When using BGP for high availability, you can control which server receives traffic by adjusting AS path lengths. BGP routers prefer routes with the shortest AS path. By prepending your local ASN, you artificially lengthen the path and deprioritize a specific instance.
In this example, you:
Configure Server One as the primary instance, which receives traffic by default.
Configure Server Two as the secondary instance, which receives traffic only when Server One is unavailable.
Follow the steps below to use AS path prepending on the secondary server to reduce its routing preference.
Update the BIRD 2.0 configuration on your secondary server.
console$ sudo nano /etc/bird/bird.conf
Add a BGP prepend filter to the export block in both the IPv4 and IPv6 protocol definitions.
iniexport filter { # Artificially increase path length by prepending the local AS number. bgp_path.prepend(<BGP-Private-Instance-ASN>); accept; };
Replace
<BGP-Private-Instance-ASN>with your actual BGP AS number assigned by Vultr.Your updated BGP configuration for the second server should look like below.
IPv4
iniprotocol bgp vultr_ipv4 { local as <BGP-Private-Instance-ASN>; source address <SERVER-IPv4-Address>; ipv4 { import none; export all; export filter { bgp_path.prepend(<BGP-Private-Instance-ASN>); accept; }; }; graceful restart on; multihop 2; neighbor 169.254.169.254 as 64515; password "<BGP-PASSWORD>"; }
IPv6
iniprotocol bgp vultr_ipv6 { local as <BGP-Private-Instance-ASN>; source address <SERVER-IPv6-Address>; ipv6 { import none; export all; export filter { bgp_path.prepend(<BGP-Private-Instance-ASN>); accept; }; }; graceful restart on; multihop 2; neighbor 2001:19f0:ffff::1 as 64515; password "<BGP-PASSWORD>"; }
This configuration ensures that the secondary instance advertises a longer AS path, making it less preferred for incoming traffic. If the primary instance goes offline, BGP automatically fails over to the secondary route.
You can prepend the local ASN multiple times to further reduce a server’s priority.Note
Persist the ha-ip Virtual Interface Configuration
Manually created virtual interfaces and IP assignments are lost after a reboot. To persist the ha-ip interface and Reserved IPs, configure them with systemd-networkd for a reliable, service-managed high-availability setup.
Create the virtual interface definition.
console$ sudo nano /etc/systemd/network/10-ha-ip.netdev
Add the following network configuration.
ini[NetDev] Name=ha-ip Kind=dummy
Create the network configuration file for Reserved IP assignment.
console$ sudo nano /etc/systemd/network/10-ha-ip.network
Add the following configuration.
ini[Match] Name=ha-ip [Network] Address=192.0.2.4/32 Address=2001:db8:1234:5678::3/64 IPv6AcceptRA=no
Replace the IP addresses with your actual Reserved IPv4 and IPv6 addresses.
Enable and start the
systemd-networkdservice.console$ sudo systemctl enable --now systemd-networkd
View the status of the
systemd-networkdservice.console$ sudo systemctl status systemd-networkd
The status of the service must be active and running.
Ensure the dummy kernel module loads at boot.
console$ echo dummy | sudo tee -a /etc/modules $ echo "options dummy numdummies=1" | sudo tee /etc/modprobe.d/dummy.conf
This ensures the dummy module is available and preconfigured after every reboot.
Conclusion
In this guide, you configured a high availability environment on Vultr using Reserved IPs and BGP routing. You created a virtual interface for the Reserved IPs, advertised the routes using BGP, adjusted traffic priority with AS path prepending, and ensured the configuration persists across system reboots. This setup allows seamless traffic failover between multiple instances in the same region, ensuring continuous service availability in case of node failure.