How to Set Up Vultr CDN Pull Zones for WordPress Websites with CDN Enabler
Introduction
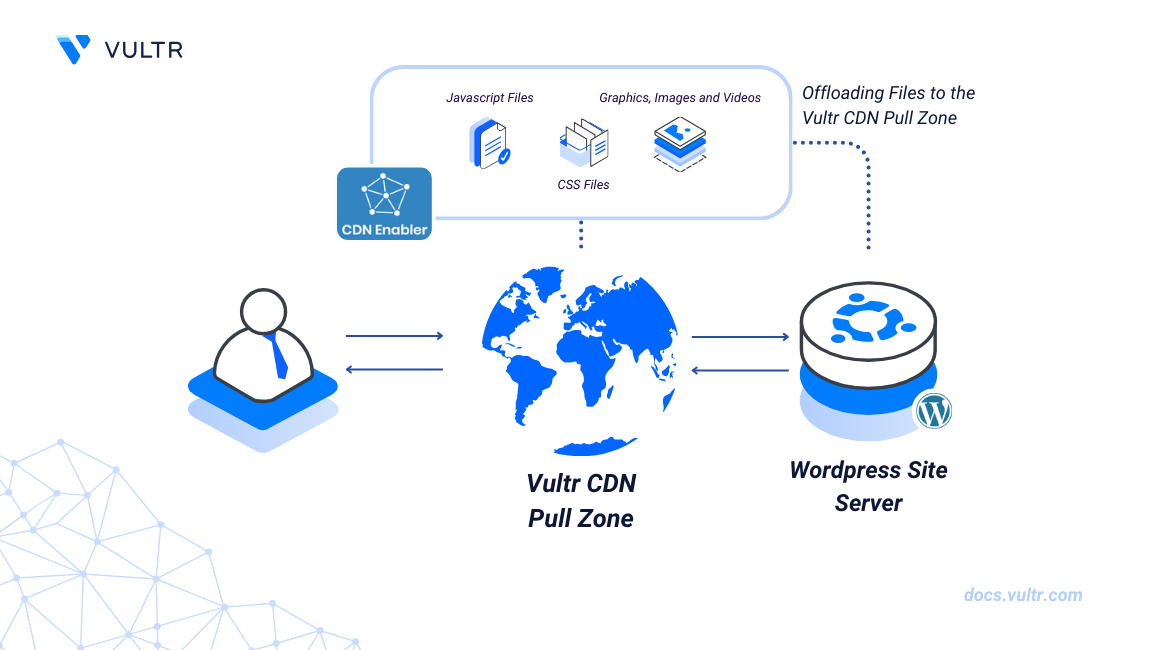
CDN Enabler is a WordPress content delivery plugin that rewrites static asset requests such as images, CSS, and Javascript files for serving by a Content Delivery Network (CDN). Vultr CDN Pull Zones enable the automatic caching of your WordPress site to improve the delivery of static assets such as images, documents, and media files closer to your site's visitors.
This article explains how to set up Vultr CDN Pull Zones for WordPress websites using the CDN Enabler plugin.
Prerequisites
Before you begin:
Create a new Vultr CDN Pull Zone for your WordPress website by providing the domain name as the origin URL.
Login to the WordPress administration dashboard.
https://example.com/wp-admin
Install CDN Enabler
CDN Enabler is available in the default WordPress plugins directory. Follow the steps below to download and install the CDN Enabler plugin to your WordPress site.
Navigate to Plugins on the main navigation menu.
Click Add new plugins from the list of options to browse the WordPress plugins directory.
Enter
CDN Enablerin the search field.
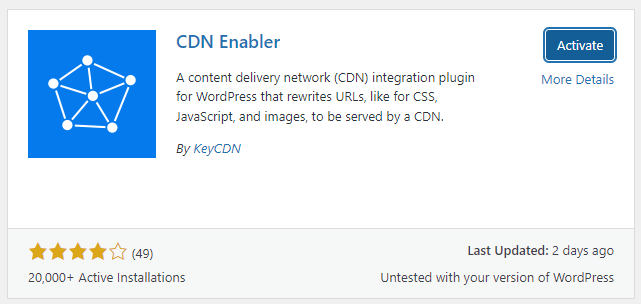
Find the CDN Enabler plugin in your search results.
Click Install to download the latest plugin package and install it on your WordPress site.
Click Activate to enable the plugin.
Configure CDN Enabler
CDN Enabler supports multiple file types and enables caching by rewriting all supported requests to your Vultr CDN Pull Zone's URL. Follow the steps below to configure CDN Enabler to use your Vultr CDN Pull Zone URL as the hostname and enable the plugin to deliver supported assets using your Vultr CDN's URL.
Navigate to Settings on the main navigation bar.
Click CDN Enabler from the list of options to access the plugin settings page.
Enter your Vultr CDN Pull Zone URL in the CDN Hostname field. For example,
cdn-example88.vultrcdn.com.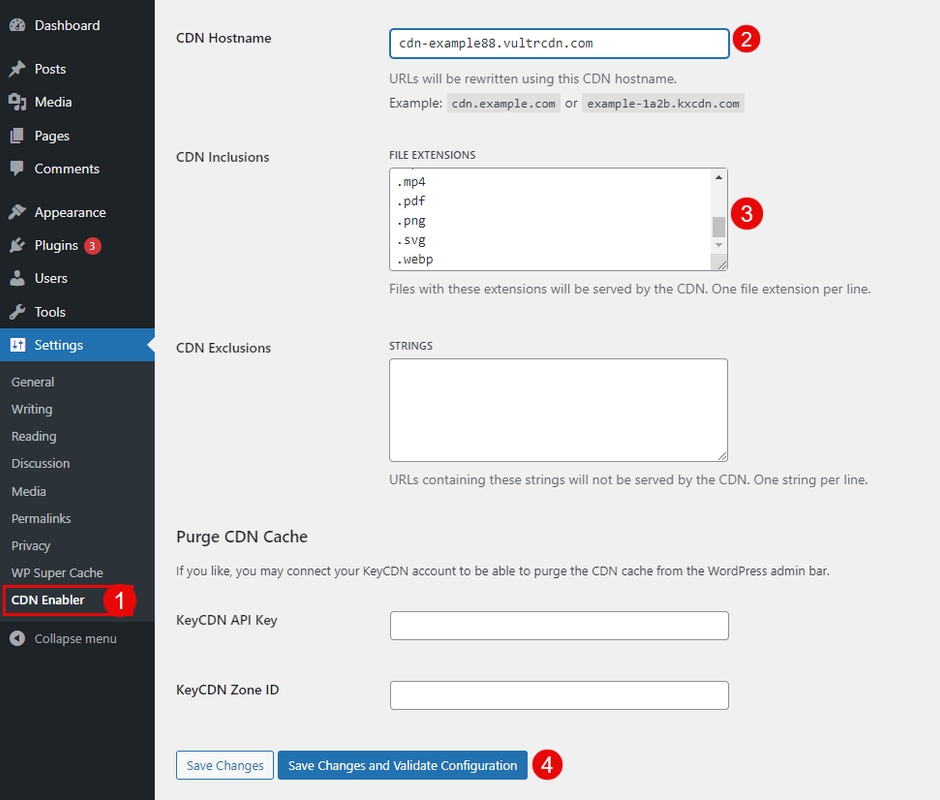
Verify the list of default file formats available in the File Extensions field to rewrite and cache with your Vultr CDN Pull Zone.
Enter specific strings or file extensions within the CDN Exclusions field to exclude from your Vultr CDN URL.
Click Save Changes and Validate Configuration to apply your CDN configuration changes..
Verify that a
Valid CDN Hostname: cdn-example88.vultrcdn.com returned a 200 status code.prompt displays at the top of your plugin page to verify that your Vultr CDN Pull Zone is integrated with the WordPress site.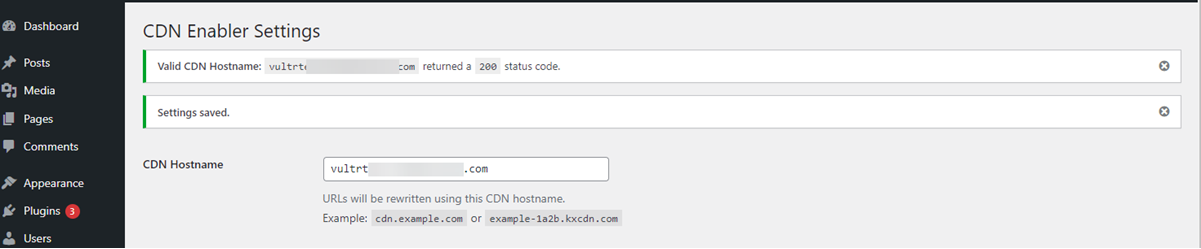
Test your Vultr CDN Pull Zone Integration
A Vultr CDN Pull Zone URL contains the full cached version of your WordPress site. The CDN Enabler plugin rewrites your original WordPress content requests with the Vultr CDN Pull Zone's URL to enable faster delivery of all cached files. Follow the steps below to verify that CDN Enabler delivers all actively enabled assets using your Vultr CDN Pull Zone URL.
Access your WordPress website as a regular visitor using a different web browser such as Chrome.
https://example.comRight-click any image on your WordPress site and select Copy Image Link from the list of options.
Paste the link to your URL bar and verify that it includes your Vultr CDN Pull Zone URL. Press :Key_enter: to load the image and verify that it's correctly served from your Vultr CDN Pull Zone.

Right-click anywhere on your WordPress site and select Inspect from the list of options to verify all assets served from your Vultr CDN Pull Zone.
Navigate to the Sources tab and verify that your Vultr CDN Pull Zone URL is available on the list of asset origin URLs.
Click your Vultr CDN Pull Zone to expand the group and view all files delivered by the CDN.
Expand your original domain origin and verify that the CDN serves all file extensions such as
.jpgimages actively enabled in your CDN Enabler configuration.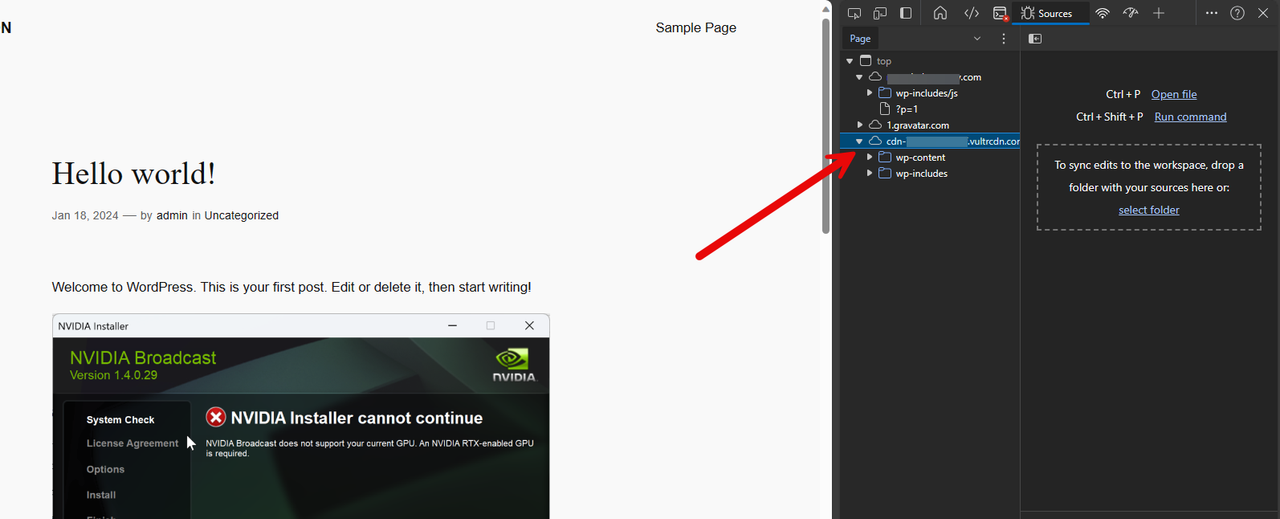
Troubleshooting
CDN Enabler requires an active Vultr CDN Pull Zone to correctly deliver all enabled WordPress assets using the CDN. While setting up the plugin, you may experience configuration errors. Follow the steps below to fix common Vultr CDN Pull Zone integration errors.
Invalid CDN Hostname: cURL error 28: Resolving timed out after 10000 milliseconds
Visit your Vultr CDN Pull Zone's URL in a new web browser window and verify that it loads your full WordPress site correctly. For example,
https://cdn.example88.vultrcdn.com.https://cdn.example88.vultrcdn.comAccess your Vultr CDN Pull Zone's management page.
Find the CDN Information section and verify that your Origin URL value uses the same URL scheme as your Vultr CDN Pull Zone.
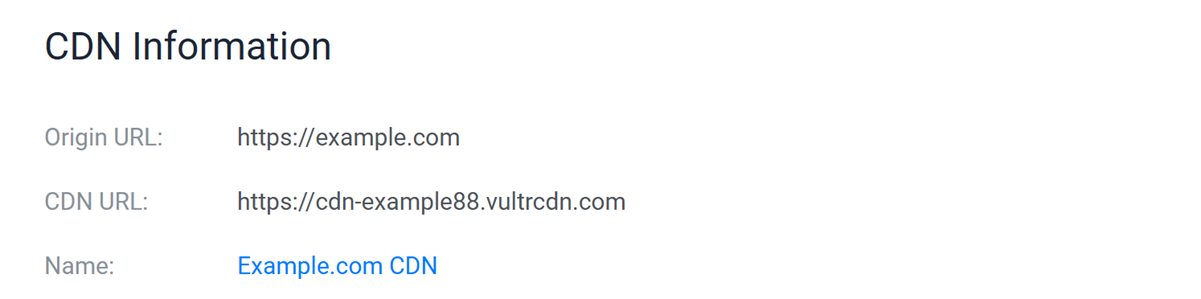
For example, if your Vultr CDN Pull Zone URL is
https://cdn.example88.vultrcdn.com, your origin URL must also use thehttps://connection scheme such ashttps://example.com. When using HTTP, both the CDN URL and Origin URL should use the samehttp://scheme. For example,http://example.com.
Conclusion
You have installed CDN Enabler and configured your WordPress website to serve cached content from your Vultr CDN Pull Zone. You can offload all supported file types and use CDN Enabler to improve your general website's performance.