How to Use MosaicML MPT Large Language Model on Vultr Cloud GPU

Introduction
Mosaic Pretrained Transformer (MPT) is a Large Language Model (LLM) developed by MosaicML. It has two sets of models, MPT-7B and MPT-30B along with various fine-tuned versions. These MPT models are trained on 1T tokens and have a context window of 65+ with the MPT-7B story-writer version.
MPT-7B & MPT-30B are open-source LLM models distributed under the Apache-2.0 license. This permits users to use the models for commercial purposes without licensing restrictions.
This article explains how to implement MPT-7B and MPT-30B models on a Vultr Cloud GPU Server. You will optimize and compare the model results in VRAM consumption and output average time when tested with different precision values (32-bit, 16-bit, 8-bit, and 4-bit).
Prerequisites
Before you begin:
- Deploy a fresh Ubuntu 22.04 A100 Cloud GPU Server with at least:
- 80 GB GPU RAM
- 12 vCPUs
- 120GB Memory
- Use SSH to access the server.
- Create a non-root user with sudo rights and switch to the user account.
Install CUDA Toolkit
The CUDA toolkit is required to run MPT models with lower precision settings. In this section, install the CUDA toolkit to install the libraries needed to write and compile GPU-accelerated applications using CUDA as described in the steps below.
Download the CUDA toolkit.
$ wget https://developer.download.nvidia.com/compute/cuda/11.8.0/local_installers/cuda_11.8.0_520.61.05_linux.runInitialize CUDA toolkit installation.
$ sudo sh cuda_11.8.0_520.61.05_linux.runWhen prompted, read the CUDA terms, and enter
acceptto agree to the toolkit license. Deselect all the provided options, and only keep the CUDA toolkit selected.Using the
echoutility, append the following configurations to the~/.bashrcfile.$ echo " export PATH=$PATH:/usr/local/cuda-11.8/bin export LD_LIBRARY_PATH=/usr/local/cuda-11.8/lib64 " >> ~/.bashrcThe above lines declare the environment variable configuration that enables your system to use the CUDA toolkit and its libraries.
Using a text editor such as
Nano, edit the/etc/ld.so.conf/cuda-11-8.conffile.$ nano /etc/ld.so.conf.d/cuda-11-8.confAdd the following line at the beginning of the file.
/usr/local/cuda-11.8/lib64Save and close the file.
Disconnect your session to save the configurations.
$ exitUsing
SSH, start a new session.$ ssh user@SERVER-IPRun the
ldconfigcommand to update the linker cache, and refresh information about shared libraries for smooth program execution.$ sudo ldconfig
Install the Required Packages
To utilize the model features and tools to the maximum, install Jupyter Notebook and all required libraries as described in this section.
Install PyTorch.
$ pip3 install torch torchvision torchaudio --index-url https://download.pytorch.org/whl/cu118The above command installs the PyTorch library with torchvision and torchaudio packages. PyTorch offers efficient tensor computations and supports GPU acceleration for training and inference.
Optionally, to install the PyTorch version that matches a specific CUDA version, get started with PyTorch to select preferences and run the install command.
Install the
notebookpackage.$ pip3 install notebookInstall required packages.
$ pip3 install bitsandbytes scipy transformers accelerate einops xformersBelow is what each package represents:
transformers: An open-source library developed by Huggingface. It's used for Natural Language Processing (NLP) tasks, and its key functionalities include tokenization and finetuning.accelerate: Developed by HuggingFace,accelerateimproves the training and inference of machine learning models.einops: Reshapes and reduces the dimensions of multi-dimensional arrays. It also provides a flexible and concise syntax for manipulating tensors.xformers: Provides multiple building blocks for making transformer-based models.bitsandbytes: Focuses on functions that optimize operations involving 8-bit data, such as matrix multiplication.scipy: Enables access to thebitsandbytesfunctionalities for scientific, and technical computing.
Allow incoming connections to the default Jupyter Notebook port
8888.$ sudo ufw allow 8888Launch Jupyter Notebook in the background.
$ jupyter notebook --ip=0.0.0.0 &The above command starts Jupyter Notebook and allows connections from all IP addresses, and generates a random access token.
In a web browser such as Chrome, access Jupyter Notebook using your generated access token.
http://SERVER-IP:8888/tree?token=YOUR-TOKEN
Run the MPT-7B model
In this section, you will initialize the MPT-7B base model in 32-bit precision (full precision), its tokenizer, and pipeline. Then test the model by entering a prompt to get a generated output as described in the following steps.
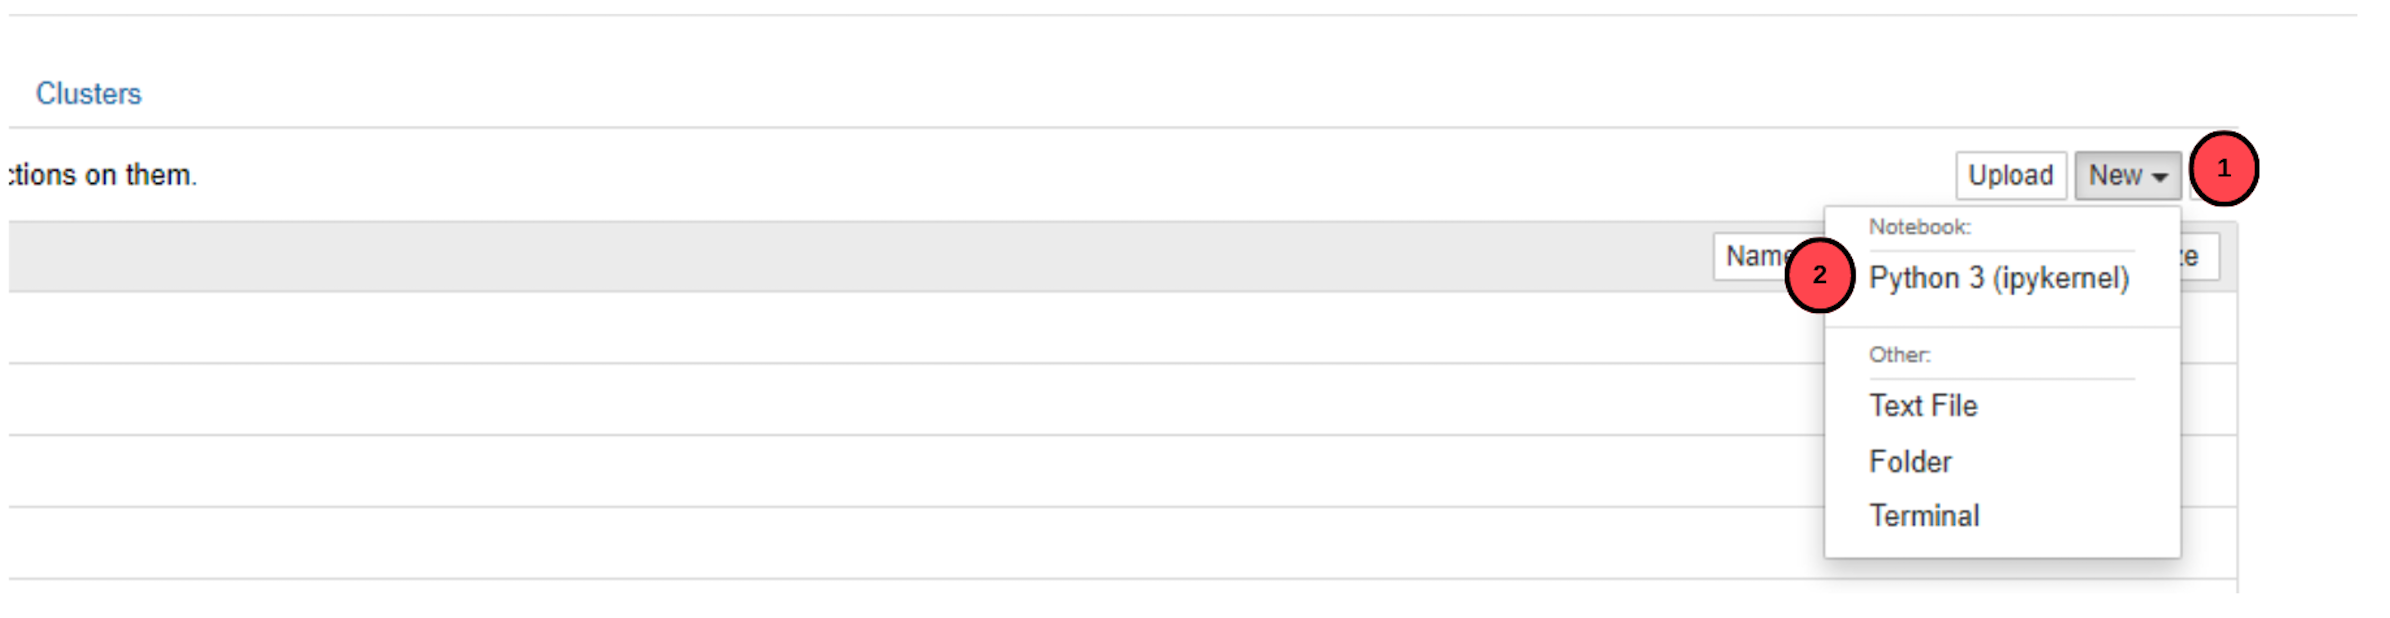
In your browser, access Jupyter NoteBook.
Click New on the top middle-right bar.
Choose Python 3 (ipykernel) from the drop-down list of options.
When the file opens in a new tab, click the file name, and rename the file to
MPT-7B.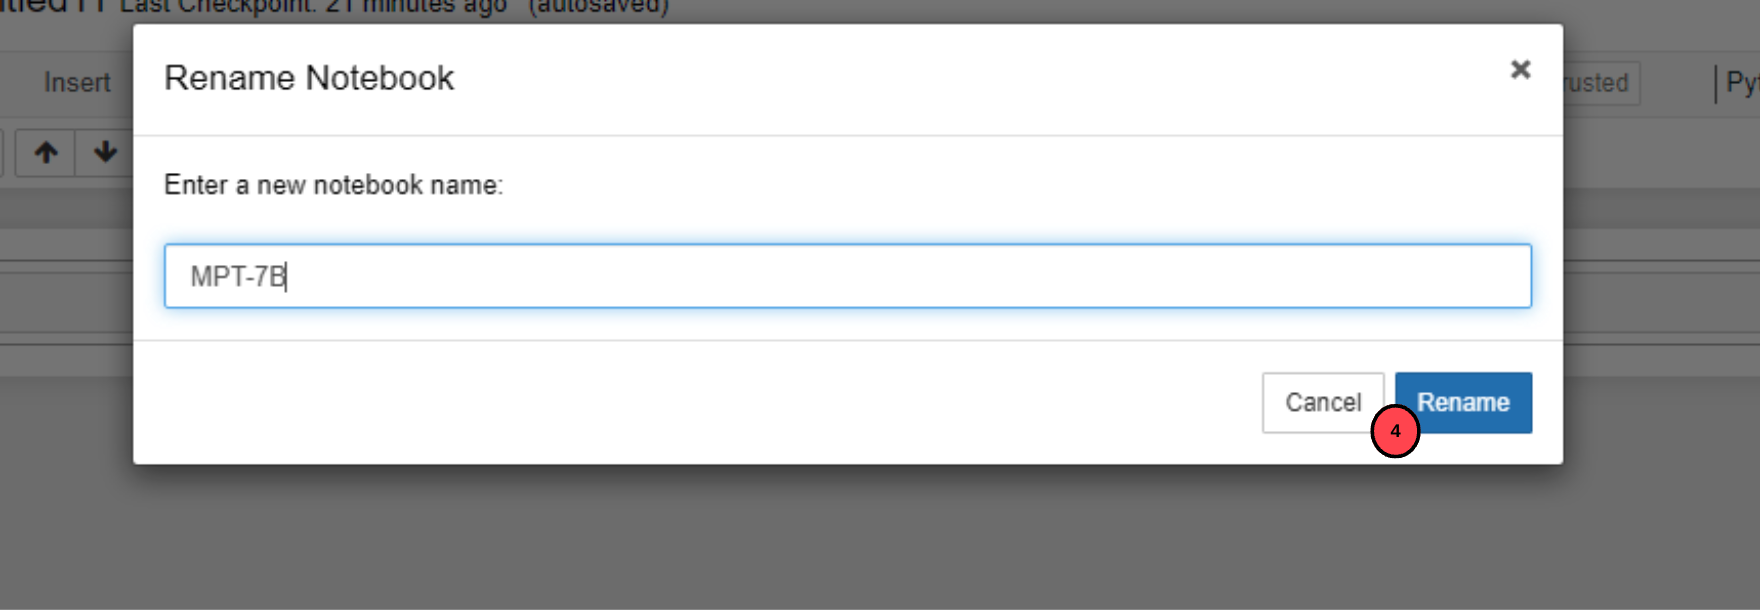
In the
MPT-7Bfile, copy and paste the following code to initialize the MPT-7B model.import transformers import torch device = f'cuda:{torch.cuda.current_device()}' if torch.cuda.is_available() else 'cpu' model = transformers.AutoModelForCausalLM.from_pretrained( 'mosaicml/mpt-7b', trust_remote_code=True, init_device=device ) model.eval() model.to(device) print(f"Model loaded on {device}")The above code block uses the transformers library, and initializes the MPT-7B model.
model-eval()defines that the model is in use for inference and training.Click the playf symbol on the task bar or press
CTRL+ENTERon your keyboard to run the above code.When the code is executed successfully, it prints the device on which the model is running. The overall download process and initialization can take up to 15 minutes.
Initialize the tokenizer.
tokenizer = transformers.AutoTokenizer.from_pretrained("EleutherAI/gpt-neox-20b")Run the tokenizer to set it to
EleutherAI/gpt-neox-20b.Initialize the pipeline.
 pipe = transformers.pipeline(
        model=model,
        tokenizer=tokenizer,
        task='text-generation',
        temperature=0.1,
        device=device,
        max_new_tokens= 50,
        repetition_penalty=1.1
    )
The above code initializes a pipeline for text generation using the
transformerlibrary.To input the prompt in the pipeline, run the following code. Replace
YOUR_INPUTwith any actual text you desire. For example,KINGto verify that the model is runningresult = pipe('YOUR_INPUT')[0]['generated_text'] print(result)The above code generates text using the
pipepipeline and prints it. Generated text is retrieved using thegenerated_textkey from the dictionary.Fetch the GPU usage Statistics.
!nvidia-smiOutput:
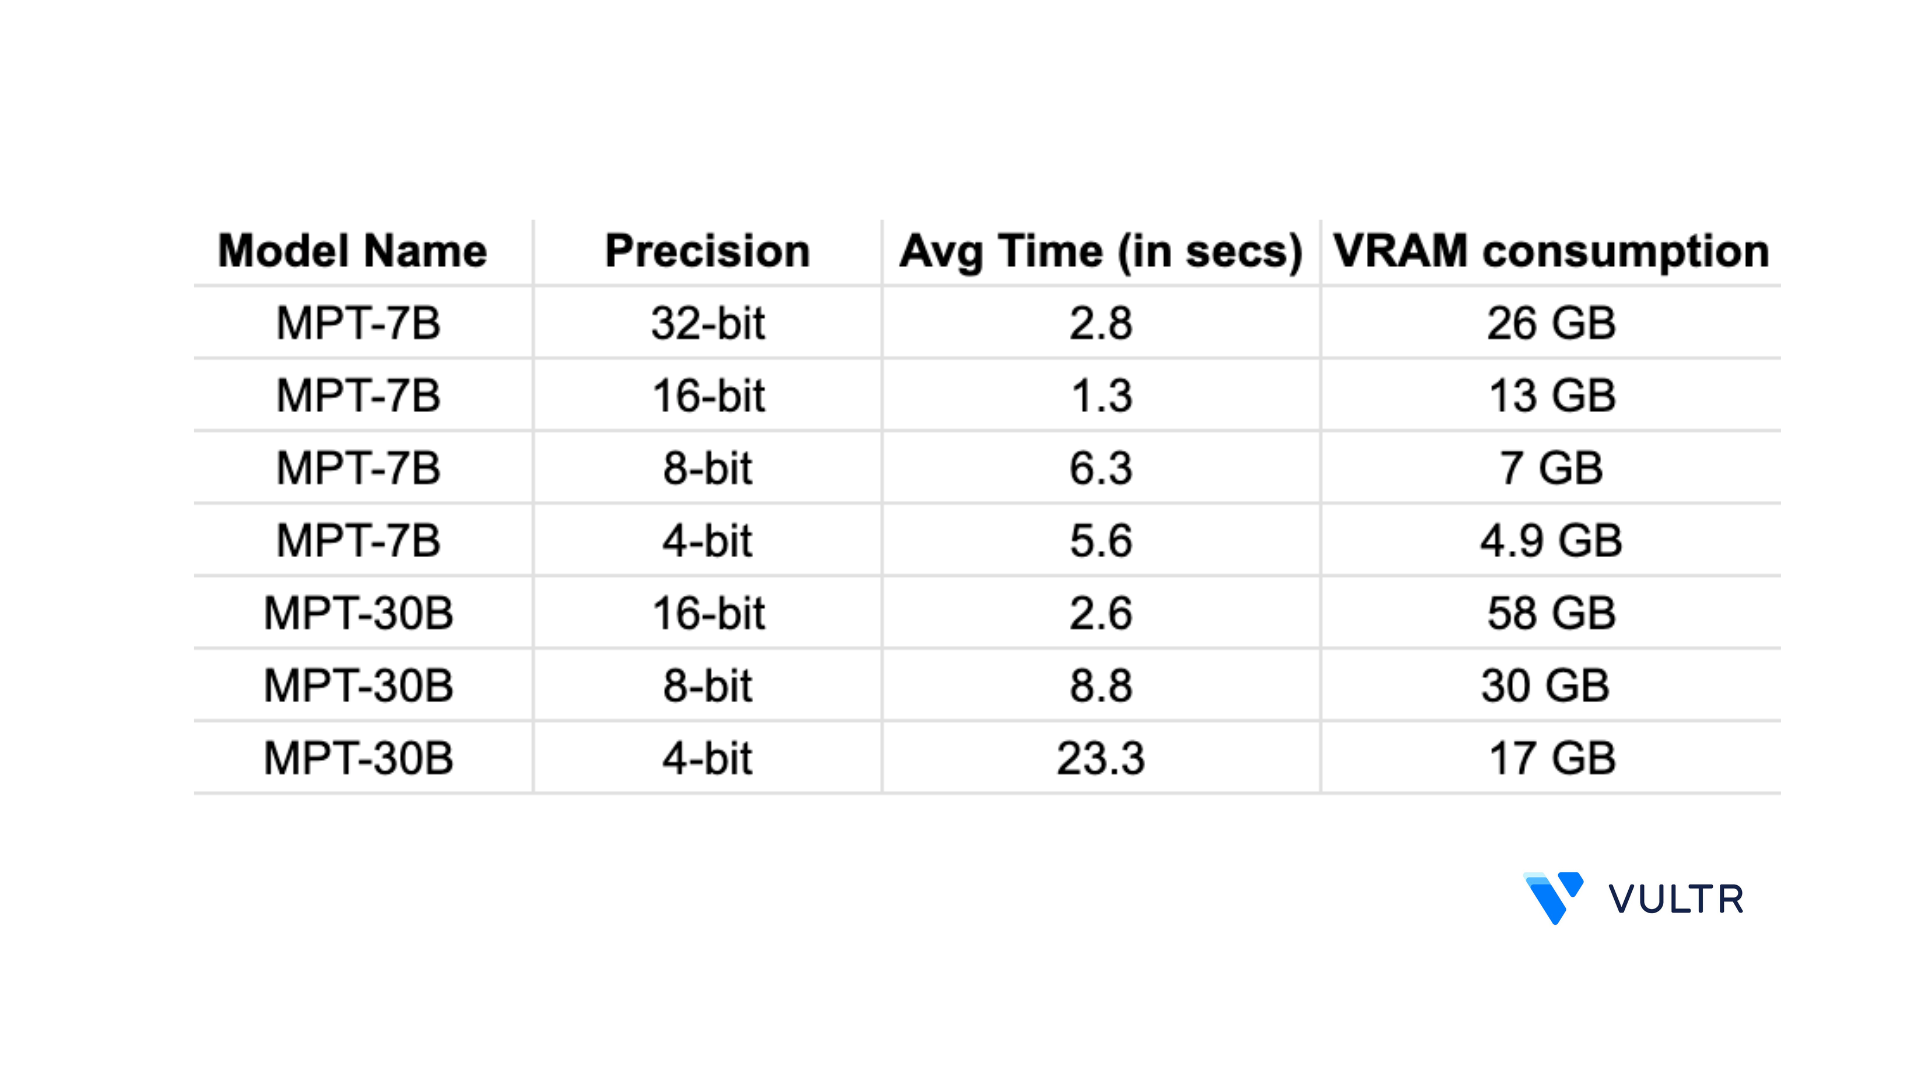
+-----------------------------------------------------------------------------+ | Processes: | | GPU GI CI PID Type Process name GPU Memory | | ID ID Usage | |=============================================================================| | 0 0 0 36339 C /usr/bin/python3 26314MiB | +-----------------------------------------------------------------------------+In the above output, the MPT-7B model with 32-bit precision uses
26GBof GPU VRAM.
Run the MPT-30B model
In this section, initialize the MPT-30B base model in 16-bit precision (half-precision due to hardware limitations), its tokenizer, and pipeline as described in the steps below.
Navigate to the main menu bar, click Kernel, and select
Restart and clear outputto restart the kernel and clear the VRAM memory.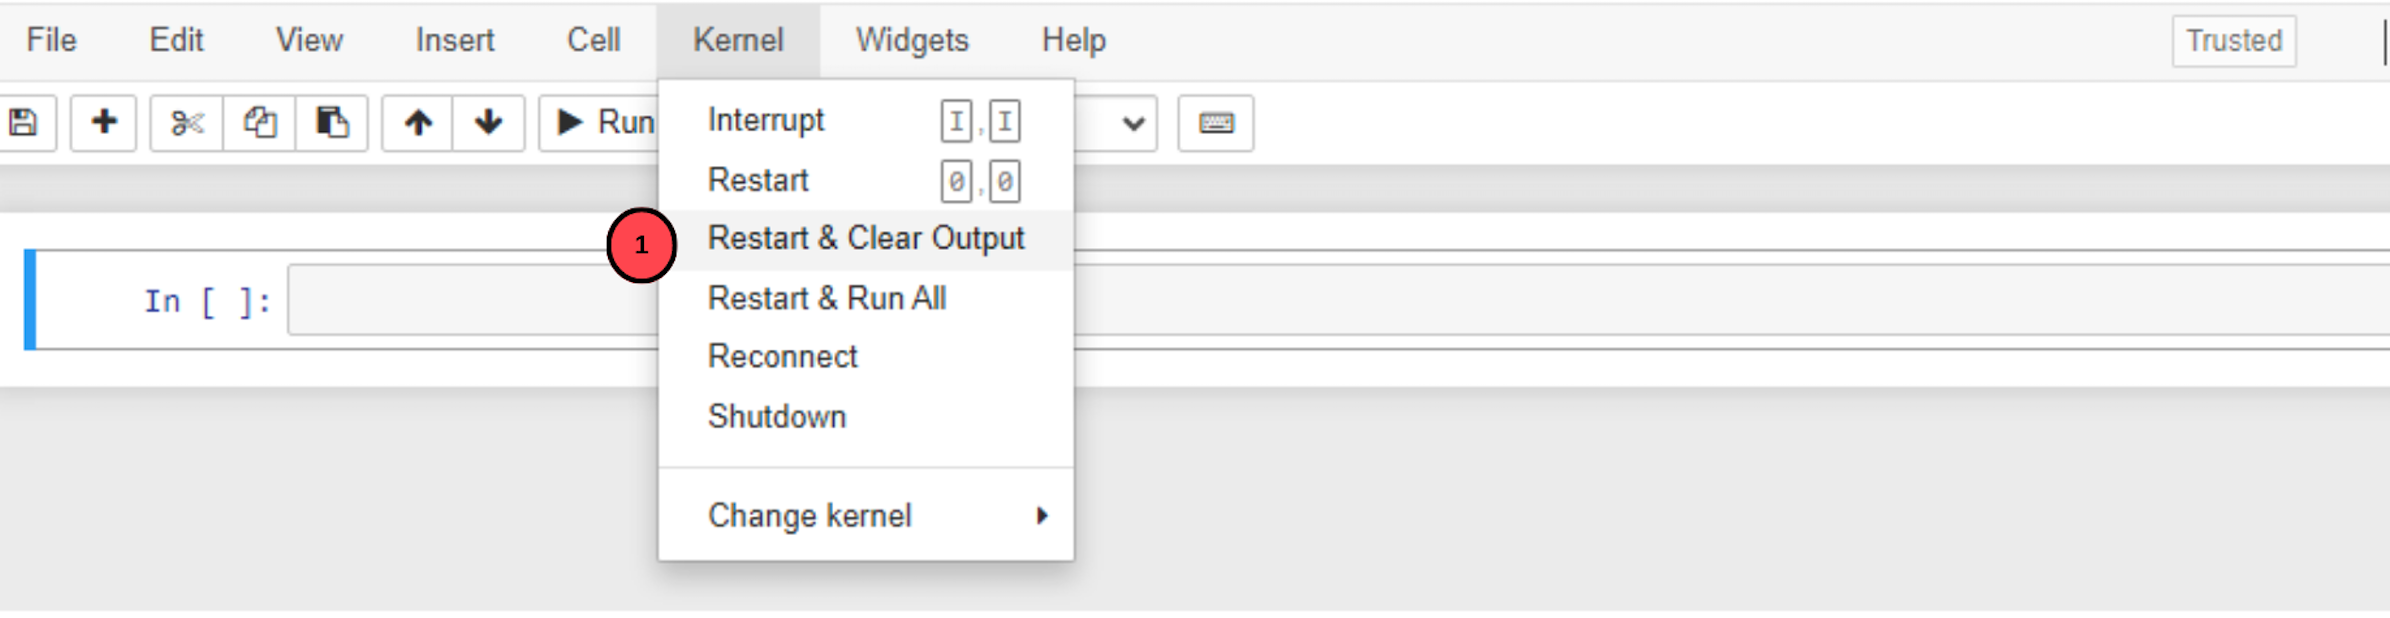
It's necessary to clear the VRAM space to avoid
out-of-memory erroralerts.Click the File dropdown, and create a new Notebook named
MPT-30B.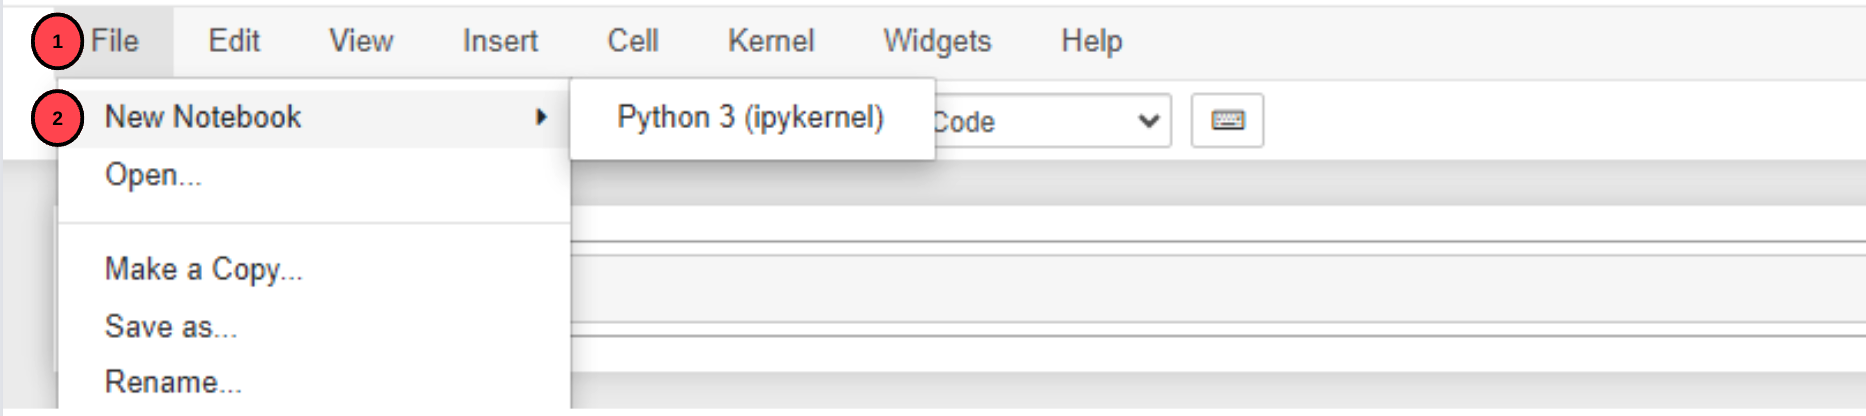
Initialize the MPT-30B model.
import transformers import torch device = f'cuda:{torch.cuda.current_device()}' if torch.cuda.is_available() else 'cpu' model = transformers.AutoModelForCausalLM.from_pretrained( 'mosaicml/mpt-30b', trust_remote_code=True, torch_dtype=torch.bfloat16, init_device=device ) model.eval() model.to(device) print(f"Model loaded on {device}")When run, the above code sets the model to
mosaicml/mpt-30and the new parametertorch_dtypeinstructs the model to run in 16-bit precision.Initialize the tokenizer.
tokenizer = transformers.AutoTokenizer.from_pretrained("mosaicml/mpt-30b")The above code changes the tokenizer to
mosaicml/mpt-30bused to train the MPT-30B model.Initialize the pipeline.
pipe = transformers.pipeline( model=model, tokenizer=tokenizer, task='text-generation', temperature=0.1, device=device, max_new_tokens= 50, repetition_penalty=1.1 )To input the prompt in the pipeline, run the following code.
result = pipe('YOUR_INPUT')[0]['generated_text'] print(result)Check the GPU usage.
!nvidia-smiOutput:
+-----------------------------------------------------------------------------+ | Processes: | | GPU GI CI PID Type Process name GPU Memory | | ID ID Usage | |=============================================================================| | 0 0 0 36583 C /usr/bin/python3 58092MiB | +-----------------------------------------------------------------------------+In the above output, the MPT-30B model with 32-bit precision for 5 responses with 50 new max tokens uses
58GBof VRAM.
Finetuned MPT LLM Models
Base MPT models have untrained model weights, these produce random outputs that may not be relevant to the source prompt. Finetuned versions on the other hand are trained on specific datasets to give the desired output depending on the provided prompt.
MosaicML offers various fine-tuned versions of the MPT-7B and MPT-30B LLM models such as:
MPT-7B-StoryWriter-65k+: This model has a context window of 65k tokens, and it's fine-tuned for reading and writing fictional passages with lengthy contexts.MPT-7B-Chat: Resembles a chatbot, and it's used to generate dialogue.MPT-7B-Instruct: This model is finetuned for short-form instruction generation.MPT-30-Chat: Functions similar toMPT-7B-Chat.MPT-3B-Instruct: Functions similar toMPT-30B-Instruct.
Unlike the base models, finetuned versions are not covered by the Apache-2.0 license which implies they can't be used for commercial purposes.
Inference optimization
In this section, apply the MPT-7B and MPT-30B base models in different precision settings to compare their VRAM consumption and average output time for each model.
- To apply the models, navigate to the Kernel, anc click
Restart and clear output optionto free GPU memory. - Create a new Notebook named
MPT-7B-optimizationto perform the steps in this section.
Load Model 16-bit
Initialize the MPT-7B model.
import transformers import torch device = f'cuda:{torch.cuda.current_device()}' if torch.cuda.is_available() else 'cpu' model = transformers.AutoModelForCausalLM.from_pretrained( 'mosaicml/mpt-7b', trust_remote_code=True, torch_dtype=torch.bfloat16, init_device=device ) model.eval() model.to(device) print(f"Model loaded on {device}")torch_dtypeis added to the previously used MPT-7B model code that was executed on 32-bit. The addition, enables the model to run with 16-bit precision.Click the play symbol to initialize the model.
Initialize the tokenizer.
tokenizer = transformers.AutoTokenizer.from_pretrained("EleutherAI/gpt-neox-20b")Initialize the pipeline.
pipe = transformers.pipeline( model=model, tokenizer=tokenizer, task='text-generation', temperature=0.1, device=device, max_new_tokens= 50, repetition_penalty=1.1 )Input the prompt in the pipeline.
 result = pipe('YOUR_INPUT')[0]['generated_text']
 print(result)
Check the GPU memory usage.
!nvidia-smiOutput:
+-----------------------------------------------------------------------------+ | Processes: | | GPU GI CI PID Type Process name GPU Memory | | ID ID Usage | |=============================================================================| | 0 0 0 36401 C /usr/bin/python3 13628MiB | +-----------------------------------------------------------------------------+With 16-bit precision, the model takes
13.6 GBmemory which is less than the memory consumed in 32-bit. It also takes a1.3 secsaverage time for 5 responses with 50 new max tokens.
Load Model 8-Bit
Clear the GPU memory.
Initialize the MPT-7B model.
import transformers import torch device = f'cuda:{torch.cuda.current_device()}' if torch.cuda.is_available() else 'cpu' model = transformers.AutoModelForCausalLM.from_pretrained( 'mosaicml/mpt-7b', trust_remote_code=True, load_in_8bit = True ) model.eval() print(f"Model loaded on {device}")In the above code,
load_in_8bitis set totrue. This instructs the model to run in 8-bit precision.Initialize the tokenizer.
tokenizer = transformers.AutoTokenizer.from_pretrained("EleutherAI/gpt-neox-20b")Initialize the pipeline.
pipe = transformers.pipeline( model=model, tokenizer=tokenizer, task='text-generation', temperature=0.1, max_new_tokens= 50, repetition_penalty=1.1 )Input a prompt in the pipeline.
 result = pipe('YOUR_INPUT')[0]['generated_text']
 print(result)
Check the GPU memory usage.
!nvidia-smiOutput:
+-----------------------------------------------------------------------------+ | Processes: | | GPU GI CI PID Type Process name GPU Memory | | ID ID Usage | |=============================================================================| | 0 0 0 36457 C /usr/bin/python3 7582MiB | +-----------------------------------------------------------------------------+In the above output, the MPT-7B model with 8-bit precision uses
7.5 GBmemory which is less than the memory consumed in 16-bit. It also takes a6.3 secsaverage time for 5 responses with 50 new max tokens.
The MPT-7B model initialization code can also be applied to execute the MPT-30B model in 8-bit by changing the model to mosaicml/mpt-30b, and also its tokenizer to mosaicml/mpt-30b. It uses 30.1 GB of VRAM memory and an 8.8 secs average time for 5 responses with 50 new max tokens.
Load Model 4-bit
Clear the GPU memory.
Initialize the MPT-7B model.
import transformers import torch device = f'cuda:{torch.cuda.current_device()}' if torch.cuda.is_available() else 'cpu' model = transformers.AutoModelForCausalLM.from_pretrained( 'mosaicml/mpt-7b', trust_remote_code=True, load_in_4bit = True ) model.eval() print(f"Model loaded on {device}")In the above code,
load_in_4bitis set totrue. This instructs the model to run with 4-bit precision.Initialize the tokenizer.
tokenizer = transformers.AutoTokenizer.from_pretrained("EleutherAI/gpt-neox-20b")Initialize the pipeline.
pipe = transformers.pipeline( model=model, tokenizer=tokenizer, task='text-generation', temperature=0.1, max_new_tokens= 50, repetition_penalty=1.1 )Add a prompt to the pipeline.
 result = pipe('YOUR_INPUT')[0]['generated_text']
 print(result)
Check the GPU usage.
!nvidia-smiOutput:
 +-----------------------------------------------------------------------------+
 | Processes:                                                                  |
 |  GPU   GI   CI        PID   Type   Process name                  GPU Memory |
 |        ID   ID                                                   Usage      |
 |=============================================================================|
 |    0    0    0      36521      C   /usr/bin/python3                 4918MiB |
 +-----------------------------------------------------------------------------+
As displayed in the output, the MPT-7B model with 4-bit precision uses
4.9 GBof memory which is lower than the memory consumed when executed in 8-bit. It also takes a5.6 secsaverage time for 5 responses with 50 new max tokens.The same code block can be applied to execute the MPT-30B model in 8-bit by changing the
modeltomosaicml/mpt-30b, and also its tokenizer tomosaicml/mpt-30b. On usage, it uses17.6 GBof memory and a23.3 secsaverage time for 5 responses with 50 new max tokens.
When you execute LLM models in different precisions, resource consumption is reduced and improves the model performance. Hence, the output produced by lower precision models may not be as thorough as the output produced by a model in 32-bit precision.
Key Parameters
trust_remote_code: Gets code from a remote source, and checks if it's trustworthy and secure by considering its origin, integrity, and safety measures.task: Sets the task of the pipeline astext-generation.temperature: This parameter has a max value of 1.0 and a min value of 0.1. It's used to control the randomness in the output, the closer an assigned value is to 1.0, the more random the output becomes.device: Specifies the device on which the pipeline is run. In this article,cuda:0.max_new_tokens: This is one of the most important parameters where the number of tokens in the output is defined, and the model gives an output with a random number of tokens ifmax_new_tokensis not defined.repetition_penalty: Control the probability of generating repeated tokens. A high parameter value results in a less number of repeated tokens and vice versa.
Conclusion
In this article, you implemented MPT-7B Large Language Models (LLMs) on a Vultr Cloud GPU Server. You installed the CUDA toolkit to run the model with lower precision configurations, and implemented two MosaicML base models MPT-7B and MPT-30B with their inference optimization on various bit configurations. This resulted in different GPU VRAM consumption, and differences in the average time taken to generate an output.
Below are the GPU memory usage statistics, and average time it takes for the models to produce outputs with 50 new max tokens on an 80GB RAM Vultr Cloud GPU Server.
More Information
For more information, visit the following resources: