How to Use Vultr Cluster API to Manage Kubernetes Clusters
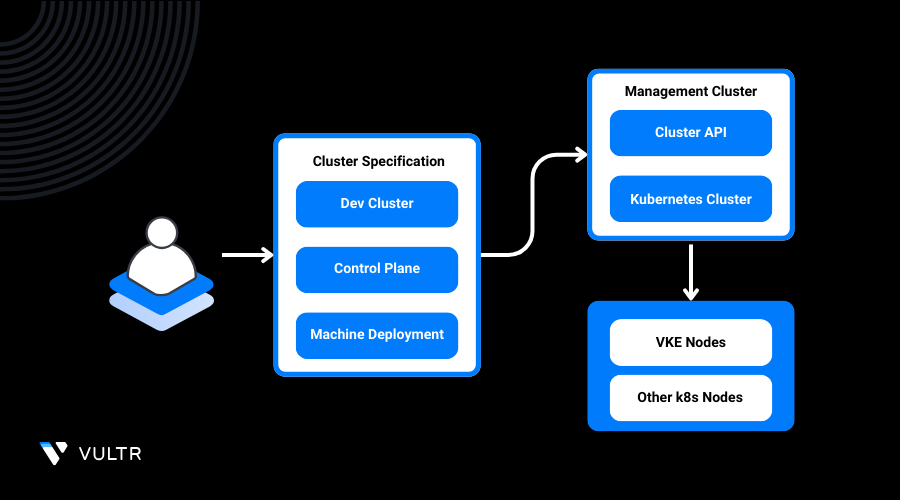
Introduction
The Vultr Cluster API is a set of RESTful endpoints designed to manage and automate the deployment, scaling, and lifecycle of clusters, particularly Kubernetes clusters, on Vultr's cloud platform. Through the Cluster API, developers can programmatically create new clusters, configure node pools, scale resources, and delete clusters. The API’s compatibility makes deploying on Vultr Kubernetes Engine (VKE) almost identical to deploying on other major cloud platforms, supporting seamless hybrid and multi-cloud setups for versatile cloud strategies. This API is crucial for DevOps and cloud-native workflows, helping to streamline infrastructure provisioning, enhance workload scalability, optimize resource utilization, and integrate efficiently across diverse cloud environments.
In this article, you will learn how to use the Cluster API to create and manage a Kubernetes cluster.
Prerequisites
Before you begin:
- Deploy an Ubuntu instance on Vultr.
- Access the instances using SSH.
In the server:
- Install clusterctl, kubectl, kustomize, Packer, and Ansible.
- Also install Minikube and the Minikube driver (kvm2) along with Kind and Vultr CLI.
Cluster API Core Components
Management Cluster: A central cluster that runs the Cluster API controllers and manages the lifecycle of other clusters, known as workload clusters.
Workload Cluster: A cluster dedicated to running user applications and workloads, managed by the management cluster.
Control Plane: The set of components responsible for maintaining the cluster’s desired state, including the API server, etcd database, and controllers.
Infrastructure Provider: Provides the resources and integration for the underlying cloud or infrastructure provider (e.g. Vultr) in Cluster API.
Cluster API Provider: The main interface in the Cluster API, responsible for managing clusters, machines, and related components across infrastructure providers.
Build a Vultr snapshot
In this section, you will create a snapshot of the Ubuntu 22.04 operating system using the image builder repository, and initialize the management cluster.
Export your Vultr API key as an environment variable.
CONSOLECreate an SSH key.
CONSOLEClone the image builder repository.
CONSOLENavigate to directories in the repository.
CONSOLECreate a Vultr snapshot.
CONSOLEThe snapshot creation will take approximately 30 minutes to complete. Once created, you will be able to view the snapshot in your Vultr Console like below.
Verify the snapshot presence and note the snapshot ID for later use.
CONSOLEInitialize the management cluster.
CONSOLEExit the directory for the steps in the next section.
Create a Workload Cluster
In this section, you will create a workload cluster, deploy a CNI, and deploy Vultr Cloud Controller Manager to get all the cluster nodes ready and running for operations.
Clone the cluster api repository.
CONSOLENavigate to
config/default/manager_image_patch.yamlfile in the cloned repository.CONSOLEUpdate value of the image field below to your controller image URL in the Vultr provider. Save and exit the file.
Navigate to
config/default/credentials.yamlfile in the cloned repository.CONSOLEAdd your Vultr API key. Save and exit the file.
Create environment variables.
CONSOLE
Example values can be found in scripts/capvultr-config-example.sh file in the repository.
Make the bash script executable.
CONSOLEGenerate the cluster definition.
CONSOLEApply the template.
CONSOLEView the workload cluster resources.
CONSOLEThe control planes won't be ready until you install the CNI and Vultr Cloud Controller Manager.
Verify that the first control plane is up.
CONSOLEOnce the control plane node has initialized, retrieve the workload cluster's Kubeconfig.
CONSOLEVerify the presence of Kubernetes nodes in the workload cluster.
CONSOLEDeploy Cilium CNI, you can also bring your own CNI.
Create a Vultr secret.
CONSOLEDeploy Vultr Cloud Controller Manager.
CONSOLEVerify the status of the status of workload cluster nodes.
CONSOLE
Conclusion
In conclusion, the Vultr Cluster API enables efficient deployment and management of Kubernetes clusters on Vultr. By completing these steps, you’ve set up scalable clusters with automated networking and management, optimizing your cloud infrastructure for streamlined, cloud-native application deployment.
Tags:Cluster API


0 Comments
Be the first to comment and share your perspective with the community.