How to Use Vultr Managed Database for PostgreSQL in Python
Introduction
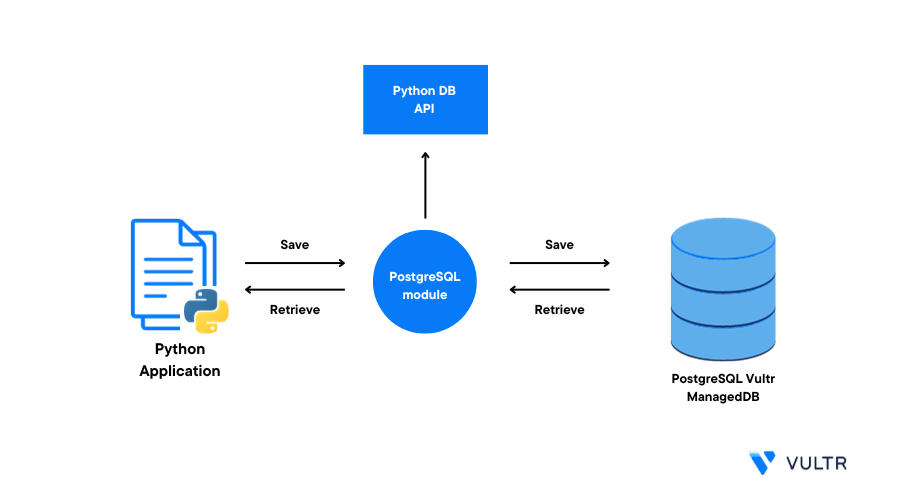
Python is a highly level programming language that allows you to build general purpose applications. By integrating Python with a Vultr Managed Database for PostgreSQL, you can automate most application processes for fast scaling and high level development of new features to match your user needs.
Depending on your Python application structure, integrating a managed PostgreSQL database best suites the following types of applications:
- E-commerce web applications.
- A data warehouse for mobile apps and desktop applications.
- Geospatial, analytics, and vector applications.
This guide explains how to use Vultr Managed Database for PostgreSQL in Python applications. By leveraging the database's high availability, you're to create a console application that makes database queries to retrieve stored information.
Prerequisites
Before you begin, be sure to:
Deploy a Vultr Cloud Server Distribution of your choice
This guide uses a Linux server, but depending on your Python application backend, you can apply the instructions on any distribution including Windows Servers.
Create a non-root sudo user account and switch to the new account
Install the Python PostgreSQL Adapter
To integrate Python with a Vultr Managed Database for PostgreSQL, install the required psycopg adapter package that allows you to connect to the database. Depending on your Linux distribution, install the PostgreSQL adapter as described in the steps below.
Update the server:
On Ubuntu/Debian:
$ sudo apt updateOn CentOS, and RHEL distributions:
$ sudo dnf updateInstall the PostgreSQL client tool
$ sudo apt-get install -y postgresql-clientOR
$ sudo dnf install postgresqlInstall the Python Pip Package Manager
$ sudo apt install -y python3-pipOR
$ sudo dnf install python3-pipUsing
pip, install the PostgreSQLpsycopgadapter package$ pip install psycopg
Set Up the Database
To connect Python to your Vultr Managed Database for PostgreSQL, create a sample database. Within the database, create a table and add sample records you can retrieve using the Python application as described below.
This sample Python application requires a sample PostgreSQL database with one table. This table stores customers' names and their unique customer_ids. Follow the steps below to set up the database:
Using the PostgreSQL client tool
psql, log in to the Vultr Managed Database for PostgreSQL cluster$ psql -p 16751 -h vultr-prod-aaa.com -d defaultdb -U vultradminOr, copy and use the connection string in your Vultr Managed Database dashboard
postgres://vultradmin:example-password@vultr-prod-aaa.com:16751/defaultdbReplace the above
psqlconnection details with your actual database values as below:- Username:
vultradmin - Password:
example-password - Host:
vultr-prod-aaa.com - Port:
16751
When prompted enter the correct Vultr Managed Database for PostgreSQL database to connect to your database.
- Username:
Create a new
xyz_companydatabasedefaultdb=> CREATE DATABASE xyz_company;Switch to the new
xyz_companydatabasedefaultdb=> \c xyz_company;Create a new sample
customerstable.xyz_company=> CREATE TABLE customers ( customer_id SERIAL PRIMARY KEY, first_name VARCHAR (50), last_name VARCHAR (50) );Add sample data to the
customerstablexyz_company=> INSERT INTO customers (first_name, last_name) VALUES ('MARY', 'ROE'); INSERT INTO customers (first_name, last_name) VALUES ('PETER', 'SMITH'); INSERT INTO customers (first_name, last_name) VALUES ('JOHN', 'ALEX');View the
customerstable data to verify that all records are availablexyz_company=> SELECT customer_id , first_name, last_name FROM customers;Output:
  customer_id | first_name | last_name
 -------------+------------+-----------
            1 | MARY       | ROE
            2 | PETER      | SMITH
            3 | JOHN       | ALEX
 (3 rows)
Exit the PostgreSQL database console
xyz_company=> \q
Create a PostgreSQL Database Module
In Python, a central database connection module allows you to reuse code in different application files without applying the logic in each file. In this section, create a Python connection file that works as a central module for PostgreSQL connections.
Create a new
projectdirectory$ mkdir projectSwitch to the new directory
$ cd projectUsing a text editor such as
Nano, create a new Python filepostgresql_connector.py$ nano postgresql_connector.pyAdd the following code to the file. Replace the
psycopg.connectvalues with your actual Vultr Managed Database for PostgreSQL valuesimport psycopg class PostgresqlConnector: def __init__(self): self.db_conn = psycopg.connect( host = "vultr-prod-aaa.com", port = "16751", user = "vultradmin", password = "example-password", dbname = "xyz_company" ) def insert_customer(self, query_string, json_data): db_cur = self.db_conn.cursor() db_cur.execute(query_string, [json_data['first_name'], json_data['last_name']]) self.db_conn.commit() return "Success" def get_customers(self, query_string): db_cur = self.db_conn.cursor() db_cur.execute(query_string) return db_cur.fetchall() def update_customer(self, query_string, json_data): db_cur = self.db_conn.cursor() db_cur.execute(query_string, [json_data['first_name'], json_data['last_name'], json_data['customer_id']]) self.db_conn.commit() return "Success" def delete_customer(self, query_string, json_data): db_cur = self.db_conn.cursor() db_cur.execute(query_string, [json_data['customer_id']]) self.db_conn.commit() return "Success"Save and close the file.
In the above application file:
PostgresqlConnector()is a class module with five methods:__init__()executes every time you create an instance of thePostgresqlConnectorclass to establish a connection to the PostgreSQL database using theself.db_conn = psycopg.connect(...)functioninsert_customer(self, query_string, json_data)takes a JSON payload and populates thecustomerstable using theINSERTSQL statementget_customers(self, query_string)retrieve all customers from the databaseupdate_customer(self, query_string, json_data)updates a customer that matches a givencustomer_idvaluedelete_customer(self, query_string, json_data)deletes a customer from the database table
Create the Main Python Application
Create a new
main.pyfile$ nano main.pyAdd the following code to the file
 import http.server
 from http import HTTPStatus
 import socketserver

 import json
 import postgresql_connector

 class HttpServerHandler(http.server.SimpleHTTPRequestHandler):

     def set_headers(self):

         self.send_response(HTTPStatus.OK)
         self.send_header('Content-type', 'application/json')
         self.end_headers()

     def do_POST(self):

         self.set_headers()
         json_data = json.loads(self.rfile.read(int(self.headers['Content-Length'])))

         pg_conn = postgresql_connector.PostgresqlConnector()
         query_string = "insert into customers (first_name, last_name) values (%s, %s)"

         resp = {"data": pg_conn.insert_customer(query_string, json_data)}

         self.wfile.write(bytes(json.dumps(resp, indent = 2) + "\r\n", "utf8"))

     def do_GET(self):

         self.set_headers()

         pg_conn = postgresql_connector.PostgresqlConnector()

         query_string = 'select * from customers'

         resp = {"data": pg_conn.get_customers(query_string)}

         self.wfile.write(bytes(json.dumps(resp, indent = 2) + "\r\n", "utf8"))

     def do_PUT(self):

         self.set_headers()
         json_data = json.loads(self.rfile.read(int(self.headers['Content-Length'])))

         pg_conn = postgresql_connector.PostgresqlConnector()

         query_string = 'update customers set first_name = %s, last_name = %s where customer_id = %s'

         resp = {"data": pg_conn.update_customer(query_string, json_data)}

         self.wfile.write(bytes(json.dumps(resp, indent = 2) + "\r\n", "utf8"))

     def do_DELETE(self):

         self.set_headers()
         json_data = json.loads(self.rfile.read(int(self.headers['Content-Length'])))

         pg_conn = postgresql_connector.PostgresqlConnector()

         query_string = 'delete from customers where customer_id = %s'

         resp = {"data": pg_conn.delete_customer(query_string, json_data)}

         self.wfile.write(bytes(json.dumps(resp, indent = 2) + "\r\n", "utf8"))

 httpd = socketserver.TCPServer(('', 8080), HttpServerHandler)

 print("HTTP server started at port 8080...")

 try:

     httpd.serve_forever()

 except KeyboardInterrupt:

     httpd.server_close()

     print("HTTP server stopped.")
Save and close the file.
In the above
main.pyfile:- The import section adds the HTTP server and
postgresql_connectormodule you created earlier to the application functions HttpServerHandler(http.server.SimpleHTTPRequestHandler)is a web server handler class that listens for incoming HTTP connections on your defined port8080with the following methods:set_headers(self)sets the correct HTTP headers when the Python application responds to HTTP clientsdo_POST(self)handles all HTTP POST requests to redirect anINSERTquery to thePostgresqlConnector()classdo_GET(self)runs an HTTP GET method to retrieve data from thecustomerstable using thePostgresqlConnector()class. This method runs theselect * from customersSQL statementdo_PUT(self)executes an HTTP PUT method to update customer details in the database table using theupdate customers set first_name = %s, last_name = %s where customer_id = %sSQL statementdo_DELETE(self)runs a function that deletes a customer from the database using thedelete from customers where customer_id = %sSQL statement
- The import section adds the HTTP server and
Test the Python Application
You have developed a Python application with the necessary modules and functions. To verify that your application reads and writes to your Vultr Managed Database for PostgreSQl, run the following operations.
Run the application in the background
$ python3 main.py &Output:
HTTP server started at port 8080...Using the
curlutility tool, create a new customer using the following HTTP POST method$ curl -X POST http://localhost:8080/ -H 'Content-Type: application/json' -d '{"first_name": "ANNE", "last_name": "HENRY"}'Output:
 {
   "data": "Success"
 }
Using the HTTP GET method, retrieve all customers in the database
$ curl -X GET http://localhost:8080/Output:
 {
   "data": [
     [
       1,
       "MARY",
       "ROE"
     ],
     [
       2,
       "PETER",
       "SMITH"
     ],
     [
       3,
       "JOHN",
       "ALEX"
     ],
     [
       4,
       "ANNE",
       "HENRY"
     ]
   ]
 }
Using the PUT method, update a customer's details
$ curl -X PUT http://localhost:8080/ -H 'Content-Type: application/json' -d '{"first_name": "MARY ANNE", "last_name": "SMITH", "customer_id": 1}'Output.
 {
   "data": "Success"
 }
Delete a customer from the database
$ curl -X DELETE http://localhost:8080/ -H 'Content-Type: application/json' -d '{"customer_id": 4}'Output:
 {
   "data": "Success"
 }
To stop the Python application background process, view the running jobs
$ jobsOutput:
[1]+ Running python3 main.py &Keep note of the background process ID
Stop the process by ID. For example, for job ID
1, run:$ kill %1
Conclusion
You have created a Python application that connects to a Vultr Managed Database for PostgreSQL to perform read and write tasks. Depending on your Python application structure, create the necessary databases, and implement the correct connector with your desired SQL statements to interact with your PostgreSQL database.
Next Steps
To implement more functionalities using your Vultr Managed Database for MySQL, visit the following resources: