How to Use Vultr’s K3s Marketplace Application

Introduction
K3s marketplace application offers a lightweight Kubernetes distribution optimized for fast and efficient deployments. Designed for resource-constrained environments like edge computing, it simplifies the management of modern applications without the complexity of traditional Kubernetes setups.
Vultr's K3s marketplace application simplifies Kubernetes deployments and includes essential tools like kubectl and helm to manage and orchestrate your deployments with ease. It also includes pre-installed containers and services preinstalled to run applications on your server.
Follow this guide to use Vultr's K3s Vultr marketplace application to access a K3s cluster, enable remote access and deploy applications.
Deploy the K3s Marketplace Application on Vultr
Follow the steps below to deploy the K3s marketplace application using the Vultr Customer Portal.
Open the Vultr Customer Portal Customer Portal, navigate to Products -> Compute and click Deploy Server.
Select your desired instance type such as Optimized Cloud Compute or Cloud Compute.
Choose your preferred Vultr location.
Select an instance plan based on your project needs.
Click the Marketplace Apps tab, enter and select K3s.
Optional: Enter the K3s server URL and Token of an existing K3s cluster to add additional nodes.
Optional: Select an SSH key to enable on the instance.
Enter your desired hostname and instance label.
Select any Additional Features to enable on the instance.
Click Deploy to start the instance deployment process.
When the deployment process is complete, click the instance to open its management page.

Access the K3s Cluster
Follow the steps below to access the K3s cluster and view all active nodes.
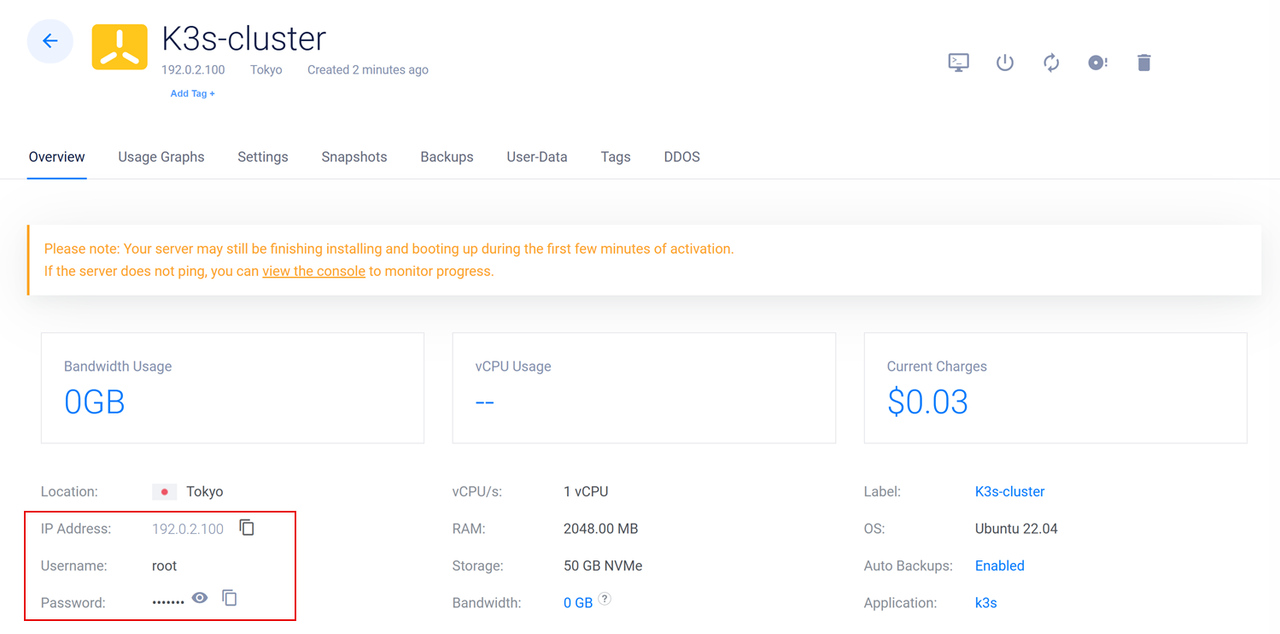
Find and copy the instance's SSH credentials including the public IP address, and
rootuser password in the Overview tab.
Use SSH to access the K3s instance. Replace
192.0.2.100with the actual instance's IP address.console$ ssh root@192.0.2.100
Accept the SSH fingerprint key and enter the
rootuser password when prompted.View the active K3s version.
console# k3s --version
Output:
k3s version v1.31.3+k3s1 (6e6af988)
go version go1.22.8
View all active nodes in the K3s cluster.
console$ kubectl get nodes
Output:
NAME          STATUS   ROLES                  AGE     VERSION
k3s-cluster   Ready    control-plane,master   4m11s   v1.31.3+k3s1
Enable Remote Access
The K3s instance includes a k3s-public.yaml configuration file that contains all credentials to access the K3s cluster using tools like Kubectl and Helm from other hosts. Follow the steps below to verify the default configuration path, configure the firewall, and enable remote access to the K3s cluster.
View the UFW status and verify the active firewall rules.
console# ufw status
Output:
Status: active

To                         Action      From
--                         ------      ----
22/tcp                     ALLOW       Anywhere
6443/tcp                   ALLOW       Anywhere
30000:32767/tcp            ALLOW       Anywhere
30000:32767/udp            ALLOW       Anywhere
22/tcp (v6)                ALLOW       Anywhere (v6)
6443/tcp (v6)              ALLOW       Anywhere (v6)
30000:32767/tcp (v6)       ALLOW       Anywhere (v6)
30000:32767/udp (v6)       ALLOW       Anywhere (v6)
The K3s marketplace application is configured with all necessary firewall rules by default based on the above output. The following network ports are allowed through the firewall based on the above output.
22: The SSH port for secure remote access to the server.6443: The Kubernetes API port that allows remote access to the K3s cluster's control plane.30000:32767/tcp: The Kubernetes NodePort services range used to expose cluster applications to external networks.
Run the following command to allow connections to the default Kubernetes API server port
6443if the rule does not already exist.console$ ufw allow 6443/tcp
View the
k3s-public.yamlfile contents in the/rootdirectory to use when connecting to the K3s cluster from a remote workstation.console# cat /root/k3s-public.yaml
Your output should be similar to the one below.
apiVersion: v1
clusters:
- cluster:
    certificate-authority-data: LS0tLS1CRU...................................
    server: https://192.0.2.100:6443
  name: default
contexts:
- context:
    cluster: default
    user: default
  name: default
current-context: default
kind: Config
preferences: {}
users:
- name: default
  user:
Use the above
/root/k3s-public.yamlconfiguration to replace the.kube/configfile on your workstation to connect to the K3s cluster.List all active nodes in the K3s cluster when connected.
console$ kubectl get nodes
Output:
NAME          STATUS   ROLES                  AGE     VERSION
k3s-cluster   Ready    control-plane,master   4m11s   v1.31.3+k3s1
Deploy Applications on the K3s Cluster
Follow the steps below to deploy a sample application to the K3s cluster.
Create a new
sampleapp.yamlfile.console# nano sampleapp.yaml
Add the following configurations to the
sampleapp.yamlfile to create a new deployment, service and configmap.yamlapiVersion: apps/v1 kind: Deployment metadata: name: greetings-app labels: app: greetings-app spec: replicas: 3 selector: matchLabels: app: greetings-app template: metadata: labels: app: greetings-app spec: containers: - name: nginx image: nginx:latest ports: - containerPort: 80 volumeMounts: - name: greetings-app-volume mountPath: /usr/share/nginx/html volumes: - name: greetings-app-volume configMap: name: greetings-app-config --- apiVersion: v1 kind: ConfigMap metadata: name: greetings-app-config data: index.html: | <!DOCTYPE html> <html> <head> <title>Hello World! Greetings from Vultr</title> </head> <body> <h1>Greetings from Vultr!</h1> </body> </html> --- apiVersion: v1 kind: Service metadata: name: greetings-service spec: selector: app: greetings-app ports: - protocol: TCP port: 80 targetPort: 80 type: NodePort
Save and close the file.
Apply the configuration to the K3s cluster.
console# kubectl apply -f sampleapp.yaml
Output:
deployment.apps/greetings-app created
configmap/greetings-app-config created
service/greetings-service created
View all deployments and verify that the new deployment is ready.
console# kubectl get deployments
Output:
NAME            READY   UP-TO-DATE   AVAILABLE   AGE
greetings-app   3/3     3            3           9s
View all services, verify that the
greetingsservice is available and note the external port mapping.console# kubectl get services
Output:
NAME                TYPE        CLUSTER-IP      EXTERNAL-IP   PORT(S)        AGE
greetings-service   NodePort    10.43.248.243   <none>        80:32115/TCP   16s
kubernetes          ClusterIP   10.43.0.1       <none>        443/TCP        9m59s
The
greetings-serviceis accessible with the NodePort32115based on the above80:32115/TCPport information output.View all pods in the cluster.
console# kubectl get pods
Output:
NAME                             READY   STATUS    RESTARTS   AGE
greetings-app-74c846f898-fq68x   1/1     Running   0          119s
greetings-app-74c846f898-jwmdd   1/1     Running   0          119s
greetings-app-74c846f898-pb5df   1/1     Running   0          119s
Access the
greetings-serviceNodePort service port32115using your K3s server's IP address in a web browser such as Chrome. Replace192.0.2.100with your actual server's IP address.http://192.0.2.100:32115Verify that the application page displays a
Greetings from Vultrmessage.
Conclusion
You have deployed the Vultr's K3s marketplace application, enabled remote access and deployed applications on the K3s cluster. K3s eliminates the complexities of setting up Kubernetes which enables developers to focus on managing applications and scaling deployments effectively.