How to Use Vultr's NetBird Marketplace Application
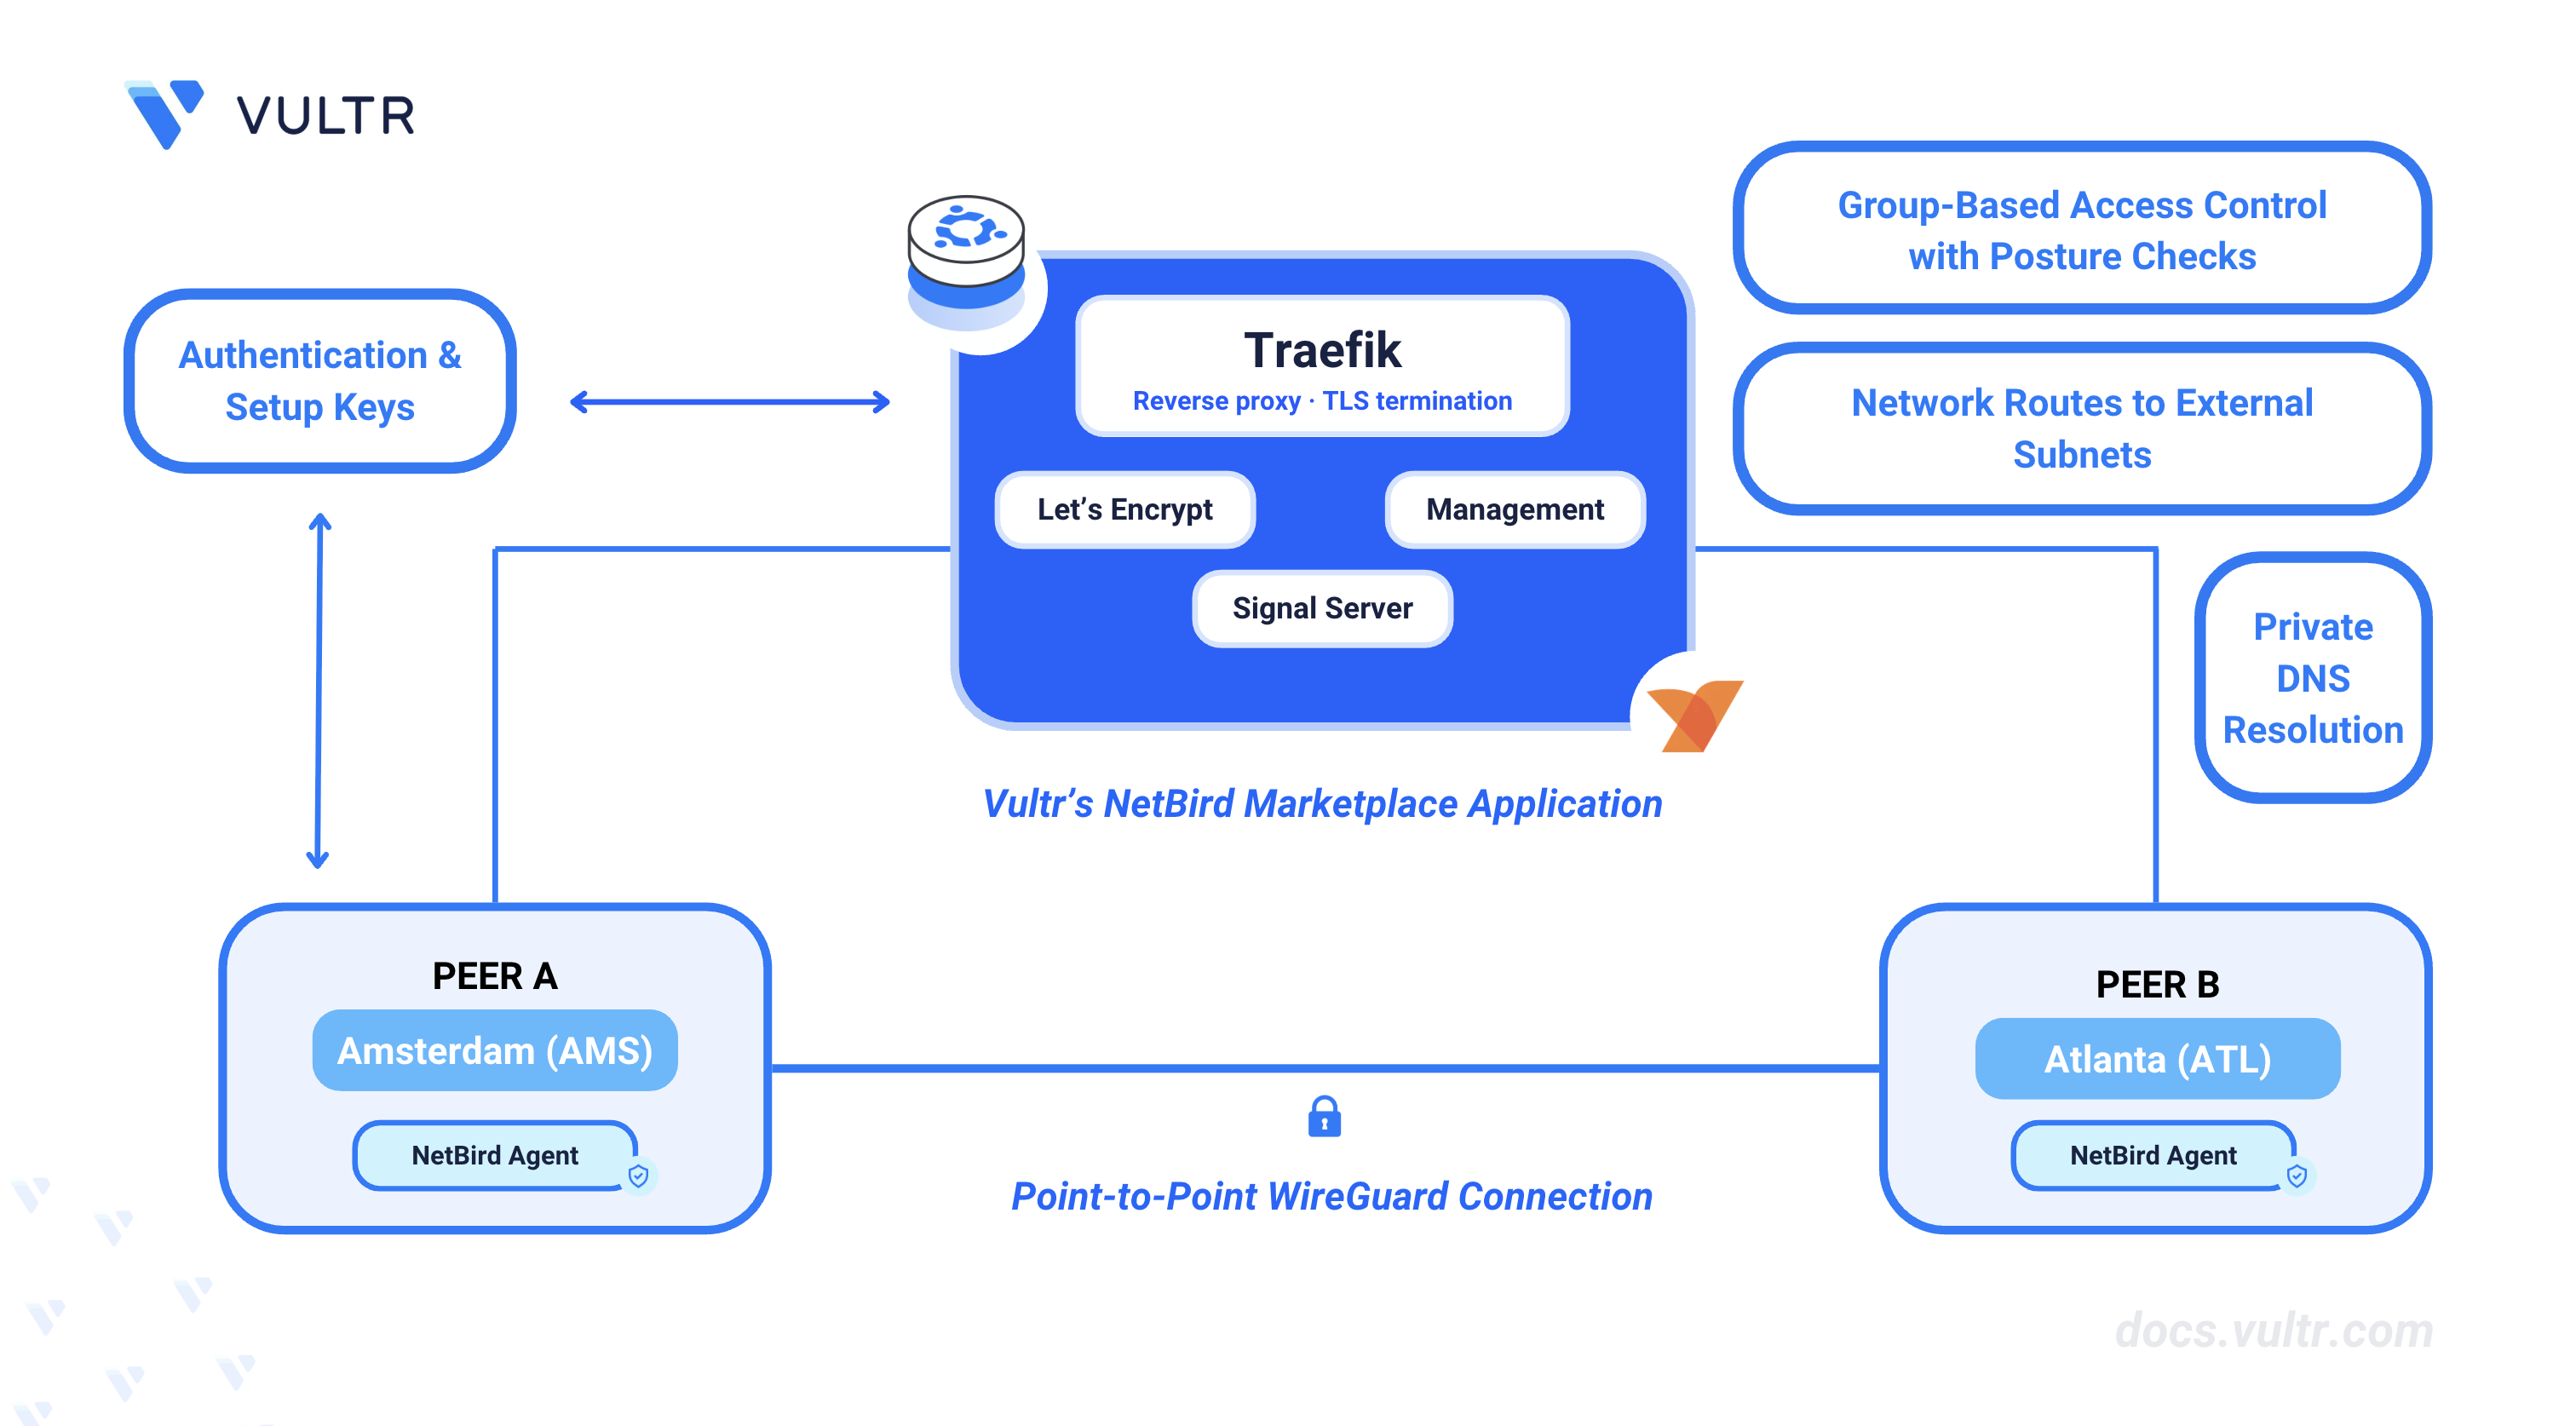
NetBird is an open-source zero-trust networking platform that builds encrypted peer-to-peer mesh networks using WireGuard. Rather than routing all traffic through a centralized gateway, peers discover each other through a management server and establish direct connections. The management server handles authentication, peer registration, and policy distribution, while data flows directly between peers over the 100.64.0.0/10 address range. The Vultr Marketplace provides a pre-configured NetBird management server on Ubuntu 24.04 LTS with Traefik as the reverse proxy and Let's Encrypt for automatic Transport Layer Security (TLS) certificates.
This guide explains deploying and configuring Vultr's NetBird Marketplace Application. It covers deploying the management server, adding peers to the network, configuring access control policies, setting up network routes to private subnets, and configuring DNS nameservers for internal hostname resolution.
Prerequisites
Before you begin, you need to:
- Have a Vultr account.
- Own a domain name and have access to its DNS settings to create an A record.
Deploy the NetBird Marketplace Application
The NetBird Marketplace Application deploys a management server with Traefik handling TLS termination. Traefik requests a Let's Encrypt certificate for the domain you configure during deployment, so the domain A record must resolve to the server IP before the provisioning script can complete.
Log in to your Vultr Console and click Deploy +.
Under Choose Type, select Dedicated CPU.
Choose a server location.
Select a plan with at least 2 vCPUs and 4 GB RAM.
Click Configure Software.
Click the Marketplace Apps tab and search for NetBird Server. Select it.
Under Requested Marketplace App Variables, fill in the following:
- nb_domain (Required): The fully qualified domain name for your NetBird server, for example
netbird.yourdomain.com. - acme_email (Optional): Your email address for Let's Encrypt certificate expiry notifications.
- nb_domain (Required): The fully qualified domain name for your NetBird server, for example
Under Server Settings, add your SSH key and set a hostname for the instance.
Click Deploy Now and wait for the instance status to show Running.
Configure DNS Records
After deployment, the server's IPv4 address appears on the instance overview page. Create the DNS records before the provisioning script can reach the TLS certificate step.
On the Vultr Console instance overview page, copy the IPv4 address.
In your domain registrar's DNS settings, create an A record pointing the subdomain to the server:
- Host: the subdomain portion of your
nb_domain(for example,netbird) - Value: the server IPv4 address
- TTL: 300
- Host: the subdomain portion of your
If you plan to use NetBird's built-in proxy feature, create a wildcard CNAME record pointing to your
nb_domain:- Host:
* - Value:
netbird.yourdomain.com
- Host:
Verify that the A record resolves correctly. Replace
netbird.yourdomain.comwith your configurednb_domain.CONSOLEVerify that the output shows the server's IPv4 address before continuing.
Access the Dashboard
The provisioning script runs in the background after the server starts. It waits for the domain to resolve, then configures Traefik, generates TLS certificates, and starts all NetBird services.
On the instance overview page, click View Console in the Vultr Console to open a browser-based terminal and watch the provisioning output.
Wait until the terminal shows
NETBIRD SETUP COMPLETEbefore proceeding.Open
https://netbird.yourdomain.comin a browser (replacenetbird.yourdomain.comwith yournb_domain).Complete the initial account setup form to create the administrator account.
On the sign-in page that appears after account creation, enter the email address and password you just registered and click Sign in.
An onboarding wizard opens. Select Peer-to-Peer Network to continue, or click Skip to Dashboard at the bottom of the page to configure the network manually.
Add Peers to the Network
Each machine that joins the NetBird network is called a peer. NetBird assigns each peer a unique IP from the 100.64.0.0/10 range — the exact address varies per account since each tenant receives a randomly allocated /16 block within that range. After signing in, the onboarding wizard guides you through adding your first two peers. For headless servers and automated pipelines that cannot authenticate through a browser, a setup key can be used instead.
Add the First Peer
On the Let's get your first device online screen, click Install NetBird.
Select the tab for your operating system. The management URL is pre-filled with your
nb_domain. Follow the platform-specific instructions:Linux — Run the install script, then connect to the management server. Replace
netbird.yourdomain.comwith yournb_domain.CONSOLECONSOLEThe command opens a browser window. Log in with your administrator account.
macOS — Click Download NetBird to download and run the installer. After installation, click the NetBird icon in the system tray, select Settings, then Advanced Settings, and enter your
nb_domainas the Management URL. Click Connect from the system tray icon and sign in with your account.Windows — Click Download NetBird to download and run the installer. After installation, click the NetBird icon in the system tray, select Settings, then Advanced Settings, and enter your
nb_domainas the Management URL. Click Connect and sign in with your account.
The right panel of the wizard updates from Waiting for your first device to connect to show the connected peer and its assigned IP address.
Add a Second Peer
On the Time to bring in your second device screen, copy the install link (
https://netbird.yourdomain.com/install) and open it on the second machine, or follow the same platform-specific install steps from the previous section.The right panel updates to show both peers connected.
On the Let's put that connection to the test screen, run the ping command shown to verify direct connectivity between the two peers.
On the Set the rules screen, review the Default Policy, which allows connections between all your devices, then click Continue.
Click Go to Dashboard to open the NetBird dashboard.
Manage Groups and Setup Keys
Groups organize peers so that access control policies can target sets of machines rather than individual addresses. Setup keys automate peer registration without interactive browser authentication, which is useful for servers and CI/CD pipelines.
Create a Group
In the NetBird dashboard, navigate to Peers.
Click the peer name to open its details.
Under Assigned Groups on the right side of the page, click the Add or select group(s) dropdown, type a group name, and press Enter to create and assign it.
Configure Access Control Policies
Access control policies define which groups can communicate with each other. Without an explicit policy, no peer can reach another. The default ALL to ALL policy allows unrestricted communication — remove it after creating specific policies to enforce zero-trust access.
In the NetBird dashboard, navigate to Access Control, then Policies.
Click Add Policy.
On the Policy tab:
- Under Protocol, select ALL to permit all traffic, or select TCP or UDP to restrict traffic to specific ports.
- Under Source, select the group that initiates traffic.
- Under Destination, select the group that receives traffic.
- If you selected TCP or UDP, specify the allowed ports or port ranges under Ports.
- Verify that the Enable Policy toggle is on.
Click Continue. The Posture Checks tab opens. Posture checks restrict access based on conditions such as client version, operating system, or location. Skip this tab for a basic policy by clicking Continue again.
On the Name & Description tab, enter a name for the rule in the Name of the Rule field. The description is optional.
Click Add Policy to create the policy.
To enforce zero-trust access, delete the default ALL to ALL policy.
Set Up Network Routes
Network routes allow peers to reach subnets that are not part of the NetBird network, such as a private Virtual Private Cloud (VPC) or a Local Area Network (LAN). A routing peer acts as a gateway — it must already be a connected peer and have direct access to the target subnet.
In the NetBird dashboard, navigate to Network Routes.
Click Add Route.
On the Route tab:
- Under Route Type, select Network Range to route a private IPv4 subnet, or Domains to route traffic for specific domain names.
- Under Network Range, enter the Classless Inter-Domain Routing (CIDR) block to route, for example
172.16.0.0/16. - Select Routing Peer to assign a single peer as the gateway, or Peer Group to distribute routing across multiple peers. Select the peer or group from the dropdown.
Click Continue. On the Groups tab:
- Under Distribution Groups, select the groups whose peers should receive and use this route.
- Under Access Control Groups (optional), select groups to restrict access to this route. These groups act as the destination when creating access policies for the route.
Click Continue. On the Name & Description tab, enter a unique name in the Network Identifier field, for example
vultr-cdg-vpc. The Description field is optional.Click Continue. On the Additional Settings tab:
- Verify that the Enable Route toggle is on.
- Enable Masquerade to perform Network Address Translation (NAT), which allows peers to access the target subnet without requiring return routes on the subnet's local routers. Leave it disabled if the target subnet already has a return route back to the
100.64.0.0/10range. - Set a Metric value if you have multiple routing peers for the same subnet. A lower metric indicates higher priority.
Click Add Route.
Peers in the distribution groups can now reach addresses in the configured CIDR range through the routing peer.
Configure DNS Nameservers
NetBird routes DNS queries for specific domains to a nameserver running on a peer. This lets peers resolve internal hostnames without exposing the DNS server to the public internet.
In the NetBird dashboard, navigate to DNS, then Nameservers.
Click Add Nameserver.
Select Custom DNS to use a nameserver running on one of your peers.
On the Nameserver tab:
- Enter the IP address of the nameserver in the IP field. Use the NetBird-assigned address of the peer running the DNS service, visible in the Peers section of the dashboard. The Port defaults to
53. - Under Distribution Groups, select the groups that should use this nameserver.
- Verify that the Enable Nameserver toggle is on.
- Enter the IP address of the nameserver in the IP field. Use the NetBird-assigned address of the peer running the DNS service, visible in the Peers section of the dashboard. The Port defaults to
Click Continue. On the Domains tab:
- Click + Add Domain and enter the domains whose queries should route to this nameserver, for example
corp.internal. - Enable Mark match domains as search domains if you want peers to resolve short hostnames — for example,
peerresolving topeer.corp.internal— without typing the full domain.
- Click + Add Domain and enter the domains whose queries should route to this nameserver, for example
Click Continue. On the Name & Description tab, enter a name in the DNS Name field, for example
office-resolver. The description is optional.Click Add Nameserver.
Peers in the selected distribution groups resolve queries for the configured match domains using the specified nameserver.
Conclusion
You have deployed the NetBird Marketplace Application on Vultr, connected peers to the management server, and configured groups, setup keys, access control policies, network routes, and DNS nameservers. The WireGuard-encrypted mesh network connects your machines with policies that control traffic at the group level. For more information, refer to the NetBird documentation.


0 Comments
Be the first to comment and share your perspective with the community.