Introduction
Throughout this tutorial you will learn how to configure a basic level of security on a brand new Vultr VC2 virtual machine running Ubuntu 18.04.
Prerequisites
Create and modify a user
The first thing we are going to do is create our new user that we will be using to log into the VM:
adduser porthorianNote: It is recommended to use a unique username that will be difficult to guess. Most bots will default to try root, admin, moderator, and similar.
You will be prompted for a password here. It is strongly recommended that you use a strong alpha numeric password. After that, follow the prompts on your screen and when it asks you if the information is correct just press Y.
Once that new user is added we will need to give that user sudo permissions so we can execute commands from the user on behalf of the root user:
usermod -aG sudo porthorianOnce you have given your user sudo permissions switch to your new user:
su - porthorianGenerate and configure an SSH key
To generate the SSH key, please follow this doc.
Once you have generated your new SSH key, copy your public key. It should look like the following:
ssh-rsa AAAAB3NzaC1yc2EAAAABJQAAAQEAmB3uRWxAAELNJ8oGBCBmZx7S11vnAp0RG8rdKf6CLdvT7NMbKF55F8Wf0hFPewEryplaH54ibdmaTuheJVKy1lUhHnVi0AcBpkhJiiOQdEtvbYKT/eIkQl/Qm92Gz6aL3lJ0UknO4gO0LzgqI2vYX0b9LHMF+ZvApEDahLCna6RKo3/lffnANUKfExE+dVwOcJwATL3Ld5IkSatm7zBqbJAim0wj/JQ5ejzkL+aYd3YawpW3qf+WsY3HGbK2TIJt3LsiZJ3M7giZo/fVIZCJqsIOyO9NUOEx5/+KE8IniGb7gdRYgquAEJr89poDCNz/8CBODi9z3ukiE1+UnVlhfQ== rsa-key-20190408Configure your users directory
Navigate to your users home directory if you are not already in it:
cd $HOME$HOME is the environment variable for your users home directory. This is automatically set when the new user is created.
While in our home directory we are going to place another directory inside it. This directory will be hidden from other users on the machine, except root and the user who owns the directory. Create the new directory and restrict its permissions with the following commands: mkdir ~/.ssh chmod 700 ~/.ssh
Now we are going to open a file in .ssh called authorized_keys. This is the universal file that OpenSSH looks for. You can change the name of this inside the OpenSSH config, /etc/ssh/sshd_config, if the need arises.
Use your favorite editor to create the file. This tutorial will use nano:
nano ~/.ssh/authorized_keysCopy and paste your ssh key into the authorized_keys file that we have opened. Once the public key is inside you can save the file by pressing Ctrl + O.
Make sure the appropriate file path shows up:
/home/porthorian/.ssh/authorized_keysIf it is the right file path just press Enter, otherwise, make necessary changes to match the example above. Then exit the file with Ctrl + X.
Now we are going to restrict access to the file:
chmod 600 ~/.ssh/authorized_keysExit our created user and go back to the root user:
exitDisabling password authentication
We can now disable password authentication to the server, that way login will require an ssh key. It is important to note that if you disable password authentication and the public key was not installed correctly you will lock yourself out of your server. It is recommended that you test the key first before even logging out of your root user.
We are currently logged into our root user, so we are going to edit the sshd_config:
nano /etc/ssh/sshd_configWe are going to search for 3 values to make sure that OpenSSH is configured properly.
PasswordAuthenticationPubkeyAuthenticationChallengeResponseAuthentication
We can find these values by pressing Ctrl + W.
The values should be set to the following:
PasswordAuthentication  no
ChallengeResponseAuthentication  no
PubkeyAuthentication  yes
If the values are commented out, remove the # at the beginning of the line and make sure that the values of those variables are as shown above. Once you have changed those variables, save and exit your editor, with Ctrl + O, Enter and finally Ctrl + X.
Now we are going to reload sshd with the following command:
systemctl reload sshdNow we can test the login. Make sure you have not logged out of your root session yet, and open up a new ssh window and connect with your ssh key linked to the connection.
In PuTTY this is under Connection -> SSH -> Auth.
Browse to find your private key for authentication, as you should have saved it when creating the ssh key.
Connect to your server with the private key as your authentication. You will now be logged in to your Vultr VC2 virtual machine.
Note: If you added a passphrase while generating the ssh key you will be prompted for one. This is completely different from your actual user's password on the virtual machine.
Setup a basic firewall
Configure UFW
First we are going to start by installing UFW if it is not already on the virtual machine. A good way to check is with the following command:
sudo ufw statusIf UFW is installed, it will output Status:inactive. If it is not installed, you will be instructed to do so.
We can install it with this command:
sudo apt-get install ufw -yNow we are going to allow SSH port 22 in our firewall:
sudo ufw allow 22Alternatively, you can allow OpenSSH:
sudo ufw allow OpenSSHEither one of the commands above will work.
Now that we have allowed the port through our firewall we can enable UFW:
sudo ufw enableYou will be asked if you are sure you want to perform this operation. Typing y followed by Enter will enable the firewall:
porthorian@MEANStack:~$ sudo ufw enable
Command may disrupt existing ssh connections. Proceed with operation? y
Note: If you did not allow OpenSSH or Port 22, you will lock yourself out of your virtual machine. Make certain that one of these is allowed before enabling UFW.
Once the firewall is enabled, you will still be connected to your instance. We are going to double check our firewall now with the same command as before:
sudo ufw statusYou will see something similar to the following output:
porthorian@MEANStack:~$ sudo ufw status
Status: active

To                         Action      From
--                         ------      ----
22                         ALLOW       Anywhere
22 (v6)                    ALLOW       Anywhere (v6)
Configuring the Vultr firewall
To further secure our server we are going to use our Vultr Firewall. Log in to your account. Once logged in you will navigate to the firewall tab located towards the top of your screen:

Now we are going to add a new firewall group. This will allow us to specify which ports can even reach our UFW firewall, providing us with a double layer of security:

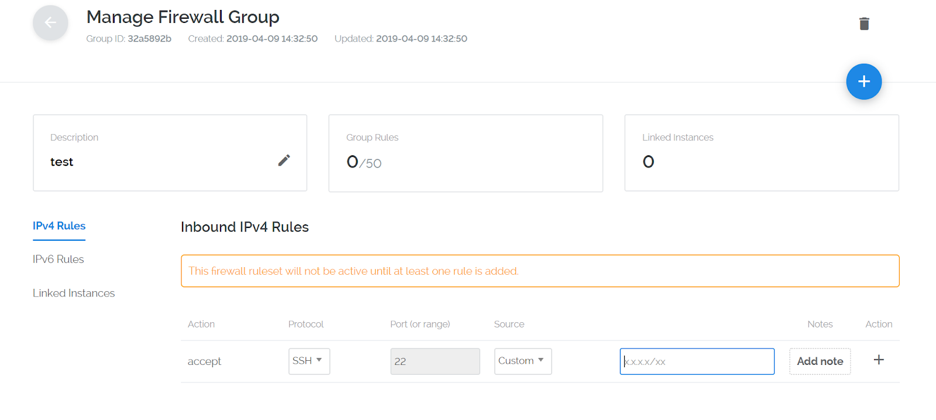
Vultr will now ask you what you are going to name your firewall using the "Description" field. Make sure you describe what the servers under this firewall group will be doing, for easier future administration. For the sake of this tutorial we are going to name it test. You can always change the description later if you would like.
First we are going to need to get our IP address. The reason we are doing this directly is that if your IP address is not static and is constantly changing, you can simply log in to your Vultr account and change the IP address.
That is also why we did not require the IP address on the UFW firewall. Plus it limits the use of your virtual machine's firewall from filtering out all the other ports and just lets the Vultr firewall handle it. This limits the strain of overall traffic filtering on your instance.
Use Vultr's network looking glass to find your IP address.
So now that we have our IP address we are going to add an IPV4 Rule to our newly created firewall:

Once you have the IP address entered, click the + symbol to add your IP address to the firewall.
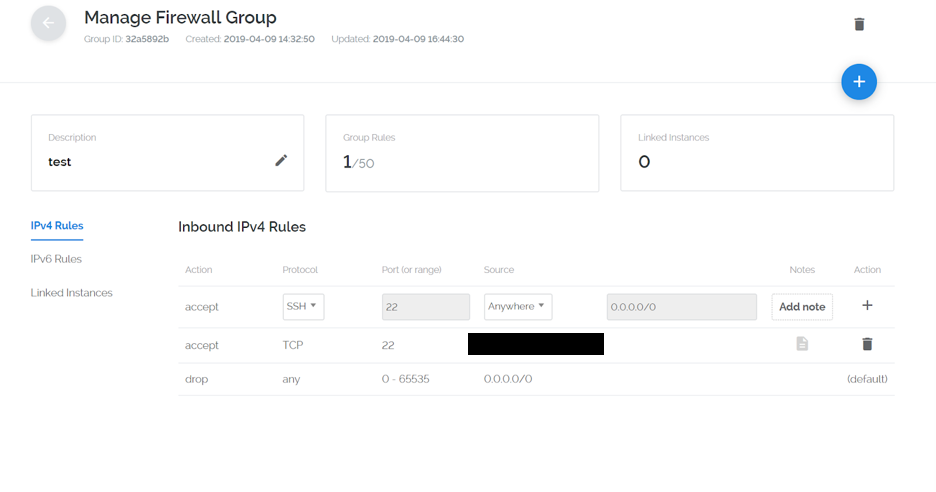
Your firewall group will look like the following:

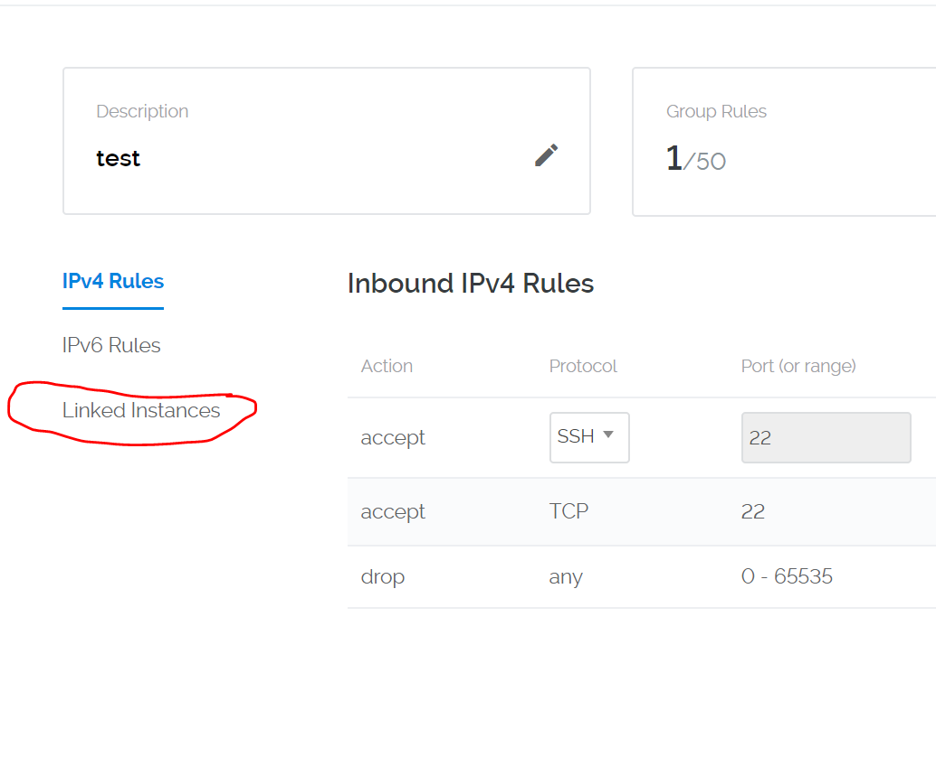
Now that we have our IP properly binded in the Firewall group, we need to link our Vultr Instance. On the left hand side you will see a tab that says "Linked Instances":

Once on the page you will see a drop down with a list of your server instances:

Click the drop down and select your instance. Then, when your ready to add the instance to the firewall group click the + symbol.
Congratulations, you have successfully secured your Vultr VC2 Virtual Machine. This gives you a good basis for a very basic security layer without the worry of someone trying to brute-force your instance.
No comments yet.