Vultr's One-Click Webmin is a web-based interface for system administration that can setup user accounts, Apache, DNS, file sharing, and much more. This guide uses 192.0.2.123 as an example IP address and webmin.example.com as the domain name.
Basic Setup
This basic setup is for those familiarizing themselves with Webmin. The official website has extensive documentation on the product. Read more about Webmin on the official documentation portal.
Connect to https://192.0.2.123:10000/ with a web browser. Replace the example IP address with your server's IP, or click the access link on the server information page.
- You can proceed past the SSL warning. See our instructions to bypass the HTTPS warning for self-signed SSL/TLS certificates.
- Log in with the root account for your instance.
Log in as root. The password is on the server information page and in your activation e-mail.
Install Let's Encrypt SSL Certificate
Webmin fully supports free Let's Encrypt SSL certificates. You can install and manage SSL from the Webmin dashboard.
Register the name and create a DNS record for the server's IP address. Consult your DNS provider for instructions, or see our guide if using Vultr's DNS.
Verify the DNS has finished propagation, and the name is visible throughout the internet before proceeding. Propagation usually happens quickly, but could take up to 48 hours in some cases.
Configure Apache and the server firewall. Verify you can reach the non-secure HTTP Apache welcome page.
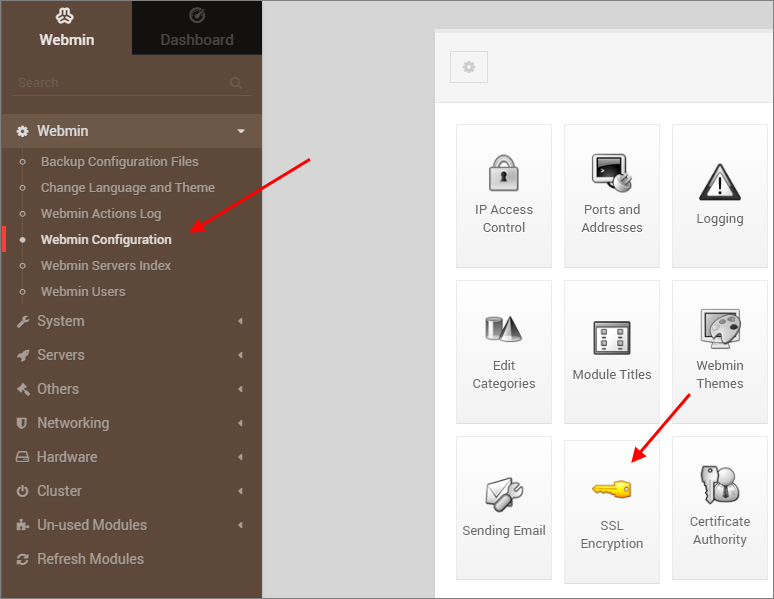
http://webmin.example.comClick Webmin > Webmin Configuration.
Click SSL Encryption.

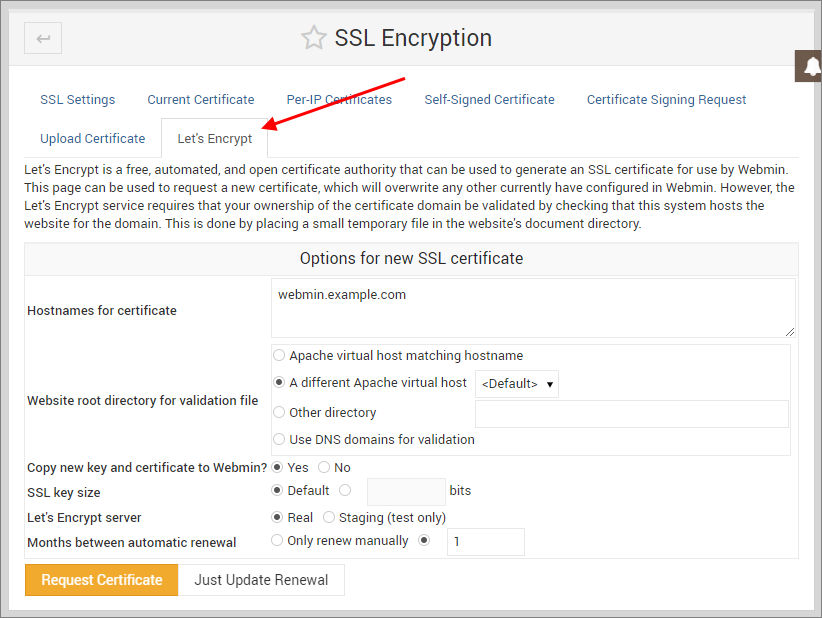
Click the Let's Encrypt tab.

Enter your domain name and set the certificate options. For the Website root directory for validation file option, select the default Apache host. Set the remaining options:
- Copy new key and certificate to Webmin: Yes
- SSL key size: Default
- Let's Encrypt server: Real
- Months between automatic renewal: 1
Click Request Certificate.
Verify the Apache server SSL certificate is correct when you connect to:
https://webmin.example.com
About One-Click Apps
One-Click apps are updated regularly without notice. When launching a One-Click app, you'll receive our latest version. We do not update deployed instances, and you are responsible for keeping the instance up-to-date. If you design an infrastructure based on One-Click apps and need to ensure the same app version in the future, take a snapshot of the initial deployment and create new instances from the snapshot.