Vultr Managed Database for Caching Reference Guide

Introduction
This reference guide for Vultr Managed Database for Caching covers all the essential information you need to administer and use your database. This guide assumes you've already deployed a Vultr Managed Database for Caching by following our Quickstart guide and want to learn more.
To get started, navigate to the Databases section of my.vultr.com. Then, click your deployed database to open the administration area containing several tabs.
Overview Tab
The Overview tab contains several sections:
Connection Details
Use the Connection Details section to locate your database connection information. It looks like this:
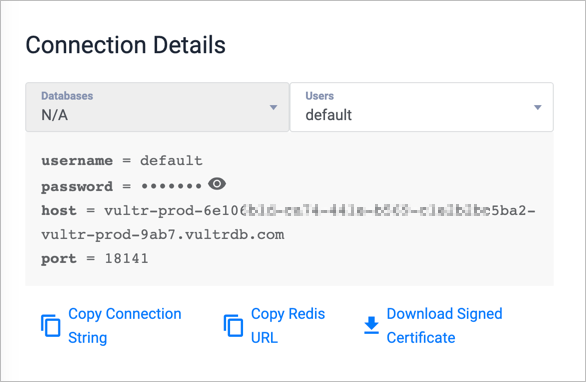
You'll find the username, password, host, and port number here. The password is hidden by default, but you can click the eye icon to reveal it.
Your other options are:
Users: If you have multiple users, choose the user account from the Users drop-down.
Copy Connection String: Use this button to copy a connection string for
redis-clito your clipboard. Here's an example:redis-cli -u rediss://default:[YOUR_PASSWORD]@[YOUR_HOST]:18141Copy Redis® URL: Copies the Vultr Managed Database for Caching URL to your clipboard. It looks like this:
rediss://default:[YOUR_PASSWORD]@[YOUR_HOST]:18141Download Signed Certificate: Note that both previous connection strings use
rediss://to indicate an SSL connection. If you need to download a signed certificate for your client, use this button.
Your connection string connects to the primary node and will automatically switch to the newly-elected primary node in case of a database failover.
For more information about connecting to Vultr Managed Database for Caching with TLS/SSL, please see How to Securely Connect to Redis® with TLS/SSL in Go, NodeJS, PHP, Python, and redis-cli.
General Information
The General Information section of the Overview tab has two user-editable fields and other key information about your cluster. It looks like this:
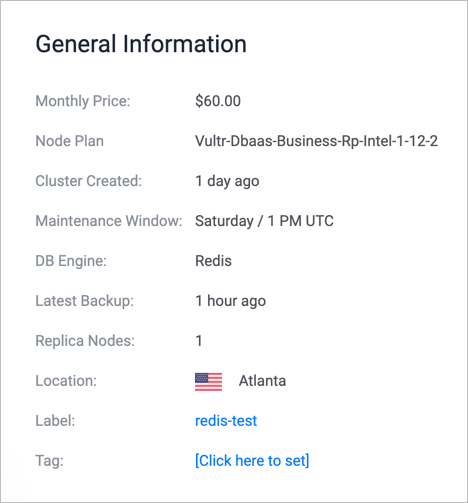
- To rename the cluster, click the Label and type a new name.
- Click Tag to add a new tag to the cluster.
Trusted Sources
When you deploy a database cluster, it's open to all internet traffic. Use the Trusted Sources section to restrict access to your database cluster.
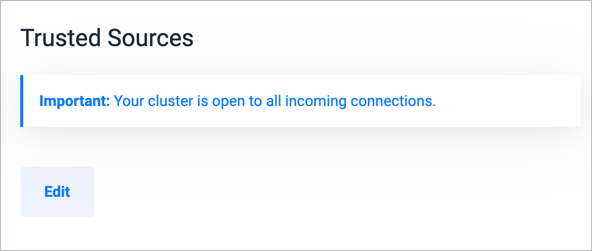
You should list allowed IP addresses in the Trusted Sources section. After you set a trusted IP address, all other traffic is blocked, similar to a firewall. Setting the trusted sources is a good security practice before you create your databases and add users.
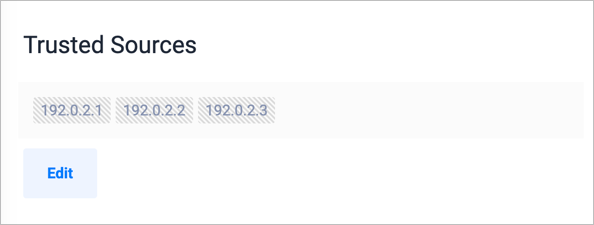
To add a trusted source:
- Click Edit.
- Enter an IPv4 address. IPv6 is not supported.
- Click Save.
You can add multiple IP addresses at a time, separated by commas. When complete, your trusted sources list looks similar to:
Actions
In the Actions section of the Overview tab, you'll find:
- Fork Database Cluster: When you fork a cluster, you create a second cluster from a snapshot of the original. You can change the number of nodes, the type, and the location of the new cluster.
- Restore From Backup: Restoring from backup creates a new cluster without standby or read-only nodes.
Resources
This section has links to documentation and support.
Usage Graphs Tab
Monitor the cluster's resource use in this tab.
Service Logs Tab
Use this tab to monitor the recent log entries.
Users Tab
Use this tab to manage the cluster's users and passwords. When you first deploy a cluster, it looks like this:
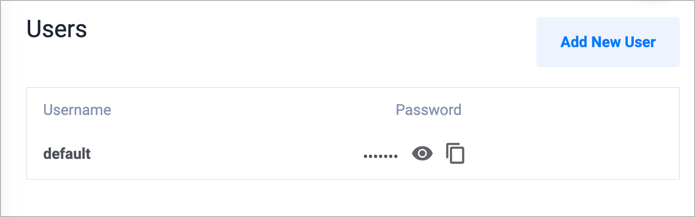
- Use the eye icon to reveal the user's password.
- Use the copy icon to copy the password to your clipboard.
- Use the Add New User button to create a new database user. Enter a username and password in the pop-up window. The system automatically generates a strong password if you leave the password blank.
Migration Tab
See the Managed Database Migration guide for more information about this section.
Settings Tab
Use the Settings tab to manage the cluster options. Choose from the following menus.
- Upgrade Window: Set the preferred time for system upgrades.
- Eviction Policies: The data eviction policy controls what happens when the maximum memory limit is reached. Choose from the following values:
- noeviction: New values aren't saved when memory limit is reached. When a database uses replication, this applies to the primary database
- allkeys-lru: Keeps most recently used keys; removes least recently used (LRU) keys
- allkeys-lfu: Keeps frequently used keys; removes least frequently used (LFU) keys
- volatile-lru: Removes least recently used keys with the expire field set to true.
- volatile-lfu: Removes least frequently used keys with the expire field set to true.
- allkeys-random: Randomly removes keys to make space for the new data added.
- volatile-random: Randomly removes keys with expire field set to true.
- volatile-ttl: Removes keys with expire field set to true and the shortest remaining time-to-live (TTL) value.
- Change Plan: Scale up your database cluster.
- Datacenter Location: Migrate your entire cluster to a new datacenter location.
- Delete Managed Database:: Destroy the cluster and all backups.
Frequently Asked Questions
Is the database backed up?
Yes, all Managed Databases are backed up for disaster recovery purposes. You can use these backups to restore a cluster, which overwrites the current cluster's data. You can also fork a cluster from the backup, which creates a new cluster without modifying the existing cluster. You'll find those options in the Actions section of your cluster's Overview tab.
The databases do not have point-in-time recovery. When recovering or forking a Vultr Managed Database for Caching, you can choose from a list of periodic backups.
How do I find my Node Plan?
You can deploy Managed Databases in several node plans, which are a shorthand way of identifying the available size and number of nodes. We offer Hobbyist, Startup, Business, and Premium node plans.
After you deploy a Managed Database, look in the General Information section of your cluster's information page. The Node Plan appears below the Monthly Price. The plan name format is: Vultr-Dbaas-[plan type]-[other internal information]. Here are two example node plans, with the important information underlined in red.
Premium node plan:

Business node plan:

The node plan determines what backup and recovery options are available. See the previous section, "Is the database backed up?" for details.
Can I deploy Managed Databases with the Vultr API or vultr-cli?
Support for Vultr API and vultr-cli is coming soon. Today, you can deploy managed databases from the Vultr customer portal.
How do I scale my database cluster?
- Use the Change Plan menu on the Setting tab to scale your cluster up.
- To scale a cluster down, migrate or fork it to a new, smaller cluster.
How do I create an admin (superuser) or root-level account?
You cannot create superuser accounts. To create a standard user account, use the Vultr customer portal.
Can I use multiple primary (write) nodes?
A cluster can only have one primary node. It can have multiple replica (read-only) nodes.
How is memory allocated for a Vultr Managed Database for Caching?
Maximum memory for Vultr Managed Database for Caching is set to 70% of available RAM (minus management overhead) plus 10% for the replication log.
Why is memory limited for Vultr Managed Database for Caching?
We reserve memory because the following situations can happen:
- When a new Vultr Managed Database for Caching node connects to the existing master, the master forks a copy of itself and sends current memory contents to the other node.
- Similar forking is done when Vultr Managed Database for Caching persists its current state on disk. This happens every 10 minutes.
When Vultr Managed Database for Caching creates a fork of itself, all the memory pages of the new process are identical to the parent and don't consume any extra memory. However, any changes in the parent process cause memory to diverge and the real memory allocation to grow.
More Resources
- Top Five Use Cases for Redis® In-Memory Database Server
- Rate Limit a Python API with Redis®
- How to Manage PHP Session Data With Redis® On Ubuntu 20.04
- How to Implement an Event Processing Model with Go, Redis®, and MySQL 8
- Cache MySQL Data with Redis® and PHP on Ubuntu 20.04
- How to Use a Redis® Cache with PostgreSQL in Golang
- How to Set Up Redis® Caching for WordPress with Ubuntu 20.04 and Nginx
- Use Redis® Pub/Sub with PHP on Ubuntu 20.04
- Implement Redis® Transactions and Locks with Golang and MySQL on a Linux Server
- More Redis® articles at Vultr
- Redis® Documentation